Popular Mechanics - Saturday Mechanic: Repairing Windshields
http://hearst.corp.printthis.clickability.com/pt/cpt?action=cpt&title=Popu...
1 of 5
29/08/2006 2:25 PM
SAVE THIS | EMAIL THIS | Close
Repairing Windshields
BY MIKE ALLEN
Illustrations by Ron Carboni and Russell J. Von Sauers
Published on: September 10, 1999
It's a fine day. The sun is shining, traffic is moving along smartly
and you haven't a care in the world. Whack! Until now, that is.
Now there's a rosebud the size of a quarter smack in the
windshield. What's worse, it's directly in y our line of sight. It must
have been a hypervelocity railgun pellet fired at you by an Imperial
Stormtrooper, because you didn't see it coming or going. And as
your heartbeat returns to normal, the awful truth soaks in: You're
going to have to have the windshield replaced. This means dealing
with the glass shop, being without your car for a day or two, having
a potentially leaky windshield and, worst of all, higher insurance
premiums.
Actually, it's worse. Some insurance policies won't even cover
chipped glass. Maybe if you just raised or lowered your seat an
inch so you didn't have to look right through the chip...
Better Living Through Chemistry
Before you panic, drive home and get out your magnifying glass.
Take a really close look at your new chip. It just might be possible
to repair the chip instead of replacing the entire windshield. The
technique is to inject an epoxy or acrylic adhesive or filler into the
chip.
Even if your chip isn't in your direct line of sight, it's a good idea to
try and repair it. Water will find its way into the chip, pulled in by
surface tension. If the chip goes all the way through the top
lamination, any moisture that gets that deep can delaminate the
glass from the center membrane. Eventually, the membrane will
fog, causing a larger blemish. Water also can freeze in the chip,
causing a larger flaw or even a crack. Also, water can carry dirt
into the crack--and there's no way to flush it out.
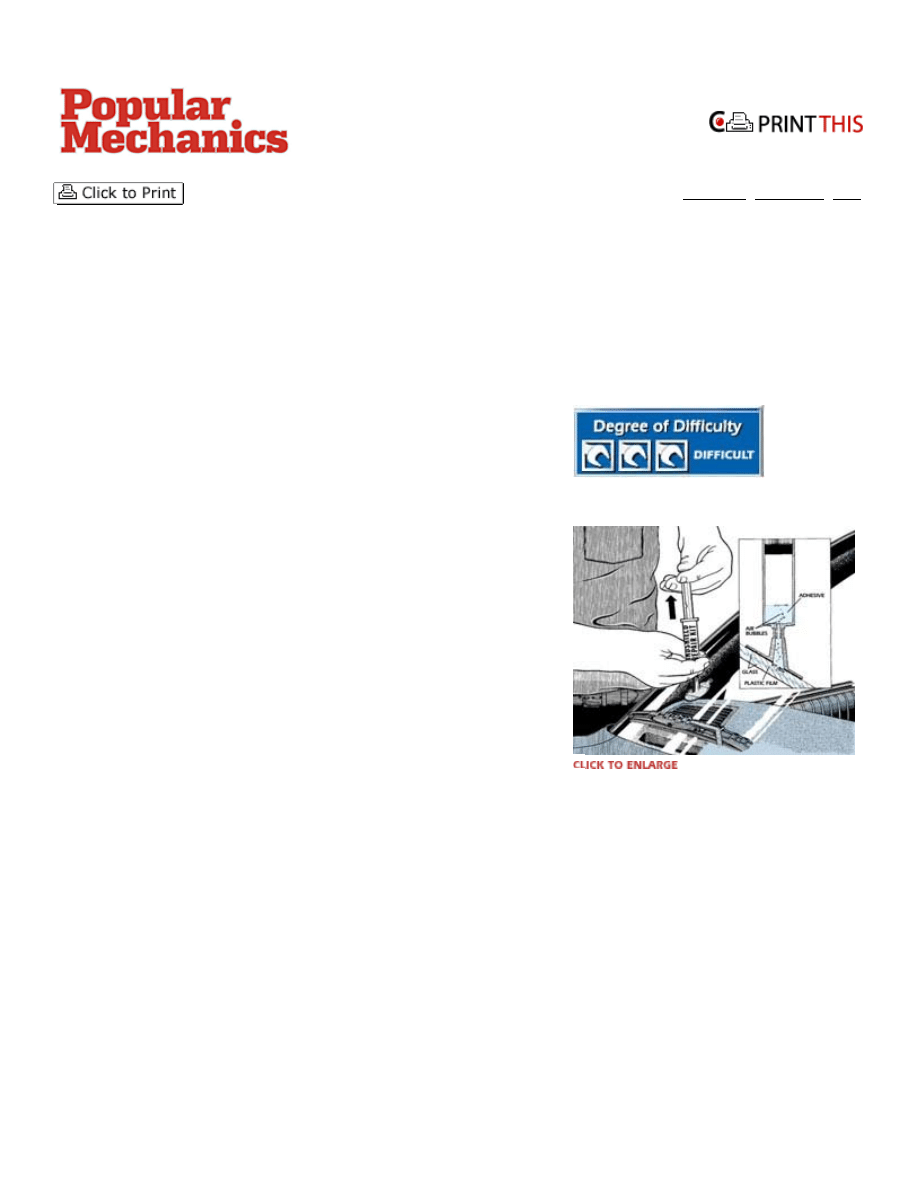
As you can surmise, it's best to do the repair as soon as possible,
Alternating cycles of vacuum and pressure will push
adhesive into the chip, and evacuate air from the
bottom of the chip.

Popular Mechanics - Saturday Mechanic: Repairing Windshields
http://hearst.corp.printthis.clickability.com/pt/cpt?action=cpt&title=Popu...
2 of 5
29/08/2006 2:25 PM
assuming that it's repairable. Remember that not all chips can be
fixed. The best you can hope for is to fill most of the chip. It may
still leave a visible flaw. But the improvement on most chips will
be dramatic, and at least you've sealed the chip from the
atmosphere and probably eliminated the possibility of it growing
larger or discoloring in the future.
You can't fix long cracks. So it's critical that you fill chips before
they turn into cracks. Basically, any chip that goes into the surface
of the glass perpendicular to the surface or at a shallow angle can
be repaired. That includes cone-shaped chips, leaf-shaped chips or
almost any chip that hasn't flaked a big piece of glass off onto the
road.
Let's Go Shopping
Windshield crack repair kits can be found in the auto parts
department of many mass merchandisers like Kmart, Sears and
Wal-Mart, as well as more traditional auto parts stores like Pep
Boys and AutoZone. Failing that, the warehouse-distributor auto
parts stores that cater to professional mechanics can supply you.
In the New York area, we found two different types of repair kits
and there may be others. Expect to pay around 10 bucks.
Procedures differ marginally, but the principle is the same. We
fixed a couple of windshields, and the results were excellent.
How Dry I Am
Start with an absolutely dry windshield that's somewhere near
room temperature. Tough on a rainy or wintery day, so you may
need to park your car indoors for a while to equilibrate. Dry is
really essential--you don't want to trap any water in the repair. Use
a hair dryer if the window is wet. If the surface is dirty, don't use
any detergents or window cleaner. Lighter fluid or acetone can help
dry and clean the surface, but don't use so much that it dribbles
down the glass and peels the paint, or worse.
Chips Ahoy
We first used a simple kit from Loctite with a one-part adhesive
and an uncomplicated syringe to apply it. Start by peeling off the
backing film on one side of the precut adhesive strip and applying
it to the precleaned glass, centered over the chip. Burnish with the
back of your thumbnail or a blunt object. Now peel the remaining
film. Orient the plastic adapter so that the fitting is as close to
vertical as possible and stick it to the film. Burnish again.
Pull the cap off the syringe, keeping it pointy-end up so the
adhesive doesn't wind up on the fender. Attach the syringe to the
adapter. Now here's the tricky part--lay your watch down
Many chips will be repaired almost completely by
adhesive injection kits. But some damage requires
complete windshield replacement.
Popular Mechanics - Saturday Mechanic: Repairing Windshields
http://hearst.corp.printthis.clickability.com/pt/cpt?action=cpt&title=Popu...
3 of 5
29/08/2006 2:25 PM
somewhere so you can see the second hand. Grasp the syringe
body with one hand to stabilize it, and pull the handle of the
syringe out as far as it will go. Because you've taken your watch
off, you can hold the handle in this position for a full minute. This
pulls a partial vacuum in the syringe--and in the crack. While
you're holding this vacuum, the air in the crack bubbles up through
the adhesive in the syringe, while adhesive creeps down toward the
glass and chip.
HOW IT WORKS
Laminated Safety Glass
Ordinary window glass, like you have around the house, is pretty
amazing stuff. It's clear, strong and cheap. But it's also brittle,
shattering into long, dangerous, wickedly sharp shards when
overstressed. Plastics would be as strong, but not nearly hard
enough to resist scratching and remain clear enough for a car
window--just look at any plastic-glazed outdoor bus stop or
phone booth, with its patina of fine scratches. For the side
windows of cars, automakers have come up with a good
compromise: tempered glass. It's stronger than standard, but
more importantly, when it does shatter it breaks up into small
granules. These granules are still sharp, but should do less
damage than the long shards of untempered glass. However, for a
windshield, constantly bombarded by pebbles, tempered glass
would have a short life span.
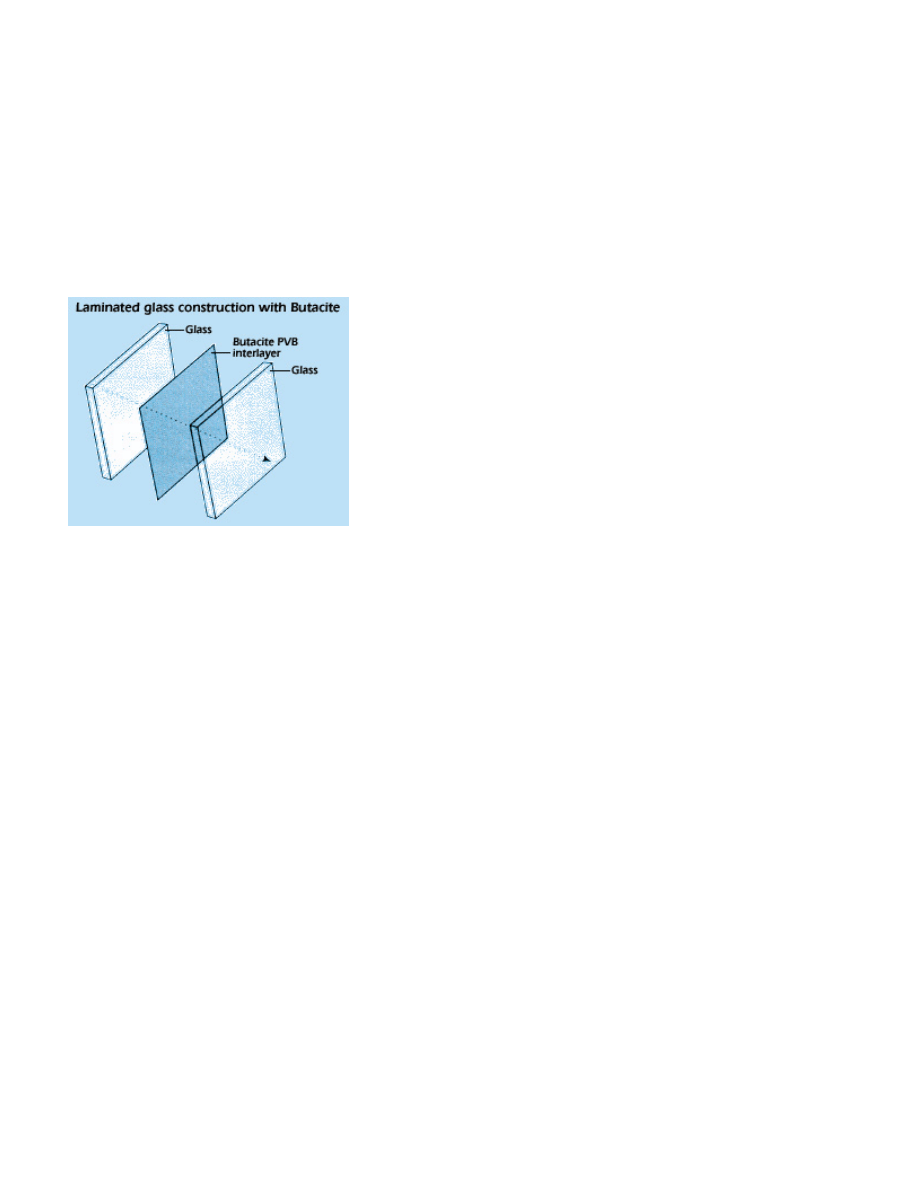
So, many years back, the car manufacturers switched to a
laminated glass sandwich for the windshield. It's a simple
process. Two thinner sheets of glass are fused to a rubber inner
layer. The tempered-glass outer layers are then independent of
each other. The rubbery center sheet provides damping to any
shock waves from errant stones, reducing the probability of
breakage. And if the glass is hit by an object smartly enough,
odds are that only the outer sheet will break, as is the case with
most stone chips. If a really big piece of debris hits the glass hard
enough to break both inner and outer layers, the tough membrane
prevents it from winding up in your lap. Even better, the shards
of glass from the inner lamination wind up stuck to the
membrane, keeping them from spalling away from the
windshield at a high velocity, causing great havoc.

Popular Mechanics - Saturday Mechanic: Repairing Windshields
http://hearst.corp.printthis.clickability.com/pt/cpt?action=cpt&title=Popu...
4 of 5
29/08/2006 2:25 PM
Now let go of the handle. Don't follow the handle, let it go
abruptly. The pressure wave from the handle slamming down will
force adhesive into the crack. Repeat this suck-and-slam operation
a half-dozen times or so, forcing the crack virtually full of
adhesive.
Now remove the syringe, adapter and adhesive sheet. There will be
a film of adhesive on the surface of the glass. You can chase that
back with an alcohol-dampened paper towel, but leave the pimple
of adhesive right above the crack undisturbed until it cures for a
few hours.
With the pimple hardened, simply take a single-edge razor blade
and shave the protruding adhesive off. Use a sharp blade, and you'll
be able to do this in a single pass.
The Other Path
We tried a different crack repair kit as well. This differed in that it
used a two-part adhesive. This required us to mix two small vials
of adhesive and hardener in the syringe before starting, which was
simple. The adhesive disc and syringe adapter were similar (if not
identical) to the simpler kit's, and were applied in an identical
fashion. The syringe, however, was more complex. It used a wire
latch arrangement on the body that dropped into two notches on the
handle when necessary. A simple pushpin stuck into the body was
used as a very crude valve to let air in and out of the body. Once
the syringe is attached to the adapter (the adapter already being
stuck airtight to the glass), the pushpin is removed. Now bottom
the syringe plunger, pushing the air out. Insert the pin, and pull the
handle out until the clip clicks into the slot. This will hold the
plunger out, and the partial vacuum under it for the designated
time.
Now, rather than rapidly releasing the pressure like we did with the
earlier kit, remove the pin, admitting air into the syringe barrel.
Now replace the pin, sealing the hole. Release the clip, and push
the handle in, lightly pressurizing the barrel and forcing adhesive
into the chip for a minute or so. The second slot will trap the clip as
soon as you've pushed in far enough. Repeat this "vent, suck, vent,
squeeze" operation several times to force adhesive into the crack.
While the ingenious clip-and-slot and vent business relieves you of
the necessity of constantly grasping the syringe barrel like it's the
last beer at the picnic, there are caveats. The vacuum pulled isn't as
good, purging less air on every iteration. And the simpler kit
seemed to force the adhesive deeper into the crack faster by using
the plunger as a piston to rapidly pressurize the system.
Having said that, both kits did a bang-up job. After shaving the
excess adhesive off, both cracks are barely visible. The adhesive is
Take care to burnish the adhesive patch to a perfectly
clean windshield and adapter, or you'll make a mess
later.

Popular Mechanics - Saturday Mechanic: Repairing Windshields
http://hearst.corp.printthis.clickability.com/pt/cpt?action=cpt&title=Popu...
5 of 5
29/08/2006 2:25 PM
clear, and has the same refractive index as the glass so that it
renders the crack invisible from almost any angle.
One warning: Don't get cute and try to depress the plunger by hand
and squeeze the adhesive deeper into the glass with either kit. The
adhesive patch might become unglued and squirt adhesive all over
your windshield and fender and shirt. Don't ask how we know this.
Links referenced within this article
Find this article at:
http://www.popularmechanics.com/automotive/sub_care_sat/1272411.html
SAVE THIS | EMAIL THIS | Close
Uncheck the box to remove the list of links referenced in the article.
Wyszukiwarka
Podobne podstrony:
Popular Mechanics Repairing Power Antennas
Popular Mechanics Repairing Composite Headlights
Popular Mechanics Repairing Power Windows
Popular Mechanics Repairing Electrical Wiring
Popular Mechanics Repairing Your Rear Window Defroster
Popular Mechanics Repairing Cooling System Leaks
Popular Mechanics Repairing Power Antennas
Popular Mechanics Repairing Composite Headlights
Popular Mechanics Diagnosing And Repairing Wheel Vibration
Popular Mechanics Suspension Repair And Maintenance
więcej podobnych podstron