www.facebook.com/grammabeanshandmadegifts
https://www.etsy.com/shop/grammabeans
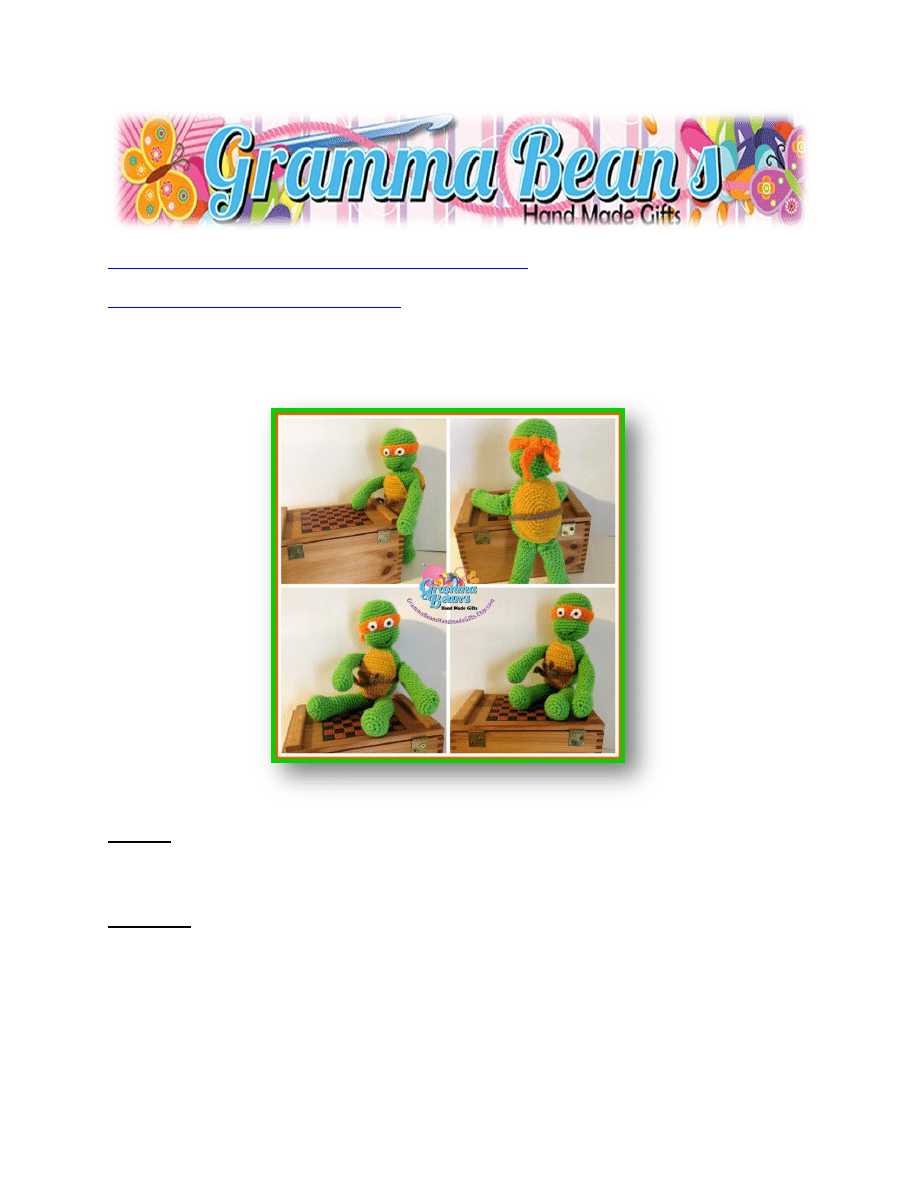
Ninja Turtle
GAUGE
7 Rows or 8 Sc= 2 inches
Materials
Hook size G
Yarn Needle
Scissors
Two Really small buttons or safety eyes, or you can sew on the black part of the eye

Worsted Weight Yarn, these are the colors I used, you can use any worsted weight you choose
Spring Green
Pumpkin
Café Latte
White
Gold
Skill Level
Intermediate
Pattern
Terminology & Notes
Yarn Over (YO)
Slip Stitch (sl st): Insert hook in st indicated, yo and draw through all loops.
Single Crochet (sc): Insert hook in st indicated and draw up a loop (2 loops on hook), yo,
draw through both loops on hook.
NOTE: Do not count your turning chains as a stitch throughout pattern, always join in
first stitch of row and always start your first stitch in the same stitch you joined into. Do
not turn your work unless told to do so.
COPYRIGHT 2013: Gramma Beans Handmade Gifts patterns are written under copyright.
Patterns are not to be copied, sold or distributed.
You are free to sell items you crochet from my pattern, but please use your own photos and
give credit to me, for the pattern, in your listing by inserting the following, link to my Etsy shop,
into your item description:
www.facebook.com/GrammaBeansHandmadeGifts
Head
Using Spring Green or color of choice
Rnd 1—Ch 2, 8 sc in 2
nd
ch from hk, join to 1
st
sc, ch 1
Rnd 2—2 sc in ea st around, join,
Rnd 3—Ch 1, *sc in 1
st
st, 2 sc in next* repeat around, join

Rnd 4—Ch 1, *sc in first 2 sts, 2sc in next*, repeat around, join
Rnd 5—Ch 1, *sc in first 3 sts, 2 sc in next*, repeat around, join
Rnds 6-15—Ch 1, sc in ea st around, join
Rnd 16—Ch 1, *sc in first 3 sts, sc2tog*, repeat around, join
Rnd 17—Ch 1, *sc in first 2 sts sc2tog*, repeat around, join
Rnd 18—Ch 1, *sc in 1
st
st, sc2tog*, repeat around, join
Stuff head firmly
Rnd 19—Ch 1, *sc2tog*, repeat around, join, fasten off leaving tail to sew head to body.
Arms—Make Two
Rnd 1—Ch 2, 6 sc in 2
nd
ch from hk, join
Rnd 2—Ch 1, 2 sc in ea st around, join
Rnd 3—Ch 1, *sc in 1
st
st, 2 sc in next*, repeat around, join
Rnd 4—Ch 1, sc in ea st around, join
Rnd 5—Ch 1, sc in ea st around, join
Rnd 6—Ch 1, *sc in first 2 sts, sc2tog*, repeat around, join
Rnd 7—Repeat round 6
Rnds 8-20—Ch 1, sc in ea st around, join
Finish off, stuff arms, leave tail for sewing
Legs—Make Two
Rnd 1—Ch 2, 6 sc in 2
nd
ch from hk, join
Rnd 2—Ch 1, 2 sc in ea st around, Join
Rnd 3—Ch 1, * sc in 1
st
st, 2 sc in next*, repeat around, join

Rnd 4—Ch 1, * sc in first 2 sts, 2 sc in next*, repeat around, join
Rnd 5—Ch 1, sc in ea st around, join
Rnd 6—Ch 1, * sc in first 2 sts, sc2tog*, repeat around, join
Rnd 7—Ch 1, *sc in 1
st
st, sc2tog*, repeat around, join
Rnd 8—Ch 1, sc in ea st around, join
Rnds 9-25—repeat round 8
Finish off, stuff
Body
Rnd 1—Ch 2, 6 sc in 2
nd
ch from hk, join
Rnd 2—Ch 1, 2 sc in ea st around, join
Rnd 3—Ch 1, *sc in 1
st
st, 2 sc in next*, repeat around, join
Rnd 4—Ch 1, *sc in first 2 sts, 2 sc in next*, repeat around, join
Rnd 5—Ch 1, * sc in first 3 sts, 2 sc in next*, repeat around, join
Rnd 6—Ch 1, * sc in first 4 sts, 2 sc in next*, repeat around, join
Rnd 7—Ch 1, sc in ea st around, join
Rnds 8-18 Repeat rnd 7
Rnds 19-21—Ch 1, * sc in first 3 sts, sc2tog*, repeat around, join
Stuff
Rnd 22—Ch 1, *sc2tog*, repeat around, join and finish off
Sew Legs and arms to body, attach head
Bandana
Row 1—Ch 56, sc in 2
nd
ch from hk, turn

Row 2—Ch 1, sc in ea st across, turn
Row 3—Ch 1, sc in ea st across, finish off
Eyes—white
Ch 2, 5 sc in 2
nd
ch from hk, join, fasten off
Using black yarn for the black part of eyes, sew a little dot in the middle, or you may choose to
use buttons or small safety eyes…once done with this place the eyes in the center of the
bandana and sew in place.
Sew bandana to head, tie in back
You can sew on a mouth if desired at this time as well.
Shell—Front
Row 1—Ch 7, sc in 2
nd
ch from hk, turn
Row 2—Ch 1, 2 sc in 1
st
st, sc in next 4 sts, 2 sc in last st, turn
Row 3—Ch 1, sc across, turn
Row 4—Ch 1, 2 sc in 1
st
st, sc in next 6 sts, 2 sc in last st, turn
Row 5—Ch 1, sc across, turn,
Row 6—Ch 1, 2 sc in 1
st
st, sc in next 8 sts, 2 sc in last st, turn
Row 7—Ch 1, sc across, turn
Rows 8-14—Ch 1, sc across, turn
Row 15—Ch 1, sc2tog, sc in next 8 sts, sc2tog, turn
Row 16—Ch 1, sc across, turn
Row 17—Ch 1, sc2tog, sc in next 6 sts, sc2tog, turn
Row 18—Ch 1, sc across, do not turn, sc around shell with 2 sc in ea corner, fasten off, position
and sew to front of turtle

Shell—Back
Rnd 1—Ch 2, 8sc in 2
nd
ch from hk, join
Rnd 2—Ch 1, 2 sc in ea st around, join
Rnd 3—Ch 1, 2 sc in next 2 sts, sc in next 4 sts, 2 sc in next 4 sts, sc in next 4 sts, 2 sc in last two
sts, join
Rnd 4—Ch 1, sc in ea st around, join
Rnd 5—Ch 1, 2 sc in next 2 sts, sc in next 8 sts, 2 sc in next 4 sts, sc in next 8 sts, 2 sc in last 2 sts,
join
Rnd 6—Ch 1, sc in ea st around, join
Rnd 7—Ch 1, 2 sc in next 2 sts, sc in next 12 sts, 2 sc in next 4 sts, sc in next 12 sts, 2 sc in last 2
sts, join
Rnd 8—Ch 1, sc in 1
st
four sts, 2 sc in next st, * sc in next 4 sts, 2 sc in next st*, repeat around,
join
Rnds 9-10—Ch 1, sc in ea st around, join
Finish off
Sew to back of turtle, adding stuffing to help it stand out. You can also sew on lines on your
turtle shell in the front or the back if desired to give it more definition.
Tie
Ch 66, sc in 2
nd
ch from hk and ea ch across, finish off,
Tie around turtle, sew down if desired.

Wyszukiwarka
Podobne podstrony:
Fatty Coon 03 Fatty Discovers Mrs Turtle's Secret
Devil Doll Sacrilegium
picture turtle addition
Cherry Orchard, A Doll's House, and Galileo General Analys
Doll's House, A Interpretation and Analysis of Ibsen's Pla
epickawaii Lalaloopsy Doll (c)
Baby Doll, Teksty
Swipe 2 ninja approach
President Ninja
Ninja Method Email 1
Doll-skala dojrzalosci, Studia
Baby doll polka
AdorabellePlushies Peanut Big Top Type Doll
Martial Arts How To?come A Ninja Assassin
Doll's House, A General Analysis of the Play
więcej podobnych podstron