Nautical Clock and
Weather Station
hen we decided to move from a wild and windy
part of the coast to a relatively mild hills-and-dales
part of the country, we felt that we wanted to take a lasting
memento with us. As we both love the sea, we felt that
we wanted a reminder of our wonderful walks along the
rugged cliffs, of the picnics on the lonely beaches, and of
the exciting times we had with our many boats. After a
great deal of thought that took in such notions as collect-
ing sea shells and the like, it suddenly came to us. Why
not take a piece of driftwood—perhaps part of an old
boat—and turn it into a nautical clock and weather sta-
tion? To our way of thinking, the whole project would be
a lasting memento . . . of the beaches, the storms that
smashed up the boats, and the constant need to keep one
eye on the time, tide and weather.
So if you, too, want to make a memento gift that uses
a piece of found wood, then this is a great project.
The wonderful thing about a design of this size, type
and character is its flexibility. There are any number of
amazingly exciting options. I say this because, as soon as
I had made the sculpted and weathered board, Gill came
up with the beautiful idea of using one of our old mould-
ing planes to create a classic moulded board. Her thinking
was that there must be thousands of woodworkers out
there who own an old plane and are just looking for an
excuse to tune it up and get started! She also had the
bright idea that with a more formal board, the various
instruments could be arranged so that the board could be
mounted vertically or horizontally.
MAKING THE FOUND WOOD BOARD
This project is slightly unusual in that your found wood
needs the minimum of preparation. Okay, it needs to be
clean and the like, but that's about it—no jointing, no
W
Copyright 2004 Martian Auctions
933

extensive marking out, just three drilled holes and a small
amount of planing and sanding. And, of course, there's
no reason why your piece of found wood can't be a branch
from a special tree, a part of an old house, a piece of wood
found in the desert or mountains, or by a river, as long
as it has some particular significance.
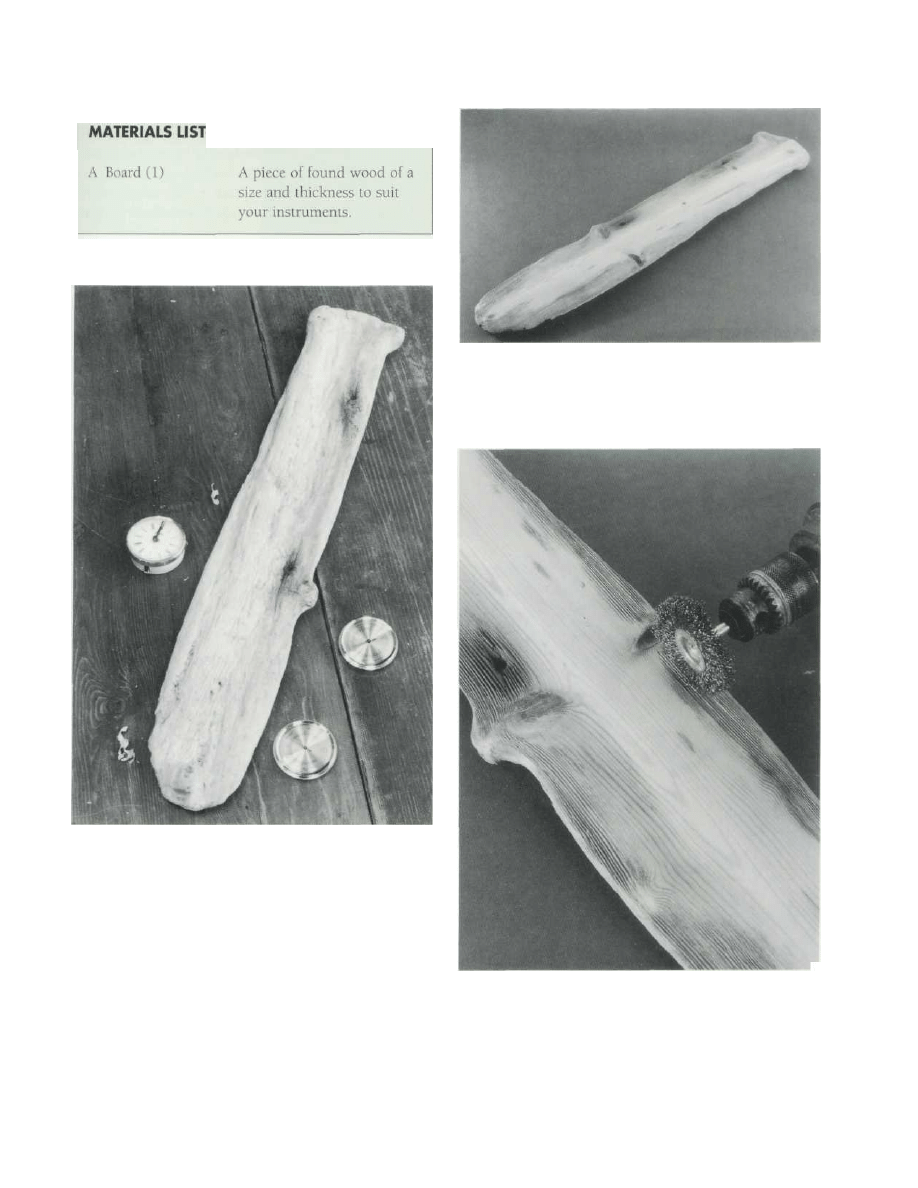
When you have found your piece of wood, set it down
on the bench and consider how the instruments might
best be placed. Are you going to settle for the clock, the
thermometer and the hygrometer, (see page 73), or are
you going to go for additional instruments like a tube
barometer or maybe a special tide-time clock? Of course,
much depends on the size of your piece of found wood.
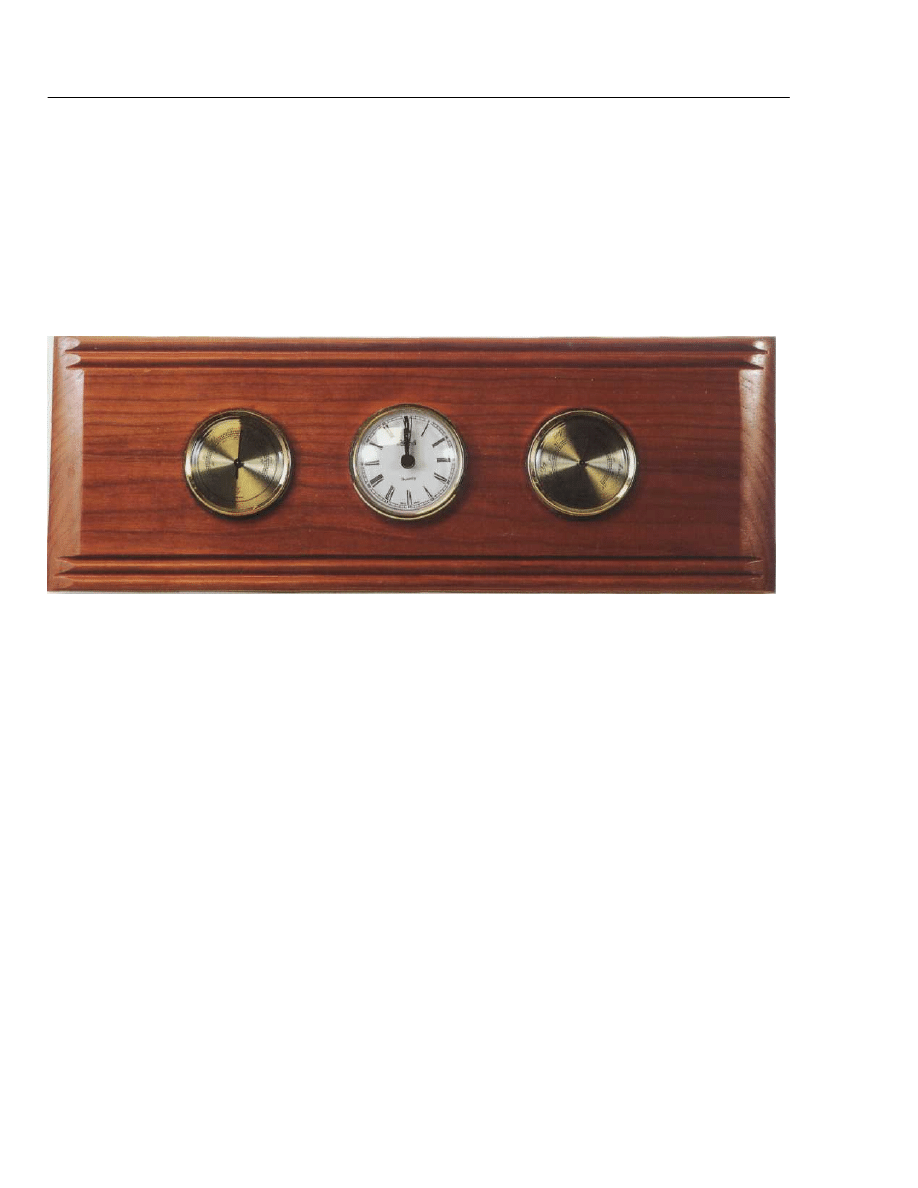
Though I wanted three matching brass dials, with a
clock having Arabic numerals, I found it impossible to
get a good matchup. As you can see, I had to settle for a
slightly nasty white-face clock with Roman numerals.
Make sure that the instruments you choose are designed
to fit into a shallow recess or hole, with the brass surround
or rim overlapping the edge of the hole.
When you have decided where the instruments are
going to be placed, use a wire brush to scour the grit and
grime from the workpiece. If you see some part of the
found wood that could be modified in some way, then so
much the better. For example, 1 knocked out two rusty
old nails and wire brushed the resultant iron-stained holes
so that they were big enough to take a piece of found
rigging cordage, so that the clock and weather station
could be hung on the wall.
Use the wire brush to sculpt the form, to extend and
exaggerate the actions of nature. You can make contours
that are rounded and rippled, much the same way as the
wind, rain, sand and sea scour out the soft part of the
grain, so that the hard gram and knots are left standing
in relief.
When you have achieved what you consider is a good
form, use a plane and sandpaper to prepare a level seating
big enough for the instruments. Aim for a flat smooth
surface that is slightly bigger than the instruments. Make
sure that there are no nails, grit or other matter in the
areas that are going to be drilled.
Having cleaned up the seating for the instruments so
that it resembles a level plateau, bore the recess holes out
with the Forstner bits. Then seal with a coat of varnish
and use beeswax to burnish the whole works to a rich
sheen finish. Finally, push fit the instruments in the holes,
fit the rope or chain, and the project is finished and ready
for hanging.
Copyright 2004 Martian Auctions
934
STEP-BY-STEP STAGES
1 Having found your piece of wood, select a set
of instruments to fit.
2 Remove the more obvious bits of rubbish—old
nails, bits of tar, embedded grit and such. Wipe the
wood with a damp cloth and leave it until it is good and
dry.
3 Not forgetting to wear gloves and goggles, use a
power drill fitted with a wire brush attachment to scour
out the loose grain. The safest procedure is to have the
workpiece either screwed or clamped to the bench.
Copyright 2004 Martian Auctions
935

4 A close-up showing
how I have concent r a t e d
use of the wire brush
along the edges and
around the knots, so that
there is a smooth, level
central area.
5 If you have a drill bit
size that fits the in-
strument, then so much
the better; otherwise, you
have to drill the nearest
size hole. After drilling the
hole, painstakingly file it
to fit. I needed to remove
an all-round strip about
1/8" wide.
Note—as I said earlier
in the project, I don't
much like the clock as
shown. On consideration,
I would much prefer the
l i t t l e watch-clock as
shown in the miniature
mantle clock case project.
Copyright 2004 Martian Auctions
936

MAKING A TRADITIONAL
BEAD-MOULDED BOARD
Having measured and marked out the board and cut it to
size, use the bench plane to bring it to a smooth finish.
When you are happy that the board is square and true,
secure it to the bench so that one long side is hanging
over the edge.
Set your moulding plane up with
3
/8"-wide beading
iron. If like me, you are using a single-bead cutter to plane
two beads side by side—a double reed—then adjust the
fence to the position for the bead that is furthest in from
the edge. The procedure is: First cut the bead that is fur-
thest in from the edge. Then reset the fence and cut the
bead nearest the edge. You repeat the procedure for the
other edge of the board.
Finally, having used a block plane to chamfer the ends
of the board, drill out the three large-diameter holes as
already described in step 5.
SPECIAL TIP
If you are looking to bore out clean-sided, flat-bottomed
holes—relatively shallow holes as in this project—then
you can't do better than using Forstner drill bits in con-
junction with a drill press. We use a large Delta bench drill
press. It doesn't wobble, or make odd noises, or require a
great deal of attention. It just gets on with the job. As for
the drill bits, we have a set of Forstner bits made by Freud.
They do a beautiful job every single time. They bore down
through end grain and hard knots, and just about any-
thing we care to throw at them. Best of all, we like the
fact that we can use them to bore out overlapping holes.
Yes, they do cost about twice as much as most bits, but
they last longer, stay sharp and are a pleasure to use.
1 When you have used the plane to cut the two beads
side by side, reset the blade to the very finest of
skimming cuts and burnish the surface of the wood to a
sheen finish. Be careful not to force the pace. Just let the
weight of the plane do the work.
STEP-BY-STEP STAGES
Copyright 2004 Martian Auctions
937
Wyszukiwarka
Podobne podstrony:
Seasons and Weather Wordsearch
ingold 2007 Earth, sky, wind, and weather
seasons and weather
weather station Colonial
15 Weather and enviroment
15 Weather and environment
The main press station is installed in the start shaft and?justed as to direction
Outlook Stationery Letterheads And Templates Using Signatures
Weather and environment
the weather and what your body does, Wiedza, Anielski
weather and seasons vocab juniors
Język angielski The weather and the humans
weather and clothes
Enviroment Weather and climate (tłumaczenie)
Weather and Senses Worksheet
34 Weather and climate
więcej podobnych podstron