AUDIO
TOYOTA GENUINE AUDIO
EINBAUANLEITUNG
INSTALLATION INSTRUCTIONS
NOTICE EXPLICATIVE DE L’INSTALLATION
Avensis
LHD
FÜR-FOR-POUR **T25*L
Binder Volume 4
Manual Ref.no
A4LT25/J-0-3500

Avensis (T25)
TOYOTA GENUINE AUDIO
Avensis (LHD) - 3
10-02
1. INHALTSVERZEICHNIS
TABLE OF CONTENTS
TABLE DES MATIERES
1. Verwendungstabelle
Application Chart
Tableau des applications ................................................................................................................................................................
4
2. Systemaufbau
System Layout
Disposition du système .................................................................................................................................................................
5
3. Einbau des 6 CD-Wechslers im Armaturenbrett
In-dash 6 CD-Changer Installation
Installation du changeur 6 CD monté dans le tableau de bord ......................................................................................................
6
4. Einbau des Verborgenen 6 CD-Wechslers
Hide-away 6 CD-changer installation
Installation du changeur 6 CD dissimulable ....................................................................................................................................
15
p. 1/1
+ ADD-ON UNIT
(S
)
Hide Awa
y CD-Chan
g
er TM0461
(08601-00911
)
Navi
g
ation S
ystem TNS300
(08545-20801
)
1
Radio/Cassette/CD (Lo) (only)
MOP-unit or
-
W53900 (08600-05821)
-
2
Radio/Cassette/CD (Hi) (only)
MOP-unit or
-
W53901 (08600-05822)
-
3
Radio/Cassette/CD (Lo) + Hide Away CD-Changer
MOP-unit or
(2)
Wire (08695-00370)
W53900 (08600-05821)
(2)
Wire (08695-00370)
4
Radio/Cassette/CD (Lo) + In-Dash CD-Changer
MOP-unit or
(1)
Wire (08695-00370) + F/K (08695-05801)
W53900 (08600-05821)
(1)
Wire (08695-00370) + F/K (08695-05801)
5
Radio/Cassette/CD (Lo) + Navigation (TBT)
MOP-unit or
(3)
Wire (08695-00370) + F/K (PZ425-T0330-60)
W53900 (08600-05821)
(3)
Wire (08695-00370) + F/K (PZ425-T0330-60)
6
Radio/Cassette/CD (Lo) + Hide Away CD-Changer + Navigation (TBT)
MOP-unit or
(2)
(3)
Wire (08695-00370) + F/K (PZ425-T0330-60)
W53900 (08600-05821)
(2)
(3)
Wire (08695-00370) + F/K (PZ425-T0330-60)
7
Radio/Cassette/CD (Lo) + In-Dash CD-Changer + Navigation (TBT)
MOP-Unit or
(1)
(3)
Wire (08695-00370) + F/K (08695-05801) + F/K (PZ425-T0330-60)
W53900 (08600-05821)
(1)
(3)
Wire (08695-00370) + F/K (08695-05801) + F/K (PZ425-T0330-60)
8
Radio/Cassette/CD (Hi) + Hide Away CD-Changer
MOP-unit or
(2)
Wire (08695-00370)
W53901 (08600-05822)
(2)
Wire (08695-00370)
9
Radio/Cassette/CD (Hi) + In-Dash CD-Changer
MOP-Unit or
(1)
Wire (08695-00370) + F/K (08695-05801)
W53901 (08600-05822)
(1)
Wire (08695-00370) + F/K (08695-05801)
10
Radio/Cassette/CD (Hi) + Navigation (TBT)
MOP-unit or
(3)
Wire (08695-00370) + F/K (PZ425-T0330-60)
W53901 (08600-05822)
(3)
Wire (08695-00370) + F/K (PZ425-T0330-60)
11
Radio/Cassette/CD (Hi) + Hide Away CD-Changer + Navigation (TBT)
MOP-Unit or
(2)
(3)
Wire (08695-00370) + F/K (PZ425-T0330-60)
W53901
(08600-05822
)
(2
)
(3
)
Wire
(08695-00370
) + F/K
(PZ425-T0330-60
)
12
Radio/Cassette/CD (Hi) + In-Dash CD-Changer + Navigation (TBT)
MOP-Unit or
(1)
(3)
Wire (08695-00370) + F/K (08695-05801) + F/K (PZ425-T0330-60)
W53901 (08600-05822)
(1)
(3)
Wire (08695-00370) + F/K (08695-05801) + F/K (PZ425-T0330-60)
Unique Design Audio
HEAD UNIT
COMBINATION
REQUIRED ADDITIONAL PARTS
In-Dash CD-Chan
g
er TM0561
(08601-00907
)
AUDIO & NAVIGATION APPLICATION CHART
TMME-CA Division Dev. Dept. II - December 12th, 2002
Avensis **T25*L
(LHD)
MOP: Factory installed option
(1): Glove box application (2): Located under the RH-seat (3): Located under the LH-seat
Avensis (T25)
TOYOTA GENUINE AUDIO
Avensis (LHD) - 5
10-02
2. SYSTEMAUFBAU
SYSTEM LAYOUT
DISPOSITION DU SYSTEME
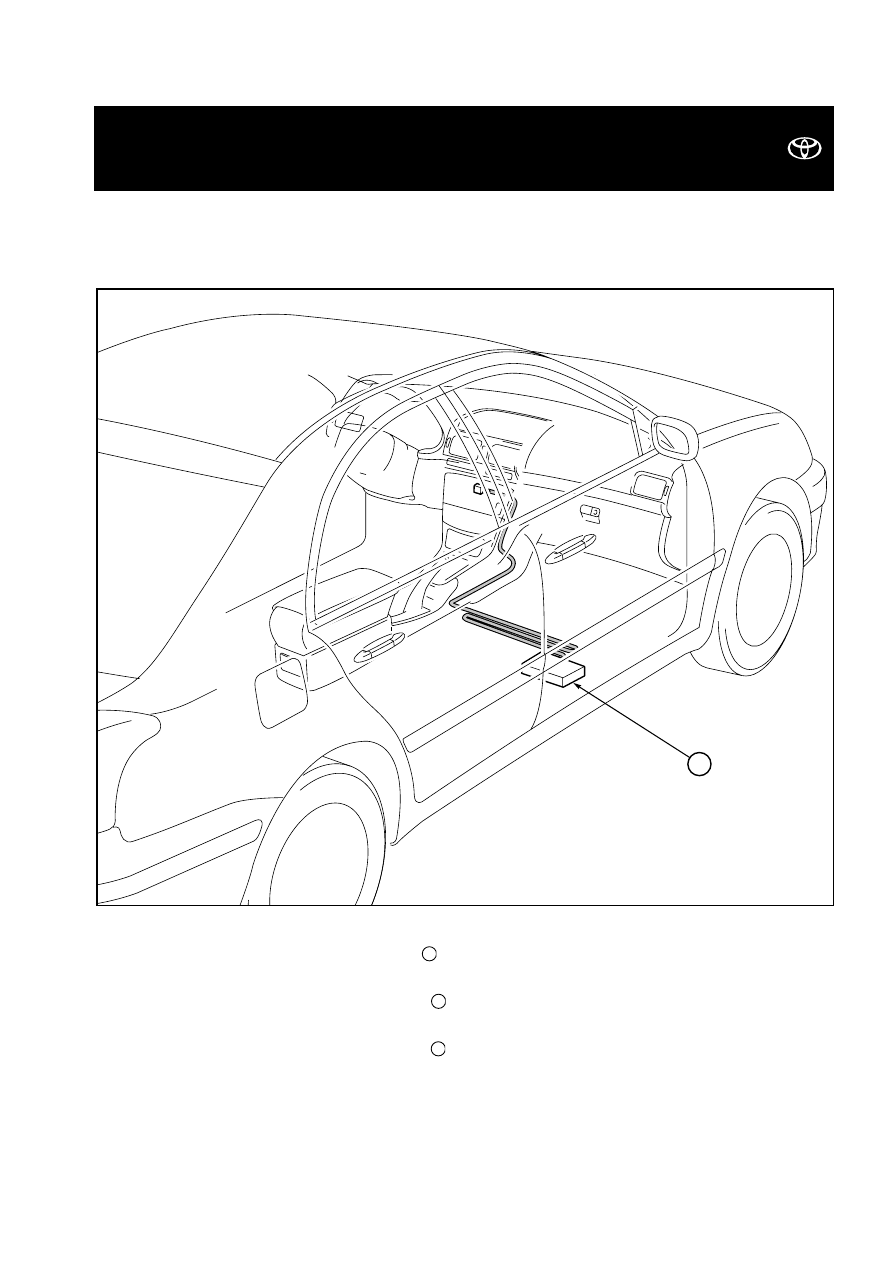
VERBORGENER 6 CD-WECHSLER
THE HIDE-AWAY 6 CD-CHANGER
CHANGEUR 6 CD DISSIMULABLE
HINWEIS:
Die Einbauposition für den verborgenen 6 CD-Wechsler
ist unter dem Beifahrersitz.
NOTE:
The installation position of the hide-away 6 CD-changer
in under the passenger’s seat.
REMARQUE :
La position d’installation du changeur 6 CD dissimulable
se situe sous le siège du passager.
12
12
12
12
Avensis (T25)
TOYOTA GENUINE AUDIO
Avensis (LHD) - 6
10-02
3. EINBAU DES 6 CD-WECHSLERS IM ARMATURENBRETT
IN-DASH 6 CD-CHANGER INSTALLATION
INSTALLATION DU CHANGEUR 6 CD MONTE DANS LE TABLEAU DE BORD
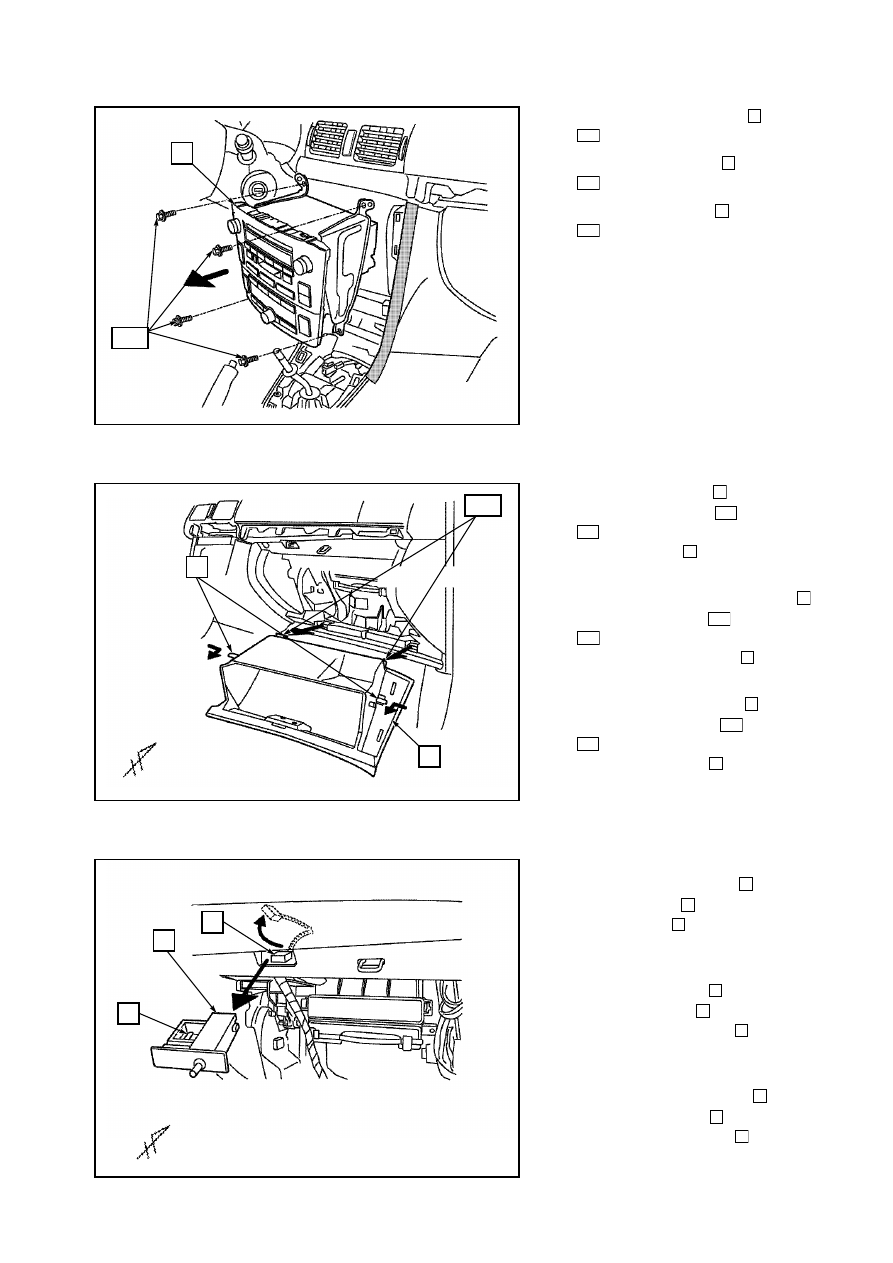
Abb. 1 - Fig. 1
Abb. 2 - Fig. 2
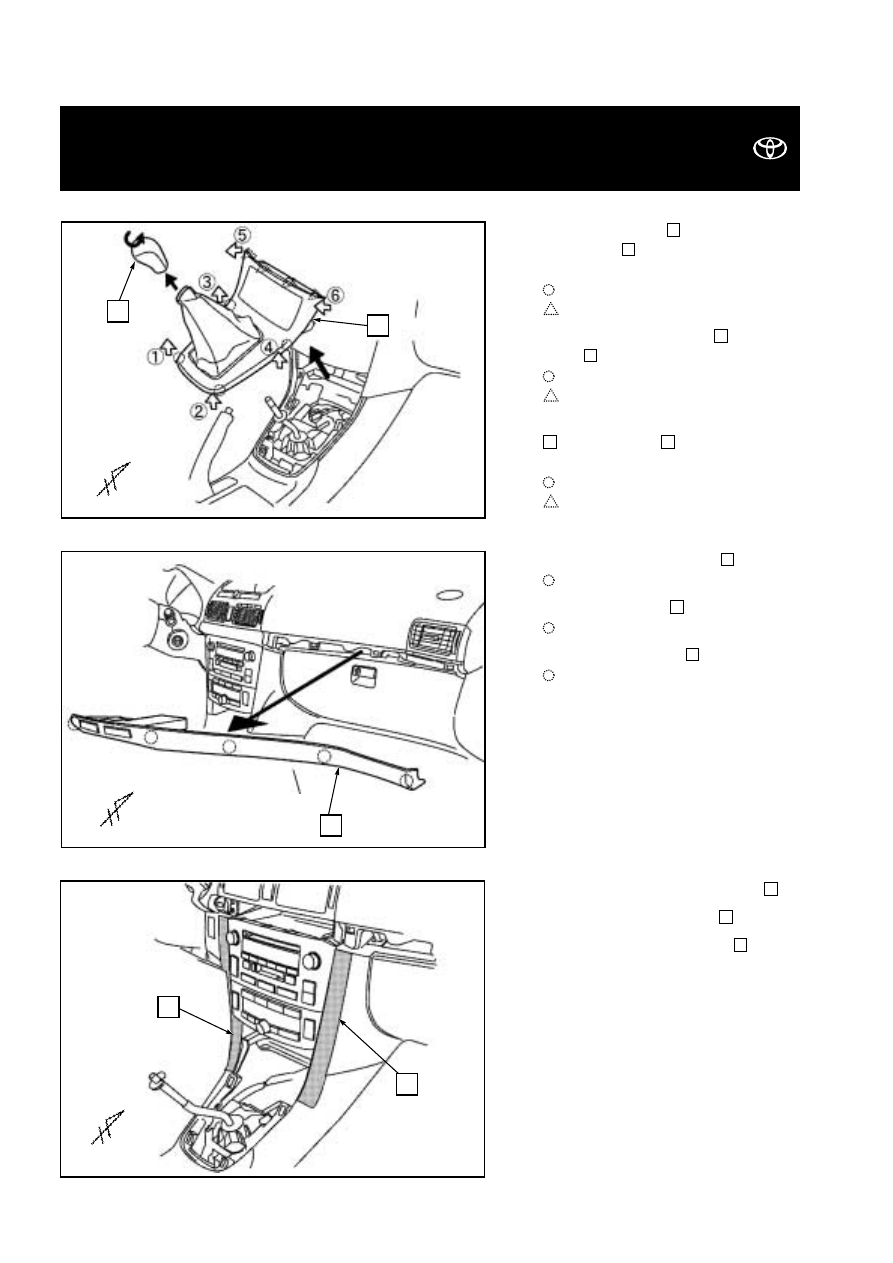
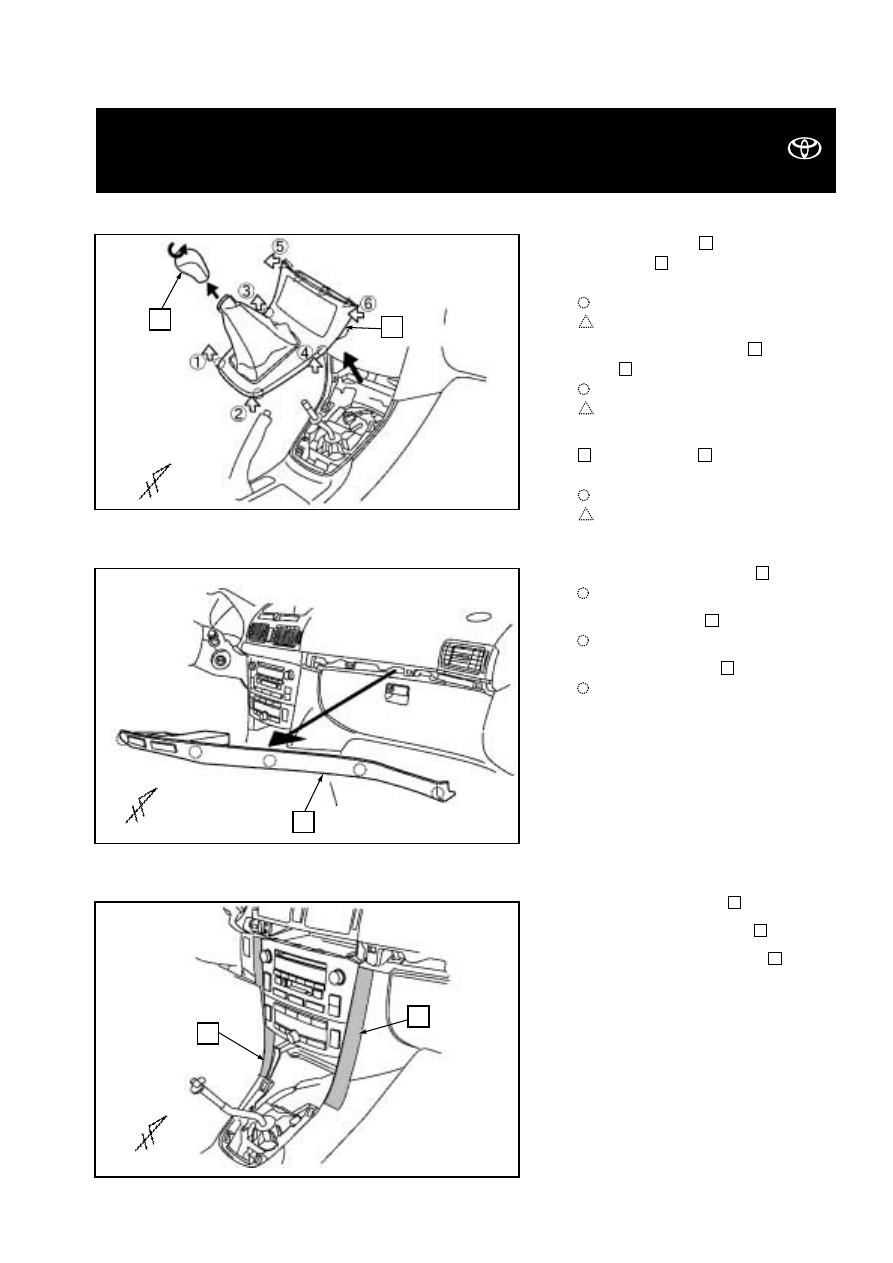
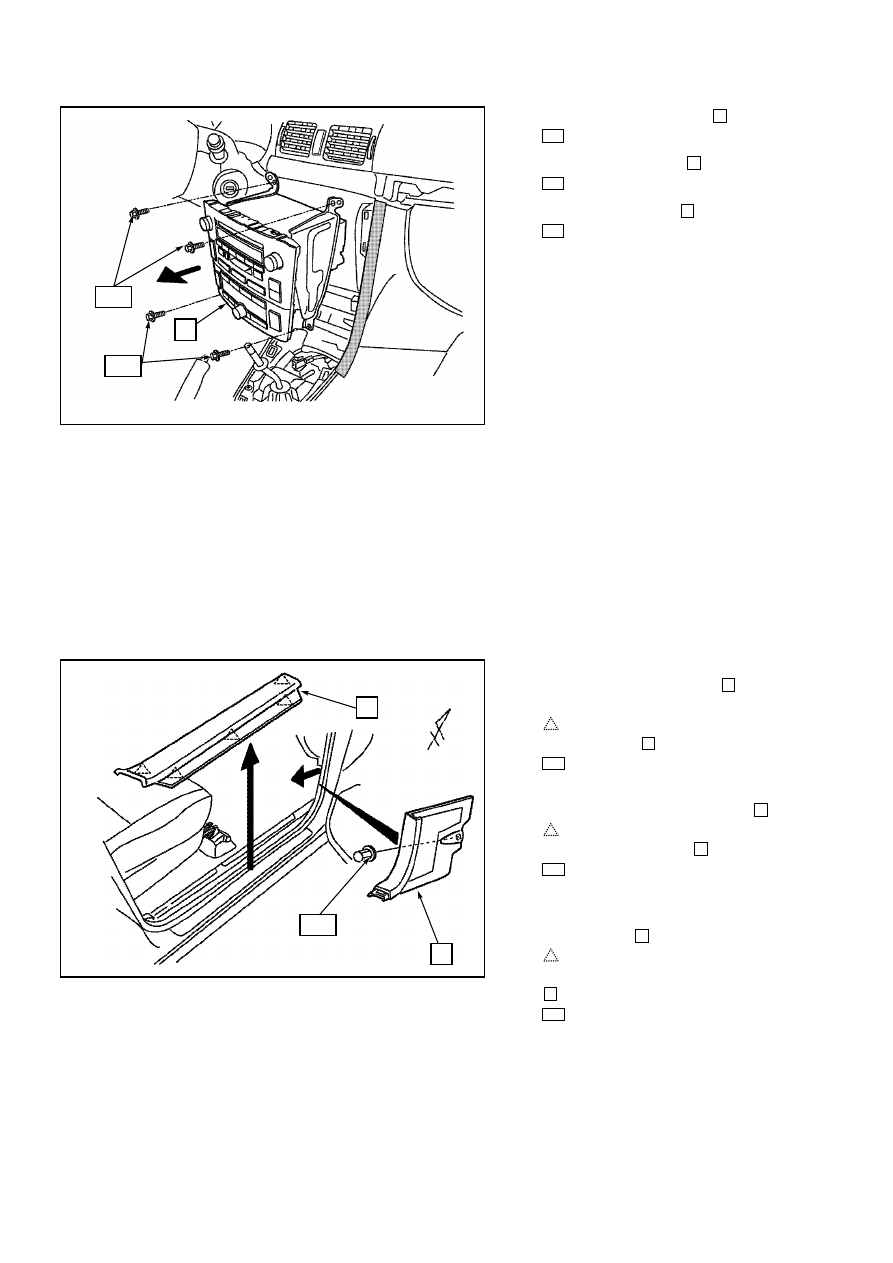
1.
Schalthebelknauf
und Schaltungs-
abdeckung
mit einem Nylonhebel-
werkzeug entfernen.
: Clip (4x)
: Nagel (4x)
1.
Remove the shift knob
and shift
cover
using a nylon pry tool.
: Clip (4x)
: Nail (4x)
1.
Déposez la rotule du levier de vitesses
et sa garniture
à l’aide d’un levier
en nylon.
: Clip (4x)
: Clou (4x)
2
1
2
1
2
1
3.
Das Schutzklebeband anbringen
.
3.
Attach the protection tape
.
3.
Fixez le ruban de protection
.
4
4
4
Abb. 3 - Fig. 3
2.
Die Verkleidung entfernen
.
: Clip (5x)
2.
Remove the panel
.
: Clip (5x)
2. Déposez
le
panneau
.
: Clip (5x)
3
3
3
1
2
3
4
4
Avensis (T25)
TOYOTA GENUINE AUDIO
Avensis (LHD) - 7
10-02
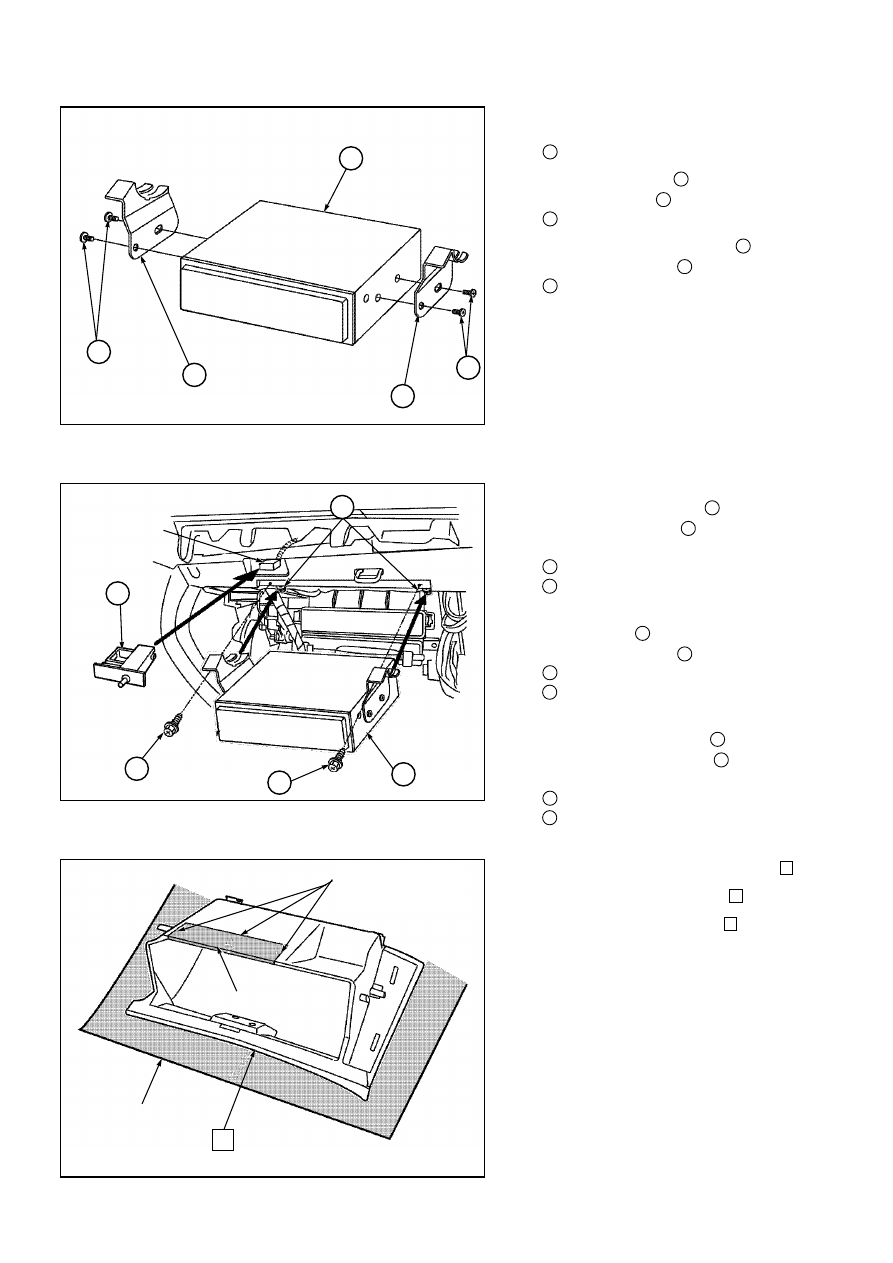
4.
Die Audioeinheit ausbauen
.
: Bolzen (4x)
4.
Remove the audio unit
.
: Bolt (4x)
4. Déposez l’unité audio
.
: Boulon (4x)
101
5
101
5
101
5
Abb. 4 - Fig. 4
6.
a)
Den Schalter ausbauen
.
b)
Die Glühlampe
entfernen.
c)
Den Stecker
zum Entfernen nach
oben bewegen.
6.
a)
Remove the switch
.
b)
Remove the bulb
.
c)
Remove the connector
by moving it
upward.
6.
a)
Déposez le commutateur
.
b)
Déposez l’ampoule
.
c)
Déposez le connecteur
en le dépla-
çant vers le haut.
27
20
26
27
20
26
27
20
26
Abb. 5 - Fig. 5
Abb. 6 - Fig. 6
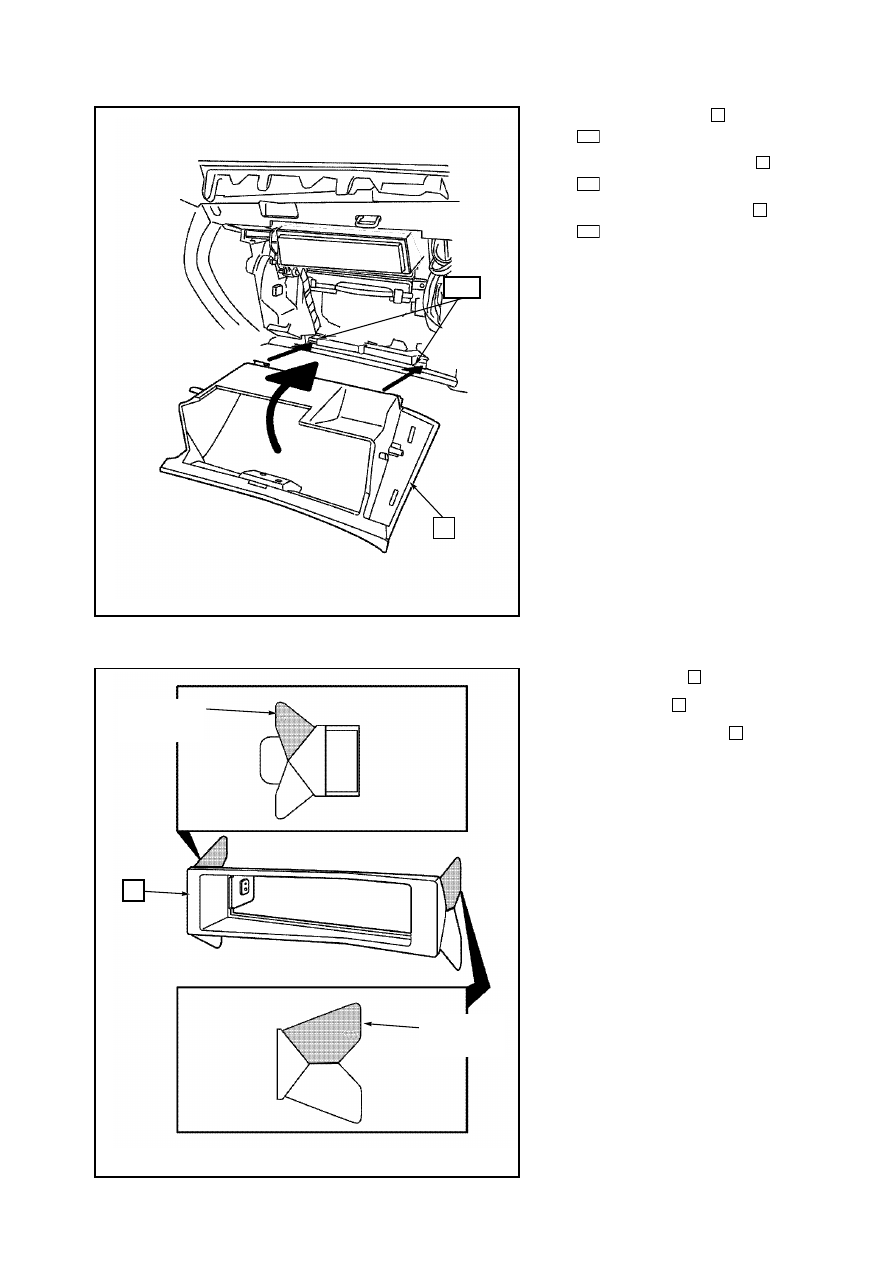
5.
Das Handschuhfach
ausbauen.
a)
Die Haken entfernen
.
: Haken (2x)
b)
Die Anschläge
durch Ziehen nach
innen entfernen.
5.
Remove the glove compartment
.
a)
Remove the hooks
.
: Hook (2x)
b)
Remove the stoppers
by pulling
them inside.
5.
Enlevez la boîte à gants
.
a)
Déposez les crochets
.
: Crochet (2x)
b)
Déposez les butées
en les tirant vers
l’intérieur.
28
102
104
6
28
104
104
6
28
102
104
6
6
104
26
27
28
101
5
20
Avensis (T25)
TOYOTA GENUINE AUDIO
Avensis (LHD) - 8
10-02
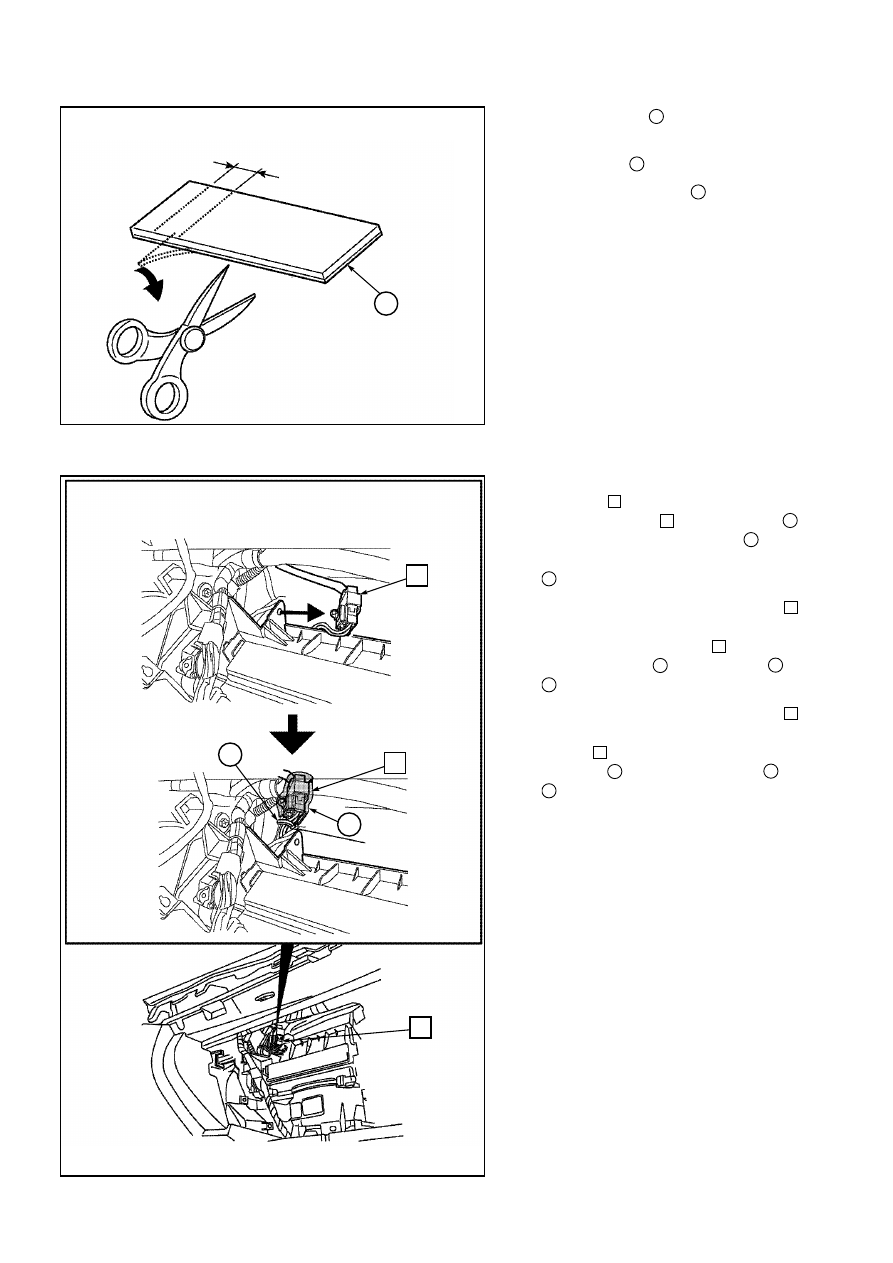
Abb. 7 - Fig. 7
Abb. 8 - Fig. 8
Etwa 1
Approxim
ately 1
Environ 1
7.
Das Klebeband
in 10 Stücke schnei-
den.
7.
Cut the tape
into 10 equal pieces.
7. Découpez la bande
en 10 mor-
ceaux.
5
5
5
8.
Die Position des fahrzeugseitigen
Steckers
von “A” nach “B” verlegen
und den Stecker
mit Klebeband
und einem Kabelbinder
am
Kabelstrang anbringen.
: Kabelbinder (1x)
8.
Relocate the vehicle connector
position from location “A” to location“B”
and attach the connector
to the har-
ness using tape
and a wire tie
.
: Wire tie (1x)
8. Déplacez le connecteur du véhicule
de la position “A” vers la position “B” et
fixez-le
au faisceau avec un morceau
de bande
et un lien pour câble
.
: Lien pour câble (1x)
20
20
5
28
28
20
20
5
28
28
20
20
5
28
28
A
B
28
28
28
5
5
20
Avensis (T25)
TOYOTA GENUINE AUDIO
Avensis (LHD) - 9
10-02
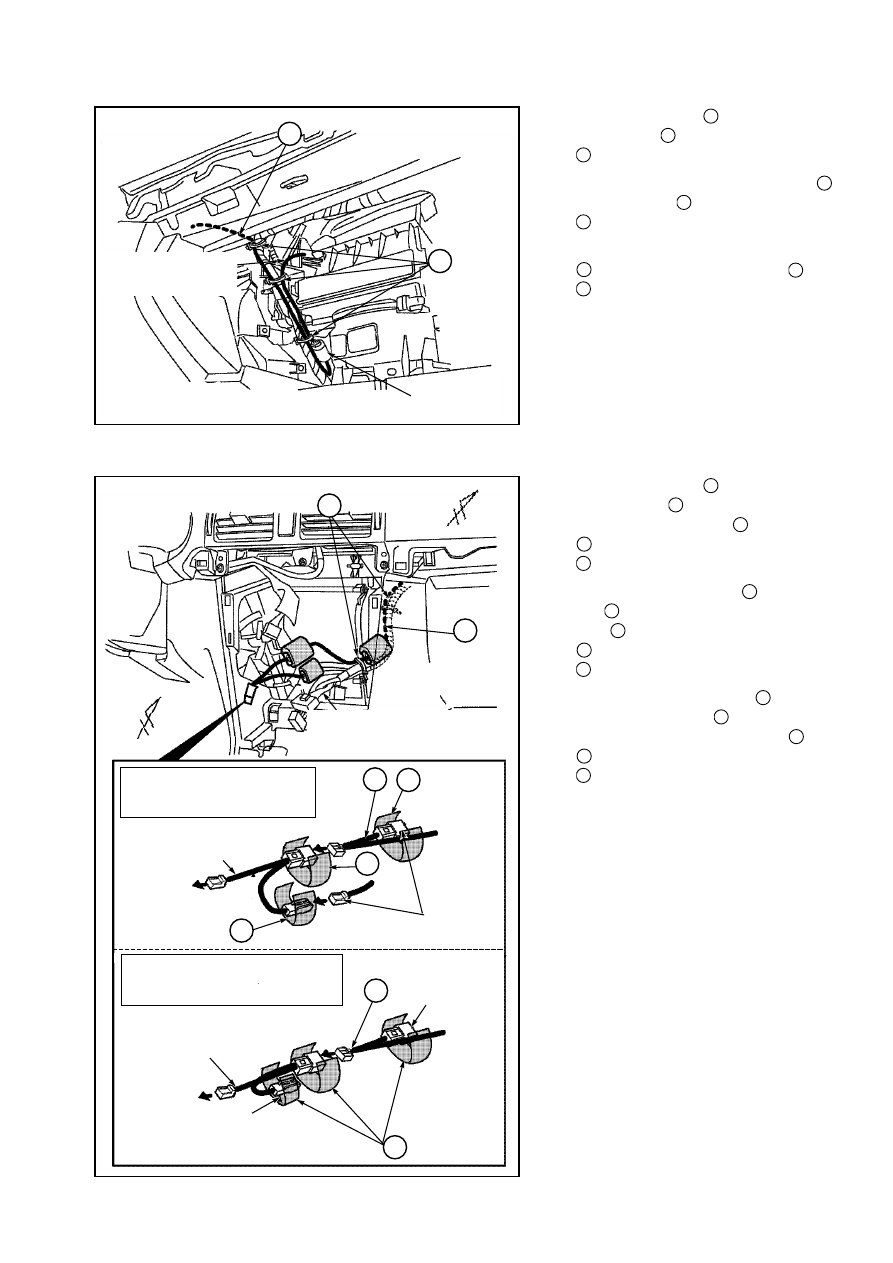
Abb. 9 - Fig. 9
9.
Das Wechslerkabel
verlegen und mit
Kabelbinder befestigen.
: Kabelbinder (3x)
9.
Route and attach the changer wire
using wire ties
.
: Wire tie (3x)
9. Acheminez et fixez le fil du changeur
à l’aide des liens pour câble
.
: Lien pour câble (3x)
20
20
6
20
20
6
20
20
6
Abb. 10 - Fig. 10
10. Das Wechslerkabel
verlegen und mit
Kabelbinder
befestigen und die
Stecker mit Klebeband
umwickeln.
: Klebeband 2x (3x)
: Kabelbinder (2x)
10. Route the changer wire
using wire
ties
and wrap the connectors using
tape .
: Tape 2x (3x)
: Wire tie (2x)
10. Guidez le fil du changeur
à l’aide
des liens pour câble
et entourez les
connecteur à l’aide de l’adhesif
.
: Adhésif 2x (3x)
: Lien pour câble (2x)
(*) Nicht anschließen
(*) Do not connect
(*) Ne pas raccorder
20
5
5
20
6
20
5
5
20
6
20
5
5
20
6
6
6
20
20
Anschließen
Connect
Raccordez
Zur Audioeinheit
To audio
Vers audio
Fahrzeugkabelstrang
Vehicle harness
Faisceau de câbles du véhicule
Zur Audioeinheit
To audio
Vers audio
AVC-LAN Kabelstrang
AVC-LAN wire harness
Faisceau de câbles
AVC-LAN
5
5
5
5
6
6
Kabel Wechslereinheit
Wire changer unit
Fil du changeur
OHNE POP-UP-DISPLAY
WITHOUT POP UP DISPLAY
SANS AFFICHAGE DISSIMULABLE
(*)
(*)
(*)
AVC-LAN Kabelstrang
AVC-LAN wire harness
Faisceau de câbles
AVC-LAN
MIT POP-UP-DISPLAY
WITH POP UP DISPLAY
AVEC AFFICHAGE DISSIMULABLE

Avensis (T25)
TOYOTA GENUINE AUDIO
Avensis (LHD) - 10
10-02
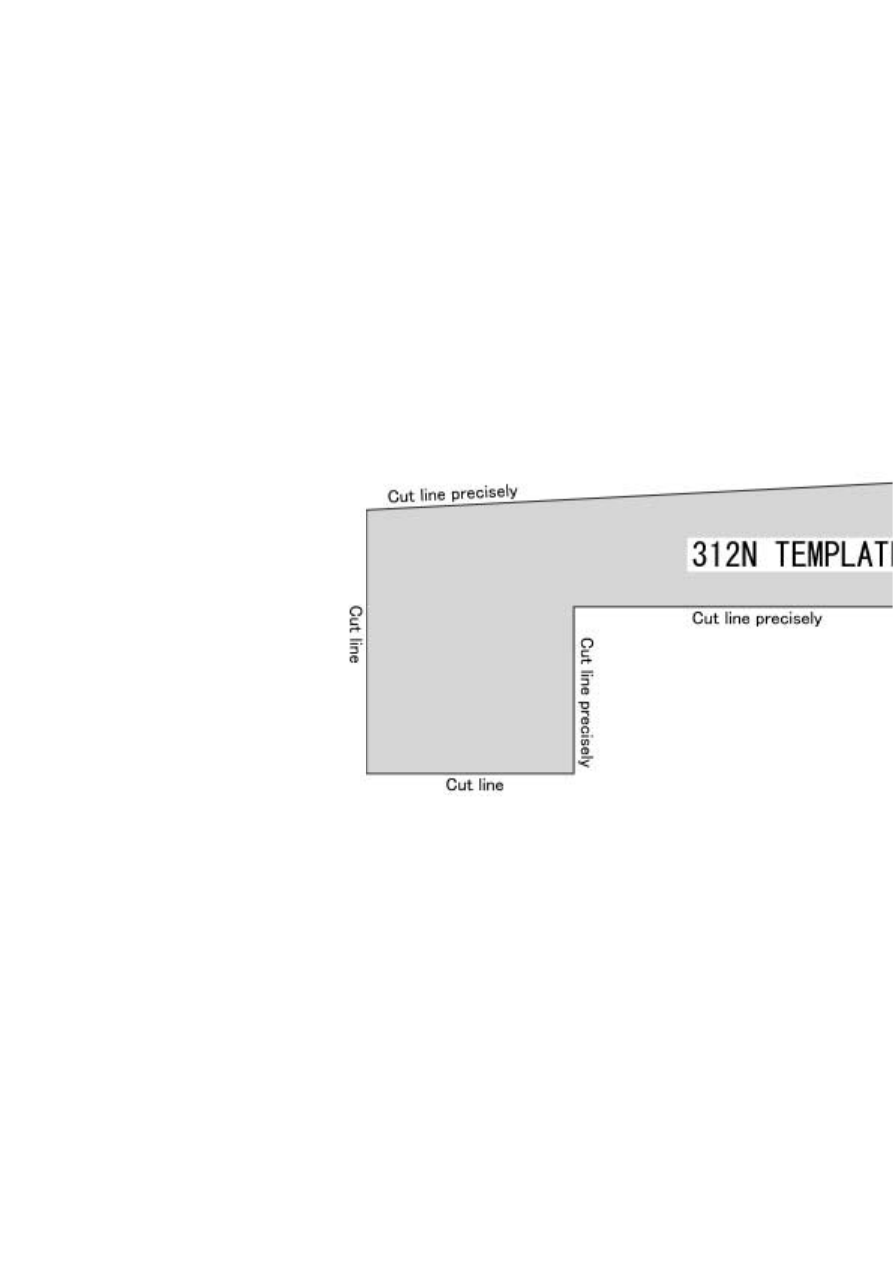
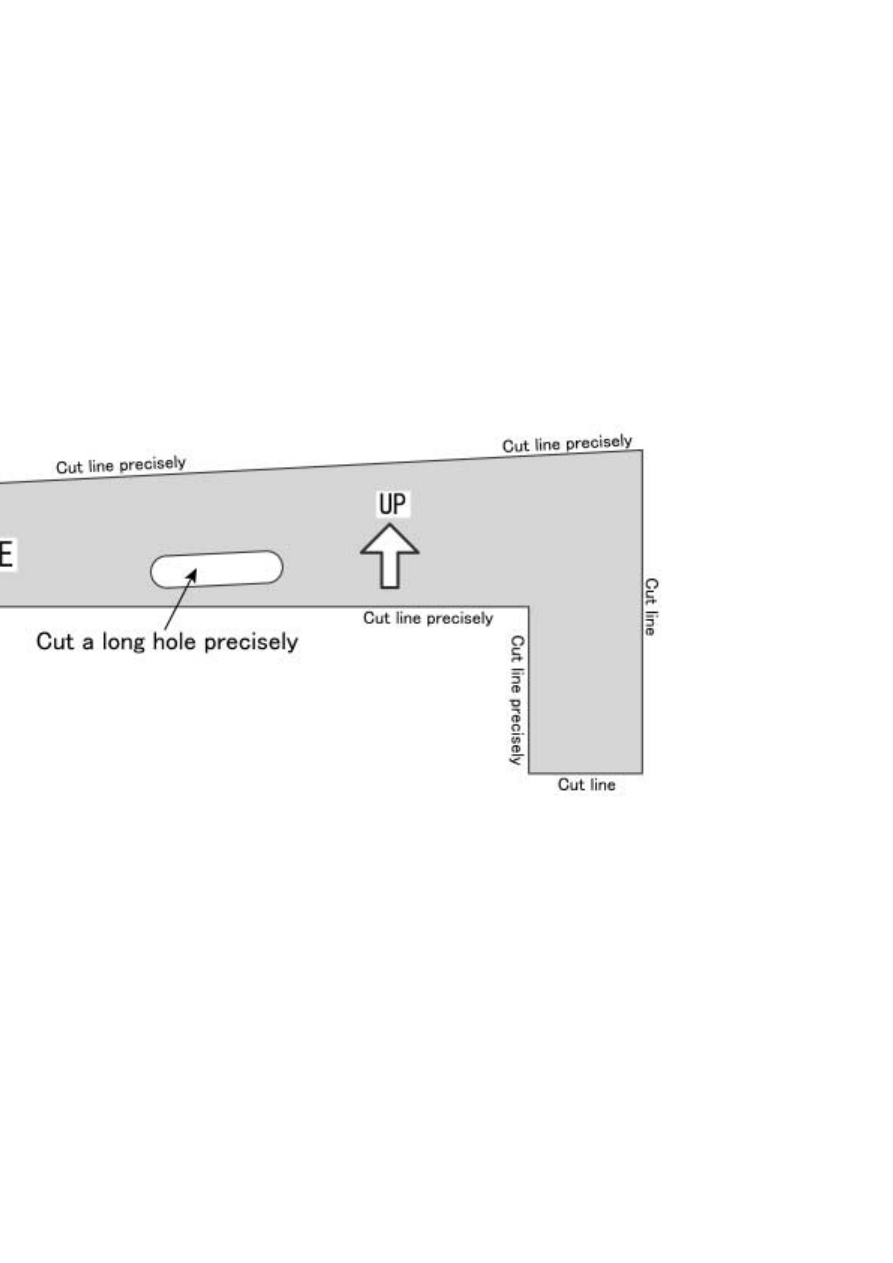
11. Die Schablone (312N)
(see page
22, 23) mit einer Schere ausschneiden.
11. Cut the template (312N)
(see page
22, 23) using scissors.
11. Découpez le gabarit (312N)
(see
page 22, 23) à l’aide de ciseaux.
7
7
7
Abb. 11 - Fig. 11
13. Schutzklebeband
verwenden, um
die Oberfläche des Armaturenbretts
nicht zu beschädigen.
13. Use protection tape
in order not to
damage the surface of the dashboard.
13. Utilisez la bande de protection
afin
de ne pas endommager la surface du
tableau de bord.
4
4
4
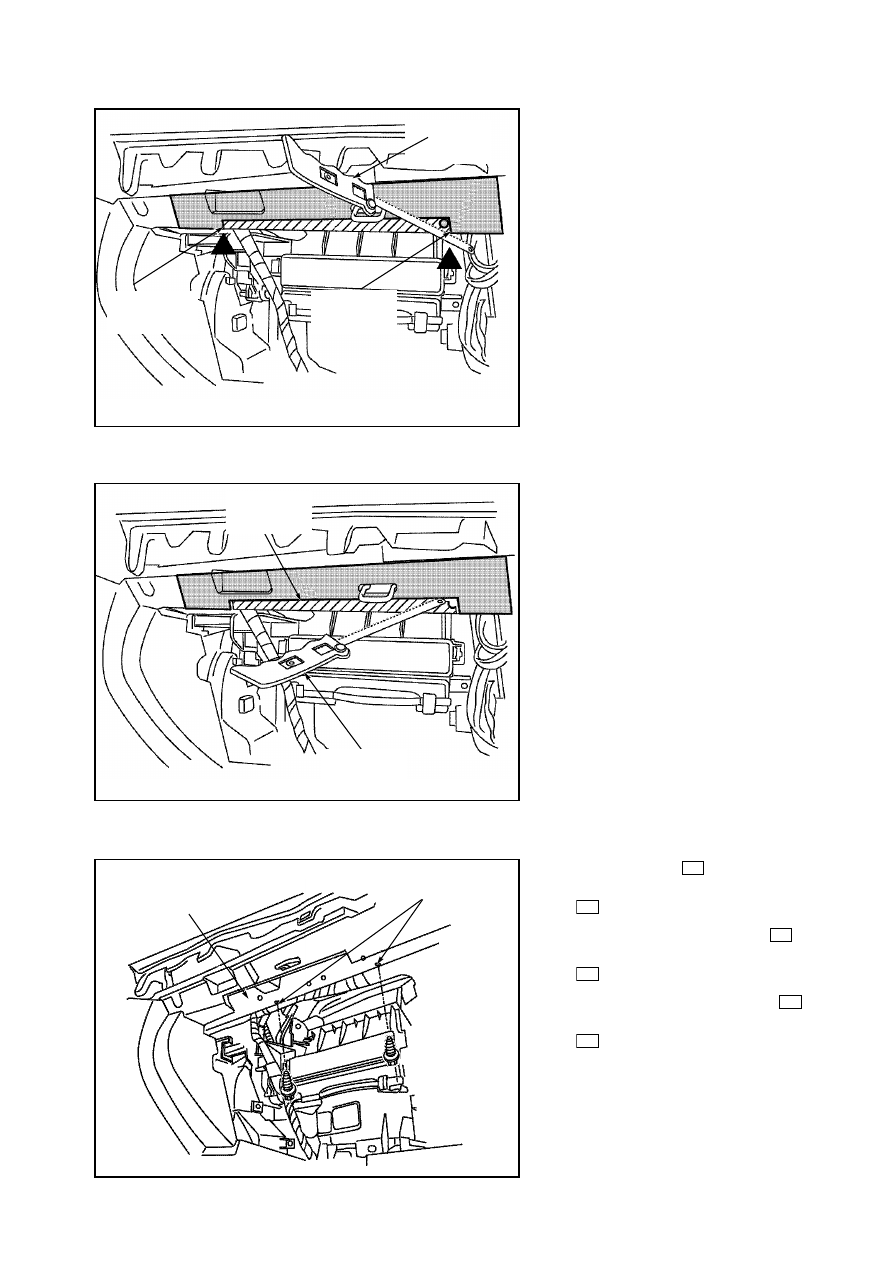
Abb. 13 - Fig. 13
Abb. 12 - Fig. 12
Ecken stimmen
Corner fits
Adapté aux coins
Markierung
Marking
Repère
Ecken stimmen
Corner fits
Adapté aux coins
Markierung
Marking
Repère
Ein Loch mit 10mm Durchmesser bohren.
Drill a hole of 10mm
Percez un trou de 10 mm
Öffnungen
Hole fit
Adapté au trou
7
7
4
12. Das Armaturenbrett mit Hilfe der
Schablone markieren (312N)
.
12. Mark the dashboard using the template
(312N)
.
12. Marquez le tableau de bord à l’aide du
gabarit (312N)
.
7
7
7
Avensis (T25)
TOYOTA GENUINE AUDIO
Avensis (LHD) - 11
10-02
14. Die auf dem Armaturenbrett markierte
Position mit einer Säge ausschneiden.
14. Cut the marked position on the dash-
board using a saw.
14. Découpez à l’aide d’une scie l’empla-
cement marqué sur le tableau de bord.
Abb. 14 - Fig. 14
Abb. 15 - Fig. 15
16. Die Schrauben
provisorisch in die
vorhandenen Löcher einsetzen.
: Schraube (M6x12) (2x)
16. Temporary attach the screws
in the
existing holes.
: Screw (M6x12) (2x)
16. Fixez temporairement les vis
aux
trous existants.
: Vis (M6x12) (2x)
106
106
106
106
106
106
Abb. 16 - Fig. 16
15. Die auf dem Armaturenbrett markierte
Position mit einer Säge ausschneiden.
15. Cut the marked position on the dash-
board using a saw.
15. Découpez à l’aide d’une scie l’empla-
cement marqué sur le tableau de bord.
Einschneiden
Cut
Découpez
Einschneiden
Cut
Découpez
Säge
Saw
Scie
Vorhandene Löcher
Existing holes
Trous existants
Verstärkungsrohr
Reinforcement pipe
Tuyau de renforcement
Einschneiden
Cut
Découpez
Säge
Saw
Scie
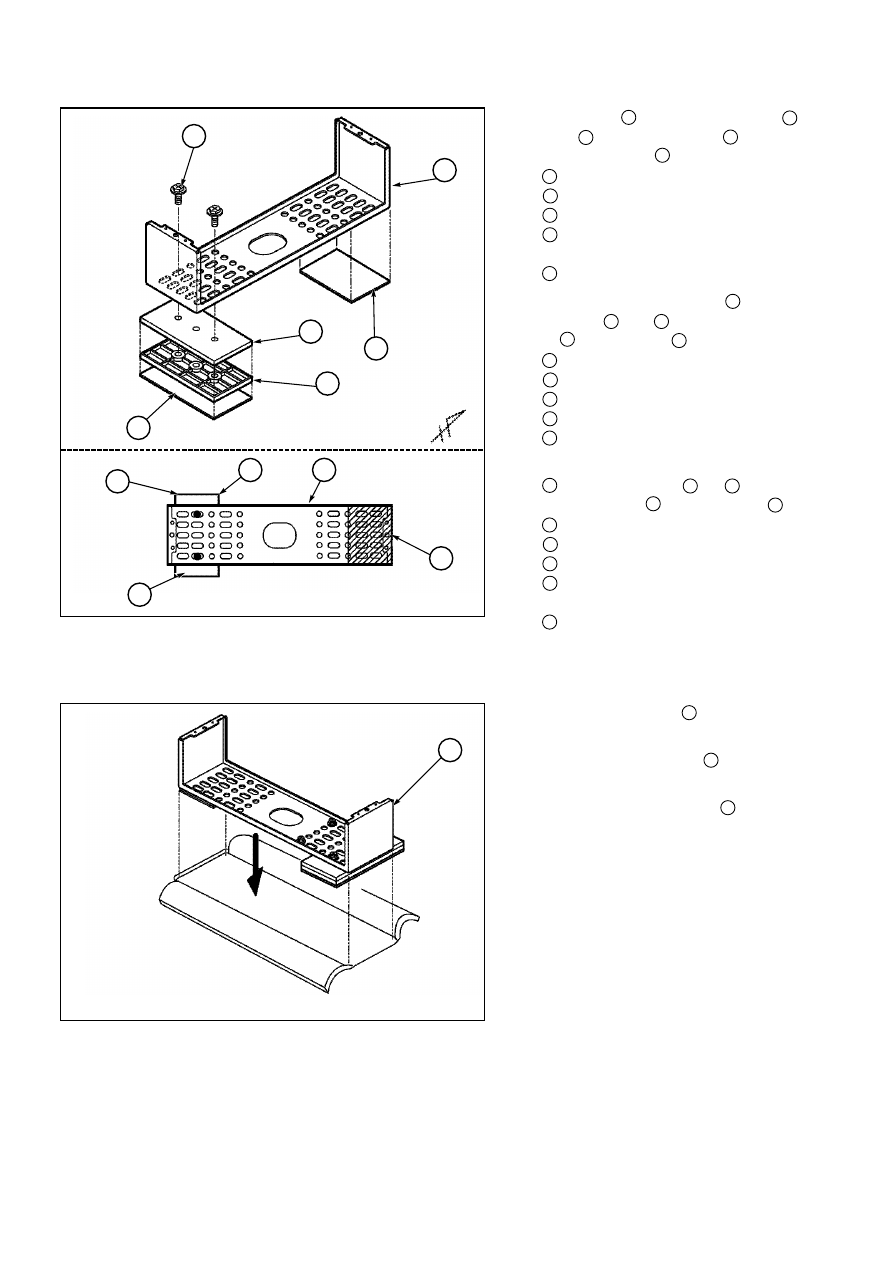
17. Die seitlichen Halterungen (L) und (R)
an der Wechslereinheit anbringen.
: Bolzen (M5x8) (4x)
17. Fit the side bracket
(L) and (R) onto
the changer unit
.
: Bolt (M5x8) (4x)
17. Fixez les supports latéraux
(G) et
(D) sur le changeur
.
: Boulon (M5x8) (4x)
10
30
21
10
30
21
10
Abb. 17 - Fig. 17
Abb. 18 - Fig. 18
19. Das Handschuhfach ausschneiden
.
19. Cut the glove compartment
.
19. Découpez la boîte à gants
.
6
6
6
Abb. 19 - Fig. 19
Avensis (T25)
TOYOTA GENUINE AUDIO
Avensis (LHD) - 12
10-02
18.
a)
Den Schalter einbauen
.
b)
Die Wechslereinheit
für den Einbau
ins Armaturenbrett einbauen.
: Schraube (M6x12) (2x)
: Schraube (M6x14) (2x)
18.
a)
Fit the switch
.
b)
Fit the changer unit
.
: Screw (M6x12) (2x)
: Screw (M6x14) (2x)
18.
a)
Installez le commutateur
.
b)
Installez le changeur
dans le
tableau de bord.
: Vis (M6x12) (2x)
: Vis (M6x14) (2x)
23
22
30
24
23
22
30
24
23
22
30
24
30
30
21
21
10
10
23
23
22
24
Markierung
Existing marking
Repère
Stecker
Connector
Connecteur
Schneiden
Cut
Découpez
Decke
Blanket
Drap
6
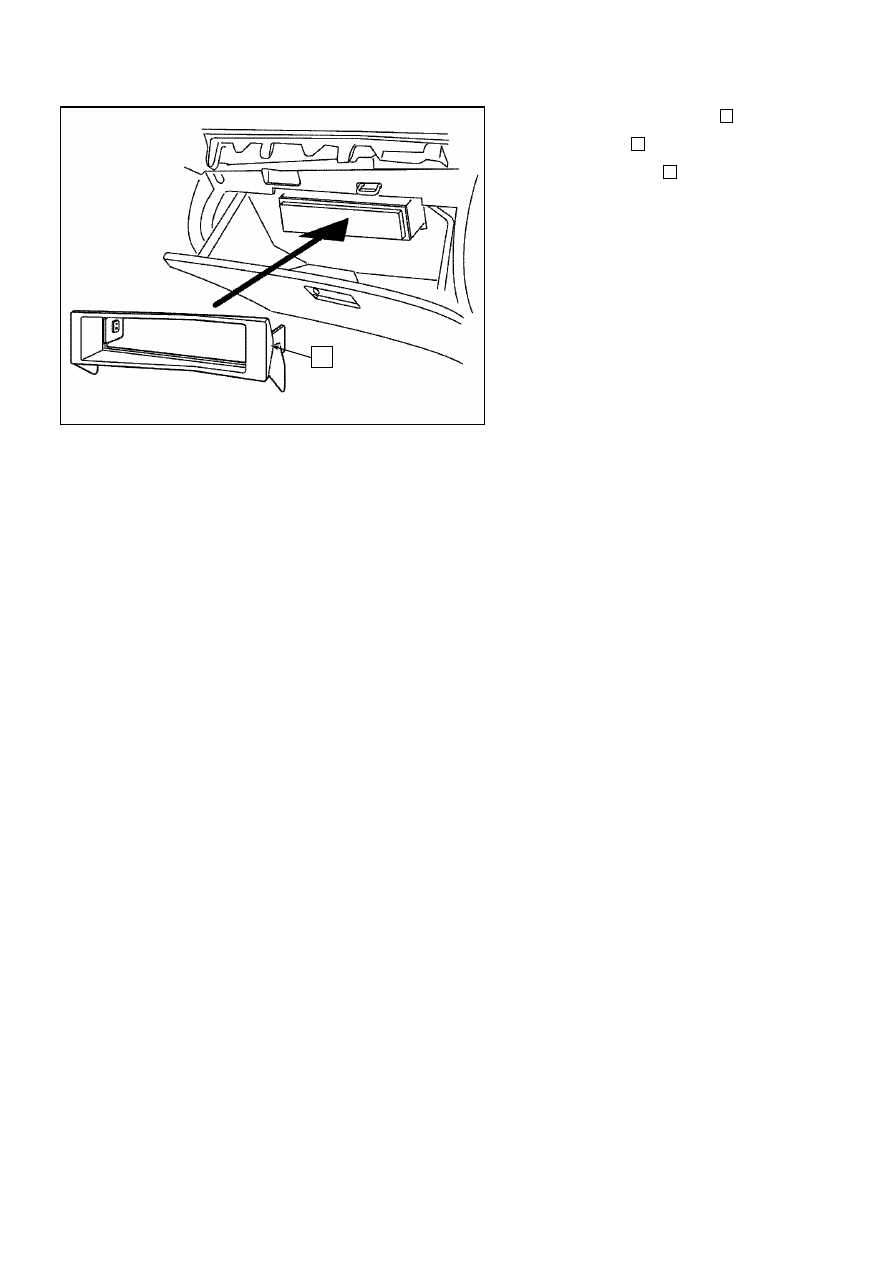
20. Das Handschuhfach
einbauen.
: Haken (2x)
20. Fit the glove compartment
.
: Hook (2x)
20. Repladez la boîte à gants
.
: Crochet (2x)
104
6
104
6
104
6
Abb. 20 - Fig. 20
21. Die Verkleidung
ausschneiden.
21. Cut the panel
.
21. Découpez le panneau
.
3
3
3
Abb. 22 - Fig. 22
Avensis (T25)
TOYOTA GENUINE AUDIO
Avensis (LHD) - 13
10-02
6
3
100
Einchneiden
Cut
Découpez
Einchneiden
Cut
Découpez
22. Die Verkleidung einbauen
.
22. Fit the panel
.
22. Fixez le panneau
.
3
3
3
Abb. 23 - Fig. 23
Avensis (T25)
TOYOTA GENUINE AUDIO
Avensis (LHD) - 14
10-02
3
3. EINBAU DES VERBORGENEN 6 CD-WECHSLERS
HIDE-AWAY 6 CD-CHANGER INSTALLATION
INSTALLATION DU CHANGEUR 6 CD DISSIMULABLE
Avensis (T25)
TOYOTA GENUINE AUDIO
Avensis (LHD) - 15
10-02
Abb. 24 - Fig. 24
Abb. 25 - Fig. 25
Abb. 26 - Fig. 26
3.
Das Schutzklebeband
anbringen.
3.
Attach the protection tape
.
3.
Fixez le ruban de protection
.
4
4
4
2.
Die Verkleidung entfernen
.
: Clip (5x)
2.
Remove the panel
.
: Clip (5x)
2.
Déposez le panneau
.
: Clip (5x)
3
3
3
1.
Schalthebelknauf
und Schaltungs-
abdeckung
mit einem Nylonhebel-
werkzeug entfernen.
: Clip (4x)
: Nagel (4x)
1.
Remove the shift knob
and shift
cover
using a nylon pry tool.
: Clip (4x)
: Nail (4x)
1.
Déposez la rotule du levier de vitesses
et sa garniture
à l’aide d’un levier
en nylon.
: Clip (4x)
: Clou (4x)
2
1
2
1
2
1
1
2
3
4
4
4.
Die Audioeinheit ausbauen
.
: Bolzen (4x)
4.
Remove the audio unit
.
: Bolt (4x)
4.
Déposez l’unité audio
.
: Boulon (4x)
101
5
101
5
101
5
5.
a)
Die Einstiegsverkleidung
(R) der
Vordertür entfernen.
: Nagel (5x)
b)
Das Stehblech
(R) ausbauen.
: Mutter(1x)
5.
a)
Remove the front door scuff plate
(R).
: Nail (5x)
b)
Remove the kick panel
(R).
: Nut (1x)
5.
a)
Enlevez la plaque de protection de la
portière avant
(D).
: Clou (5x)
b)
Enlevez le panneau latéral de protection
(D).
: Ecrou (1x)
103
9
8
103
9
8
103
9
8
Abb. 27 - Fig. 27
Abb. 28 - Fig. 28
Avensis (T25)
TOYOTA GENUINE AUDIO
Avensis (LHD) - 16
10-02
8
9
103
5
101
101
7.
Das Klebeband
in 10 Stücke schnei-
den.
7.
Cut the tape
into 10 equal pieces.
7. Découpez la bande
en 10 mor-
ceaux.
5
5
5
Abb. 30 - Fig. 30
Avensis (T25)
TOYOTA GENUINE AUDIO
Avensis (LHD) - 17
10-02
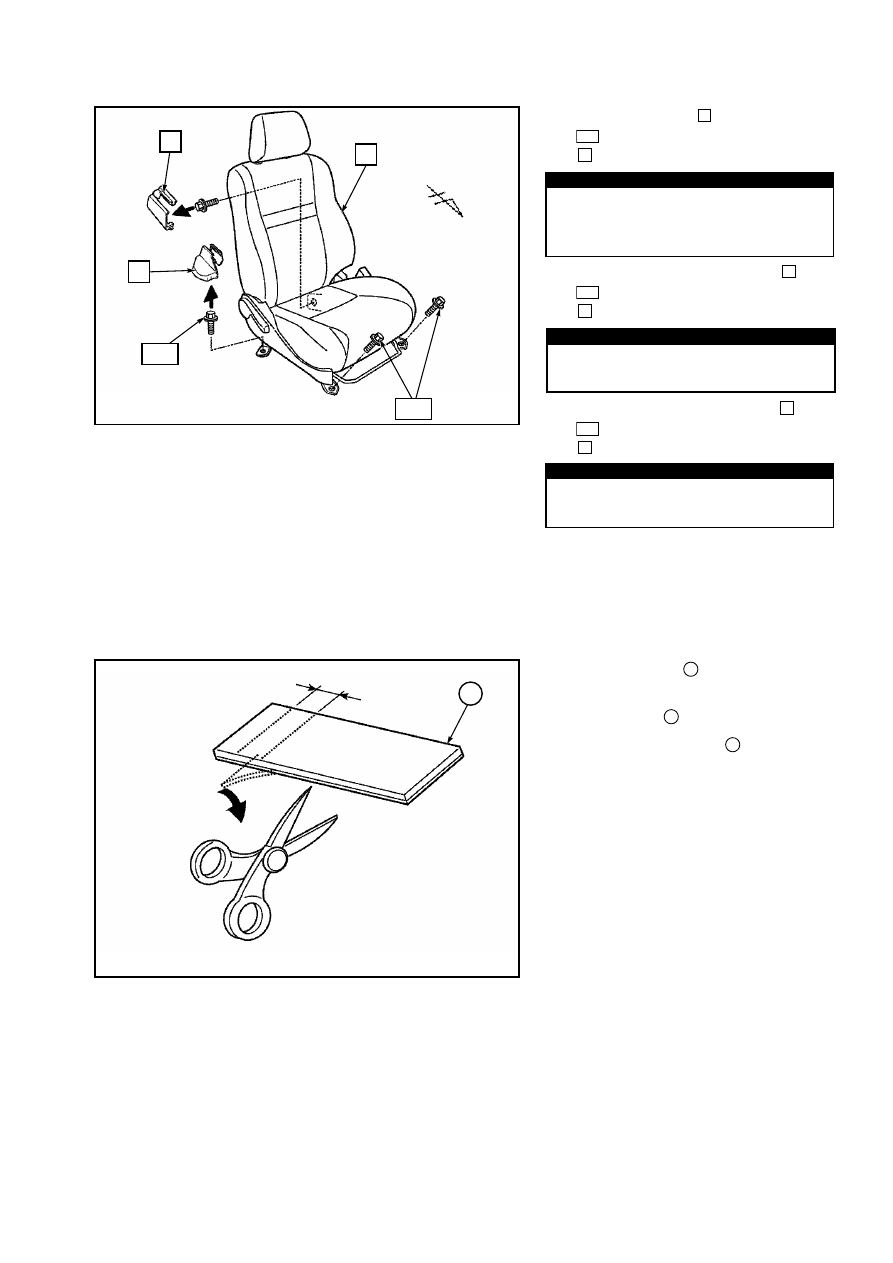
6.
Den Beifahrersitz
ausbauen.
: Schraube mit Unterlegscheibe (4x)
: Abdeckung (2x)
6.
Remove the passenger’s seat
.
: Bolt w/washer (4x)
: Cover (2x)
6. Enlevez le siège du passager
.
: Boulon avec rondelle (4x)
: Couvercle (2x)
11
106
10
11
106
10
11
106
10
Abb. 29 - Fig. 29
Fasten the bolt with specified torque
when reassembling.
CAUTION
Lors du remontage, serrez le boulon au
couple spécifié.
ATTENTION
Beim zusammenbau die Schraube mit
dem vorgeschriebenen Anzugsmo-
ment anziehen.
VORSICHT
11
11
10
106
106
25mm
5
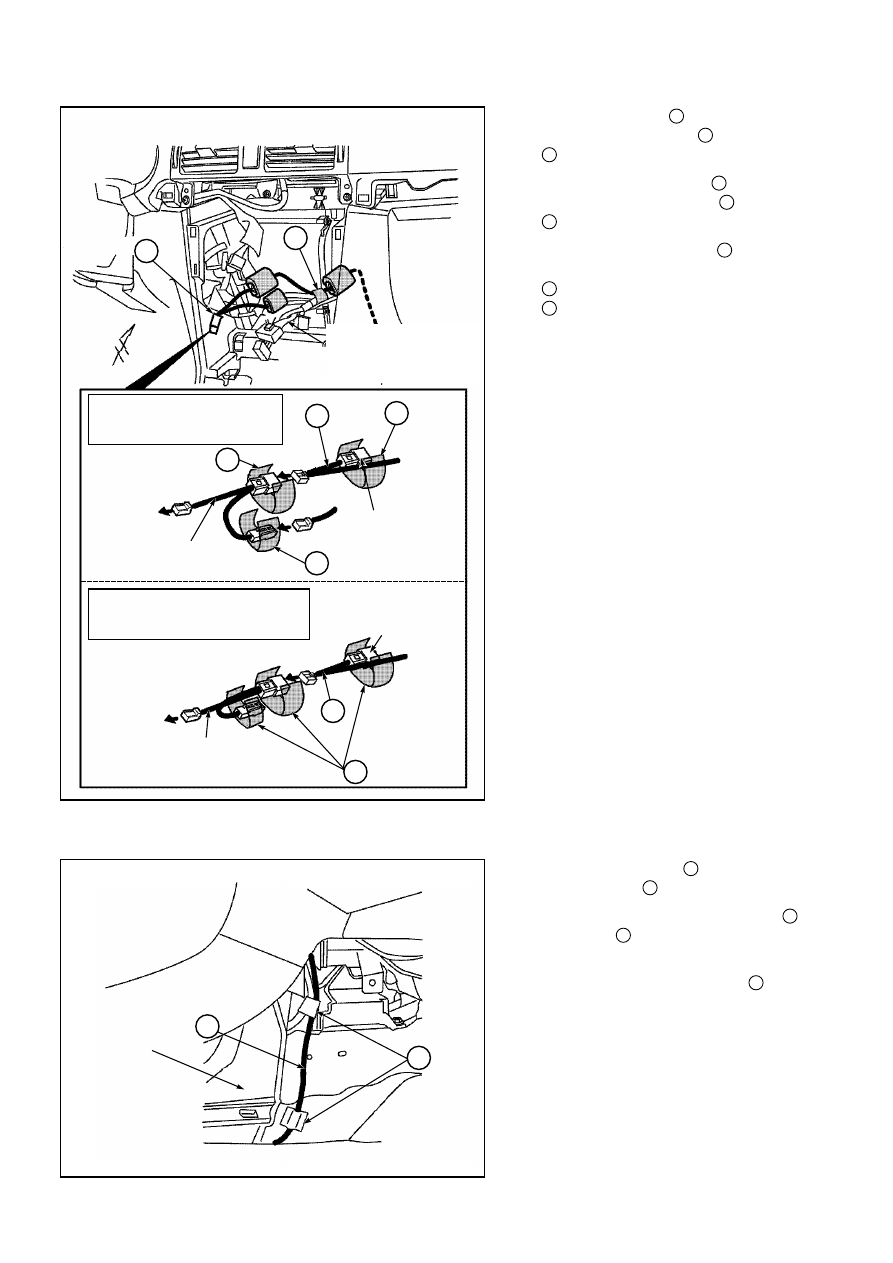
9.
Das Wechslerkabel
verlegen und
mit Klebeband
(2x) befestigen.
9.
Route and attach the changer wire
using tape
(2x).
9. Acheminez et fixez le fil du changeur
à l’aide de morceaux de bande
(2x).
5
5
6
5
6
Abb. 32 - Fig. 32
Avensis (T25)
TOYOTA GENUINE AUDIO
Avensis (LHD) - 18
10-02
8.
Das Wechslerkabel
verlegen und die
Stecker mit Klebeband
umwickeln.
: Klebeband (2x3)
8.
Route the changer wire
and wrap
the connectors using tape
.
: Tape (2x3)
8. Guidez le fil du changeur
et entou-
rez les connecteur à l’aide de l’adhesif
.
: Adhésif (2x3)
(*) Nicht anschließen
(*) Do not connect
(*) Ne pas raccorder
5
5
6
5
5
6
5
5
6
Abb. 31 - Fig. 31
6
Fahrzeugkabelstrang
Vehicle Harness
Faisceau de câblesdu
véhicule
Zur Audioeinheit
To audio
Vers audio
Zur Audioeinheit
To audio
Vers audio
AVC-LAN Kabelstrang
AVC-LAN wire harness
Faisceau de câbles AVC-LAN
AVC-LAN Kabelstrang
AVC-LAN wire harness
Faisceau de câbles AVC-LAN
Lüftungskanal
Duct
Conduite
5
5
5
5
5
5
(*)
(*)
6
6
6
OHNE POP-UP-DISPLAY
WITHOUT POP UP DISPLAY
SANS AFFICHAGE DISSIMULABLE
MIT POP-UP-DISPLAY
WITH POP UP DISPLAY
AVEC AFFICHAGE DISSIMULABLE
11. Den Teppich an der Einbauposition der
Wechslereinheit auf der Beifahrerseite
einschneiden.
11. Cut the carpet at the changer unit
attachment position on the passenger
side.
11. Découpez la moquette au niveau de la
position de fixation du changeur, du
côté du passager.
Abb. 34 - Fig. 34
Avensis (T25)
TOYOTA GENUINE AUDIO
Avensis (LHD) - 19
10-02
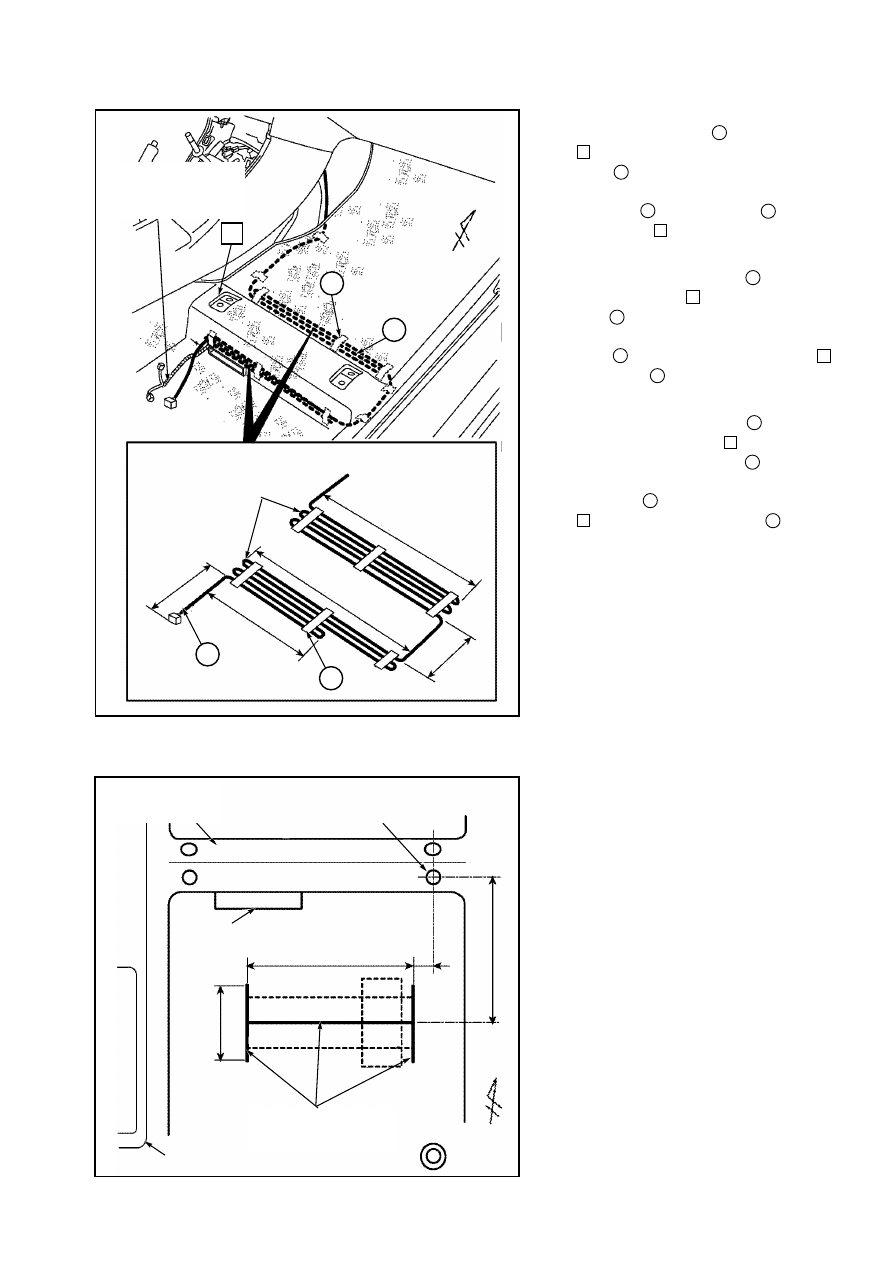
10.
a)
Das Wechslerkabel
am Querträger
entlang verlegen und mit Klebe-
band (4x)
befestigen.
b)
Den überschüssigen Teil des Wechs-
lerkabels mit
Klebeband (6x) am
Querträger
befestigen.
10.
a)
Route the changer wire
along the
cross member
and attach using
tape (4x).
b)
Attach the excess wire of the changer
wire
onto the cross member
using tape
(6x).
10.
a)
Guidez le fil de changeur
le long de
la poutre transversale
et attachez-le
à l'aide du ruban adhésif
(4x).
b)
Attachez le fil excédentaire du fil de
changeur
sur la poutre transversale
à l'aide du ruban adhésif
(6x).
5
12
6
5
12
6
5
12
6
5
12
6
12
5
6
5
12
6
Abb. 33 - Fig. 33
Bereich ausschneiden
Cut area
Zone de découpe
269mm
500mm
500mm
300mm
270mm
200mm
45mm
80mm
185mm
Mittelkonsole
Centre console
Console centrale
Querträger
Cross member
Poutre transversale
Positionierungsöffnung Beifahrersitz
Positioning hole passenger seat
Trou de positionnement du siège du passager
Lüftungskanal
Duct
Conduite
Überschüssiges Kabel
Excess wire
Fil exédentaire
12
6
5
6
5
Fahrzeugkabelstrang
Vehicle harness
Faisceau de câbles du
véhicule
13. Die Sockelhalterung
am Boden des
Beifahrersitzes befestigen.
13. Attach the base bracket
on the floor
on the passenger side.
13. Fixez le support de base
au plan-
cher du côté passager.
7
7
7
Abb. 36 - Fig. 36
Avensis (T25)
TOYOTA GENUINE AUDIO
Avensis (LHD) - 20
10-02
12. Klebeband
und Distanzstücke (
und
) mit Schrauben
an der
Sockelhalterung
anbringen.
: Distanzstück (ohne Mutter)
: Distanzstück (mit Mutter)
: Klebeband (1x)
*: Klebeband (auf 67mmx50mm
schneiden) (1x)
: Schraube (M5x16) (2x)
12. Attach the adhesive tapes
and the
spacers (
and
) to the base brack-
et
using screws
.
: Spacer (w/o nut)
: Spacer (w/nut)
: Tape (1x)
*: Tape (cut to size 67mmx50mm) (1x)
: Screw (M5x16) (2x)
12. Fixez les morceaux de bande adhésive
et les entretoises (
et
) au sup-
port de la base
à l’aide des vis
.
: Entretoise (sans écrou)
: Entretoise (avec écrou)
: Adhésif (1x)
*: Adhésif (à découper au format 67
mm x 50 mm)
: Vis (M5x16) (2x)
8
5
5
16
15
8
7
16
15
5
8
5
5
16
15
8
7
16
15
5
8
5
5
16
15
7
8
16
15
5
Abb. 35 - Fig. 35
7
7
7
8
5
5
5
16
15
15
16
5
*
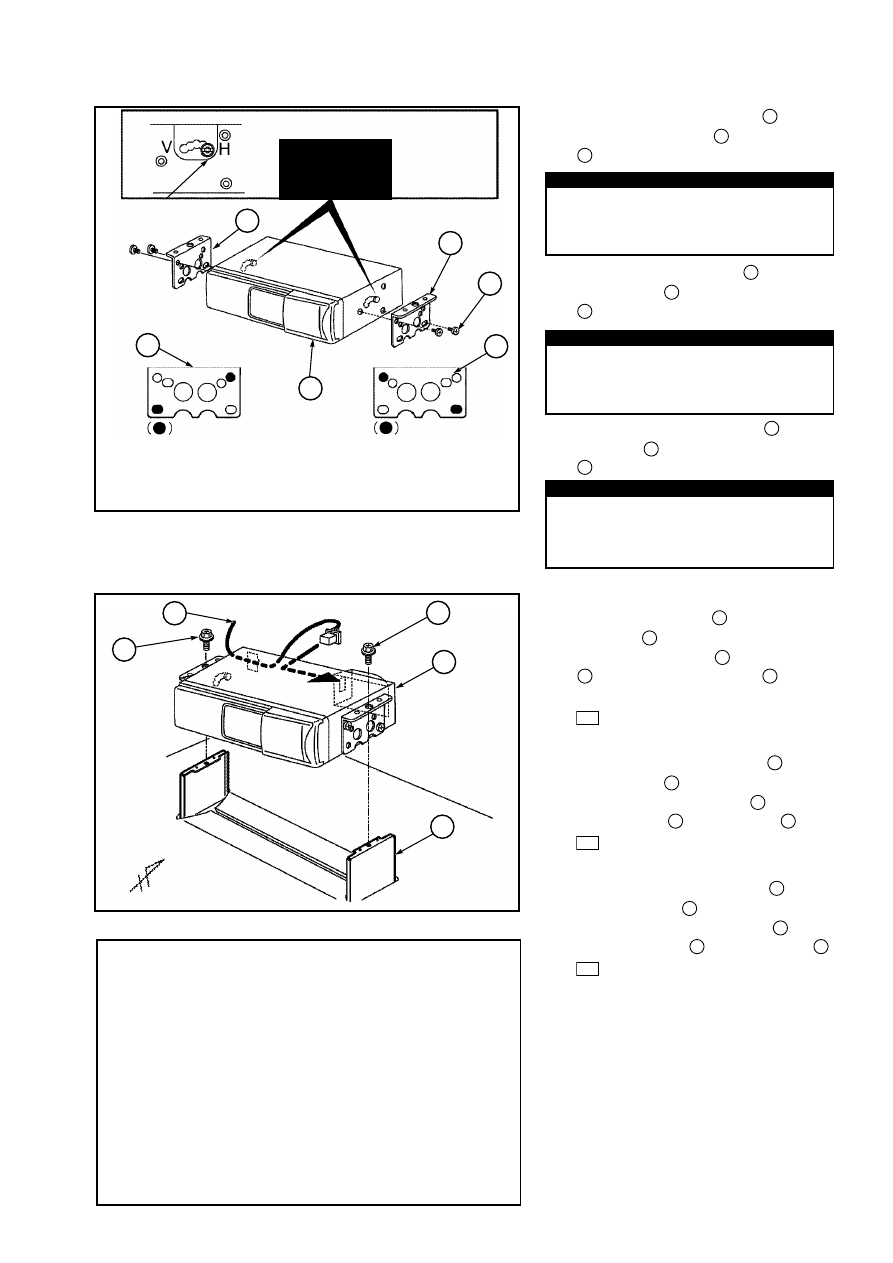
Abb. 37 - Fig. 37
Avensis (T25)
TOYOTA GENUINE AUDIO
Avensis (LHD) - 21
10-02
15. Die Wechslereinheit anbringen.
a)
Das Wechslerkabel
an der Wechs-
lereinheit
anschließen.
b)
Die Wechslereinheit
mit Schrauben
an der Sockelhalterung
befesti-
gen.
: Bolzen (M5x10) (4x)
15. Fit the changer unit.
a)
Connect the changer wire
to the
changer unit
.
b)
Mount the changer unit
onto the
base bracket
using screws
.
: Bolt (M5x10) (4x)
15. Installez le changeur.
a)
Connectez le fil du changeur
à l’uni-
té du changeur
.
b)
Installez l’unité du changeur
sur le
support de base
à l’aide des vis
.
: Boulon (M5x10) (4x)
105
10
7
12
12
6
105
10
7
12
12
6
105
7
10
12
12
6
Abb. 38 - Fig. 38
VERGEWISSERN, DASS ALLE GELÖSTEN
STECKER KORREKT WIEDER
ANGESCHLOSSEN WERDEN.
VERKLEIDUNG EINPASSEN UND AUSGEBAUTE
TEILE WIEDER EINBAUEN.
ENSURE THAT ALL REMOVED CONNECTORS ARE
PUT BACK CORRECTLY.
REFIT THE TRIM AND REMOVED PARTS.
VEILLEZ A REPLACER CORRECTEMENT TOUS LES
CONNECTEURS QUI ONT ETE ENLEVES.
REPLACEZ LE GARNISSAGE AINSI QUE LES
PIECES QUI ONT ETE DEMONTEES.
Desserrez les vis avant de les déplacer.
Serrez-les aprés les avoir changé de
position.
ATTENTION
Schraube
Screw
Vis
VORSICHT
CAUTION
ATTENTION
Lochposition auf der linken Seite
Hole position on the left side
Position des trous du côté gauche
14. Die seitlichen Halterungen
(2x) an
der Wechslereinheit
befestigen.
: Bolzen (M5x8) (4x)
14. Mount the side brackets
(2x) to the
changer unit
.
: Bolt (M5x8) (4x)
14. Fixez les supports latéraux
(2x) au
changeur .
: Boulon (M5x8) (4x)
10
12
9
10
12
9
10
12
9
Loosen the screws before moving
them. Tighten up after the position is
changed.
CAUTION
Vor dem Verschieben, die Schrauben
lösen. Anziehen, nachdem die Position
verändert wurde.
VORSICHT
9
12
12
9
9
9
10
6
7
10
10
Lochposition auf der rechten Seite
Hole position on the right side
Position des trous du côté droit
Avensis (T25)
Avensis (LHD) - 22
10-02
Avensis (LHD) - 23
10-02
TOYOTA GENUINE AUDIO

TOYOTA MOTOR CORPORATION
Wyszukiwarka
Podobne podstrony:
Influence of different microwave seed roasting processes on the changes in quality and fatty acid co
HONDA 6 Disc In Dash CD Changer
Estimation of Dietary Pb and Cd Intake from Pb and Cd in blood and urine
Changes in passive ankle stiffness and its effects on gait function in
Estimation of Dietary Pb and Cd Intake from Pb and Cd in blood and urine
Changes in passive ankle stiffness and its effects on gait function in
Tiger 1 Audio CDs Tests and Phonics Audio CD lista sciezek 2
Stability and Change in Temperament During Adolescence
Changes in Negative Affect Following Pain (vs Nonpainful) Stimulation in Individuals With and Withou
2004 Variation and Morphosyntactic Change in Greek From Clitics to Affixes Palgrave Studies in Langu
False belief understanding in 2and5 year olds Evidence from violation of expectation change of locat
Barwiński, Marek Changes in the Social, Political and Legal Situation of National and Ethnic Minori
Feltynowski, Marcin The change in the forest land share in communes threatened bysuburbanisation an
Kwiek, Marek; Maassen, Peter Changes in Higher Education in European Peripheries and Their Contexts
Changes in personality in pre and post dialectical behaviour therapy BPD groups A question of self
więcej podobnych podstron