Quick Tips
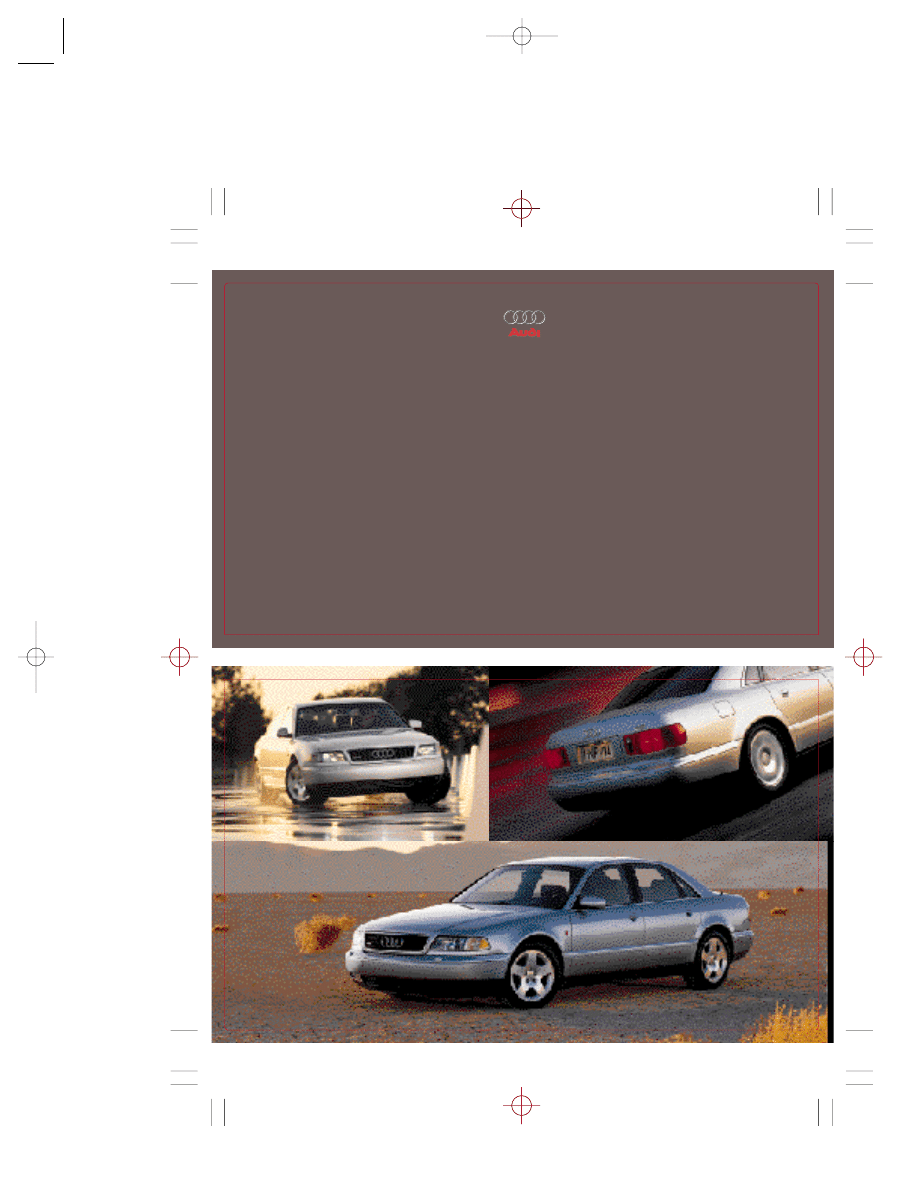
Audi A8
page 1
page 26
1999 Audi A8
Quick Tips™
3800 Hamlin Road
Auburn Hills, Michigan 48326
http://www.audi.com
Quick Tips™ is not intended as a substitute for your Owner’s Manual or Sound System booklet.
If you have a question or concern that is not resolved by your Audi Dealership, please call
Audi’s Customer Relations Department at 1-800-822-2834, 9 a.m. to 7 p.m. eastern time.
©1998 Audi of America, Inc.
Quick Tips™ is a trademark of Calcar.
“Audi”, “A8”, “quattro”, and the four rings emblem are registered trademarks of Audi AG.
“Dolby” is a registered trademark of Dolby Laboratories.
“Tiptronic” is a registered trademark of Dr. Ing. h. c. F. Porsche AG.
4/98 Printed in U.S.A Part No. W42 552 305 51
It has always been Audi’s policy to continuously improve its products. Audi, therefore, reserves the right to make changes in
design and specifications, and to make additions or improvements in its products, without incurring any obligation to install
them on products previously manufactured. Text, illustrations and specifications in Quick Tips™ are based on information
available at time of printing.
8665 CALCAR Audi A8 1/30/04 12:04 PM Page 1
Always check the Owner’s Manual for additional important details and safety information
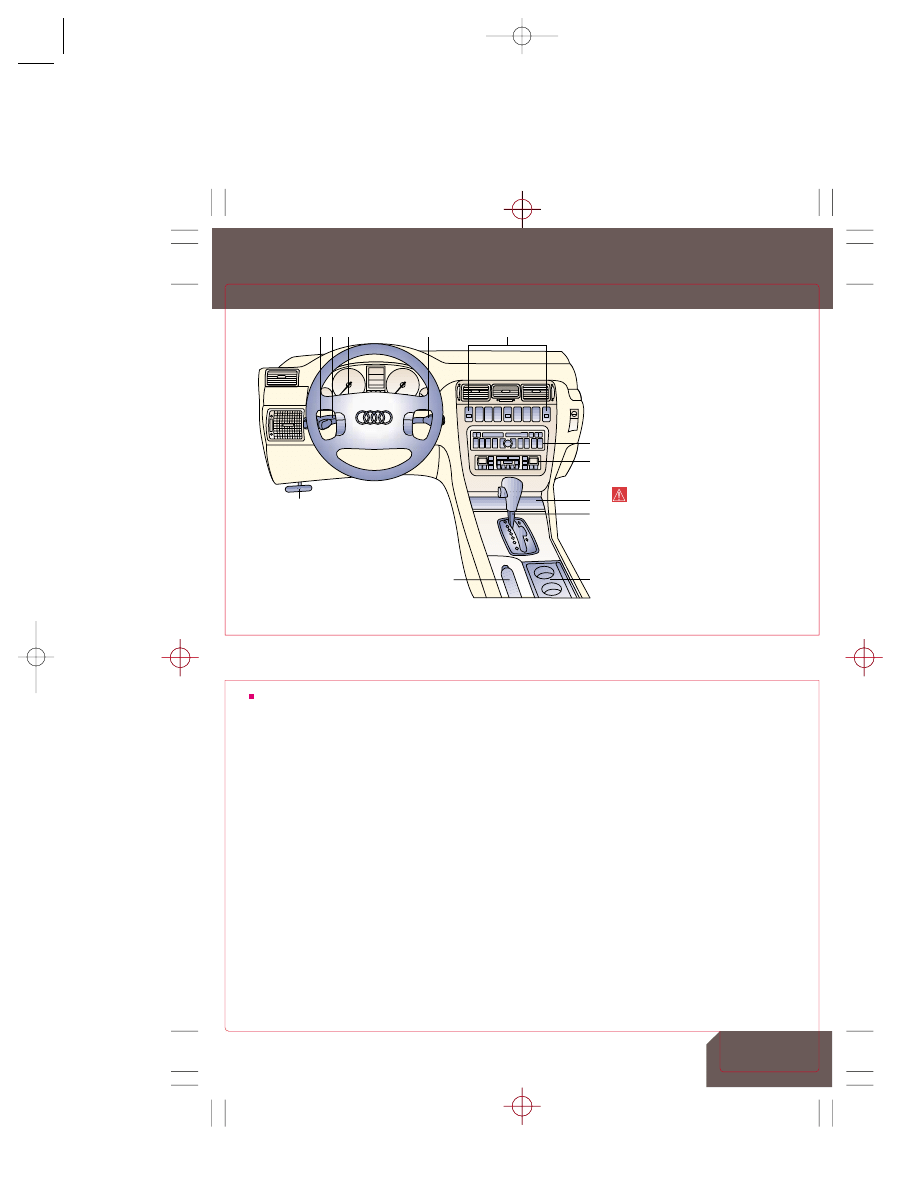
Driver’s View
Quick Tips
Audi A8
page 2
page 3
1 2 3
4
5
7
12
6
8
9
11
10
This Quick Tips™ is intended
to give you a brief overview of
your vehicle’s main features.
It does not contain all the
information you will need to
operate your vehicle safely
and is not a substitute for
your Owner’s Manual.
The Owner’s Manual contains
detailed information about all
your vehicle’s features and
important warnings about
vehicle and occupant safety.
Please read it thoroughly.
Throughout this QuickTips™,
WARNINGS, which concern
your safety, are highlighted like
this. Please read them carefully
and heed what they have to say.
Remember that your Owner’s
Manual contains more detailed
information and additional
important information
about safety.
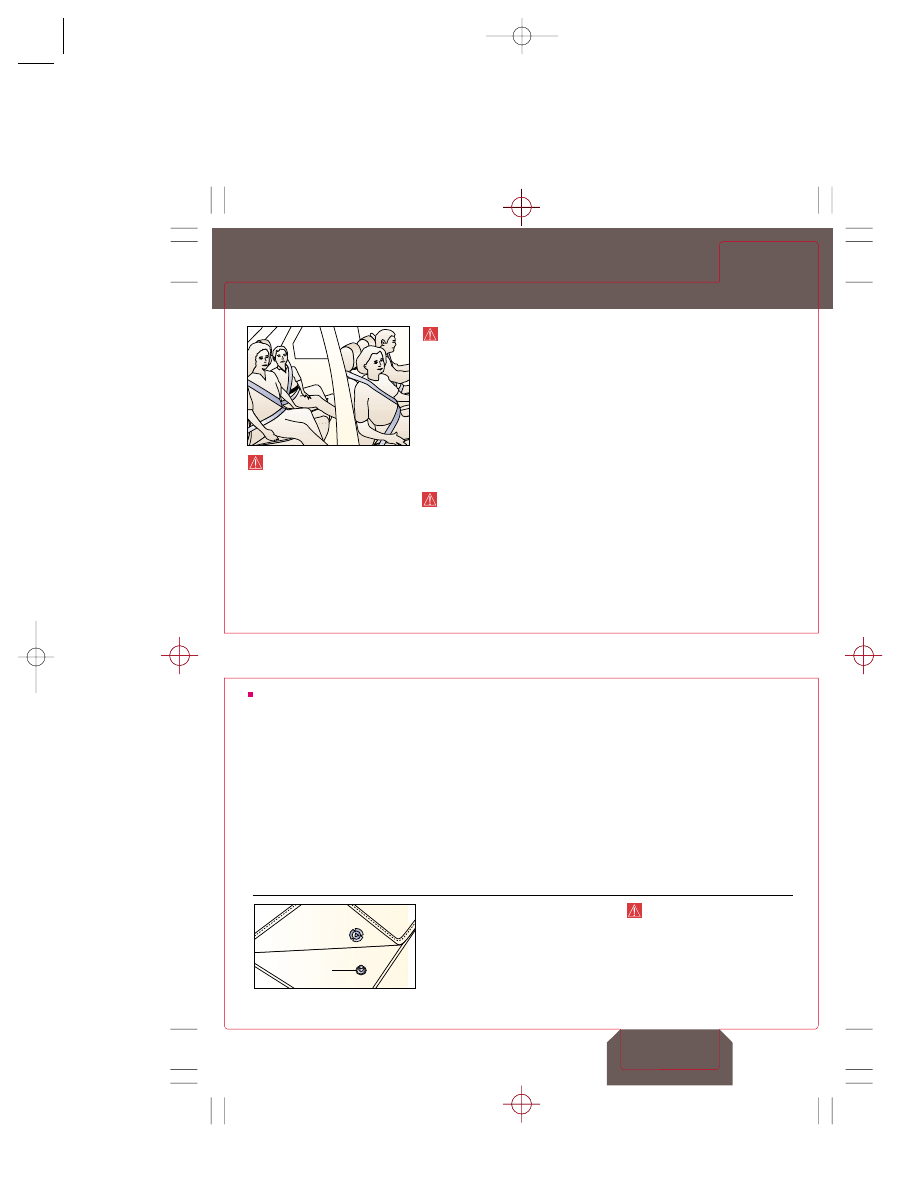
Airbags are supplemental
restraints only. Always
use safety belts and seat
children only in the rear,
using restraint system
appropriate for size and age.
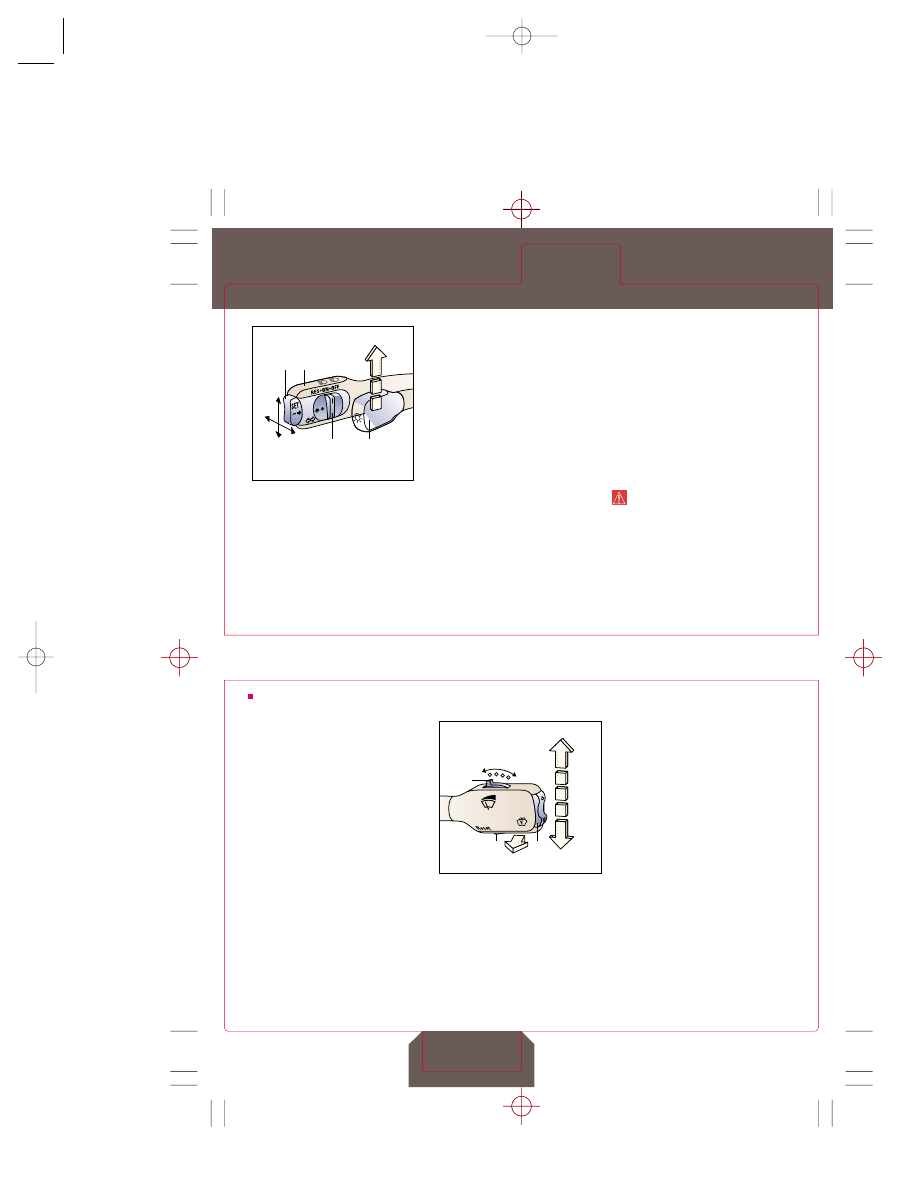
1. Turn signal/headlight
dimmer switch/cruise
control lever,
see Control Levers
2. Exterior lights switch,
see Control Levers
3. Steering wheel
adjustment,
see Memory Controls
4. Windshield wiper/washer
and trip computer lever,
see Control Levers
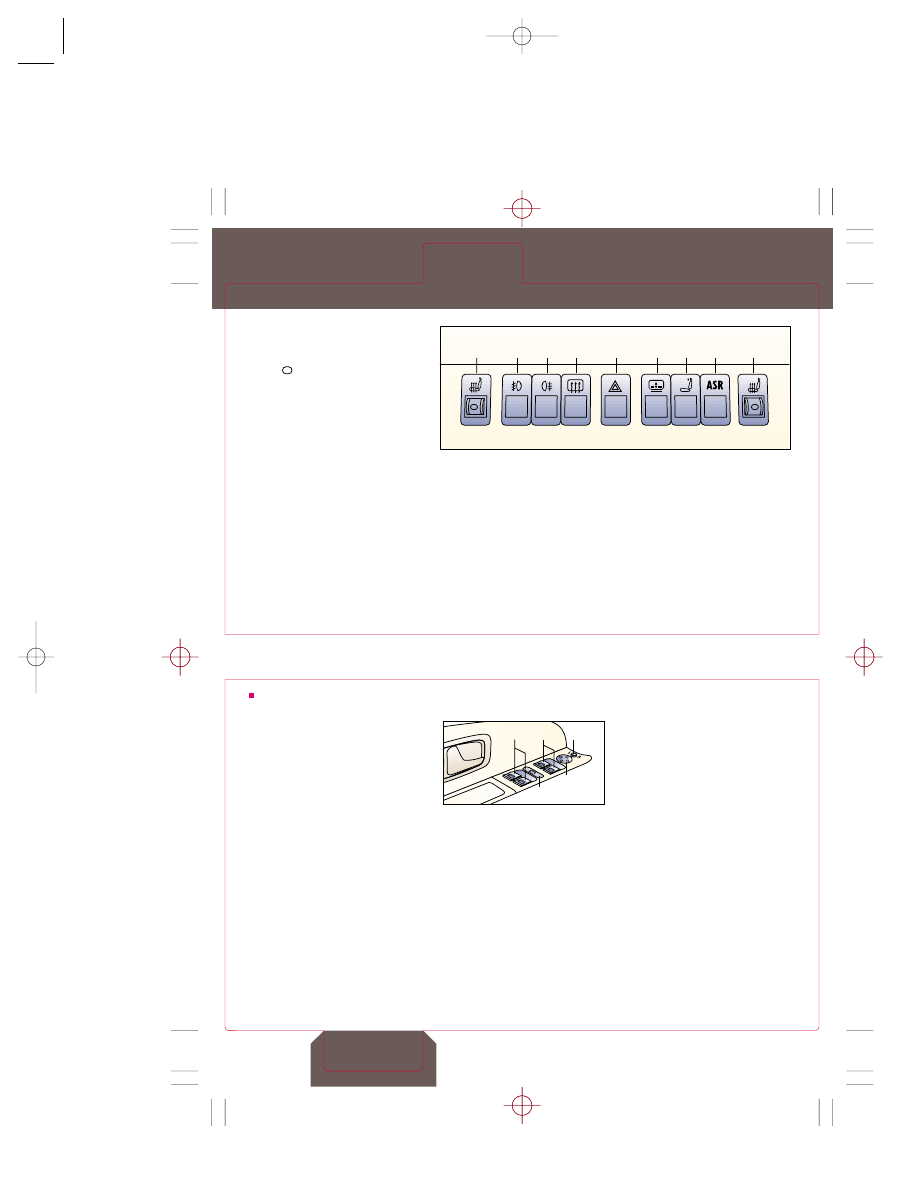
5. Center console switches:
Electrically heated seats*
Tip: Steering wheel
heating* automatically
on when driver’s seat
heating* turned on
Front fog lights
Rear fog light
Rear window defogger
Emergency flasher
Rear window sun blind*
Rear head restraints
retractor*
Anti-Slip Regulation (ASR)*,
see Center Console
6. Sound system,
see Sound Systems
7. Climate controls,
see Climate Controls
8. Ashtray/cigarette lighter
9. Selector lever,
see Automatic Transmission
10. Cup holders
11. Parking brake lever
To set: Pull up until strong
resistance is felt
To release: Press brake pedal,
pull handle up, press release
button and lower lever
12. Hood release
Pull to open hood partially
* Denotes features optional or unavailable
on some models
Driver’s
View
8665 CALCAR Audi A8 1/30/04 11:56 AM Page 2
Always check the Owner’s Manual for additional important details and safety information
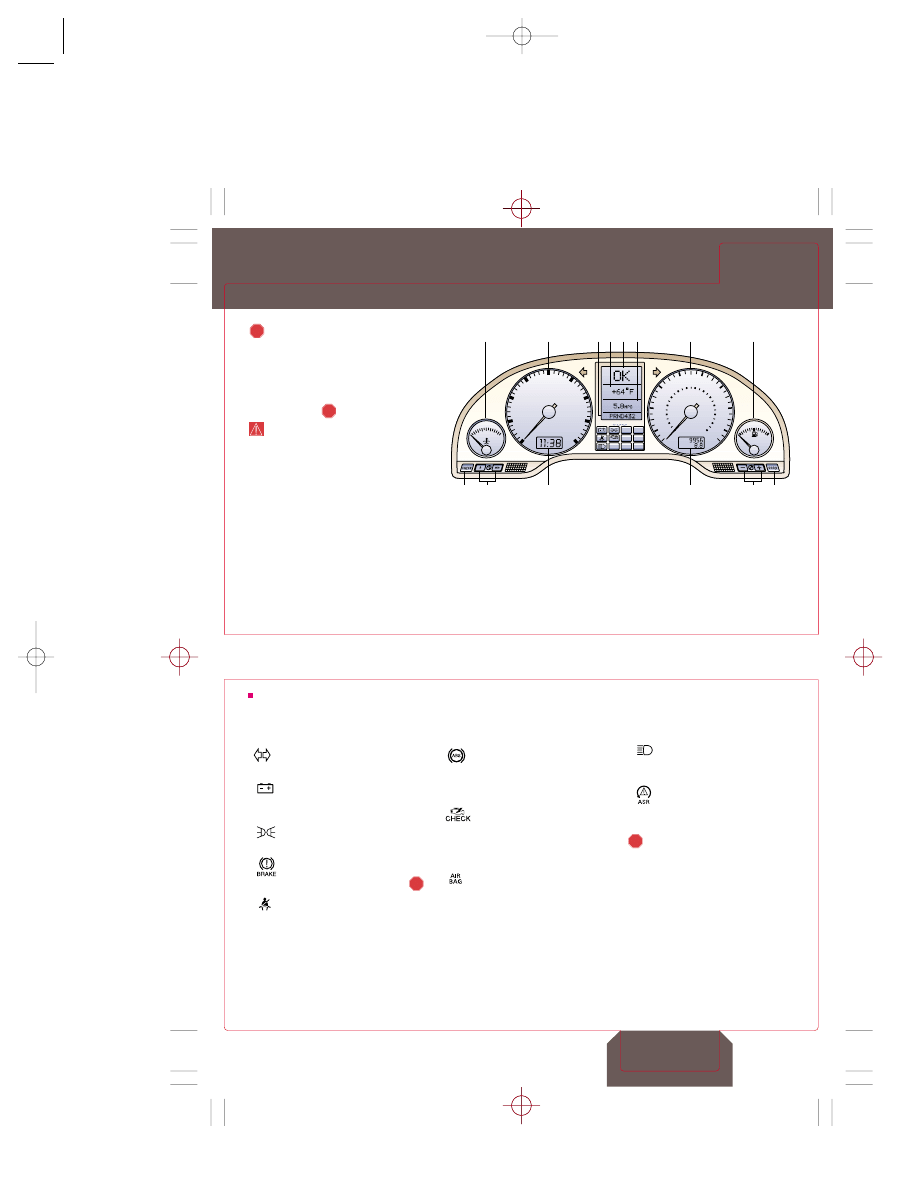
Instrument
Panel
Instrument Panel
Quick Tips
Audi A8
page 4
page 5
Stop car safely and turn off
engine; see Owner’s Manual
1. Coolant temperature gauge
Stop car if in the high zone and
coolant/temperature level warning
light on, check coolant level
when safe
WARNING: To reduce risk
of burn, never open hood
until engine has cooled
2. Tachometer
3. Automatic transmission/
Tiptronic
®
selector
lever position
4. Outside air temperature
5. Auto-Check System
6. Trip computer
7. Speedometer
8. Fuel gauge
23.8-gallon/90-litre tank
Tip: When refueling, hang
fuel filler cap on fuel filler
flap using notch on cap
9. Trip odometer reset
10. Instrument illumination
11. Odometer/trip odometer
12. Clock
13. Clock set buttons
14. Auto-Check button
1/min x 1000
C
H
4
80
60
40
20
160
140
120
100
3
5
2
6
1
7
0
8
MPH
km/h
BRAKE
ASR
CHECK
ABS
AIRBAG
E
F
UNLEADED
FUEL ONLY
260
220
180
140
100
miles
60
20
UNLEADED
FUEL ONLY
14
12
11
13
9
10
1
8
2
7
3 4 5 6
STOP
STOP
Turn signals/emergency
flasher
Generator
Battery discharging, dealer
inspection required
Side marker/headlights
Side marker or headlights on
Brake
Parking brake on/low fluid level
Safety belts
Always fasten safety belts
Anti-lock Brake System
ABS malfunction, normal brake
function only (no ABS), dealer
inspection required
Malfunction Indicator
(MIL)
Malfunction of emission control
system, dealer inspection required
Airbag
Airbag or belt tensioner
malfunction, dealer inspection
required as soon as possible
High beam
High beams or headlight
flash activated
Anti-Slip Regulation*,
see Performance
Stop car safely and
turn off engine; see
Owner’s Manual
WARNING/INDICATOR LIGHTS
STOP
STOP
* Denotes features optional or unavailable
on some models
Instrument
Panel
8665 CALCAR Audi A8 1/30/04 11:56 AM Page 3
Always check the Owner’s Manual for additional important details and safety information
Overhead
Switches
Auto-Check
System
Auto-Check System
Quick Tips
Audi A8
page 6
page 7
6
40
2
6
7
BRAKE
CHECK
ABS
AIRBAG
ASR
60
Coolant temperature
high/level low
Oil pressure low
Priority 2 (yellow symbols)
with 1 warning tone:
Brake light malfunction
Headlight/tail light
malfunction
Brake pads worn
Windshield washer fluid low
Fuel level low
Battery voltage high/low
Stores speed limit warning
Stores permanent speed
limit warning
2
1
STOP
STOP
Door(s) and/or rear lid
not closed
Tips: Radio station frequency
may be displayed when no
malfunctions exist
For multiple malfunctions,
symbols alternate at
2-second intervals
Auto-Check button
(Item 14 on Instrument Panel)
Press briefly while vehicle
stationary to sequence through
symbols as a performance check.
Briefly pressing when a priority
1 symbol is displayed provides
additional information.
Stop car safely and
turn off engine; see
Owner’s Manual
Auto-Check System
Monitors functions and components,
when key is turned on, and provides
audio and visual indications of
malfunctions to operator
Priority 1 (red symbols) with
3 warning tones:
STOP
3. Front reading lights
To turn on/off: Press
/
press again
To open: Rotate knob clockwise
for desired opening
To lower rear or close: Rotate
knob to
2. Dome light
= Always on
= Always off
= On with door open,
when door unlocked
or when key removed
from steering lock
Tip: Light stays on for
approximately 30 seconds;
turns off when ignition
turned on or vehicle locked;
turns off automatically after
about 4 minutes if car door
left open
1. Sunroof
To raise rear: Rotate knob
(1) counterclockwise for
desired tilt
1
3
2
3
4
Front
4. Rear reading lights
= Always on
= Always off
= On automatically with
front dome lights
8665 CALCAR Audi A8 1/30/04 11:56 AM Page 4
Control
Levers
Control Levers
Quick Tips
Audi A8
page 8
page 9
To return to preset speed (after
braking): Slide button to RES
To set speed: Accelerate to
desired speed, press SET (4)
To increase speed incrementally:
Slide 3 to RES and release
To decrease speed incrementally:
Press 4 and release
Tip: Incremental increase/
decrease speed changes
occur in 1 mph increments
WARNING: Use cruise
control only when traffic
and weather conditions
permit safe operation.
Failure to do so could result
in an accident.
D
D
F
E
3
1
2
4
C
B
A
2. Turn signal/headlight
dimmer switch lever
D. Turn signals right/left:
Move lever up/down
E. Headlight flasher: Pull
lever toward steering
wheel to point of resistance
and release
F. Alternate high/low beams:
Push lever forward/pull
lever to center position
Tip: Light switch must
be in position C to switch
between high/low beams
Cruise control
Cruise control on/off: Slide
button (3) to ON/OFF
To cancel: Tap brake pedal or
slide button to OFF
1. Exterior light switch
A = Lights off
B = All lights on, except
headlights
C = Headlights (only when
ignition ON) and all
other lights on
Windshield washers: Pull lever
back to (F) and hold; wipers and
washer work together
When lever released, washer stops
and wipers continue for about
4 seconds
If headlights are on, headlight
washers also operate
Trip computer
Displays trip information in
computer display
1. Function control switch
Press upper/lower edge of
rocker switch (1) to move in
forward/reverse order through:
Instantaneous fuel
consumption, miles to empty,
driving time, average fuel
consumption and average
driving speed
2. Reset button
To reset driving time, average
fuel consumption and average
driving speed: Press 2 and
hold for 2 seconds
To turn digital display on/off:
Press 2 briefly
Tip: Miles to empty
cannot be manually reset
Windshield wiper/
washer lever
Tip: Remove snow and ice
from windshield and ensure
wiper blades are not frozen
to glass before turning
wipers on
Intermittent wiping: Raise lever
to first detent (B)
To use up to four progressively
faster speeds: Move switch (3)
from left to right
Low speed: Raise lever to
second detent (C)
High speed: Raise lever to
third detent (D)
Brief wiping: Push lever
down to (E)
Tip: Wipes as long as lever
is held down
2
1
D
C
B
A
E
F
3
Always check the Owner’s Manual for additional important details and safety information
Control
Levers
8665 CALCAR Audi A8 1/30/04 11:56 AM Page 5
Always check the Owner’s Manual for additional important details and safety information
Center
Console
Center Console Switches
Quick Tips
Audi A8
page 10
page 11
4. Rear window defogger
Press on/off
Tip Rear window defogger
switches off automatically
after approximately 10
minutes
5. Emergency flasher
6. Rear window sun blind*
To raise/lower: Press/
press again
7. Rear head restraints
retractor*
Press to retract
8. Anti-Slip Regulation (ASR)*,
see Performance
1. Electrically heated seats*
To activate/deactivate: Turn
thumbwheel up from/down
to
; lit only when instrument
lights are on
Tip: Steering wheel
heating* automatically
on when driver’s seat
heating* turned on
2. Front fog lights
Press to activate/deactivate
Tip: Fog lights operational
only when low beams on
3. Rear fog light
Press to activate/deactivate
Tip: There is one rear fog
light; it is located on the
driver’s side
1
2 3 4
5
1
6 7 8
1
2
3
4
5
1
6
7
8
1. Power windows
(Switches located on
driver’s door)
All windows “Express” down
To open: Press front of
switch briefly
Only front windows
“Express” up
To close: Lift front of
switch briefly
To interrupt movement: Press
or lift front of switch again
To partially open/close any
window: Press/lift and hold
front of switch
2. Safety switch
Switch enables/disables rear
door window switches
To enable/disable:
Press/press again
Convenience close/
open feature
All windows and sunroof can
be closed/opened (windows only)
when locking/unlocking driver’s
or passenger’s door with key
To close/open (windows only):
Turn key to lock/unlock position
and hold until window/sunroof
travel is complete
Tip: Sunroof cannot be
opened while unlocking car
Tip: Releasing key will stop
window travel
Tip: A disconnected battery
will deactivate convenience
close/open feature; see
Owner’s Manual for
reprogramming
Outside mirror control
To adjust: Rotate adjuster knob (3)
to desired mirror (L, left/R, right)
and press control switch (4)
forward/backward or right/left
Tips: Outside mirrors have
automatic heaters
With adjuster knob at R
and gear selector lever in
reverse, right outside mirror
tilts slightly downward
Mirror position is stored,
see Seats
Inside and outside mirrors
dim electronically*
2
1
1
3
4
* Denotes features optional or unavailable
on some models
Power
Windows/
Mirrors
8665 CALCAR Audi A8 1/30/04 11:56 AM Page 6
Always check the Owner’s Manual for additional important details and safety information
Climate
Controls
Memory
Controls
Climate Controls
Quick Tips
Audi A8
page 12
page 13
AUTO
ECON
REST
AUTO
A
1
1
3
4
5
3
2
2
10 9
8
7
6
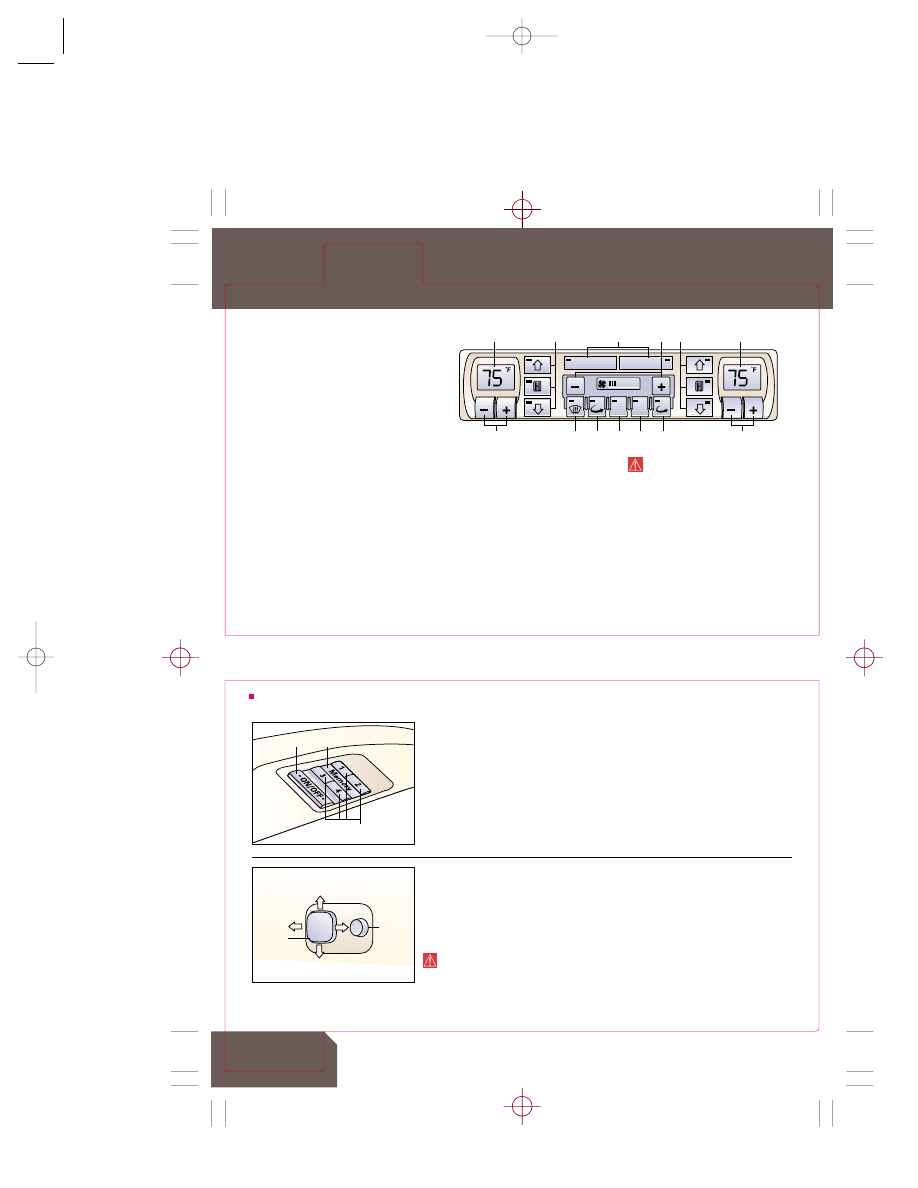
1. Selected temperature
display
2. Driver/passenger
temperature selection
75ºF recommended for all-year
operation; select temperature
then press AUTO button
With this setting, you attain
maximum comfort in the least
amount of time
3. Air distribution
4. AUTO
5. Fan speed
6. Automatic recirculation
mode
7. REST
Press with key removed or in OFF
position to circulate coolant after
warmed-up engine has been shut
down; shuts off after 10 minutes;
can be repeated up to 6 times
8. ECON
Press to turn air conditioner
compressor on/off; use to
save fuel or when only fresh,
uncooled air is required
9. Air recirculation
Tip: Air recirculation
functions only with air
conditioning turned on
WARNING: Do not use the
air recirculation over long
periods of time because
you will not receive any
fresh outside air
10. Defrost
Memory
(Switches located on driver’s
door) Stores up to 4 different
settings for driver’s seat, safety
belt height, both outside mirrors
and steering wheel
To enable/disable: Press ON/
OFF button (1)
To store settings: Adjust all
storable items, press and hold
memory button (2) and press
desired memory location button
(1 through 4) (3)
To recall settings: With door
open, press and release desired
location button (3); with door
closed longer than 30 seconds,
press and hold desired location
button (3)
B
B
A
A
4
5
3
2
1
4. Steering wheel adjustment
(Switches located on left side
of steering column)
A = Lengthen/shorten
(telescope) the column
B = Raise/lower (tilt wheel)
WARNING: Adjust the
steering wheel only when
the vehicle is stationary
5. Convenient entry function
When on, moves wheel
forward and up for easy entry
To turn on/off: Press button 2
(button depressed)/press again
Tip: To store or recall
settings, ON/OFF button
(1) must be depressed
For additional information,
see Owner’s Manual
8665 CALCAR Audi A8 1/30/04 11:56 AM Page 7
Always check the Owner’s Manual for additional important details and safety information
Seat
Controls
Seat Controls
Quick Tips
Audi A8
page 14
page 15
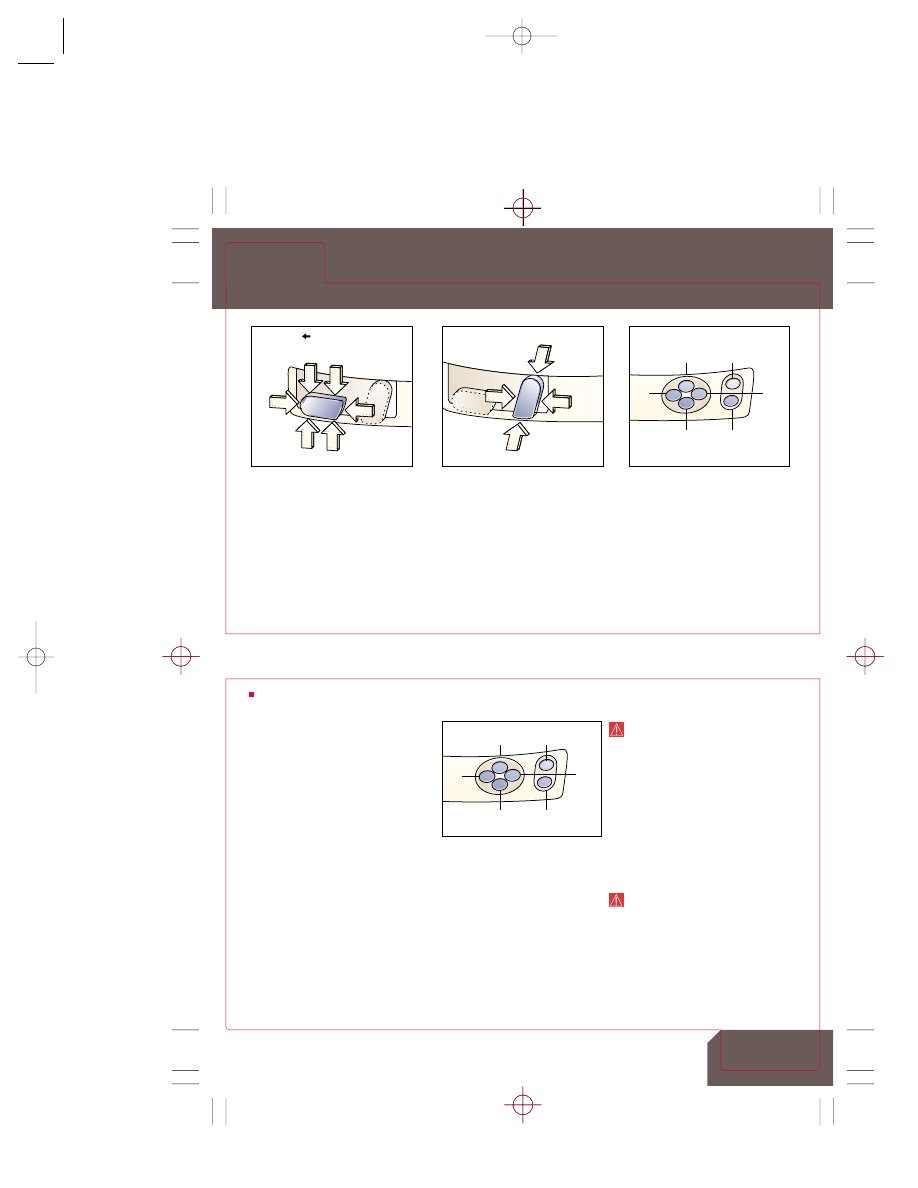
Seatback/head restraint
adjustment
D = Seatback upright/recline
E = Head restraint up/down
Lumbar support
Press F/G = more/less lumbar
Press H/I = higher/lower lumbar
Safety belt height adjustment
Press J/K = belt positioned
higher/lower
B
C
C
B
A
A
Front
H
J
I
K
F
G
Power front seats
(Switches located on outboard
side of front seats)
Seat adjustment
A = Fore/aft movement
B = Raise/lower front of seat
C = Raise/lower rear of seat
B and C together = Raise/lower
whole seat
E
E
D
D
Power rear seats*
(Switches located on outboard
corners of rear seats)
Lumbar support
Press L/M = more/less lumbar
Press N/O = higher/lower lumbar
Head restraint adjustment
Press P/Q = head restraint
up/down
N
P
O
Q
L
M
Driver’s Seat
Adjust seat in forward/backward
direction so that pedals can be
easily pushed all the way with
knees slightly bent. Adjust
seatback so that when you sit with
your back against the seatback,
you can hold the steering wheel at
the 9 o’clock and 3 o’clock position
with the elbows slightly bent.
Tip: Proper seating
position is important for
your safety and optimum
airbag performance
Front passenger’s seat
Adjust backrest to upright
position, never reclined
With feet comfortable on angled
floor in front of passenger’s
seat, adjust seat as far as possible
to the rear
WARNINGS: Front seat
passengers must never ride
in a moving vehicle with the
seatback reclined
The risk of personal injury
increases with increasing
rearward angle of the seatback
Safety belts only offer
protection when the seatback
is upright and belts are
properly positioned on
the body
WARNING: Do not recall
seat position from
memory while the vehicle
is in motion
* Denotes features optional or unavailable
on some models
Seats
8665 CALCAR Audi A8 1/30/04 11:56 AM Page 8
Always check the Owner’s Manual for additional important details and safety information
Safety
Safety
Quick Tips
Audi A8
page 16
page 17
WARNINGS: Always fasten
safety belts before driving off
Always make sure
passengers are properly
restrained
Children 12 years and under
must sit in rear seat and be
properly restrained as
indicated in Owner’s Manual
Airbag is supplemental
and does not replace safety
belt use
WARNING: Never install
rearward-facing child seats or
infant carriers on the front
passenger seat. A child will
be seriously injured when the
passenger airbag inflates.
Cargo
Whenever possible, store items
and luggage in luggage
compartment.
If necessary to stow items in
passenger compartment, be
sure they cannot fly forward in
an accident or sudden
maneuver and injure occupants.
WARNING: Thoroughly
review the A8 Owner’s
Manual for warnings
and other important
information about
proper restraint use and
reducing the risk of injury
in accidents. Failure to
properly use restraint
systems can cause serious
personal injury.
Child safety restraint system
See your Owner’s Manual for
details regarding child safety
restraint systems
Safety belts with locking
retractor
Emergency locking retractor on all
outboard safety belts: Belts lock
only on hard braking, cornering,
climbing/descending steep hills or
on impact or when belt webbing is
rapidly pulled
Convertible locking retractor
for child restraint use
(Front passenger and rear
outboard belts only)
Convertible feature of locking
retractor must be activated when
installing child safety seat.
Slowly pull belt fully out of the
retractor. Insert the belt tongue
into the buckle for that seating
position. Pull on it to check.
Guide the remaining portion of
the belt back into the retractor.
You will hear a clicking noise
which indicates that the feature
has been activated. Press child
seat firmly into seat cushion and
let belt tighten to hold child
restraint securely against seat.
Always follow instructions for the
child restraint being installed.
To disengage: Unbuckle belt and
allow webbing to retract fully.
For complete details,
see Owner’s Manual
Front floor mat fasteners
Floor mats used in your vehicle
must be attached to fasteners (1)
located in the footwells of the
front seats. This will prevent the
floor mats from interfering with
the safe operation of your vehicle.
1
WARNING: Do not install
additional floor mats on
top of existing floor mats
because you will not be
able to fasten them down
Safety/
Floor Mats
8665 CALCAR Audi A8 1/30/04 11:56 AM Page 9
Always check the Owner’s Manual for additional important details and safety information
Sound
Systems
Sound Systems
Quick Tips
Audi A8
page 18
page 19
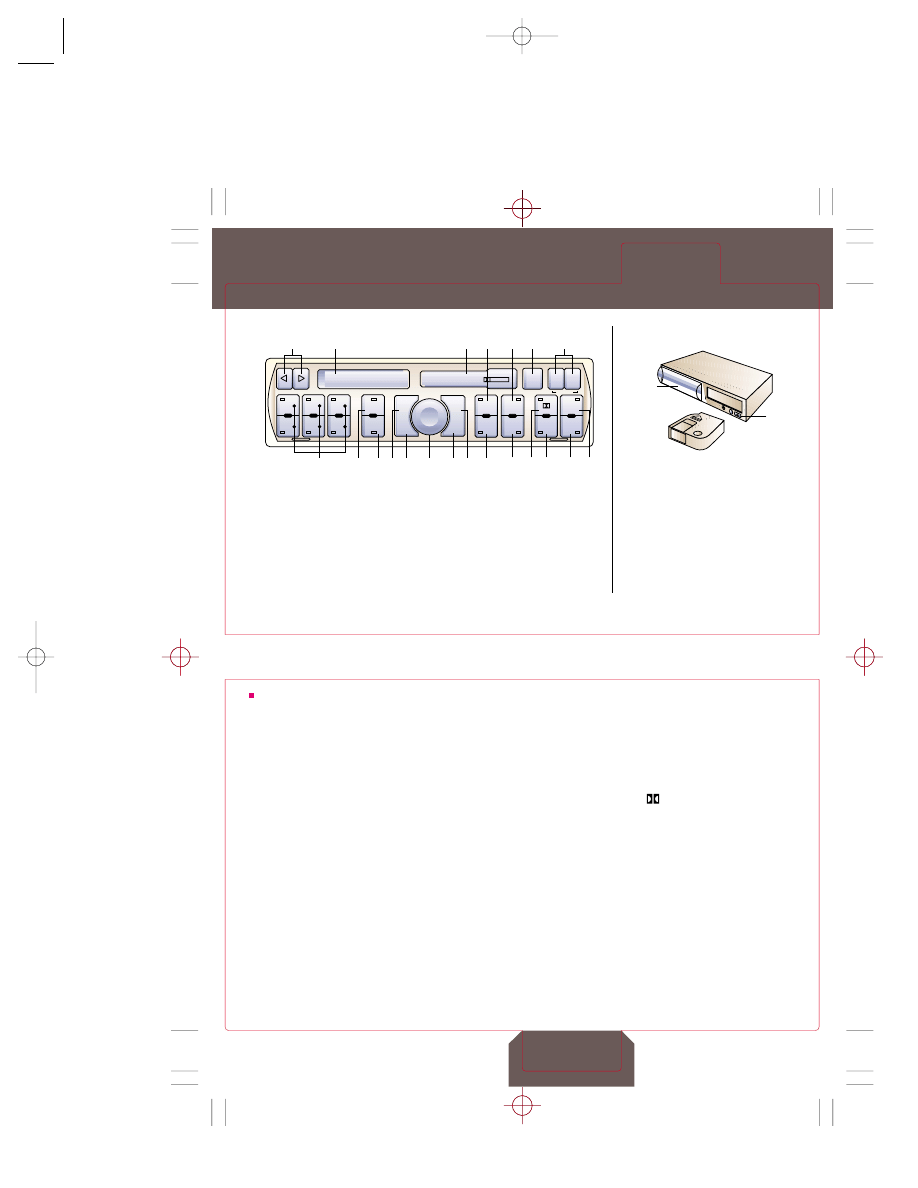
1. Station selector buttons
For 12 FM and 6 AM stations
CD selector buttons
2. AS button (Auto Store)
3. SCAN button
4. FAD button
(fader control)
5. BAL button
(balance control)
6. On/off switch and
volume control
Note: The radio features an
anti-theft coding system. If no
sound comes from the radio
when it is switched on and the
word SAFE appears in the
display, this means the radio
is locked electronically. See
instructions in Sound
System booklet.
7. BASS button
(bass control)
8. TREB button
(treble control)
9. AM button
AM band
10. FM1 button
FM band
11. FM2 button
FM band
12. RDS button
Press briefly to switch RDS
(Radio Data System) off or on
13. Station search/manual
tuning buttons
14. Display
15. Cassette slot
16. REV button
17. FF and FR buttons
Cassette eject
Press and hold both buttons
for longer than 2 seconds
CD track selector buttons
18.
Dolby
®
button
Press this button when
playing cassettes which have
been recorded with Dolby
®
noise reduction
19. TPS button
Skip to next music title
on cassette
20. MODE button
Mode selector: radio/
cassette/CD
21. RAND button
Random play for CD;
tracks on CD are played
in random sequence
Compact disc changer*
Located in trunk
Slide door (A) on disc changer to
the right, press eject button (B);
disc magazine ejects
Load up to 6 compact discs into
slots in magazine, point arrow
on magazine into changer, insert
magazine, slide door shut
B
A
Tip: Your radio is equipped with a built-in
anti-theft system which is independent of vehicle’s
anti-theft system
Refer to Sound System booklet
for information
FR
FF
SEEK
CODE
EJECT
Audi concert
DOLBY
1
2
3
4
5
6
AS
SCAN
FM1
FM2
AM
RDS
TPS
RAND
MODE
FAD
BAL
TREB
BASS
REV
1
20 21
19
12 18
9
7 8
6
5
14
15 10 11 16
4
3
2
13
17
*Denotes features optional or unavailable on some models
Sound
Systems
8665 CALCAR Audi A8 1/30/04 11:56 AM Page 10
Always check the Owner’s Manual for additional important details and safety information
Locks/
Keys
Locks/Keys
Quick Tips
Audi A8
page 20
page 21
Folding master keys with
remote control
Operates all locks
To fold key out: Press button (1)
Valet key
Operates only the door and
steering/ignition locks
Emergency key
Operates all locks, keep in
wallet or safe place
Tag Gives key number; store
in a safe place
Remote operation
The vehicle doors, rear lid and fuel
filler flap can be locked/unlocked
using remote control
2. Lock
Press (2) for about 1 second,
turn signals blink once
3. Rear lid
Press (3) for at least one
second to unlock rear lid
4. Unlock
Press (4) once to unlock
driver’s door and fuel filler
flap; press twice to unlock all
doors, fuel filler flap and rear
lid, turn signals blink twice
Tips: Unlocking activates
seat and mirror memory,
see Memory Controls
If door or rear lid is
not opened within
60 seconds, vehicle
automatically relocks
5. Panic
Press (5) for at least one
second to activate horn and
flashing lights
To cancel: Press again
WARNING: Do not leave
children inside the vehicle
unsupervised. If the
locking knobs of all doors
are depressed, the vehicle
will be locked. In an
emergency it would be
impossible to open the
doors from outside
without the key.
5
1
2
3
4
Child safety door locks
Prevents children in back seat
from accidentally opening doors
Located at edge of rear doors
A (lever up) = Lock engaged;
door opens from outside only
B (lever down) = Lock
disengaged; door opens from
inside or outside
Power locking system
To lock/unlock entire
vehicle (doors, rear lid
and fuel filler flap) from
inside: Press lower/upper
part of switch (1)
To lock/unlock entire vehicle
from outside: Use remote or
master key in driver’s or
passenger’s door or rear lid locks
Manual door locks
To lock each door: Press knob
on window sill
To unlock front doors: Pull
inside door handle once
To open front doors: Pull
handle again
Tip: Rear door(s) will not
open with child safety door
lock(s) engaged
Anti-theft
Anti-theft system automatically
armed/disarmed whenever car’s
doors or rear lid locked/unlocked
by key or remote; flashing light
in rear fog light switch (located
on center console) indicates
system armed
Interior movement sensors
Press switch located on
driver’s door pillar to deactivate
movement sensors if, for example,
a pet left in vehicle could
accidentally set off anti-theft
alarm; indicator light in rear fog
light switch comes on for about
3 seconds to verify sensors
deactivated; sensors reactivated
when vehicle unlocked and
locked again
B
A
1
Locks/
Keys
8665 CALCAR Audi A8 1/30/04 11:56 AM Page 11
Always check the Owner’s Manual for additional important details and safety information
Automatic
Transmission
Automatic Transmission
Quick Tips
Audi A8
page 22
page 23
Selector lever locking system
Key is removable from ignition
lock only with the lever in P
position; lever can be moved from
P or N only with ignition lock on,
brake pedal depressed and button
(A) on lever pressed
Tiptronic
®
To engage: Shift into Drive (D),
push lever to right into secondary
gate; move lever forward to (+)
position to engage next higher
gear, move lever back to (–)
position to engage next
lower gear.
Tip: Ignition key cannot
be removed from ignition
unless selector lever is in
PARK (P)
2
3
4
D
N
R
P
+
A
1. Spare tire
2. Jack and tools
3. Battery
4. Emergency fuel filler
flap release
5. Fuses
6. Emergency warning
triangle
Tip: For access to spare
wheel, lift floor panel at
plastic handle (8) and
engage handle in luggage
compartment seal
7. Compact disc changer*
*Denotes features optional or unavailable
on some models
Luggage compartment lock
0. Neutral
Works with
power locks;
locks luggage
compartment,
all doors and fuel filler flap
1. Locking
2. “Valet” locking
Remains locked
Tip: In the “valet”
position, the rear lid
can only be unlocked
with the master key
3. Unlocking
Turn once to open rear lid,
twice to open all locks
Remote rear lid release
To unlock rear lid: Open driver’s
door, press switch in door pillar
8
6
1
4
5
3
2
7
3
1
2
0
Luggage
Compartment
8665 CALCAR Audi A8 1/30/04 11:56 AM Page 12

Always check the Owner’s Manual for additional important details and safety information
Performance
Performance
Quick Tips
Audi A8
page 24
page 25
Proportions power from side to
side by applying the appropriate
amount of braking to the wheel
where slippage occurs
Does not require any special
driver action
Anti-Slip Regulation (ASR)*
On vehicles with front-wheel
drive, ASR helps prevent front
wheels from spinning when
vehicle is accelerated by
reducing engine power directed
to these wheels
ASR warning light flashes when
ASR is activated
System operates in conjunction
with ABS across entire
speed range
Anti-lock Braking
System (ABS)
Increases steering control by
preventing wheel lockup in
inclement or hazardous conditions
To engage, simply apply steady,
even pressure to the brake pedal
Tip: You may feel a slight
pulsation from the pedal,
or hear a mechanical
noise; this alerts the driver
that ABS is working and
vehicle speed must be
adapted to existing road
and traffic conditions
Electronic Differential
Locking (EDL) System
Works with ABS to detect
wheel slippage
If a fault occurs in ABS,
ASR is also deactivated
Tip: ASR is standard
on front-wheel drive
vehicles only
quattro All-Wheel-Drive
System*
Distributes engine power
automatically to all four wheels
for optimum efficiency in all
driving conditions
Tip: To avoid damage to
latch mechanism, do not
pull up on handle
2. Windshield/headlight
washer container
Fill with windshield washer fluid
3. Engine oil filler cap
See Owner’s Manual for
recommended oil
4. Brake fluid reservoir
Fill only with DOT 4 brake
fluid; do not overfill
5. Engine oil dipstick
Check with engine off and at
normal temperature; level
between MIN and MAX marks;
do not fill above MAX mark
6. Coolant expansion tank
Level between MIN and MAX
when cold; use G 12 A8D
coolant only
7. Power steering reservoir
Check with engine off and
at normal temperature; level
between MIN and MAX
on dipstick attached to cap;
see Owner’s Manual for
recommended fluid
Tips: Transmission does
not have a dipstick; only
an authorized Audi dealer
can properly maintain
transmission
See fuel filler flap
for fuel requirements
1
2
3 4 5 6 7
WARNING: Before you check
anything under the hood,
turn off the engine and let it
cool down. Failure to do so
could result in injury.
1. Hood latch
Pull inside hood release lever;
handle (1) will extend from grill;
pull handle completely out of
radiator grill and pull up on hood
3.7/4.2-litre V8
* Denotes features optional or unavailable
on some models
8665 CALCAR Audi A8 1/30/04 11:56 AM Page 13
Wyszukiwarka
Podobne podstrony:
Instrukcja obslugi MERCEDES E W124 ENG up by dunaj2
Instrukcja obslugi MERCEDES E W124 ENG up by dunaj2
Audi A8 Quick Tips (MINI Instrukcja) Audi A8 ENG up by dunaj2
Instrukcja obslugi AUDI A3 I 8L PL up by dunaj2
Instrukcja obslugi AUDI A6 C5 PL up by dunaj2
Instrukcja obslugi AUDI A6 2007 PL up by dunaj2
Instrukcja obslugi AUDI A4 B7 PL up by dunaj2
Instrukcja obslugi AUDI A4 B6 PL up by dunaj2
Instrukcja obslugi AUDI A3 I 8L PL up by dunaj2
Instrukcja obslugi AUDI A4 B7 PL up by dunaj2
Instrukcja obslugi AUDI A6 C5 PL up by dunaj2
Instrukcja obslugi AUDI A4 B6 PL up by dunaj2
Instrukcja obslugi AUDI A3 I 8L PL up by dunaj2
Instrukcja obslugi AUDI A6 2007 PL up by dunaj2
Instrukcja obslugi PEUGEOT 508 PL up by dunaj2
Instrukcja obslugi MERCEDES VARIO PL up by dunaj2
Instrukcja obslugi VW T4 PL up by dunaj2
Instrukcja Obslugi URSUS C330 PL up by dunaj2
Instrukcja Obslugi URSUS C330 PL up by dunaj2
więcej podobnych podstron