Ver. 1.2 jcs 23-NOV-2001
How To
Play Against
Stronger Players
Vol. 2: Illustrative Teaching Games
SAKAI Michiharu
Professional 8-Dan
English Language
Go Super Book
2001 American Go Association
All rights reserved.
Reproduction in whole or part is forbidden without explicit written permission.
Original Japanese language edition published as Go Super Book No. 7,
first printing Showa 44 (1969), copyright Nihon Ki-in.
Deep thanks to the Nihon Ki-in for granting permission to translate and publish this book for the benefit of English speaking Go players.
Printed in USA
First Distribution November, 2001
Translation Steven Bretherick
Editing and Layout John C. Stephenson
Proofreaders Andreas Balser, John Pinkerton
For general information about American Go Association activities, visit
www.usgo.org
For obtaining this book on-line, visit the Wings Across Calm Water Go Club website at
www.wingsgoclub.org
A single copy of this book may be downloaded for personal use.
Reposting to the Internet, retransmission, selling or distributing is expressly prohibited without explicit written permission.

Editor’s Note
This is the second part of the original book. In the source, both of the English volumes were bound in a single Japanese volume.

Page 1
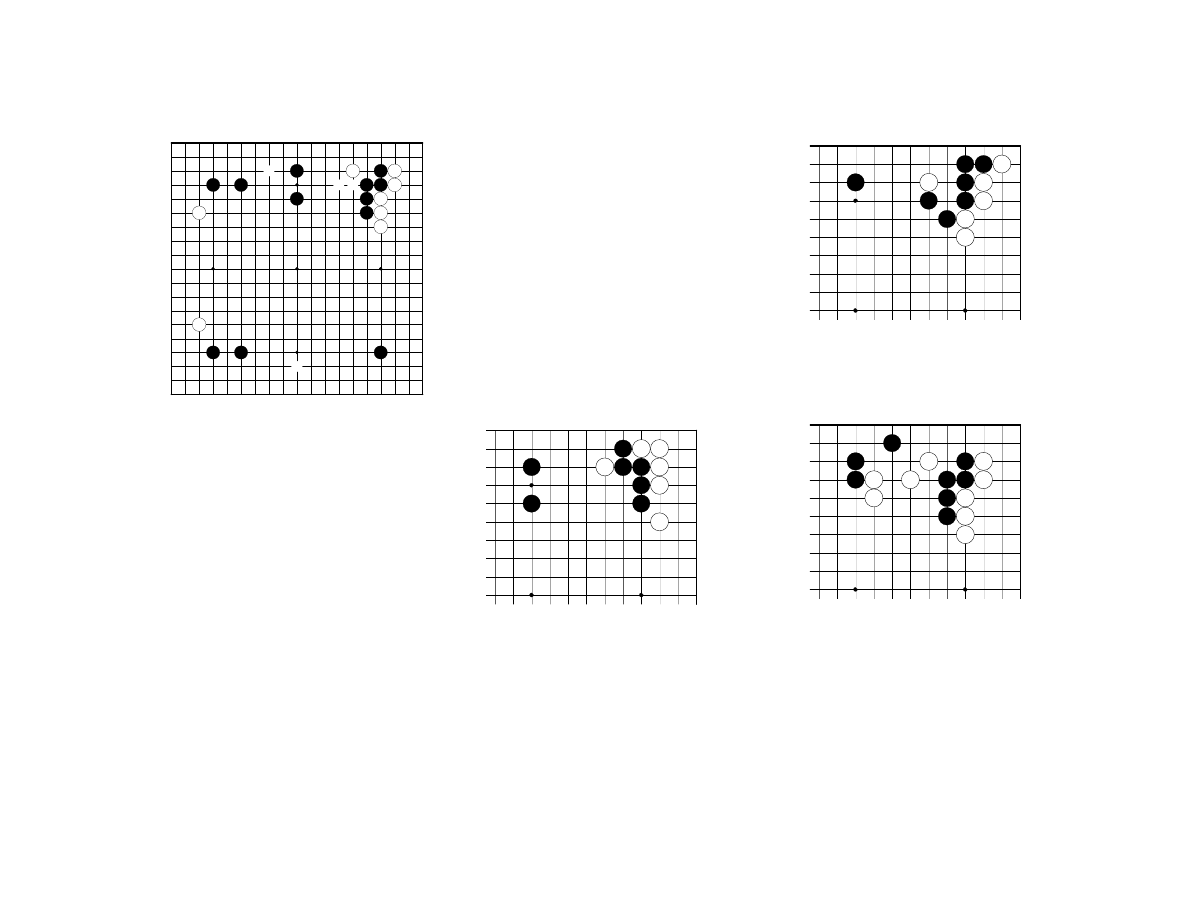
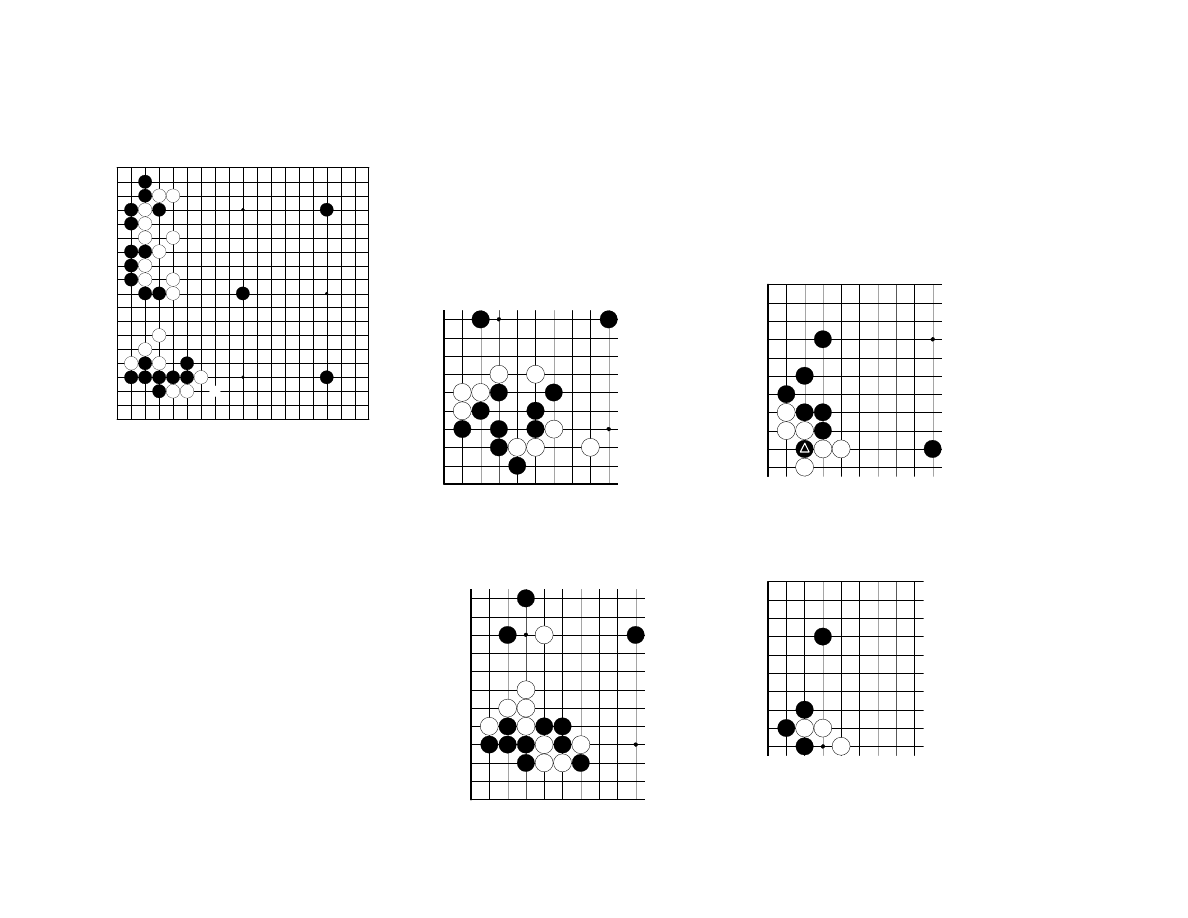
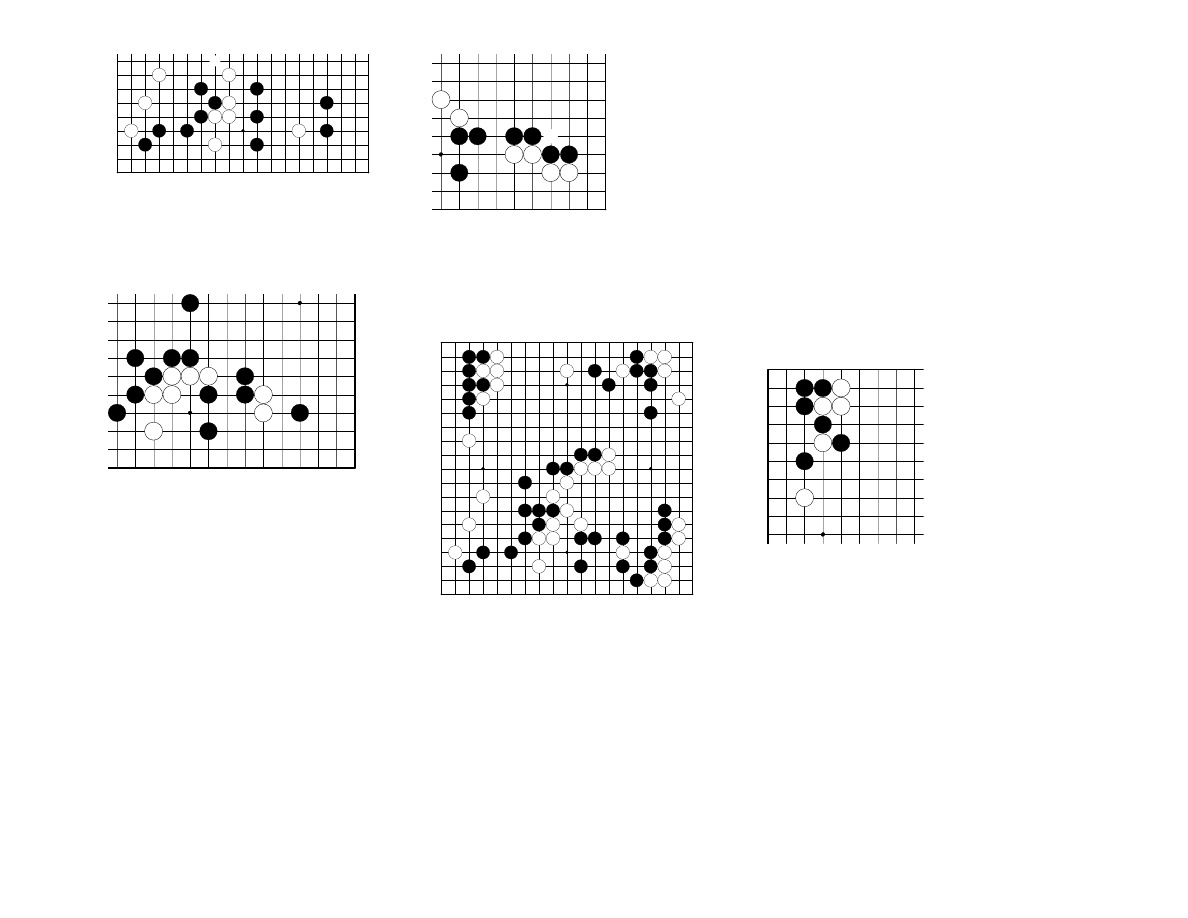
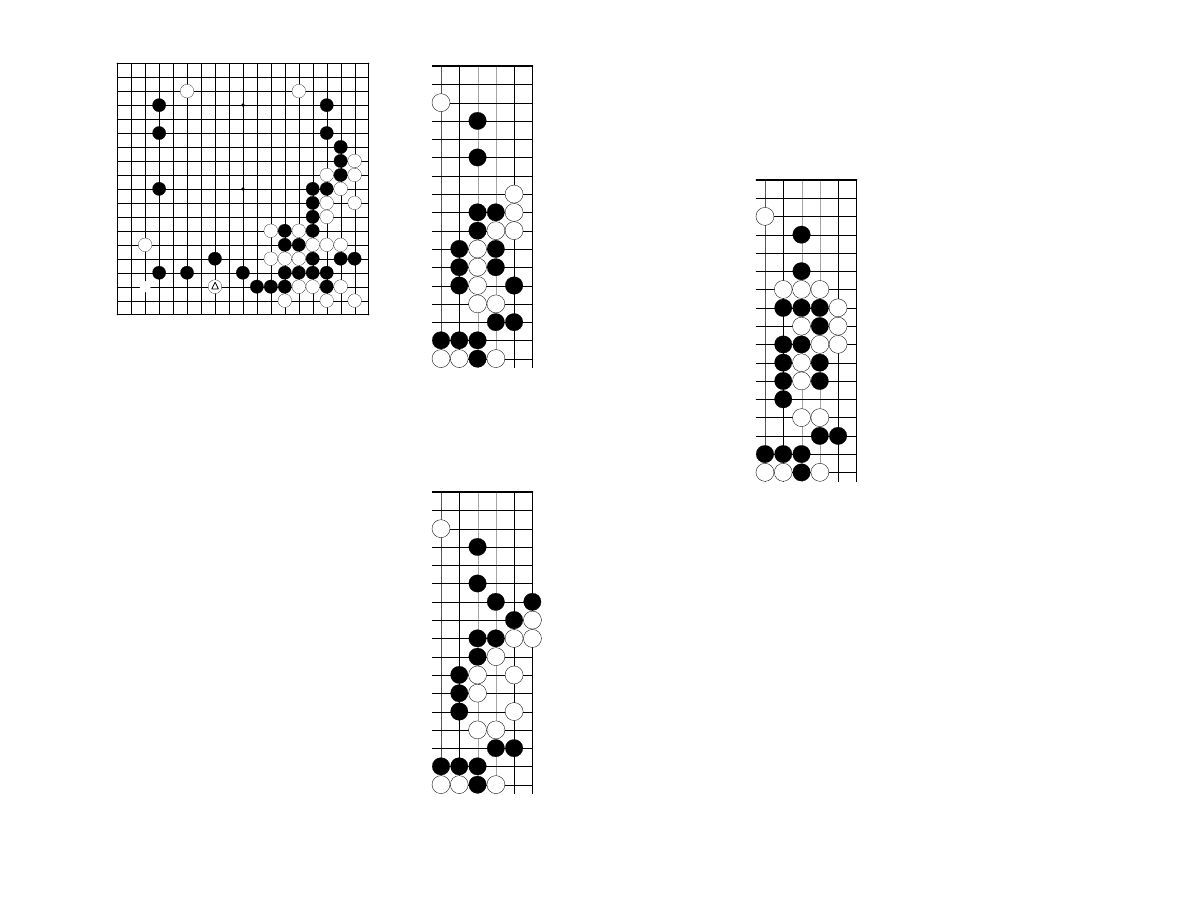
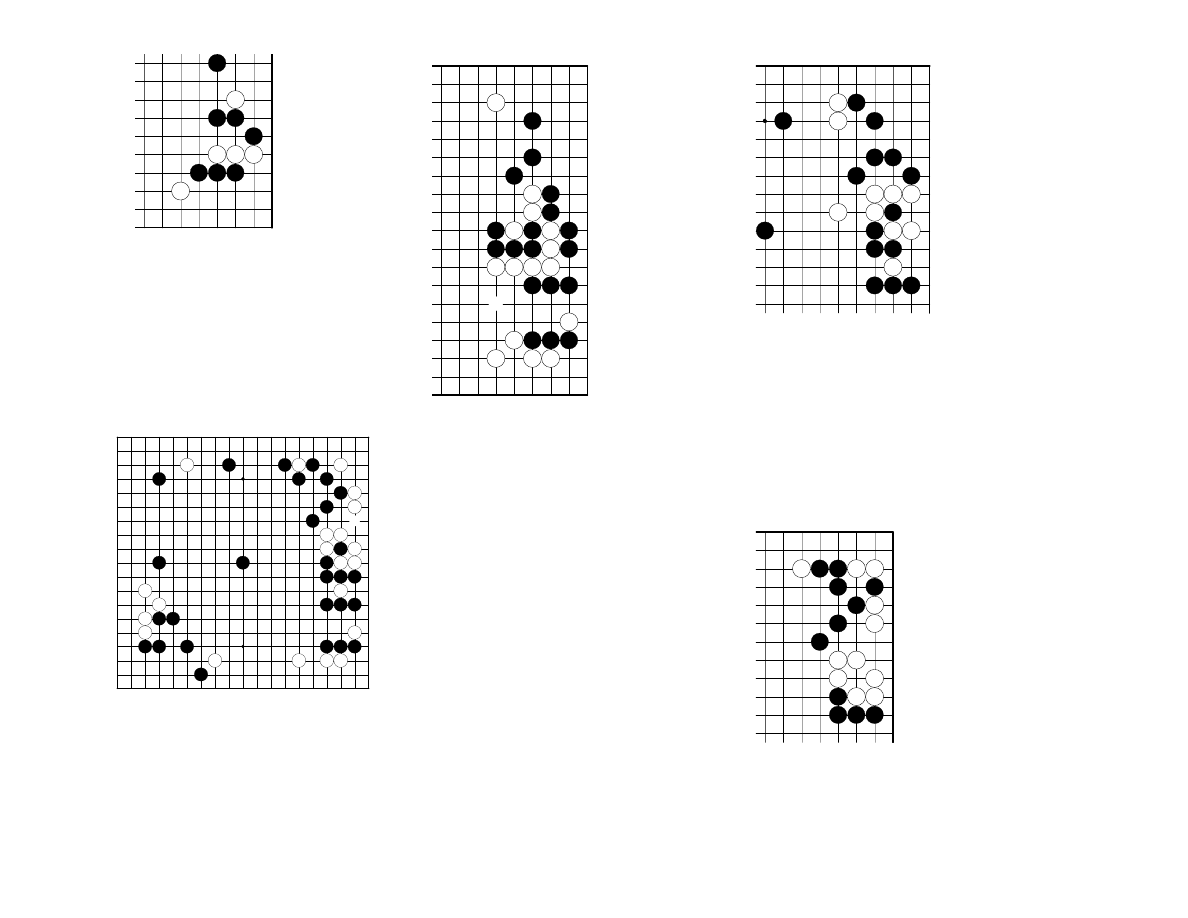
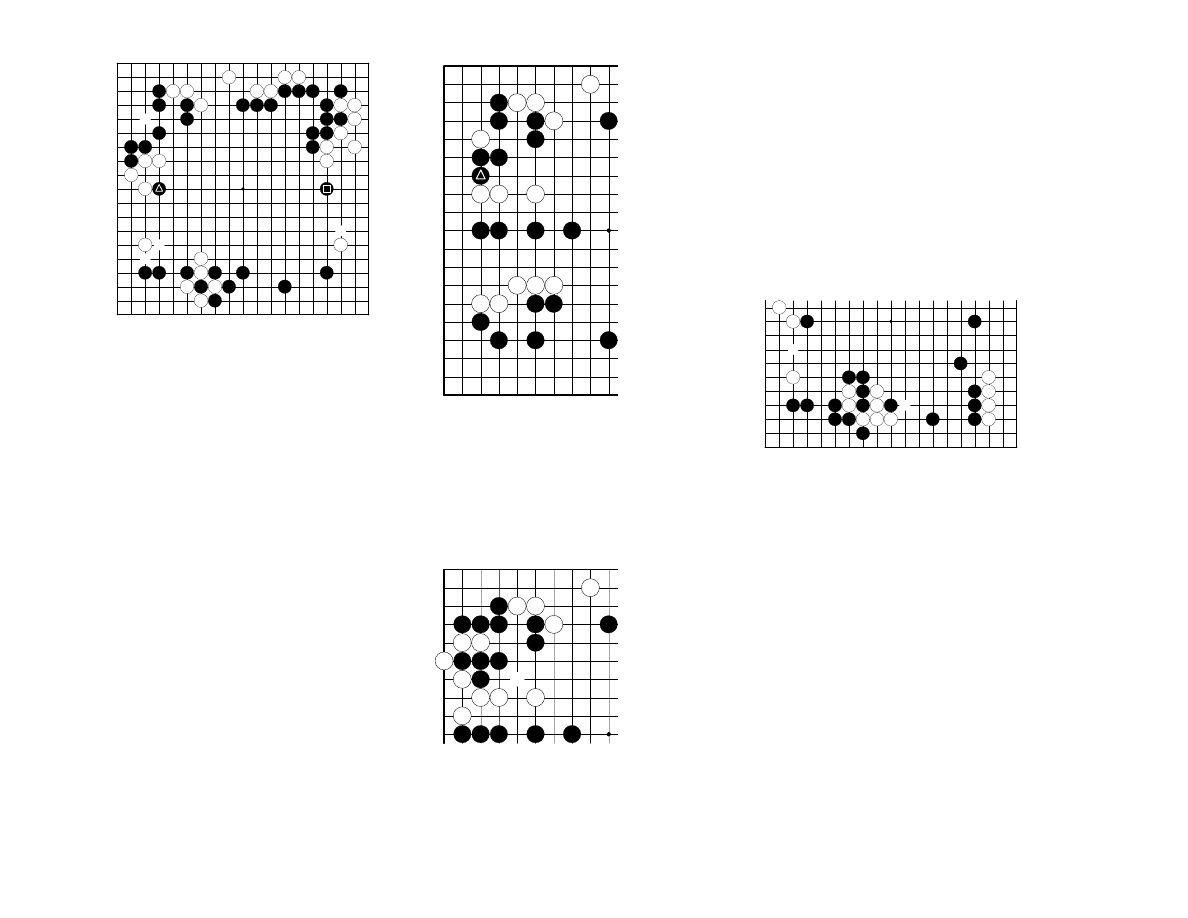
4 S T O N E H A N D I C A P G A M E ( 1 )
F R O M A T E A C H I N G G A M E A G A I N S T N , 4 - D A N
3
1
4
2
a
6
16
d
c
5
b
14
8
12
10
13
7
15
9
11
Figure 1 (moves 1—16)
A positive strategy
In a 4-stone handicap game, Black
can’t just follow the pace that White
dictates. Black needs to demonstrate a
certain amount of initiative.
From this standpoint, Mr. N’s move
at 6 is very good. Of course, defending
with 7 is also possible, but then White
will approach the corner with a move
like a.
Instead of the double approach at 7
White could play like Diagram 1. White
plays 7 in Figure 1 to give Black an
opportunity to play inaccurately.
After the double approach, Black
has a choice between the diagonal move
at 8 and the attachment at 12. Attaching
at b would be bad because it just
strengthens White’s weak stone.
Blocking at 10 is the correct way to
think. If Black blocks at 11 instead,
White crosses over with 10 and the
rationale behind Black’s pincer at 6
disappears.
However, pushing at 12 was not
correct. Black is forced to connect with
the empty triangle at 14, which is very
painful. See Diagram 2 for the proper
sequence.
When White extends to 15, jumping
to 16 is the proper move. Instead of 16,
rushing to capture the White stone with
c is playing on too small a scale.
On the other hand, if Black omits 16
and turns to take the big point at d, then
White has the rebuff in Diagram 3.
10
6
8
5
2
4
7
1
3
9
Diagram 1
White could enter the corner at the
3-3 point. Then Black can play the
sequence from 2 through the jump to 10,
yielding a good shape. This is a simple
sequence that’s easy to play for Black.
3
5
2
1
4
Diagram 2
The hane at 1 through connecting at
5 is standard, producing the proper
shape.
2
1
3
4
5
Diagram 3
White moves his stone beginning
with the shoulder hit at 1, and it is
Black’s 5 stones that come under attack.
Page 2
31
33
29
32
27
28
30
36
35
20
18
24
19
26
22
17
b
a
c
21
39
23
34
25
37
38
40
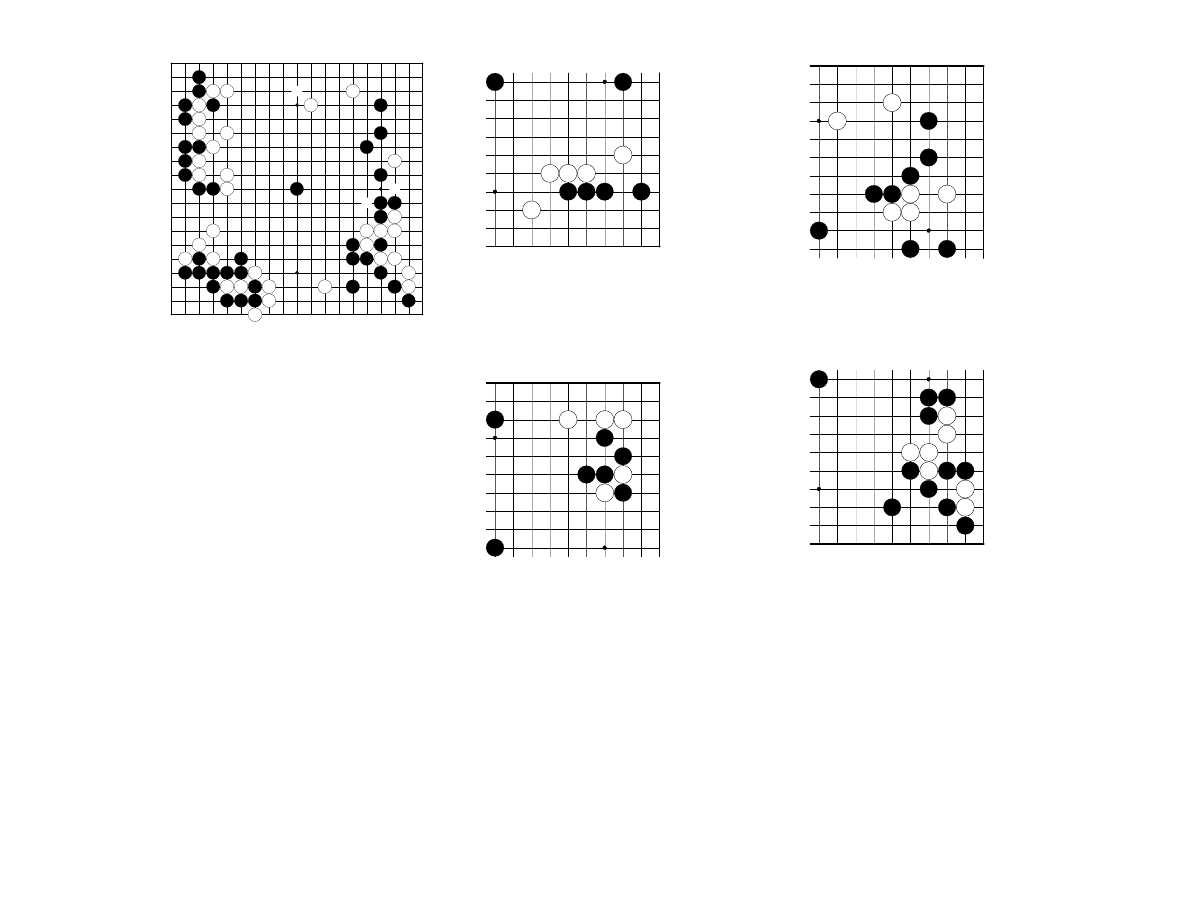
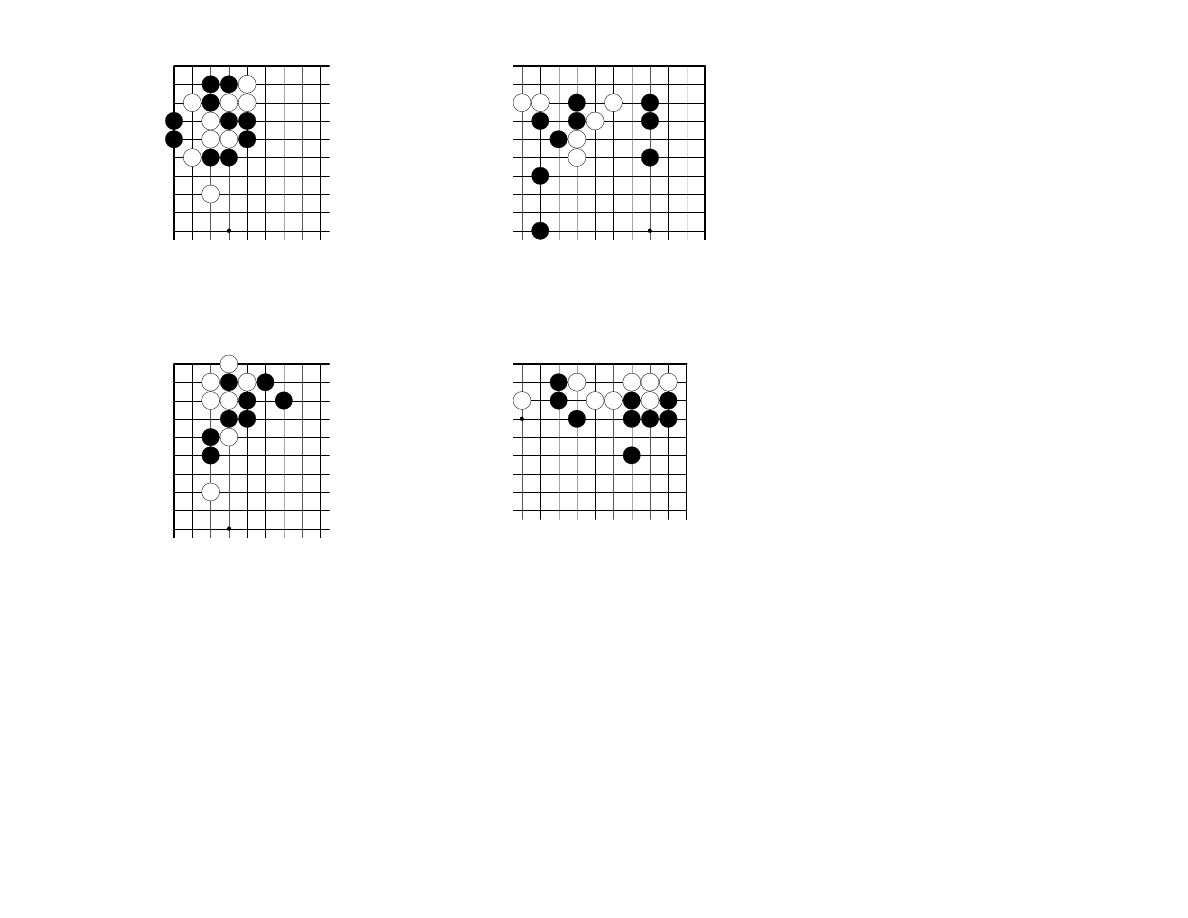
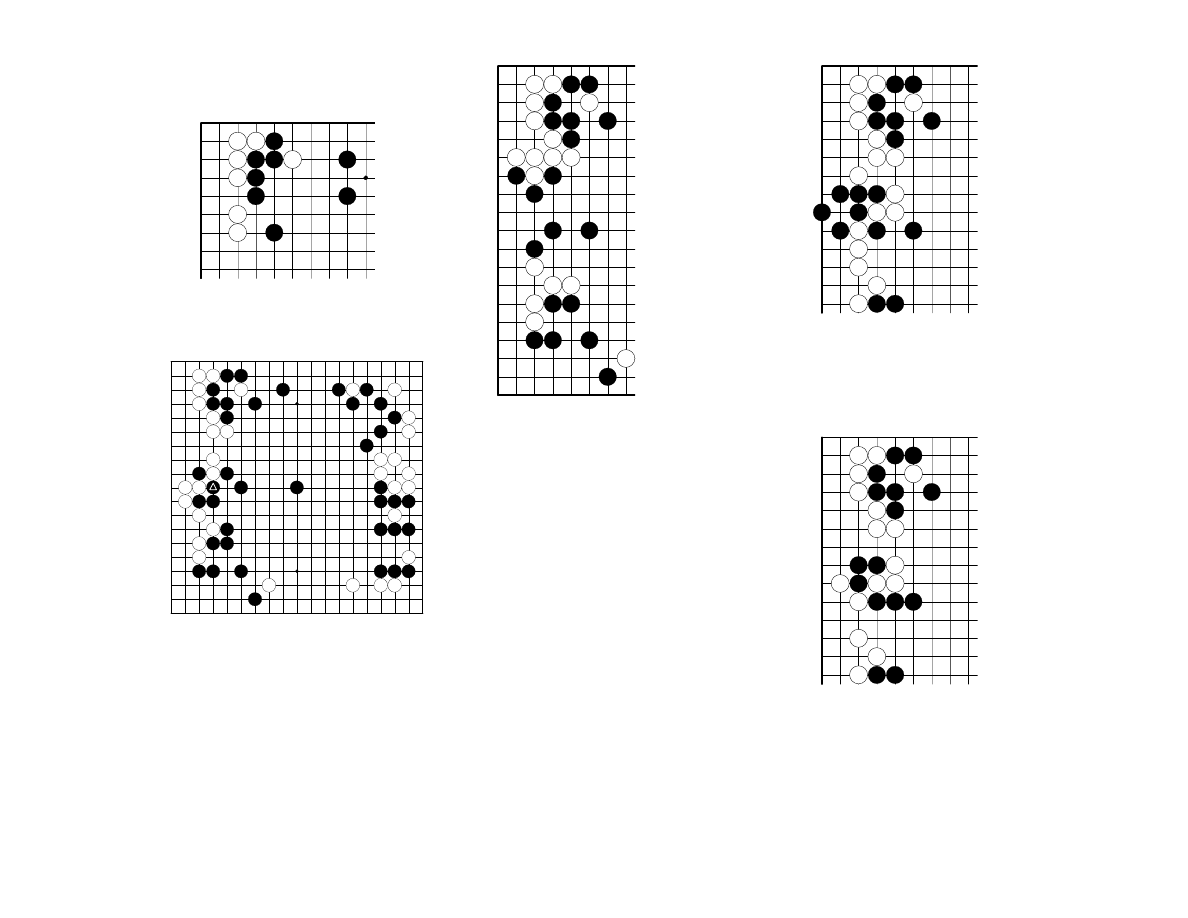
Figure 2 (moves 17—40)
Jealousy
Because of the faulty shape at the
triangled stone, Black has no choice but
to submit to the forcing moves in the
sequence from 17 through 24.
Invading the corner with 27 is
necessary. If White allows Black to
jump to 29, the upper side becomes a
large Black territory.
Mr. N responds wisely with 28 and
30. That is, instead of 30 , Black should
not block on the outside like Diagram 4.
However, after taking sente, Mr. N
appears to be jealous of White’s
territory and plays 34. Instead, at this
point, Black should follow Diagram 5.
At any rate, it seems common for
the weaker player to worry about
White’s territory, but if a handicap game
develops into a race to surround territory
(i.e. without fighting) Black cannot lose
easily. What Black should be afraid of is
if the game develops into complex
fighting.
White 37 and 39 aim for
complications. Instead, if White plays
the slack jump to a, Black jumps to b
and the game is easy.
There are various alternatives to the
hane at 40 (such as the connection at c),
but 40 is the most severe. A natural
looking but poor alternative is shown in
Diagram 6.
3
2
4
1 5
6
Diagram 4
If Black blocks with 1, White plays
2 through 6 and Black’s efforts to
surround territory on the top are all
wasted. The triangled stone in particular
seems to be crying.
5
1
4
3
2
Diagram 5
It would be better to take the large
point of 1. Then if White decides to
surround territory on the right with 2
and 4, Black is fine after taking up a
solid position with 5.
3
b
a
4
2
1
Diagram 6
This solid connection seems to be
safe, but after the attachment and
extension of White 2 and 4, then a and b
are miai.
Page 3
57
51
55
47
54
45
41
46
49
53
52
43
48
56
42
a
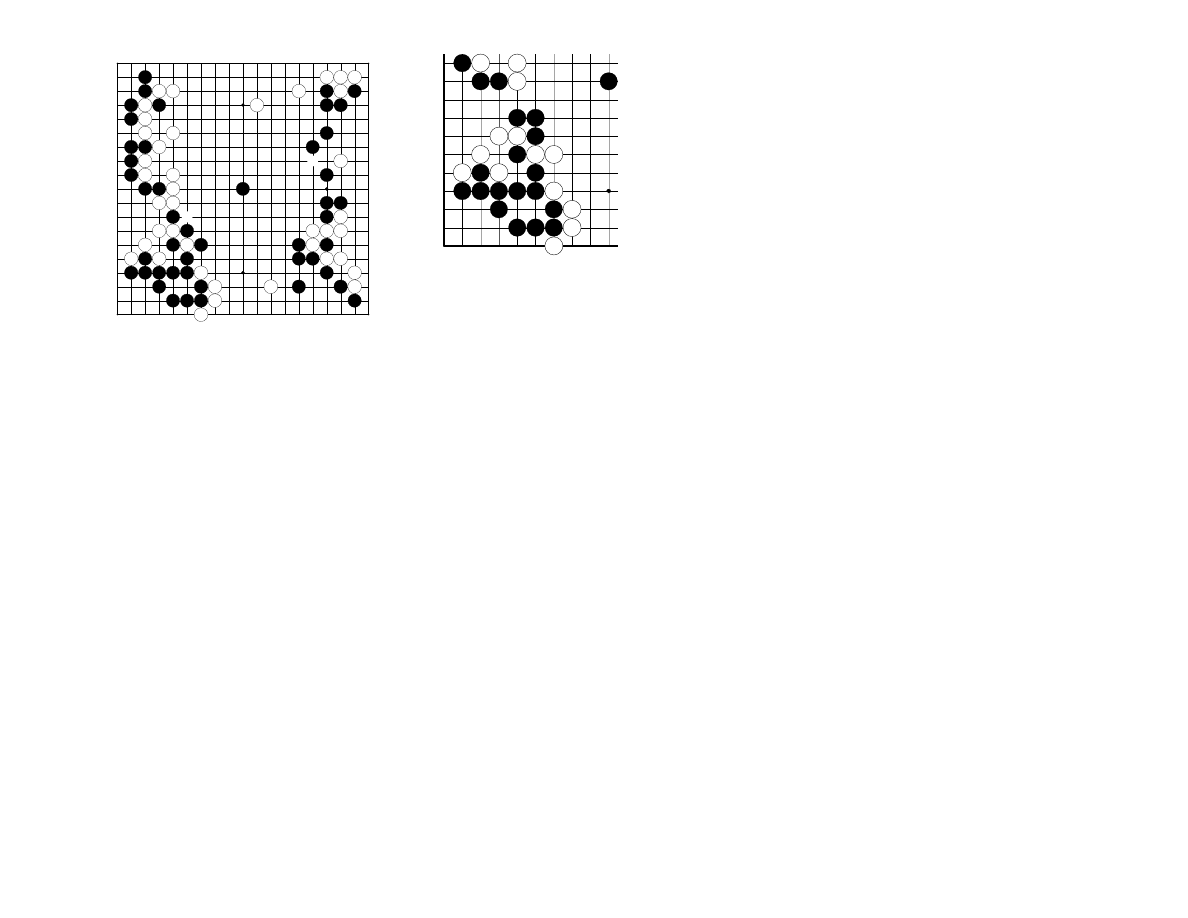
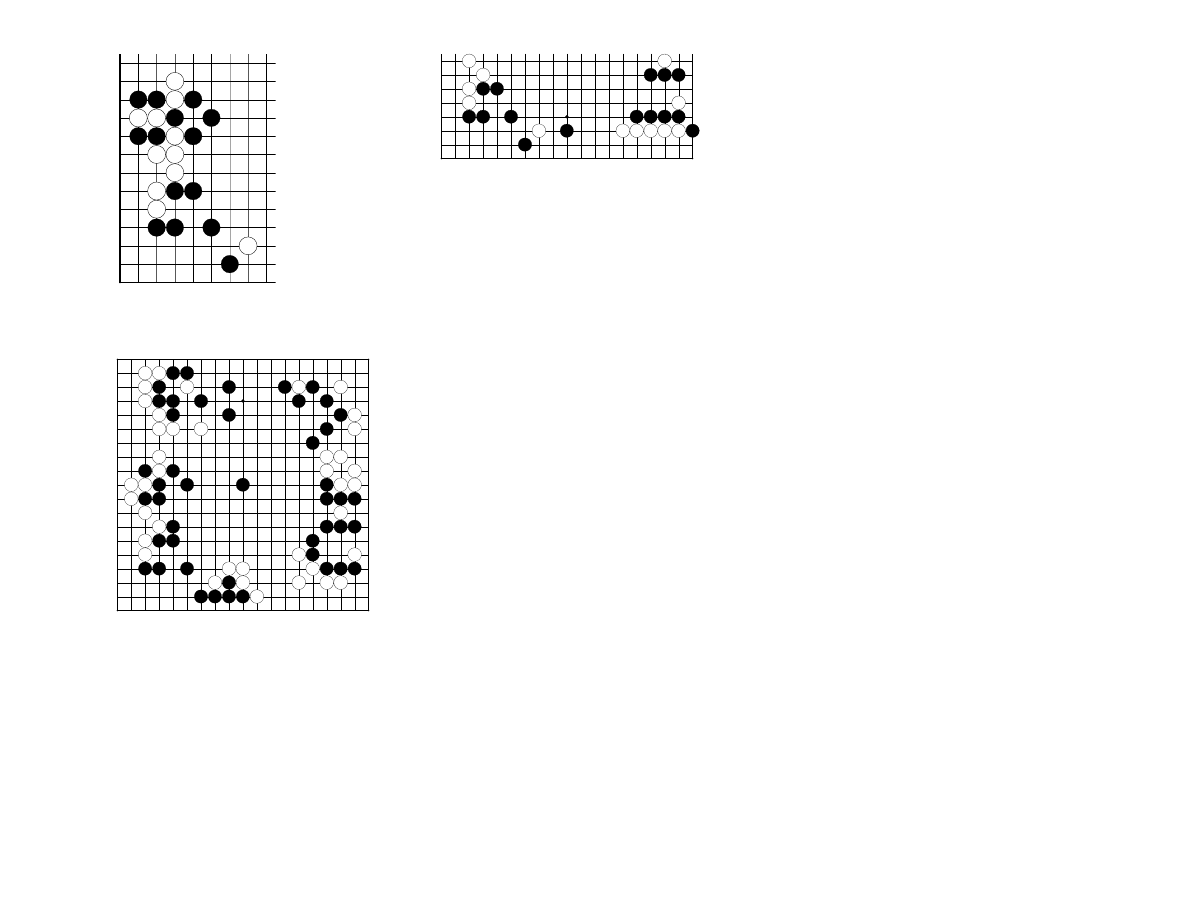
Figure 3 (moves 41—57)
44 connects
50 connects
An even battle
In response to Black’s hane at 40, it
is only natural for White counterattack
with 41. Instead of 41, see diagram 7.
After White gives atari with 41 a
difficult situation arises (see Diagram
8), but through Black 52, Mr. N holds
his own and the battle is even.
However, moving out with 54 is a
mistake.
Because Black didn’t play as in
Diagram 9, White gets to play the great
approach move at 57. How should Black
play?
2
6
3
4
1
Diagram 7
5 ko threat elsewhere
White could block with 1 and fight,
but allowing the hane at 2 is painful.
Cutting at 3 starts a large ko fight, but
with the current board position, Black
will ignore any ko threat and capture at
6.
Instead of 3
…
10
8
4
9
5
6
3
7
1
2
Diagram 8
If White connects at 1, Black resists
by connecting at 2. In the sequence after
3, White captures the triangled Black
stone, but after the quiet extension to 10,
the position is quite playable for Black.
7
5
3
4
6
1
2
Diagram 9
Black should move out on this side,
with 1. When White captures with 2,
Black cuts with 3. White can cap with 4,
but Black can sacrifice the triangled
stone with 5, then turn to take the big
point on the lower side at 7. Neglecting
to play this way is part of a series in
which Black seems a little too in love
with the invasion stone on the right side.
Page 4
c
63
64
g
f
d
69
61
60
71
67
62
66
68
b
65
70
59
76
77
72
74
79
e
73
75
78 80
81
a
58
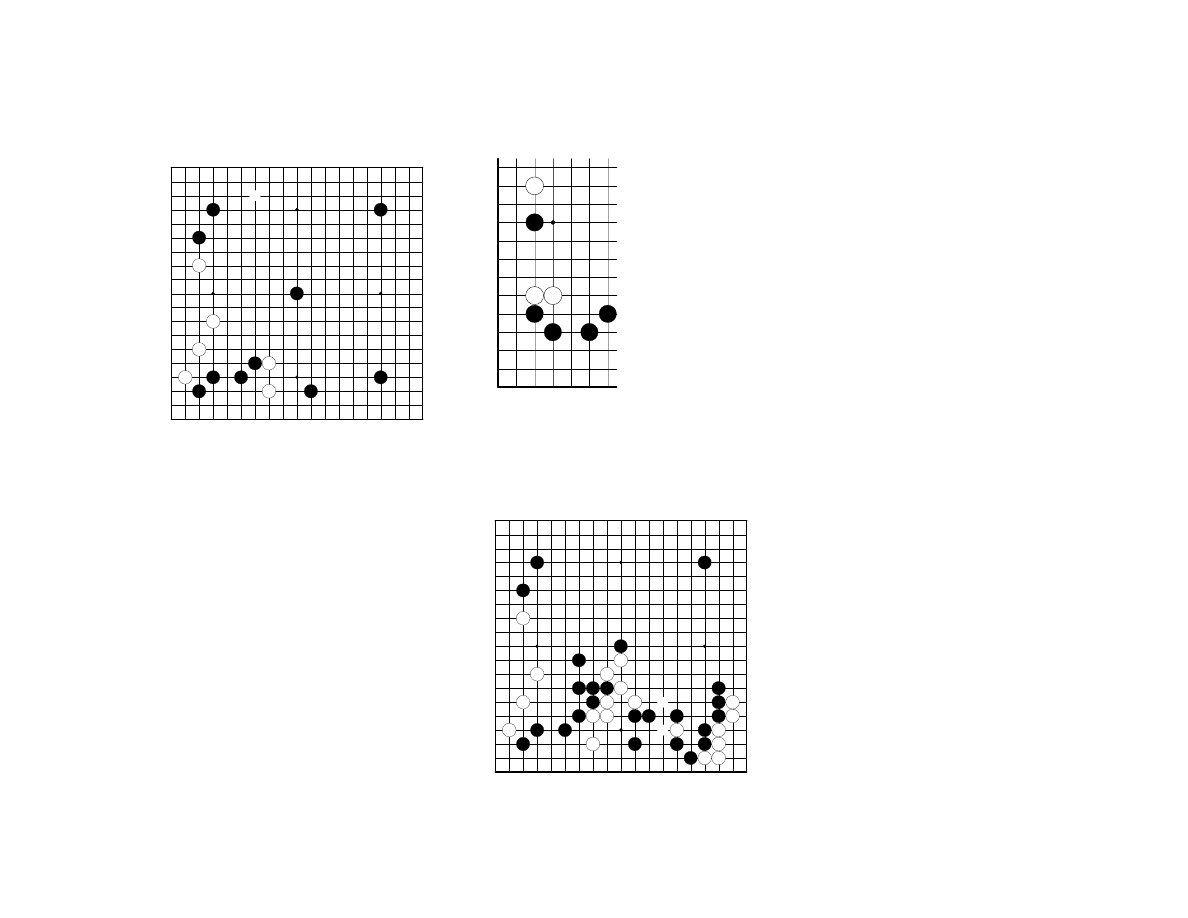
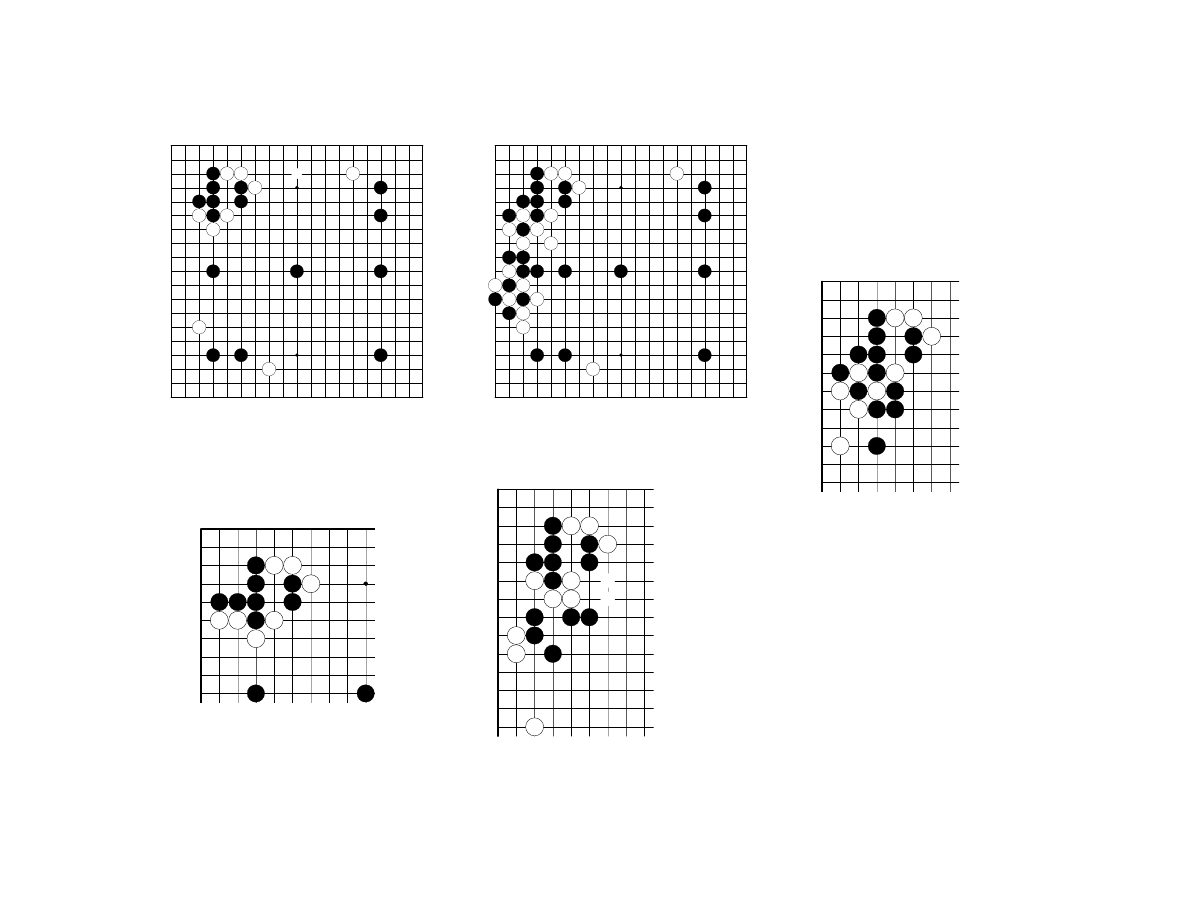
Figure 4 (moves 58--81)
A non-urgent move
For some reason, Black captured at
58. Perhaps he was worried that after the
atari at a, the triangled stone would get
cut off, but this is not an urgent move.
See diagram 10.
When White gets to surround with
59, the mood becomes unpleasant for
Black. Black shouldn’t allow the
creation of a group that can be attacked
like this.
Black’s hane at 68 is also an
unnecessary move. Quietly extending to
b and firmly getting out was called for.
Instead of White 71, the honest
move is to protect the lower side with
72, but White was concerned about the
invasion at c.
Further, if White does play on the
left, instead of 71 the proper move is
probably the knight’s move at d, but in a
handicap game, White can’t afford to be
so deliberate.
At any rate, Black responded on the
lower side with 72 through 76,
apparently satisfied to be capturing
White’s 59. However, see diagram 11
Pulling back with 80 was also a
wasted move, making Black’s loss
bigger. Instead of 80, Black should just
play the hane at e.
Instead, Black f, White g, Black h,
was a good sequence to aim for.
Moves after 81 not recorded
White wins by 2 points
1
8
7
6
5
9
4 2
3
Diagram 10
In this position, no matter what
Black needs to play the diagonal move
at 1.
If White plays on the right side with
2 and 4, Black can respond through 9
and it is White who is coming under
attack.
2
3
1
Diagram 11
Instead of Black 72, Black really
needs to have the courage to invade as
far as 1. If White answers with 2, Black
jumps out to 3 separating White.
Page 5
4 S T O N E H A N D I C A P G A M E ( 2 )
F R O M A T E A C H I N G G A M E A G A I N S T “ S ” 3 - D A N
23
21
16
15
11
13
5
6
19
17
12
2
14
8
20
18
1
22
7
24
3
a
9
10
4
Figure 1 (Moves 1--24)
Thick play by Black
Instead of the large knight’s move at
4, if Black wants to play more severely
the knight’s move at a is an alternative.
For Black’s pincer at 6 see Diagram 1.
White avoids giving Black this ideal
shape. After playing 7 and 9, White tries
the peep at 11. Instead of Black 12, see
diagram 2.
Instead of extending to 14, blocking
at 15 would transpose to Diagram 2.
The hane at Black 16 is a good
move. If Black is too afraid of the cut at
17 and extends to 17 himself, then the
result after White blocks at 16 is
uninteresting for Black.
Taking up a thick position with
Black 22 is slightly unsatisfactory.
Instead of 22, see Diagram 3
After Black plays 22, White
absolutely needs to respond at 23.
However, after extending from his
thickness with 24, Black has a favorable
opening. In handicap games, playing
thickly like this is the fastest road to
victory.
4
1
3
2
Diagram 1
Black’s pincer at 6 expects White to
jump to 1. After 2 and 4, Black has an
ideal shape.
5
1
2
6
3
4
7
Diagram 2
Blocking at Black 1 is the most
severe response. The sequence from 2
through 7 gives Black a fine
development. For details, see Basic
Position 11.
4
2
3
5
1
6
7
Diagram 3
Black can capture the triangled
White stone by cutting at 1 and 3. Even
if White cuts with 6, Black has a ladder
after 7.
Page 6
34
a
d c
45
33
43
44
27
26
30
42
46
29
25
38
36
b
41
31
28
35
37
39
40
32
Figure 2 (Moves 25—46)
A slack move
The attachment at 25 is the only
move. Defending the bottom with a is a
good point, but then Black will play the
diagonal move at 26 and White will not
be able to do anything on the top.
The hane at 27 is also the only
move. Instead, see Diagram 4.
Instead of Black 28, if White’s
triangled stone were not on the board
then Black could just connect at 30 right
away. In the case of the game, however,
it’s simpler to give atari with 28, then
connect with 30. In the sequence
through 33, White may have settled a bit
too easily, but Black ends with sente. In
a handicap game, this is a pretty even
result.
Black’s jump at 34 is slack. Looking
at the whole board situation, taking up a
position on the right side with b is a
great point. Even if Black leaves out 34
see Diagram 5.
The attachment at White 35 is an
attempt to start complications and get
some sort of position on the right side.
For this reason, instead of giving White
anything to work with, see Diagram 6.
Attaching at 42 followed by the
hane and attach with 44 and 46 is an
interesting move in this situation. Now a
Black cut at c will be severe, but White
can hardly stop to defend with d.
7
9
4
5
3
6
8
10
1
2
Diagram 4
If White pulls back with 1, Black
can block with 2 and play the sequence
through 10. This result is no good for
White. Or, instead of 2 Black could also
connect at 6, isolating the triangled
White stone. This looks bad for White.
2
b
1
3 a
4
Diagram 5
White’s invasion at 1 is nothing to
be afraid of. Gripping a stone with 2 is
good, and if White plays 3, then Black
can play the diagonal move at 4 and
fight. Playing the diagonal move at a
instead of Black 2 is not good. White
makes a tiger mouth with b leading to a
difficult fight that Black should avoid.
1
2
5
3
4
Diagram 6
Extending with Black 1 is a good
move. If White extends with 2, after 3
and 5 White’s invasion still has no
momentum.

Page 7
69
67
65
52
68
66
51
53
57
56
55
58
54
48
50
47
62
a
49
59
60
61
64
63
Figure 3 (Moves 47--69)
Black 66: a good move
If White doesn’t hurry to play 47
and 49, then Black will play the hane
with a, then attach at 49. Further, if
White doesn’t force with 61 and 63, see
Diagram 7.
Instead of black 66, see Diagram 8.
4
2
1
3
Diagram 7
Black 1 and 3 are a big reverse sente
sequence.
4
2
1
3
Diagram 8
Black 1 is a common response, but
after 2 and 4 Black’s result is no good.
73
71
72
75
70
74
76
84
86
80
78
81
85
79
77
82
83
88
c
b
87
a
Figure 4 (Moves 70—88)
The greatest possible reduction
After blocking with the triangled
stones, the thick sequence from 70
through 76 shows the right attitude for a
handicap game.
White 77 is a difficult judgment. If
White goes deeper, and plays at 79
instead of 77, White will be in danger
after c because Black has forcing moves
at a and b.
The internal hane at 82 is a good
move. Instead of 82, see Diagram 9.
Moves after 88 not recorded
Black wins by 4 points
3
1
2
Diagram 9
Blocking with Black 1 and 3 is too
submissive.
Page 8
5 S T O N E H A N D I C A P G A M E ( 1 )
F R O M A T E A C H I N G G A M E A G A I N S T “ H ” 3 - D A N
30
28
26
22
18
11
12
34
32
31
29
23
24
19
17
2
1
10
14
33
25
20
9
13
8
35
27
21
15
16
7
6
4
3
5
a
Figure 1 (Moves 1 – 35)
A low position is bad for Black
A 5-stone handicap game is similar
to a 4-stone game except of course for
the presence of the extra stone on the
central point. Finding a way to make
good use of this stone is the major
difference between the two handicaps.
Pincering immediately with Black 2
is an aggressive way to play. Black 4 is
the correct direction, but Black makes a
mistake in the joseki that follows. That
is, instead of blocking with 12, see
Diagram 1.
There is a threat that White will at
some point cut at 16. Fearing this threat,
Mr. H responded to the cap at 15 by
connecting at 16, but this is an error.
Instead, see Diagram 2.
It seems that Black was expecting
White to respond to 16 at a, but this is
too much to hope for.
Playing the hane underneath at
Black 18 is correct shape, but see
Diagram 3.
Black is forced to crawl from 20
through 34, leading to an unsatisfactory
result. Instead of White 19, see Diagram
4.
2
3
1
7
4
5
6
Diagram 1
Black must play 1. The sequence
from the White connection at 2 through
7 is the correct joseki.
1
4
3
2
5
Diagram 2
Black should defend at least once
with 1. If White cuts immediately with
2, Black can counterattack with 5,
resulting in a position that is not easy for
White.
7
6
4
9
3
8
5
1
2
Diagram 3
Here it would have been clearer to
play 1 and 3, lightly sacrificing the
triangled stone.
2
1
Diagram 4
Pulling back with 1 and allowing
Black 2 is bad for White.
Page 9
40 42
36
38
41
37
39
a
49
43
45
66
64
44
48
c
67
61
60
46
68
54
52
65
62
59
47
b
50
51
53
63
56
55
57
58
Figure 2 (Moves 36—68)
A whole board perspective
Black deserves no praise for 44,
responding to White 43. From a whole
board perspective, this is a great
opportunity to make the first move at the
top with a. In the lower right corner, see
Diagram 5.
When White plays 45, because
Black responds quietly with 46, White
gets the fine point at 49. Instead of 46,
see Diagram 6.
Before playing 49, White plays a
forcing move at 47. Playing
immediately at 49 lets Black play at b,
which is too good.
White 51 is a hard-working move.
Instead, see Diagram 7.
Black 52 and 54 are a good defense.
Instead of 52, if Black just extends to
54, then White plays 52, Black c, White
55 and it feels as if White has gotten a
good position everywhere.
Black’s cut at 62 is a mistake.
Instead, see Diagram 8.
In the sequence through 67, it seems
as if Black has helped White.
7 5
6
3
4
2
1
8
Diagram 5
If White approaches with 1,
pincering with 2 is a good move. If
White tries the sequence starting with 3,
Black can settle with 8.
1
5
8
3
4
6
7
2
9
Diagram 6
Black 1 is a good move, both a
pincer and a splitting move on the top
side. The sequence starting with White 2
is one possible variation. At any rate,
Black can’t afford to let White surround
such a large area with 49.
6 2
5
1
3
4
Diagram 7
If White runs out with 1, chasing
with 2 and 4 gives Black a good rhythm.
Playing 5 and letting Black extend to 6
is no good at all for White.
2
1 3
Diagram 8
If Black plays 1 and 3, White would
be in trouble.
Page 10
81 83
76
79
78
b
80
77
82
a
71
70
75
69
72
73
74
Figure 3 (Moves 69 – 83)
Black misses a chance
After White invades at 69, it seems
White’s strategy has succeeded.
However, if Black tries to prevent this
by skipping 68 and defending the corner
with 71, allowing White to play the
attachment at a is not a good feeling.
Black 76 is a good attacking move.
However, Black 78 is a big mistake. See
Diagram 9.
Instead of White 81, playing the cut
at b is crude.
Moves after 83 not recorded
White wins by 6 points
2
5
3
1
4
Diagram 9
If Black plays the diagonal move at
1, White will have a hard time escaping.
Page 11
5 S T O N E H A N D I C A P G A M E ( 5 )
F R O M A T E A C H I N G G A M E A G A I N S T “ A ” 3 - D A N
7
4
3
1
8
9
2
a
6
11
5
10
Figure 1 (Moves 1 – 11)
A smooth start
Instead of 4, Black could also play
the large knight at a – either is ok.
Black 6 is extremely solid. A more
aggressive alternative would be to
pincer at 10 immediately. When faced
with Black 6, White must defend with 7
and 9. See Diagram 1.
Black has made a smooth start
3
1
2
Diagram 1
If White leaves out these defensive
moves, Black can play the diagonal
attachment at 1 and invade with 3. This
is painful for White.
38
14 24
12
23
18
17
13
37
21
19
16 20
b
a
22
15
36
34
26
33
32
30
28
27
25
35
31
29
Figure 2 (Moves 12 – 38)
Black 12 and 14 make a nice shape.
Instead of White 15, jumping to
about the position of Black 16 would be
the proper move. But then after Black
plays the knight’s move at a, the whole
board position would be simplified,
which White wants to avoid.
Black’s hane at 18 lets White build
momentum. See Diagram 2.
When White attaches with 19,
pulling back to Black 20 is not a good
response. Now when White plays 21,
Black can’t extend to 23 (if Black
extends, White can play b). Black can’t
handle all of White’s threats. Therefore,
instead of Black 20, see Diagram 3.
Black’s shape is weakened a bit by
having to absorb the atari at 23. Still, it
goes without saying that the whole
board situation still favors Black.
When the corner was invaded at the
3-3 point with White 25, Mr. A seems to
have had trouble deciding how to
respond. Instead of Black 26, see
Diagram 4.
Therefore, it seems that Black has
no choice but to block with 26. The
sequence through Black 36 is forced.
This Black shape may seem thick, but
actually it’s a bit over-concentrated.
What’s more, White 37 skillfully erases
this thickness, so Black has gotten the
worst of things.
Page 12
a
2
1
3
Diagram 2
Jumping to Black 1 is good. If
White jumps to 2, Black plays 3. Instead
of 3, sealing White in with a is also a
good point.
1
2
5
3
4
Diagram 3
Extending to 1 is the crucial point to
destroy White’s shape. White has no
choice but to connect at 2. Then Black
can jump to 3 and the shoe is on the
other foot – White is too busy to handle
all of Black’s threats.
3
2
a
4
1
Diagram 4
If Black blocks from the other side,
with 1, after 2 and 4 it seems White has
done pretty well since there is still a
cutting point at a.
48
46
50
44
42
45
43
41
47
49
52
51
54
53
58
56
55
60
59
57
39
64
66
63
62
40
65
61
67
Figure 3 (Moves 39 – 67)
Questionable play by Black continues
White 41 is a common tactic used
by players giving a handicap. In
response to Black 42, White 43 is a
swindle. Instead of Black 44, see
Diagrams 5 and 6.
These variations are a little
complicated, but instead of Black 46,
see Diagram 7.
In the sequence through 50, Black
gets pushed down in gote, and White’s
wishes are granted.
Black’s invasion with 58 is a good
idea, but the diagonal move at 60 is not
the best. Instead of 60, see Diagram 8.
In response to Black 60, White can
jump into the corner with 61, spoiling
Black’s fun.
Blocking with Black 64 is also
uninteresting for Black. After
connecting with 66, Black has cut off
one White stone, but this comes
nowhere near matching White’s profit in
the corner. Therefore, instead of Black
64, see Diagram 9.
When White plays 67, how should
Black respond?
5
3
2 4
1
Diagram 5
Black can resist with 1. If White
plays 2, Black defends with 3 and 5 and
…
Page 13
13
11
12
10
6
8
9
7
Diagram 6
If White cuts with 6, play follows
the sequence through 10. Then Black 11
and 13 are great moves and White
collapses.
4
2
6
1
3
5
7
Diagram 7
Giving atari from the outside with 1
is a good move. If play follows the
sequence from 2 through 7, Black gets
great outside influence and skillfully
thwarts White’s plan.
6
5
9
7
3
4
8
2
1
Diagram 8
Descending with 1 is the most usual
course. If White plays the diagonal
move at 2, Black can fight adequately
with 3 through 9.
7
6
8
4
1
2
3
5
Diagram 9
Black must block with 1. Then
connecting with 3 and 5 and letting
White live with 6 and 8 should be good
for Black.
Page 14
80
83
93
78
76
81
92
89
82
79
77
91
90
84
88
87
94
75
a
85
86
74
72
71
73
69
70 68
Figure 4 (Moves 68 – 94)
Two good moves by Black
Black attached with 68, but there
was a move that would have forced a
crisis. See Diagram 10.
Black’s attachment at 68 ends in
gote with 74, allowing White the
opportunity to defend with 75. In this
sequence, White 71 and 73 are
necessary. If White skips them, see
Diagram 11.
But after allowing White to defend
with 75, Black saves face by invading at
76. To respond to this invasion, see
Diagram 12.
Black 84 was slack. Instead, a was a
good point, looking to attack White.
In response to White 89 and 91,
Black 90 and 92 are correct responses
that are worth learning from. See
Diagram 13.
Black captures two stones with 94
and has the advantage.
Moves after 94 not recorded
Black wins by resignation
h
c
b
f
3
a
g
1
e
d
2
Diagram 10
Black’s invasion at 1 is a good
move to threaten White. If White plays
the diagonal move at 2, Black can
respond at 3, and White cannot capture
the invaders. For example, if White tries
the attachment at a, Black responds at b
and play continues in alphabetical order
ending with h.
a
4
c
b
3
d
2
1
5
Diagram 11
Black 1 and 3 are a good sequence
forcing a ko. After Black 5, the
sequence starting with White a will end
in ko.
6
2
1
4
3
5
Diagram 12
White can play the diagonal move at
1, which would cause worry for many
amateurs, but Black can attach at 2 and
play the sequence through 6, living
easily. Therefore, White 77 through
Black 82 is a necessary sequence.
5
4
2
6
3
1
Diagram 13
White cannot grip the Black stone
with 1. After the sequence from 2
through 6, the white stones above 4 and
6 are cut off and captured.
Page 15
6 S T O N E H A N D I C A P G A M E ( 1 )
F R O M A T E A C H I N G G A M E A G A I N S T “ W ” 2 - D A N
21
20
18
17
14
15
22
10
11
32
31
1
36
13
16
12
33
35
19
34
9
2
3
7 5
4
23
8
6
26
25
24
27
28
29
Figure 1 (Moves 1 through 36)
30 connects
White uses forcing moves
In a 6-stone handicap game, Black
has an overwhelming advantage in
fighting on the right and left sides of the
board. Therefore, this is a good
opportunity for Black to master the
correct methods of fighting on the sides.
After the attachment at White 11,
White 13 and 15 aim to make Black
over-concentrated. Black seems to have
been forced a bit, but since this is a 6-
stone game it is not much to worry
about.
Black definitely gets forced in the
sequence from the hane at 24 through
the connection at 30.
7
4
1
6
3
2
5
Diagram 1
Extending at 1 and playing the
sequence through 7 is the most usual
course. (See Basic Position 20 in
volume 1)
White 31 and 33 are a rather
eccentric set of moves, but since this is
an area where White has already forced
with White 11 and Black 12, White
doesn’t regret this exchange. Black’s
extension to 34 seems innocuous at first
glance, but instead of this …
5
3
4
1
2
Diagram 2
It would be better to play more
energetically with the diagonal
attachment at Black 1. If White responds
with the hane at 2, Black can play the
hane and connection with 3 and 5, and it
is White’s shape that crumbles.
White’s attachment at 35 is an
obvious attempt to confuse the weaker
player. In response, instead of Black 36
…
Page 16
8
6
4
7
2
3
5
1
9
Diagram 3
Pulling back with Black 1 is a
clearer continuation. If White plays the
hane at 2, Black plays 3 and play returns
to the joseki.
6
5
7
8
2
1
3
4
Diagram 4
If White descends with 1, Black
responds at 2 and again play returns to a
joseki.
43
44
45
40
39
41
46
47
48
38
37
50
49
42
52
51
Figure 2 (Moves 37 through 52)
Bad shape
Because Black descended to 36,
White is able to attach at 37 and matters
become complicated. Of course, Black
should always attempt to avoid
complications – this is generally true,
not just in 6-stone handicap games.
Of course, it can’t be good for Black
to be forced to connect in bad shape
with 44. But if Black varies at 38 …
5
3
1
2
4
6
Diagram 5
Black would like to wedge at 1, if
only it worked. But after White 2 and 4
Black is hopelessly split in two.
However, even though Black suffers
a bit of a loss in the game continuation,
this is part of the benefit of getting 6
stones. White is also suffering in having
to escape with 45 and 47.
Making the hanging connection with
Black 48 is a bit too cautious. Instead of
48 …
3
1
2
4
6
5
7
Diagram 6
Black has a great chance to hane
and attach with 1 and 3.
White lives with 4 and 6. Then the
hanging connection at 7 is an efficient
move. That is, with Black 7 on the board
…
2
1 3
4
Diagram 7
There is no need to worry about
White cutting at 1. Black gives atari
with 1, then jumps to 4 and the triangled
stone is perfectly placed.
Black’s hane at 50 is weak-spirited.
Page 17
5
1
2
6
3
4
7
Diagram 8
If Black cuts at 1, White would be
in trouble. About the best White can
manage is 2 and 4, but after Black 5 and
7, White’s position is no good.
62
56
54
55
63
61
57
59
58
60
64
53
73
67
65
66
71
68
72
70
69
Figure 3 (Moves 53 through 73)
Attack and defense on the lower side
Black 54 seems to have a good feel
to it, but in fact, ending in gote with 64
is uninteresting. Instead of 54 …
1
2
4
3
5
Diagram 9
A more powerful course would be
simply descending with 1, then forcing
again with the descent at 3, followed by
5, solidifying the bottom.
Because Black ends in gote, White
is able to attack first on the bottom with
65.
Black 66 may seem obvious, but it’s
a good, severe move by Black.
4
1
2
3
Diagram 10
Simply defending with Black 1
would have been too submissive. After
White settles in with 2 and 4, Black has
no attacking prospects to look forward
to.
White’s invasion at 69 is an asking
move. White will choose a follow-up
based on Black’s response. Black chose
to block at 70, but this falls in too easily
with White’s plans. In this situation,
instead of Black 70 …
1
15
3
14
7
4
2
5
11
8
10
6
9
13
12
Diagram 11
Black must play the descent at 1.
Starting with the peep at 2, White plays
energetically to live, but after Black
connects at 15, White’s two triangled
stones are in a painful position.
After getting in the hane at 71,
White can take a breath.
Instead of Black 72 …
4
2
1 3
5
Diagram 12
Blocking with 1 is the joseki, but
after capturing the stone with 2 and 4,
White is strengthened. This is no good
for Black.
Page 18
81
89
80
77
87
75
74
82
79
78
83
76
84
85
88
90
Figure 3 (Moves 74 through 90)
86 connects
Black gets an unsatisfactory low position
Black’s diagonal attachment with 74
is a good move.
Of course, White’s attachment at 77
is unreasonable, but White has no
chance to catch up otherwise.
Attaching underneath with Black 78
is a mistake. Instead …
7
5
3
6
4
2
1
Diagram 13
Black must extend with 1. If White
flees with 2 and 4, Black can launch a
big attack on the lower side with 5 and
7.
After White blocks with 79, Black is
forced into a low position with 80
through 90. This is a bit unsatisfactory.
98
96
95
97
100
94
93
99
a
91
92
Figure 4 (Moves 91 through 100)
Black lacks resolve
In this figure, Black’s lack of
resolve is noticeable. For example,
Black 92 – instead of this, Black needs
to jump to a and attack White on a large
scale.
Also, Black 94 is unnecessary. This
is just an automatic response to White
93. Instead of 94 …
3
1
2
Diagram 14
Attaching and extending with 1 and
3 is a better sequence in terms of the
whole board position.
After White plays 99 and Black
defends with 100, the score is already
close – this favors White.
Moves after 100 not recorded
White wins by 2 points
Page 19
6 S T O N E H A N D I C A P G A M E ( 2 )
F R O M A T E A C H I N G G A M E A G A I N S T “ O ” 1 - D A N
1
6
5
b
2
a
7
c
8
22 20
21
3
12
17
24
16
15
4
25
11
18
19
9
10
13
14
23
Figure 1 (Moves 1 through 25)
About the 3-3 point
Instead of White 9, White a, Black
b, White c is a more usual way to play.
But as I’ve said before, in a 6-stone
handicap game, White can’t afford to let
the game become too simple.
The diagonal attachment at Black 10
puts the triangled stone to good use and
bears witness to Black’s fighting skill.
Jumping immediately into the 3-3
point with White 13 is an interesting
idea. Generally, invading at 3-3 too
early is problematic because it gives
Black a chance to build thickness.
Black’s descent to 14 is absolutely
the right move in this situation.
1
3
4
2
Diagram 1
Being overly protective of the lower
territory and blocking with 1 plays into
White’s plan after 2 and 4. In this case,
the territory gained by Black 1 is too
small because the triangled stone is too
close.
After the peep at White 15, play
follows a well-known course. The
connection at 22 is necessary.
3
1
5
2
6
4
Diagram 2
Blocking with Black 1 seems strong,
but Black cannot omit 5, freeing White
to play at 6. In this sequence, White 4 is
a proper move. Instead …
2
9
1
7
3
5
6
4
8
Diagram 3
If White connects at 1, after the
placement at 4 White is squeezed down
to just 2 eyes. Further, instead of White
5 …
8
5
7
4
2
1
6
3
Diagram 4
Blocking at White 1 is greedy. After
Black cuts at 2, play is forced through
Black 8, leading to a ko.
Page 20
a
38
46
49
45
50
48
39
40
47
42
43
32
28
26
41
44
31
27
36
34
30
29
35
33
37
Figure 2 (Moves 26 through 50)
Black applies strong pressure
Blocking with Black 26 is a good
move. Responding to White 27 and 29
with the double hane of 28 and 30 is
much stronger play than one would
expect from a 1-dan.
White has no choice but to play the
vulgar sequence of 31 and 33. That is,
instead of White 31 …
2
7
4
6
3
1
5
8
Diagram 5
If White tries the apparent tesuji
with 1, Black plays the sequence
through the diagonal move at 8 and
captures 5 White stones. In this
sequence, instead of White 3 …
6
2
1
7
4
3
5
Diagram 6
If White plays the hanging
connection at 1, he can live with the
sequence through 7 but in gote, while
Black’s outer thickness is now
complete.
Black’s extension at 36 is the
epitome of a calm move. If Black gets
anxious …
8
7
6
5
4
1
3
2
Diagram 7
If Black chops off the tail of
White’s group with 1 and 3, White splits
through his position with the sequence
through 8. This is no good for Black.
Having gotten sente, Black plays 38
seeking to attack the triangled stone, but
White can treat the triangled stone
lightly since the 3-3 point at a is open.
Therefore, Black 38 is not right.
Page 21
1
2
3
Diagram 8
Black should play the diagonal
attachment at 1 and then follow the
standard attacking pattern with 3. This
opens the possibility that the triangled
stone may get swallowed up without
compensation.
White seeks complications with 39.
Instead of connecting at Black 40,
playing at 41 would be simpler.
Now White is able to make a little
bit of a shape by cutting at 47 and
squeezing at 49.
a
57
55
59
58
56
60
63
61
65
62
53
64
51
66
52
b
Figure 3 (Moves 51 through 66)
54 connects
An unnecessary retreat
White turns to the biggest point on
the board by invading at 55. Now it’s
hard to understand why Black blocks
with 56. In this situation …
2
6
4
1
5
3
Diagram 9
No matter what, Black needs to
block at 1. If White at 2, Black can start
by blocking at 3. Now the sequence
through White 6 is a standard way for
Black to get sente. Instead of Black 3 …
3
1
4
2
5
6
Diagram 10
Blocking with 1 and letting White
run out with 2 through 6 is not a good
idea.
The extension at Black 58 is a vital
point, but blocking with 60 is slack.
White 59 was played in order to deal
with a Black push and cut at a. Instead
…
10
11
6
5
4
7
9
8
3
2
1
Diagram 11
It is more interesting for Black to
give atari at 1 and attack on a large
scale with 3. White is forced to run with
4 through 10, and Black still has time to
block at 11. Even in handicap go, if the
chance to attack White presents itself,
Black must seize the opportunity
without hesitation.
After getting in 61, White can take a
deep breath.
Cutting and capturing with Black 62
is a vulgar sequence.
7
4
6
2
3 5
1
Diagram 12
Black should play the diagonal
move at 1 and take deliberate aim at
White’s position. If White tries to spread
out with 2, Black can deliver a powerful
blow with 3 through 7.
Page 22
78
77
79
71
70
72
c
a
b
76
75
69
67
d
73
74
68
Figure 4 (Moves 67 through 79)
Black responds accurately
White’s invasion at 67 is seen
frequently in handicap games of 6
stones or higher. Black gets full credit
for responding at 68. Instead of 68, one
often sees the sequence Black a, White
b, Black c, White d, which is the worst
way to play. In response to Black 68 …
3
1
4
6
7
2
8
5
Diagram 13
White would like to move out with
1, but after 2 through 8, White’s position
is no good.
Therefore, White varies with 69, but
Black responds thickly with 74 and gets
a fine result.
83
81
84
82
87
99
85
97
80
98
92
96
94
93
86
91
89
88
95
90
Figure 4 (Moves 80 through 99)
Keep attacking!
Taking sente, Black played the
diagonal attachment at 80. Black gets a
gold star for this move, too. Playing the
hanging connection at 84 instead of 80
is not as good. However, Black 86 in
response to White 85 is the wrong
direction.
3
1
2
Diagram 14
Black must keep attacking with 1. If
White escapes with 2, after Black 3 the
fight is difficult for White.
Black 86 appears to be aiming at an
attack on the right side, but after 96,
Black ends in gote. This is uninteresting
for Black.
Moves after 99 omitted
White wins by 3 points
Page 23
7 S T O N E H A N D I C A P G A M E ( 1 )
F R O M A T E A C H I N G G A M E A G A I N S T “ G ” 1 - D A N
7
1
5
6
3
2 4
8
10
9
13
11
16
14
15
18
21
25
17
12
22
23
20
19
24
Figure 1 (Moves 1 through 25)
Getting forced
A 7-stone handicap game is not
much different than a 6-stone handicap
game. As with a 5-stone handicap, the
key is how to make use of the stone on
the tengen point.
Black’s attach-and-extend with 2
and 4 is very solid. This is highly
recommended in a 7-stone handicap
game.
In response to White 9, Black 10 is
also very solid. Through Black 16, there
is nothing to criticize in Black’s play.
Black allows himself to be forced
with 18.
2
6
1
8
9
11
3
4
5
7
Diagram 1
10 connects
The diagonal attachment at 1 is a
good move. Black gets a good position
after 2 through 11.
The placement at 19 is the type of
move that gives weaker players fits.
Black 20 is a bit slack.
2
5
4
3
1
6
Diagram 2
Black should play the diagonal
attachment at 1. If White plays the same
attachment as in the actual game, at 2,
now Black can resist with 3. If White
cuts with 4, Black can give atari at 5
and …
9
7
10
12
8
11
13
Diagram 3
After the sequence from 7 through
the counter-atari at 13, White is
captured. Going back to Diagram 2, if
White does not play the attachment at 2,
but instead …
Page 24
4
1 3
2
Diagram 4
If White attaches from above with 1,
Black should have no problems in the
fight after peeping at 2, then simply
pushing out with 4.
After White attaches at 21, Black
has no choice but to quietly pull back
with 22 and 24.
White now plays 25, looking for
complications. How should Black play?
41
42
40
38
36
27
30
39
34
31
26
28
37
33
a
35
29
32
Figure 2 (Moves 26 through 42)
Black skillfully changes course
Black naturally plays the hane at 26,
but after that, 28 and 30 are not forceful
enough.
11
9
10
a
4
7
8
12
5
6
3
2
1
13
Diagram 5
Black can respond powerfully by
giving atari underneath with 1, then
crawling with 3. White has no choice
but to give atari with 4 and look for
opportunities by pulling these stones
out. However, Black can firmly capture
with 11. When White plays 12, Black
responds with 13, making everything
secure and looking forward to the
possibility of later attacking with a.
When descending to 32, Black
probably expected White to immediately
answer at 35. Then Black could play at
a. But of course, White varies with 33.
Therefore, instead of 32, Black should
play more severely …
7
4
6
3
5
1
2
Diagram 6
Black should attack with 1. White 2
is pretty much necessary, and Black can
naturally position his stones with 3 and
5. If White escapes with 6, Black has a
perfect attacking move at 7.
After getting in 33, White is safe.
Of course the diagonal attachment at
36 is a good move, but responding to 37
with 38 is a wonderful change of course.
Usually in a handicap game …
3
2 4
1
Diagram 7
Black makes the mistake of
defending at 1. Then White can later
aim to strike at 2.
Page 25
The pincer at Black 42 is
appropriate in this situation. Now if
White …
7
1
3
9
11
5
2
4
6
8
10
12
Diagram 8
If White jumps into the corner with
1, Black can force with 2 through 10,
then build a big moyo with 12.
63
65
53
47
43
58
57
62
51
44
45
49
61
59
64
52
46
48
55
60
66
54
56
50
Figure 3 (Moves 43 through 66)
Giving up too soon
In order to avoid the result in
Diagram 8, White varies with 43. For
the correct way to handle this move, see
Basic Position 17. At any rate, Black’s
result through 50 is no good. At least
instead of 50, Black should push out
with 55.
Black is worried about the triangled
stone and so runs out with 56, but Black
didn’t need to be so afraid.
6
5
8
4
3
1
7
2
9
Diagram 9
In fact Black should attack with 1. If
White 2, then Black can force with 3
through 7. After this sequence, Black
still has time to run out with 9.
After omitting this sequence, Black
has to deal with White’s attachment-
and-cut with 57 and 59. Black is afraid
of complications, and so quickly gives
up on the stone with 60 through 66. But
this is too generous. To begin with,
instead of Black 60 …
9
5
1
6
7
2
3
8
4
Diagram 10
Giving atari with 1 and 3 is a
stingier way to play. The hanging
connection with 5 makes miai of Black
8 moving out and Black 9, which lives.
A further note on Black 60 …
4
5 1
6
2
3
Diagram 11
The atari at 1 followed by the
connection at 3 is usually a good tesuji,
but in this case White can take
emergency measures with 4 and 6,
which is no good for Black.
Further, Black can defer the
connection at 64.
Page 26
5
1
2
4
3
Diagram 12
Black 1 and 3, setting up a ko, is the
correct way to play.
67
70
68
73
72
74
75
71
76
77
79
80
78
69
Missing the vital point
When White plays 67, Black 68 is a
slack move that just follows White’s
lead. Instead of 68 …
5
1
4
2
3
Diagram 13
Extending to Black 1 is a vital point.
Since this sets up the push at 4, White
must respond with 2 and 4. Then if
Black invades at 5, there is no doubting
that Black is ahead.
However, Black plays perfectly
after move 70.
Moves after 80 omitted
Black wins by 5 points
Page 27
7 S T O N E H A N D I C A P G A M E ( 2 )
F R O M A T E A C H I N G G A M E A G A I N S T “ S ” 1 - D A N
12
11
1
10
16
14
13
9
15
5
6
8
2
7
17
a
3
4
Figure 1 (Moves 1 through 17)
Light, nimble play by White
Instead of White 11, the usual move
is White a. Then Black will defend at
13.
Instead of White 15, the joseki is …
2
1
4
3
Diagram 1
to descend to White 1 and then give
atari with 3. However, this felt a little
heavy, so in the game White just gave
atari with 15 then developed with 17.
37
32
20
21
36
25
30
27
28
a
18
19
38
34
31
26
29
33
23
24
Figure 2 (Moves 18 through 38)
22 connects. 35 captures ko.
A mistake in fighting
Instead of cutting with Black 18 ….
6
4
7
5
2
1 3
a
b
Diagram 2
it was possible to attack on a larger
scale with Black 1 and 3. However,
White can undercut Black with 4 and 6,
and then later can force again with a and
b, so this is actually not very interesting
for Black.
However, in response to White 21,
filling with Black 22 is no good. After
White makes shape with 23, Black can’t
be satisfied with this result. Instead of
22 …
6
2
a
3
1
5
Diagram 3 (4 connects at a)
Black must cut with 1. After White
captures with 2, lets suppose that Black
plays 3 then connects with 5. About the
best White can do is to run out with 6.
Then …
Page 28
8
10
12
7
9
11
14
13
15
Diagram 4
Black can press forward with 7
through 15, painting the outside with
thickness. This is the simplest way to
play. The more stones that get played in
this sequence, the thicker Black
becomes. This is good, even if Black
concedes a bit of territory.
Black 26 was a good move, but
Black 28 is questionable. White cuts and
creates a ko with 29 through 34. As the
proverb says, “there is no ko in the
opening.” With no appropriate ko
threats, Black has to give in with 36 and
38. This is an unsatisfactory result.
Therefore, instead of Black 28 …
2
4
1
3
6
5
7
Diagram 5
Black can draw back with 1 and
play thickly, following the example of
Diagram 4. This would be better than
the game.
43
47
45
42
41
46
44
52
60
58
56
51
57
b
54
50
48
a
55
53
49
39
59
40
Figure 3 (Moves 39 through 60)
Solid and too solid
In a handicap game it goes without
saying that it is good for Black to play
solidly, but there are limits.
In response to the White invasion at
41, taking sente with Black 42 and 44 is
an example of good solid play. Instead
of 44 …
1
2
3
9
8
4
6
10
7
5
Diagram 6
If Black had blocked at 1,
eventually he will have to run out
anyway, and after White 6 through 10,
Black comes under severe attack.
Attaching at 48, extending to 50 and
in response to White 51, connecting
with the bamboo joint at 52 are also
good examples of solid play. Instead of
52, speaking only in terms of shape …
7 5
10
8
6
9
4
1
3
2
Diagram 7
The block with Black 1 looks right.
But you can’t play go thinking only
about shape. After White pushes and
cuts with 2 and 4, Black is in trouble.
Black continues to come under
attack with White 53. With the sequence
up through Black 56, Black finds a way
to connect. But all Black is doing is
connecting, which is hard to take. This
Page 29
trouble was caused by Black’s failure on
the left side in the previous figure.
White 57 avoids a Black attack at a,
while also looking to move out with the
White stones on the left. Therefore
Black 58 is natural. However, Black 60
is unnecessary. We can say that this
move is too solid. If Black leaves out 60
…
6
2
3
9
5
1
7
4
8
10
Diagram 8
White could play the attachment,
but after 2 through 10, White can’t get
away anyway. Further, instead of 3 …
6
1
4
5
2
7
3
Diagram 9
If White plays 1, Black can take
sente with 2 through 6.
If Black is going to play in the
vicinity of 60, at the very least he should
go as far as b.
c
77
76
75
86
90
82
74
73
88
85
84
63
67
72
71
89
83
a
93
94
98
62
61
70
69
79
81
87
b
95
92
91
96
64
65
66
78
80
97
68
Figure 4 (Moves 61 through 98)
White expands
White’s 61 and the following moves
are a sequence for handicap go. Instead
of capturing a stone with Black 68 …
1
a
4
2
3
Diagram 10
Connecting with Black 1 prevents a
White move at a. However White can
still cause trouble by cutting at 2 and
pulling back with 4.
White 69 is a novel move. We’ve
already seen the atari at 70 instead of
69. Black 70 is the correct response to
White 69. However, following with
Black 72 is a mistake.
Black adopted a strategy of
sacrificing the triangled stone, but this is
too big. Instead of Black 72 …
8
9
7
4
3
2
1
5
6
Diagram 11
Black needs to come out with 1. If
the sequence from 2 through 9 ensues,
this fight is difficult for White as well as
for Black.
Black’s hane at 76 captures the three
White stones, but this cannot possibly
compare with the huge expansion of
White’s territory.
Black 82 gives White a chance to
play tricks with 83, so Black could have
considered defending with 85 instead of
82.
Blocking with Black 86 is a
mistake. From a whole-board
perspective, it would be better to block
at a, then force at b and push with c.
Using the attachment at Black 92
through 96 is a vulgar way to stop
White’s advance. Instead …
Page 30
4
2
3
a
1
Diagram 12
Black can just stop with the
attachment at 1. There is nothing to be
afraid of. If White plays 2 at 3, a is the
end. If White plays 2, then cuts at 4 …
13
12
9
8
5
11
7
6
10
Diagram 13
Black 5 through 13 catches White.
Moves after 98 omitted
White wins by 1 point
Page 31
8 S T O N E H A N D I C A P G A M E ( 1 )
F R O M A T E A C H I N G G A M E A G A I N S T “ K ” 1 - K Y U
20
28
19 15
16
18
17
27
a
23
24
21
22
25
14
29
26 30
4
12
8
2
3
13
10
5
6
1
11
7
9
Figure 1 (Moves 1 through 30)
A severe move
In an 8-stone handicap game, Black
has stones on the key points surrounding
every area, so from the very beginning
every White move is an invasion. It is
important for Black to play to connect
his stones, that is, to play thickly.
The attach-and extend joseki with 2
and 4 forces an early clarification of the
local shape. It is a good choice in high
handicap games because it simplifies the
position.
Instead of the wedge at Black 6 …
3 1
2
Diagram 1
Blocking from the corner with
Black 1 does a better job of taking
territory. But in an 8-stone handicap
game, the continuation in the game can’t
be bad either.
Defending with Black 14 is an
unambitious move. Instead …
a
3
5
2
4
1
Diagram 2
Sealing White in with Black 1 is a
better idea, inviting White to invade the
top with 2. Then attacking with 3 and 5
is severe. If Black is going to begin with
a move on top, it is better to play a than
14 in the Figure.
Black 16 begins another attach-and-
extend joseki, which continues through
20. Black 22 and 24 are a thick way to
play, but if Black wants to play more
severely …
1
3
2
7
5
6
4
Diagram 3
Black 1 is the more severe way to
play. If White clamps with 2, Black can
respond at 3. The cut at White 4 is
nothing to be afraid of.
Pulling back with Black 26 is not so
much thick as slack.
1
3
9
2
7
5
6
4
8
Diagram 4
If Black blocks with 1, White faces
a painful struggle. If White cuts with 2
and 4, Black plays the sequence through
9 and has nothing to fear.
Page 32
38
36
37
a
34
33
39
31
b
40
35
c
32
49
47
43
44
51
46
45
50
48
42
d
41
Figure 2 (Moves 31 through 51)
Allowing White good shape
When White invades at 33, the usual
response is at the location of 35, but in
this case, Black 34 is also okay.
However, Black’s hane-and-connect
with 36 and 38 is not good. Probably
Black was afraid of White a, but Black’s
continuation gives White perfect shape
with 37 and 39, and the triangled stone
withers on the vine. Instead of Black 36
…
2
3
1
5
6
10
4
11
8
7
12
9
13
Diagram 5
Black needs to descend with 1,
otherwise the diagonal attachment (the
triangled stone) is not effective. If White
plays 2, Black can resist with 3. In
response to White 4, starting a battle on
a second front with the sequence starting
with Black 5 is a high-level tactic.
7
8
1
6
5
3
4
2
a
Diagram 6
Continuing from the previous
diagram, Black is okay even if White
descends to 1. After Black 2 through 8,
the peep at a is forcing so Black has no
worries.
Black 40 is very solid, but ideally I
would have liked to have seen Black
play the diagonal attachment at b. Then
when White responds at c, Black can
develop quickly at d. When White gets
to play 41, the squared Black stone
becomes a bit thin.
White 43 is a bit unreasonable, but
without sowing confusion White has no
chance to catch up. Rather than gripping
a stone with Black 48 …
b
1
9 5
3
7
4
2
8 6
a
15
13
11
14
12
10
Diagram 7
Black should connect with 1, then
respond to White 2 and 4 by running
with 3 and 5. After White 10, Black can
choose a somewhat unusual sequence
with 11 through 15, after which Black
can aim at either a or b in the future.
Page 33
61 59
60
57
58
53
55
56
62
54
52
65
64
76
80
63
66
72
75
70
69
73
71
67
68
74
79
81
78
77
Figure 3 (Moves 52 through 81)
An unnecessary retreat
After White 53, cutting below with
Black 54 is no good. Instead …
7
1
4
2
a
3
Diagram 8
Black should cut with 1. When
Black gives atari with 3, White 4 starts
a ko, then Black takes at a; but, in this
position, Black will ignore any ko threat
and capture at 7.
After White connects with 55, Black
sacrifices two stones with 55 through
60, but this is too much to give up.
Instead of Black 58 …
2
5
1
3
4
Diagram 9
Black can ask with the attachment at
1. If White pulls back with 2, Black can
neatly connect with 3 and 5. Or, instead
of White 2 …
11
7
10
5
6
3
9
2
4
1
8
12
Diagram 10
If White resists with 1, Black can
counterattack with 2. The sequence after
3 is not branched, and Black gets a
playable position after 12.
Instead of Black 66, playing at 67
would have gained more territory, but
then White jumps out to 66 and the 2
Black stones come under attack. Black
made the right choice here, choosing
thickness over territory.
Black 76 was a blunder. Instead …
4
1
2
5 3
Diagram 11
The block at 1 succeeds. White goes
down for the count after Black 3 and 5.
6
3
5
1
4
2
Diagram 12
In the previous diagram, Black
could also capture with 1 in this
diagram, but this leaves behind bad aji
after 2 through 6.
Moves after 81 omitted
White wins by 2 points
Page 34
8 S T O N E H A N D I C A P G A M E ( 2 )
F R O M A T E A C H I N G G A M E A G A I N S T “ Y ” 1 - K Y U
24
25
21
22
23
20
19
8
10
26
18
11
4
7
12
16
17
2
3
9
15
6
5
1
14
13
Figure 1 (Moves 1 through 26)
Too timid on the side
Instead of simply extending with the
one-point jump to Black 8 …
3
1
2
Diagram 1
Black could also consider exchanging
the hane at 1 for White 2 and then
playing 3.
Black responds to White 9 by
running away with 10, but this is
"weaker player" syndrome. Because of
this, White gets to play the double-
kakari at 11, making the situation a bit
complicated. Instead of Black 10 …
6
7
5
2
4
1
3
Diagram 2
Black has nothing to worry about after
defending with 1. White naturally caps
with 2, but Black gets out easily with 3
and 5.
Instead of the diagonal move at 12,
Black can make better use of the jump
to 10.
1
2
3
5
4
6
7
a
10
8
9
Diagram 3
A good move for Black is to hit
White on the head with 1. If White
hanes with 2, Black should cut without
hesitation at 3. White can live with 4
through 10, but then Black can either
make the hanging connection at a, or
play 12 in the game diagram.
Page 35
2
1
3
4
12
5
10
9
6
11
7
8
Diagram 4
In the previous diagram, instead of
playing the hane at 2, White might try
peeping at 1 in this Diagram. After
Black blocks with 2, we can envision
the sequence through White 11. Then
Black can play the diagonal move at 12
after all, with a superior position.
40
43
39
42
41
30
36
31
29
35
38
28
27
32
37
33
34
Figure 2 (Moves 27 through 43)
Extend from a crosscut
Since Black did not settle the
position with the sequences in Diagrams
3 and 4, White comes back with the
attachment at 27. Black 28 is good, but
30 is questionable.
6
2
7
8
1
3
9
4
5
Diagram 5
Black should follow the proverb
“extend from a cross-cut” and extend to
1. If White connects with 2, Black
responds with the sequence 3 through 9,
leaving White scattered.
Black 34 is also a clumsy move. In
this sort of situation …
1
4
2
3
Diagram 6
If Black connects with 1, White
responds with 2 and 4, and Black ends
in sente.
After the block at 34, Black can’t
leave out 38. If Black is greedy and tries
to tenuki …
4
6
3
5
1 7
2
8
9
Diagram 7
White extends to 1, then makes
forcing moves at 3 and 5. After White 9,
Black is captured.
White 39 is like White 9, an attempt
to aim at a group of Black stones on the
Page 36
side. This time, Black defends the
corner with 40, but this is a mistake. In
this case, the triangled Black stones are
heavy, so Black should take the clearest
path by jumping to the location of 41.
Black gets the flow of stones exactly
backwards.
White 43 is a leaning attack. Instead
of 43 …
a
3
2
4
1
Diagram 8
If White pushes with 1, Black
escapes with 2 and 4. On the other hand,
if White jumps to a, Black pushes out
with 1, and White gets nothing, not even
any aji.
How should Black play next?
52
50
b
a
54
51
45
53
48
46
49
47
44
Figure 3 (Moves 44 through 54)
The fruits of a tesuji
After White attaches at 43 (in the
previous figure), ignoring the left side
and pushing out with Black 44 is the
only move. Instead of Black 44 …
3
1
5
2
4
8
7
6
Diagram 9
If Black defends the left side with 1,
White attaches with 2, then chases Black
with 6. White 8 comes in just the right
place to seal Black in.
After the hane at 45, White presses
Black down in sente with the sequence
through Black 54, gaining thickness at
the same time. What’s more, Black still
is left with bad aji on the left with the
peep at a or the cut at b.
81
82
76
75
78
77
83
84
74
70
71
79
69
72
73
80
57
56
59
55
86
63
58
a
62
61
60
85
67
64 68
66
Figure 4 (Moves 55 through 86)
65 captures ko
Black recovers
Black has no choice but to submit to
being constricted with the sequence
starting with 55. Then White takes profit
with the sequence starting with 69, the
fruit of White’s labors in Figure 3.
Black cannot leave out 76 …
16
14
13
15
6
7
9
3
4
12
11
8
5
1
2
Diagram 10
10 connects
White cuts with 1 and can squeeze
through 9, after which Black is captured
Black suffered in the lower half of
the board, but then recovers with fine
moves at 78 and 86.
Moves after 86 omitted
Black wins by resignation
Page 37
8 S T O N E H A N D I C A P G A M E ( 3 )
F R O M A T E A C H I N G G A M E A G A I N S T “ N ” 3 - K Y U
28
31
34
17
27
22
21
19
30
b
18
12
14
29
33
25
23
7
13
32
26
24
20
10
8
9
16
6
4
3
15
5
11
a
2
1
Figure 1 (Moves 1 through 34)
Black 18 puts up little resistance
In handicap games, White often
responds to the attach-and-extend of
Black 4 and 6 with the attachment at
White 7, so it is important to learn the
correct move order to use in response. It
is important to know that Black 12 is
correct. Instead …
5
2
1
4
3
Diagram 1
Starting by bending at Black 1 is a
mistake. White descends to 2 and gets
more territory in the corner while Black
ends in gote.
Blocking at Black 14 is a mistake.
Instead, Black should exchange a push
at 15 with White a, then descend to 21.
Getting forced by White 15 is just
painful.
In response to White’s peep at 17,
Black 18 puts up little resistance and
shows a lack of fighting spirit.
9
3
2
6
7
1
5
4
8
Diagram 2
Pressing with 1 would put White in
trouble. If White tries to push with 2 and
cut with 4, the sequence through Black 9
leads to White being captured.
At the very least, instead of 18
Black should try b to bother White
somewhat.
Black 20 is a good move. Instead …
1
2
4
3
Diagram 3
Black 1 would let White out after 2
and 4.
The attachment at Black 30 is a
good move. Instead of White 31 …
2
4
1
3
6
5
Diagram 4
If White tries to hane at 1, Black
can play the placement at 2 followed by
the cut at 4. Even if White tries 5, after
Black 6 White is completely captured.

Page 38
44
43
41
40
42
39
48
35
36
38
46
37
45
47
65
64
55
66
51
52
49
50
53
56
54
63
62
60
59
61
58
57
Figure 2 (Moves 35 through 66)
After White 35, the triangled Black
stone starts to look a bit lonely.
Attaching at Black 36 is a good move,
resolving the situation. However,
instead of Black 38 …
5
1
3
2
4
Diagram 5
Blocking with Black 1, then settling
with 5 was a bit simpler.
In response to Black 40 …
9
10
5
8
6
3
4
1
2
7
Diagram 6
The push and cut with White 1 and
3 is nothing to worry about. Black gives
atari with 4, and after the sequence
through 10, Black wins the capturing
race.
If Black is afraid of this push and
cut, and plays 42 instead of 40, then
White will play at 40. This is no good
for Black.
After gaining thickness through 47,
attaching at White 49 is a natural
strategy.
Instead of Black 50, it was also
possible for Black to play the diagonal
attachment at 51, but the sequence in the
actual game follows a policy of playing
thickly.
Black 54 was slack. Instead …
9
10
7
8
a
11
b
1
3
2
5
4
6
Diagram 7
Black 1 is more aggressive. About
the best White can manage is 2 through
6, but then Black can attack White
starting with 7. After 11, Black has a
winning advantage. After 11, if White a,
then Black b.
Therefore, instead of White 53 …
1 3
2
7
6
5
4
10
9
8
Diagram 8
White 1 is really the correct move.
However, this still lets Black gain a
favorable position with 2 through 10.
With 57 and 59, White sacrifices a
stone to make Black over-concentrated.
Page 39
90
89
88
86
87
83
75
84
76
77
80
79
78
c
81
82
72
b
a
68
74
85
67
73
70
71
69
Figure 3 (Moves 67 through 90)
White walks a dangerous path
After Black jumps to the triangled
stone, White 67 is a risky move. That is
…
4
1
5
2
3
Diagram 9
Black 1 throws into question the life
and death status of the White group. If
White tries 2 through 4, Black 5 is the
end.
Black immediately answered at 68,
without thinking, letting a big
opportunity slip away.
White can heave a small sigh after
getting to play at 75, but this is still
dangerous.
5
6
4
2
1
8
3
10
9
7
11
Diagram 10
Black could have played the
diagonal attachment at 1. About the best
White can manage is 2, but then the
sequence 3 through 11 seems likely, and
Black gains a huge advantage.
Therefore, instead of White 75 …
1
3
2
Diagram 11
Clamping at White 1 is the proper
move. However in an 8-stone handicap
game, White can’t afford to play this
leisurely.
Black 80 and 82 are good moves.
Continuing, if White blocks at a, Black
captures after b and c.
White 85 settles this group while
menacing the squared stone. If White
omits this move …
2
5
3
1
4
Diagram 12
Black settles his group on the right
with 1 through 5, weakening White’s
three stones on the upper right.
Instead of worrying about the squared
stone, Black took the initiative by attacking
with 90. This led to Black’s victory.
Moves after 90 omitted
Black wins by 12 points
Page 40
9 S T O N E H A N D I C A P G A M E ( 1 )
F R O M A T E A C H I N G G A M E A G A I N S T “ E ” 3 - K Y U
5
4
6
3
32
31
2
9
8
14
25
30
26
19
20
24
13
10
28
12
11
18
1
29
27
7
22
15
16
17
23
Figure 1 (Moves 1 through 32)
21 Captures Ko
Finally, we look at 9-stone handicap
games. Black needs to play even more
solidly than in the games up to now.
Mastering 9-stone games opens the path
to playing well in 6-stone and 4-stone
games.
The cap at White 9 is a standard
tactic in handicap games. Black has a
number of ways to respond. On the one
hand, the shoulder hit at Black 10 is
severe, but it can also lead to
complications. Instead of 10 …
4
2
b
3
a
1
5
Diagram 1
Bumping up against White with
Black 1 is the simplest way to play. If
White jumps to 2, Black plays the
sequence through 5. If White jumps to a,
Black plays the hane at b – leading to
the same result.
Instead of White 11, it’s more usual
to push at on top of Black 10, but White
11 and 13 is also an effective sequence
for the stronger player to use in a
handicap game.
The connection at Black 14 is an
excellent move. Instead of 14 …
5
3
2
4
6
1
Diagram 2
Connecting solidly at Black 1
actually helps White settle with 2 and 4.
In response to White 15, boldly
confronting White with Black 16 and 18
is good. However, retreating with Black
22 is terrible.
Page 41
7
5
4
3
6
1
2
Diagram 3
Black must fight the ko. Black can
play the diagonal attachment at 1
followed by 3. After Black 5 and 7, the
upper right corner is in no particular
danger.
41
40
42
50
49
47
54
43
39
52
48
a
53
51
44
46
45
55
b
37
35
33
34 36
38
Figure 2 (Moves 33 through 55)
Two Terrible Moves
In response to White’s invasion at
33, attaching and pulling back with 34
and 36 is terrible. After White connects,
the triangled stone goes to waste. In
response to White 33, simply defending
at 38 would have been fine.
In response to White 39, Black
again attached with 40. Instead of 40,
simply jumping to 46 was fine. Or, if
Black wants to play more solidly …
5
4
3
1
2
Diagram 4
Black can attach and extend with 1
and 3, then patiently aim at attacking the
triangled stone.
At any rate, attaching and extending
with Black 40 and 42 is absolutely the
wrong way to play.
Jumping to Black 46 is an overplay.
Black is weak in this area, so …
3 1
a
2
4
Diagram 5
Black needs to take the opportunity
to secure himself by playing the hane
and connection with 1 and 2. White
must play 4 to protect the cut at a, so
Black gets sente, and can play first at a
in the Figure.
Black 48 is an overplay. Instead …
7
1
5
4
3
6
2
Diagram 6
It was better to play solidly with
Black 1. This is a joseki, and playing
this way ensures that the triangled stone
will not be cut off. Also note that in this
situation, playing Black 4 at 3 is not
quite satisfactory.
Because Black tried a bit too hard
with 48, White’s peep at 51 is effective.
Page 42
Allowing White to cut off Black 46 is
painful. Black 54 is an attempt to erase
the aji in the corner, but it’s not that
effective …
4
3 1
2
Diagram 7
If Black wants to get rid of this aji,
it’s better to hane and connect with 1
and 3. White needs to connect with 4, so
Black gets sente and can play at a or b.
When White gets the chance to play
first on the upper side with the invasion
at 55, it’s clear that Black has lost a lot
in the fighting in the lower left.
64
63
66
65
58
57
60
56
61
62
59
67
69
68
70
Figure 3 (Moves 56 through 70)
A weak attack
Attaching with Black 56 and
connecting underneath by allowing
White to make a ponnuki is seen
frequently, but it’s usually bad. In a 9-
stone game, however, Black can
probably afford to play this way.
White invades once more with 67.
Black’s response at 68 and 70 is slack.
1
2
3
4
5
6
8
7
9
b
a
Diagram 8
Black has a splendid attack starting
with the diagonal play at 1. If White
runs with 2 and 4, Black can cut with 5
through 9 and White is in trouble. Next,
if White a, then Black b.
81
80
79
78
a
84
77
76
86
82
83
75
74
71
73
85
72
b
Figure 4 (Moves 71 through 86)
The game becomes close
The sequence from 71 through 81 in
which the triangled stone gets
surrounded can be ascribed to the
difference in strength between the two
players, but blocking with Black 82 is
just a bad move. White makes good
shape with 83 and 85 and now cutting at
a and jumping into Black’s area with b
are miai.
9
7
8
3
4
1
2
5
6
Diagram 9
In this sort of situation, the secret is
to pull back one step with Black 1. If
White plays 2, Black attaches with 3.
After the sequence through 9, Black has
nothing to worry about.
The game has now become close.
Moves after 86 omitted
White wins by 2 points
Page 43
9 S T O N E H A N D I C A P G A M E ( 2 )
F R O M A T E A C H I N G G A M E A G A I N S T “ S ” 3 - K Y U
23
22
10
8
18
12
4
7
9
17
2
3
19
11
6
5
1
15
13
14
20
21
16
Figure 1 (Moves 1 through 23)
The Iron Pillar
White is thinking about the
triangled stone when making the
approach at 11. The descent at Black 16
is locally the proper move, but this case
calls for a different approach …
3
2
7
1
5
4
6
Diagram 1
Black can tennuki in the lower right
corner and play 1 and 3. Allowing
White to hane at 4 is a bit painful, but
Black can get compensation in the
center in the sequence through 7.
After 17, Black gives up on the
triangled stone, which is a wise
decision. Instead of Black 18 …
4
3
2
1
Diagram 2
T
rying to move out with a move like
1 seems too late, and meets with a
strong attack in the shape of 2 and 4.
If White ignores the Black descent
to 20 …
Page 44
a
1
2
5
3
4
Diagram 3
Black plays 1 and 3 and captures 2
White stones. If it were just a capture
this would be OK, but after White 4
Black still has a cut at a, so White ends
in gote.
Black’s descent at 22 is called an
iron pillar, and is a very solid move.
That is …
7
5
8
1
2
6
4
3
Diagram 4
In the future, even if White comes in
the vicinity with a move like the
triangled stone, Black can ignore it.
After White 1, Black attaches with 2 and
connects his groups with the sequence
through 8.
29
28
30
25
26
33
27
32
31
40
34
39
42
37
38
43
45
41
24
46
35
36
Figure 2 (Moves 24 through 46)
44 Connects
Black 26 is too generous
Black plays a second iron pillar at
24. This makes the upper right corner
Black’s territory. In high handicap
games (6 stones or more), the iron pillar
is a very effective move.
With 26, Black blocks in the wrong
direction.
6
2
8
4
1
3
5
7
9
Diagram 5
Because of the marked stones, Black
needs to block at 1. White 2 through 8
follow the joseki, but then Black 9
occupies a key point, expanding the
moyo.
At first glance, the hane and
connection at Black 28 and 30 look very
solid, but this is also a mistake.
7
1 3
2
4
5
6
Diagram 6
Here Black 1 is an unmistakable key
point. About the best White can do is 2,
to defend against the push and cut, but
Black is fine after expanding the moyo
with 3 through 7.
With 31 it is White who gets the key
point, and Black needs to defend with
32, which is painful.
White invades at 35 knowing it’s
unreasonable.
White 37 is a natural try. Black’s
responses after 38 are flawless, but it’s
worth noting that instead of Black 44 …
7
2
1
a
5
3
10
6 8
9
Diagram 7
It would be nice to counterattack
with Black 1, but after White 10, this
White group won’t die because the
marked stone comes into play.
Black 46 seems to be from a worry
about White moving out, but this is an
uninspired move. Instead…

Page 45
1
2
3
Diagram 8
Black can take the initiative with 1.
If White 2, Black gets to jump to 3, with
attacking chances against both White
groups.
47
57
50
49
51
a
48
72
52
64
65
67
71
66
68
69
b
70
63
60
58
55
61
59
56
62
53
54
73
Figure 3 (Moves 47 through 73)
Meek play by Black
Defending the 3-3 point with Black
48 is small.
6
4
1
3
2
7
5
Diagram 9
Counterattacking with Black 1 is a
good move. After sealing White in with
Black 7, Black’s outer thickness comes
into play.
Instead of White 49, a is the proper
move, but White is looking for
complications.
Meekly defending with Black 50
avoids complications, but clearly lacks
fighting spirit.
4
1
3
2
5
Diagram 10
Black 1 would refute White’s
unreasonable play. If White cuts with 2,
Black plays 3 and 5, and nothing White
tries is going to work.
After 52, Black has clearly been
forced.
In response to White 57, Black
deserves no praise for 58. After 62,
Black ends in gote. Instead of 58,
poking out with b was wiser.
Mr. S played the hane at 66 as if it
were the only move, but Black has a
better move.
2
1
4
3
5
Diagram 11
Black should try attaching at 1.
White needs to “apologize” with 2, and
Black can seal off the outside with 3 and
5, leaving the 6 White stones on the
lower side extremely thin.
Instead of Black 68, it would be
better to attach at b.
In a handicap game, if Black makes
a number of slack moves in a row like
this, eventually White will catch up.
White 73 is a big reverse-sente
endgame move. If Black plays first…
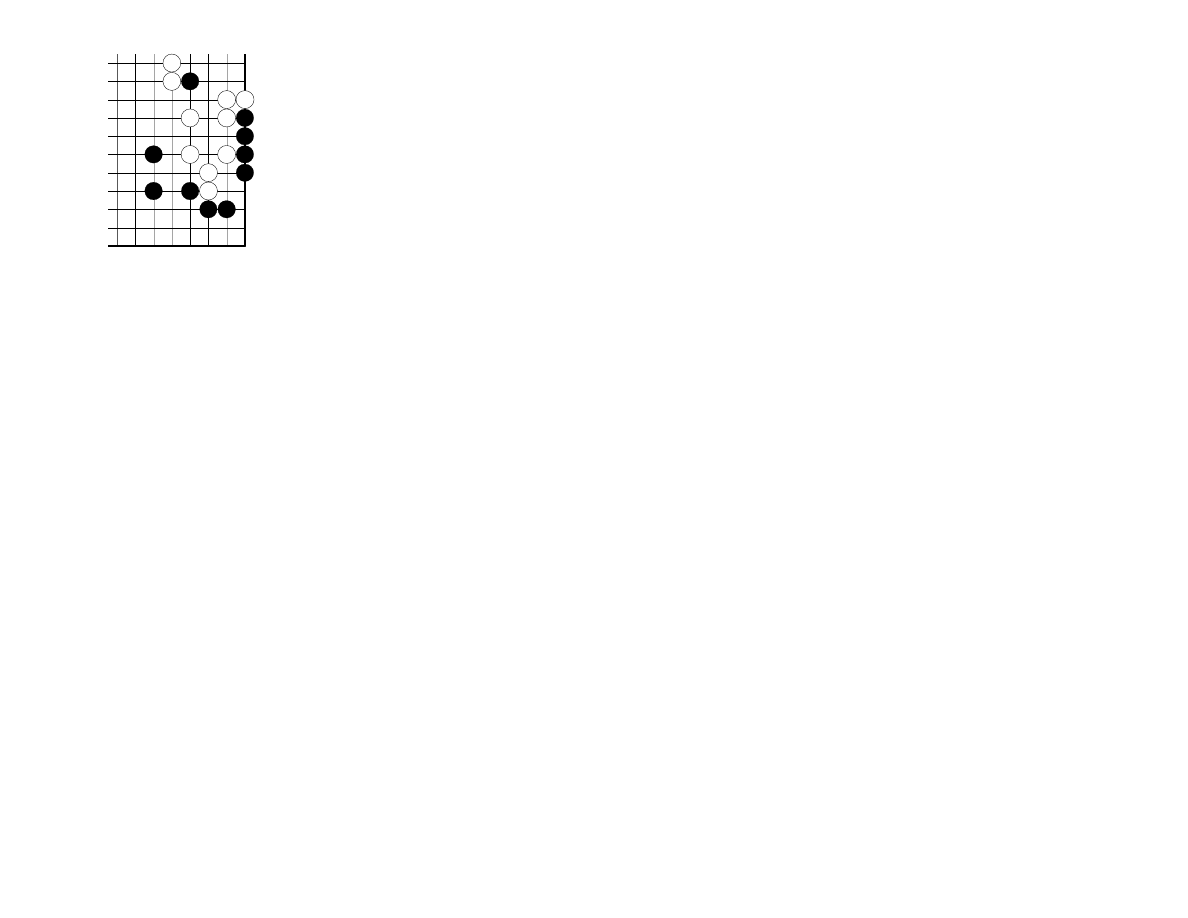
Page 46
8
4
2
6
5
7
1
3
Diagram 12
Black can play 1 through 5 in sente.
White 73 prevents this.
Moves after 73 omitted
White wins by 5 points
Page 47
9 S T O N E H A N D I C A P G A M E ( 3 )
F R O M A T E A C H I N G G A M E A G A I N S T “ H ” 4 - K Y U
10
8
7
6
4
3
5
9
2
34
33
26
21
12
28
32
25
24
30
27
23
22
11
19
16
31
29
1
a
15
13
14
18
17
20
Figure 1 (Moves 1 through 34)
The shoulder hit is good
Black 4 through 10 are a typical
joseki.
Instead of pushing with Black 16,
descending to 17 is joseki. However,
White’s hane at 17 is an overplay which
gives Black a chance.
Instead of Black 18 …
11
7
9
2
6
8
5
1
10
3
4
Diagram 1
Black’s hane at 1 succeeds. After
White cuts at 2 the sequence through
Black 11 is forced, so Black could have
seized a huge advantage. It follows that
instead of White 17, White needed to
play at 19 and allow Black to play at 17.
In response to White’s cap at 21,
Black escaped with 22. Instead of this
…
3
5
4
2
1
6
Diagram 2
Black could also escape with a
knight’s move at 1, but after White
jumps to 2 then attaches and cuts at 4
and 6, matters become complicated.
After the shoulder hit at Black 22,
Black can stay one step ahead of White
with 24 and 26, so Black has no worries.
Both 24 and 26 are better than blocking
at a, which would let White hane at the
head of two (or three) stones.
White’s attachment at 27 is a natural
attempt to take advantage of the
thickness gained by 23 and 25. If White
unimaginatively invaded at 31, Black
would calmly block at 29, which is not
satisfactory for White.
Black defends satisfactorily at 28
and 30, but the connection at 32 is
problematic…
5
3
1
2
4
Diagram 3
The turn at Black 1 is the key point,
viewing the triangled stone as light. If
White cuts at 2, Black gets great shape
after the sequence through 5. Instead of
White 4 …
3 1
2
4
Diagram 4
If White varies by cutting
underneath with 1, then after Black 2,
blocking with Black 4 is a good move.
Page 48
57
65
67
53
55
56
58
45
60
59
64
47
48
54
51
63
61
66
49
52
62
46
50
44
36
38
40
42
35
37
39
41
43
Figure 2 (Moves 35 through 67)
Too little resistance
When White jumped to 35, Black
responded with 36 but this is the
proverbial empty triangle, which is bad
shape. Instead of 36 …
5
1
6
7
2
4
3
a
Diagram 5
Black gets better shape by pushing
with 1, then peeping with 3. After Black
7, next Black can aim at a, with an
attack on the White group.
However, after pushing with 36
Black does well to continue through 44,
playing thickly.
The diagonal attachment at Black 48
is a good move, but the jump to Black
50 is questionable. More severe would
have been to descend to 59 or to jump to
63, aiming at attacking the White stone
at 45.
Jumping to 50 gives White the
chance to play the attachment at 59. But
this White 59 is risky – if Black
responds correctly, White will be in
trouble. Instead of the atari at Black 62
…
5
4
b
1
a
2
3
Diagram 6
Black can make better shape by
giving atari with 1 then connecting with
3. The cut at White 4 is not dangerous,
because the ladder with Black a and
gripping a stone with Black b are miai.
Black 64 and 66 are also dull
moves. Here …
1
3
2
Diagram 7
Black has a sharp alternative in the
placement at 1. If White plays 2, then
Black at 3 finishes the job. Black
doesn’t need to play this right away, but
64 and 66 give up this aji.
Page 49
69
81
68
82
70
75
76
73
74
b
79
a
83
77
78 80
72
71
Figure 3 (Moves 68 through 83)
More slack moves
Pushing with Black 68 and aiming
to play thickly with 70 is a good aim,
but instead of Black 68 …
2
4
1
3
Diagram 8
Going one step further with the
attachment at 1 would deserve an A+. If
White comes out at 3 instead of playing
2, then Black would play at 2, so the
sequence through White 4 is forced.
This result is better than the actual
game.
Black 74 is a good response to
White’s invasion at 73. However,
instead of Black 76 …
1
2
3
6
7
4
5
Diagram 9
Black could resist by blocking at 1.
After White 2 and 4, Black can block at
5 and White's progress is halted.
Black’s block at 78 is also slack.
3
5
2
1
4
6
8
7
9
Diagram 10
Black needs to seal White off with 1
and 3. After Black 9, the group on the
right will not die.
In the end, Black pulls back with 80
and lets White slide to 81. Letting White
live with a large profit like this is
uninteresting for Black.
The block at 82 continues Black’s
policy of playing for thickness, but here
descending to a was the largest move.
After that, about the best White could
manage is to jump to b. If White leaves
out this b …
7
6 8
4
1
5
2
3
Diagram 11
White will get sealed in after Black
1. After 2 and 4, White can manage to
live, but Black’s thickness is
overwhelming.
White takes advantage of the
opening left by Black and slides to 83.
How should Black defend?
93
94
91
92
86
85
99
97
100
98
96
95
89
90
84
87
88
Figure 4 (Moves 84 through 100)
Playing thickly
The knight’s move at Black 84 is a
weak-kneed move. In this sort of
situation …
Page 50
1
2
4
3 5
Diagram 12
The diagonal move at Black 1 is the
proper move. After White 2, if Black
wants to play quietly extending to 4
would be fine. If Black wants to play
more severely, the block at 3 followed
by extending to 5 would be okay.
Because Black played 84 in the
game, the triangled stone gets
swallowed up after 95 and 97.
However, Black’s policy of
consistently playing for thickness has
succeeded.
Moves after 100 omitted
Black wins by 3 points
Document Outline
- 4
- Figure 1 (moves 1—16)
- A positive strategy
- Diagram 1
- Diagram 2
- Diagram 3
- Figure 2 (moves 17—40)
- Jealousy
- Diagram 4
- Diagram 5
- Figure 3 (moves 41—57)44 connects50 connects
- An even battle
- Diagram 7
- Diagram 8
- Diagram 9
- Figure 4 (moves 58--81)
- A non-urgent move
- Diagram 10
- Diagram 11
- 4
- Figure 1 (Moves 1--24)
- Thick play by Black
- Diagram 1
- Diagram 2
- Diagram 3
- Figure 2 (Moves 25—46)A slack move
- Diagram 4
- Diagram 5
- Diagram 6
- Figure 3 (Moves 47--69)Black 66: a good move
- Diagram 7
- Diagram 8
- Figure 4 (Moves 70—88)The greatest possible reduction
- Diagram 9
- Figure 1 (Moves 1 – 35)
- A low position is bad for Black
- Diagram 1
- Diagram 3
- Diagram 4
- Figure 2 (Moves 36—68)
- A whole board perspective
- Diagram 5
- Diagram 6
- Diagram 7
- Diagram 8
- Figure 3 (Moves 69 – 83)
- Black misses a chance
- Moves after 83 not recorded
- White wins by 6 points
- Diagram 9
- Figure 1 (Moves 1 – 11)
- A smooth start
- Diagram 1
- Figure 2 (Moves 12 – 38)
- Diagram 2
- Diagram 3
- Diagram 4
- Figure 3 (Moves 39 – 67)
- Questionable play by Black continues
- Diagram 5
- Diagram 6
- Diagram 7
- Figure 4 (Moves 68 – 94)
- Two good moves by Black
- Moves after 94 not recorded
- Black wins by resignation
- Diagram 10
- Diagram 11
- Diagram 12
- Diagram 13
- Figure 1 (Moves 1 through 36)
- 30 connects
- White uses forcing moves
- Diagram 1
- Diagram 2
- Diagram 4
- Figure 2 (Moves 37 through 52)
- Bad shape
- Diagram 5
- Diagram 6
- Diagram 7
- Diagram 8
- Figure 3 (Moves 53 through 73)
- Attack and defense on the lower side
- Diagram 9
- Diagram 10
- Diagram 11
- Diagram 12
- Figure 3 (Moves 74 through 90)
- 86 connects
- Black gets an unsatisfactory low position
- Diagram 13
- Figure 4 (Moves 91 through 100)
- Black lacks resolve
- Diagram 14
- Moves after 100 not recorded
- White wins by 2 points
- Figure 1 (Moves 1 through 25)About the 3-3 point
- Diagram 1
- Diagram 3
- Diagram 4
- Figure 2 (Moves 26 through 50)
- Black applies strong pressure
- Diagram 5
- Diagram 6
- Diagram 7
- Diagram 8
- Figure 3 (Moves 51 through 66)
- 54 connects
- An unnecessary retreat
- Diagram 10
- Diagram 11
- Diagram 12
- Figure 4 (Moves 67 through 79)
- Black responds accurately
- Diagram 13
- Figure 4 (Moves 80 through 99)
- Keep attacking!
- Diagram 14
- Moves after 99 omitted
- White wins by 3 points
- Figure 1 (Moves 1 through 25)
- Getting forced
- Diagram 1
- 10 connects
- Diagram 2
- Diagram 3
- Figure 2 (Moves 26 through 42)
- Black skillfully changes course
- Diagram 5
- Diagram 6
- Diagram 7
- Figure 3 (Moves 43 through 66)
- Giving up too soon
- Diagram 9
- Diagram 10
- Diagram 11
- Diagram 12
- Missing the vital point
- Diagram 13
- Moves after 80 omitted
- Black wins by 5 points
- Figure 1 (Moves 1 through 17)
- Light, nimble play by White
- Figure 2 (Moves 18 through 38)
- 22 connects. 35 captures ko.
- A mistake in fighting
- Diagram 2
- Diagram 3 (4 connects at a)
- Diagram 4
- Diagram 5
- Figure 3 (Moves 39 through 60)
- Solid and too solid
- Diagram 6
- Diagram 7
- Diagram 8
- Diagram 9
- Figure 4 (Moves 61 through 98)
- White expands
- Diagram 10
- Diagram 11
- Diagram 12
- Diagram 13
- Moves after 98 omitted
- White wins by 1 point
- Figure 1 (Moves 1 through 30)
- A severe move
- Diagram 1
- Diagram 2
- Diagram 3
- Diagram 4
- Figure 2 (Moves 31 through 51)
- Allowing White good shape
- Diagram 5
- Diagram 6
- Diagram 7
- Figure 3 (Moves 52 through 81)
- An unnecessary retreat
- Diagram 8
- Diagram 9
- Diagram 10
- Diagram 11
- Diagram 12
- Moves after 81 omitted
- White wins by 2 points
- Figure 1 (Moves 1 through 26)
- Too timid on the side
- Diagram 1 Black could also consider exchanging the hane at 1 for White 2 and then playing 3.
- Diagram 2 Black has nothing to worry about after defending with 1. White naturally caps with 2, but Black gets out easily with 3 and 5.
- Diagram 3
- Diagram 4
- Figure 2 (Moves 27 through 43)
- Extend from a crosscut
- Diagram 5
- Diagram 6
- Diagram 7
- Diagram 8
- Figure 3 (Moves 44 through 54)
- The fruits of a tesuji
- Diagram 9
- Figure 4 (Moves 55 through 86)
- 65 captures ko
- Black recovers
- Diagram 10
- 10 connects
- Moves after 86 omitted
- Black wins by resignation
- Figure 1 (Moves 1 through 34)
- Black 18 puts up little resistance
- Diagram 2
- Diagram 4
- Figure 2 (Moves 35 through 66)
- Diagram 5
- Diagram 7
- Diagram 8
- Figure 3 (Moves 67 through 90)
- White walks a dangerous path
- Diagram 10
- Diagram 11
- Diagram 12
- Instead of worrying about the squared stone, Black took the initiative by attacking with 90. This led to Black’s victory.
- Moves after 90 omitted
- Black wins by 12 points
- Figure 1 (Moves 1 through 32)
- 21 Captures Ko
- Diagram 1
- Diagram 2
- Diagram 3
- Figure 2 (Moves 33 through 55)
- Two Terrible Moves
- Diagram 4
- Diagram 5
- Diagram 6
- Diagram 7
- Figure 3 (Moves 56 through 70)
- A weak attack
- Diagram 8
- Figure 4 (Moves 71 through 86)
- The game becomes close
- Diagram 9
- Moves after 86 omitted
- White wins by 2 points
- Figure 1 (Moves 1 through 23)
- The Iron Pillar
- Diagram 1
- Diagram 2
- Diagram 4
- Figure 2 (Moves 24 through 46)
- 44 Connects
- Black 26 is too generous
- Diagram 5
- Diagram 6
- Diagram 7
- Diagram 8
- Figure 3 (Moves 47 through 73)
- Meek play by Black
- Diagram 9
- Diagram 10
- Diagram 11
- Diagram 12
- Moves after 73 omitted
- White wins by 5 points
- Figure 1 (Moves 1 through 34)
- The shoulder hit is good
- Diagram 1
- Diagram 2
- Diagram 3
- Diagram 4
- Figure 2 (Moves 35 through 67)
- Too little resistance
- Diagram 5
- Diagram 6
- Diagram 7
- Figure 3 (Moves 68 through 83)
- More slack moves
- Diagram 8
- Diagram 9
- Diagram 10
- Diagram 11
- Figure 4 (Moves 84 through 100)
- Playing thickly
- Diagram 12
- Moves after 100 omitted
- Black wins by 3 points
Wyszukiwarka
Podobne podstrony:
How to play against stronger player
How to Play Against Maniacs
Garry Kasparov How to Play the Najdorf Vol 2
How to Play the Brain Game for Fun and Profit
Learn How To Play Guitar
Numbers How to Play(E)
How to play in a chord melody style
01 How To Play Drums
What s your name What s your game Show me how to play
Tutorial How to play guitar basics Yellow River Christie How to Play Guitar Chords and Lyrics pdf
091913 How to Play
Piano Lessons Learn How to Play Piano Course
How to play guitar Volare Gypsy Kings video tutorials
NLP Brain101 How to Play the Brain Game for Fun and Profit
How to Play the Guitar by Ear
Police Quest How to Play Five Card Draw Poker
więcej podobnych podstron