
Copyright 2003 Syngress Publishing, all rights reserved
This special Syngress e-book is
designed to provide quick,
step-by-step help to anybody trying
to wrestle with Win 2K Active
Directory and DNS configuration
Authors include:
Melissa Craft, Debra Littlejohn Shinder,
Ralph Crump, Paul Shields,
and David Smith
Copyright 2003 by Syngress
Publishing. All rights reserved.
DNS AND ACTIVE DIRECTORY
DNS makes Active Directory function, so the first thing you need to know is how to verify that DNS is
working, and how to install Windows 2000 DNS if it is not already on the network. Once DNS is
installed, you can configure it to meet your network’s needs. After some Domain Controllers (DCs) are
installed, you can integrate DNS zones into Active Directory, configure them with Dynamic DNS
(DDNS), and take advantage of Secure Dynamic Updates.
TOPIC 1: Installing DNS................................................................................................................ 2
TOPIC 2: Configuring Windows 2000 Domain Name System to Support Active Directory ........ 3
TOPIC 3: Setting Up a Windows 2000 Domain Controller ........................................................... 5
TOPIC 4: Locate Domain Controllers In Windows ..................................................................... 17
TOPIC 5: Promote and Demote Domain Controllers in Windows 2000...................................... 21
TOPIC 6: Design a Global Active Directory Domain and Trust Infrastructure ........................... 22
TOPIC 7: Integrating DNS into the Active Directory .................................................................. 34
TOPIC 8: Remove Data in Active Directory After a Failed Domain Controller Demotion ........ 37
TOPIC 9: Create a Child Domain in Active Directory................................................................. 38
TOPIC 10: Dynamic DNS ............................................................................................................ 39
TOPIC 11: DNS Namespace Planning ......................................................................................... 40
TOPIC 12: Modifying the Active Directory Schema ................................................................... 51
TOPIC 13: What Can Go Wrong, Will…..................................................................................... 65
TOPIC 14: Handy Active Directory Tools and Links .................................................................. 73

DNS and Active Directory
2
Copyright 2003 Syngress Publishing, all rights reserved
TOPIC 1: Installing DNS
Windows 2000 DNS is not installed automatically as part of the Windows 2000 Server operating system.
You can select to install DNS during the installation procedure, or you can add the DNS service later. To
add the service later:
1. Logon to the Windows 2000 server as an Administrator or equivalent.
2. Open
the
Control Panel.
3. Open
the
Add/Remove Programs.
4. Click
Add/Remove Windows Components.
5. Select
Networking Services under the Components list.
6. Click
Details.
7. Check the box for Domain Name System (DNS) and click OK.
8. Click
Next and insert the CD-ROM for your Windows 2000 Server software if prompted.
9. Click
Finish after the DNS software files have been copied.
How to Cheat…
Copyright 2003 Syngress Publishing, all rights reserved
3
TOPIC 2: Configuring Windows 2000 Domain Name System
to Support Active Directory
If the server does not have DNS installed or configured on it, it will not have Active Directory installed
either, because Active Directory depends on locating a DNS server. To configure DNS before running the
Active Directory Wizard:
1. Either
select
Start | Programs | Administrative Tools | DNS, or from the Windows 2000
Configure Your Server screen, select the Networking option in the left-hand pane. When it
expands, select DNS, and click the Manage DNS option in the right-hand pane that appears.
2. Select the server on which you will be configuring DNS.
3. Click
the
Action menu.
4. Choose
the
Configure the Server option.
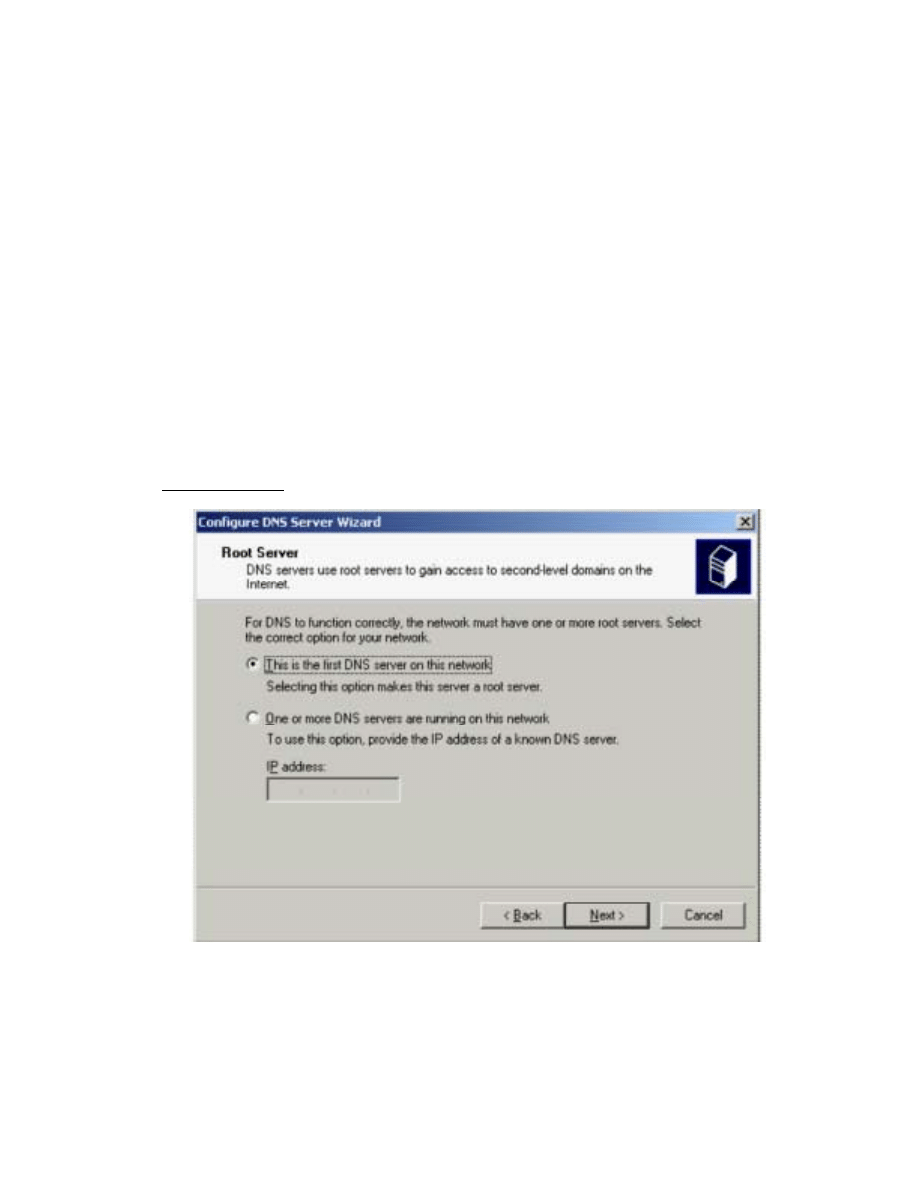
5. The Configure DNS Server Wizard appears with a Welcome screen. Click Next.
6. If this server will be a root server for DNS, select the first DNS server on the network as
shown in the following figure. If DNS is already installed and configured on the network,
select the second option.
DNS Root Server
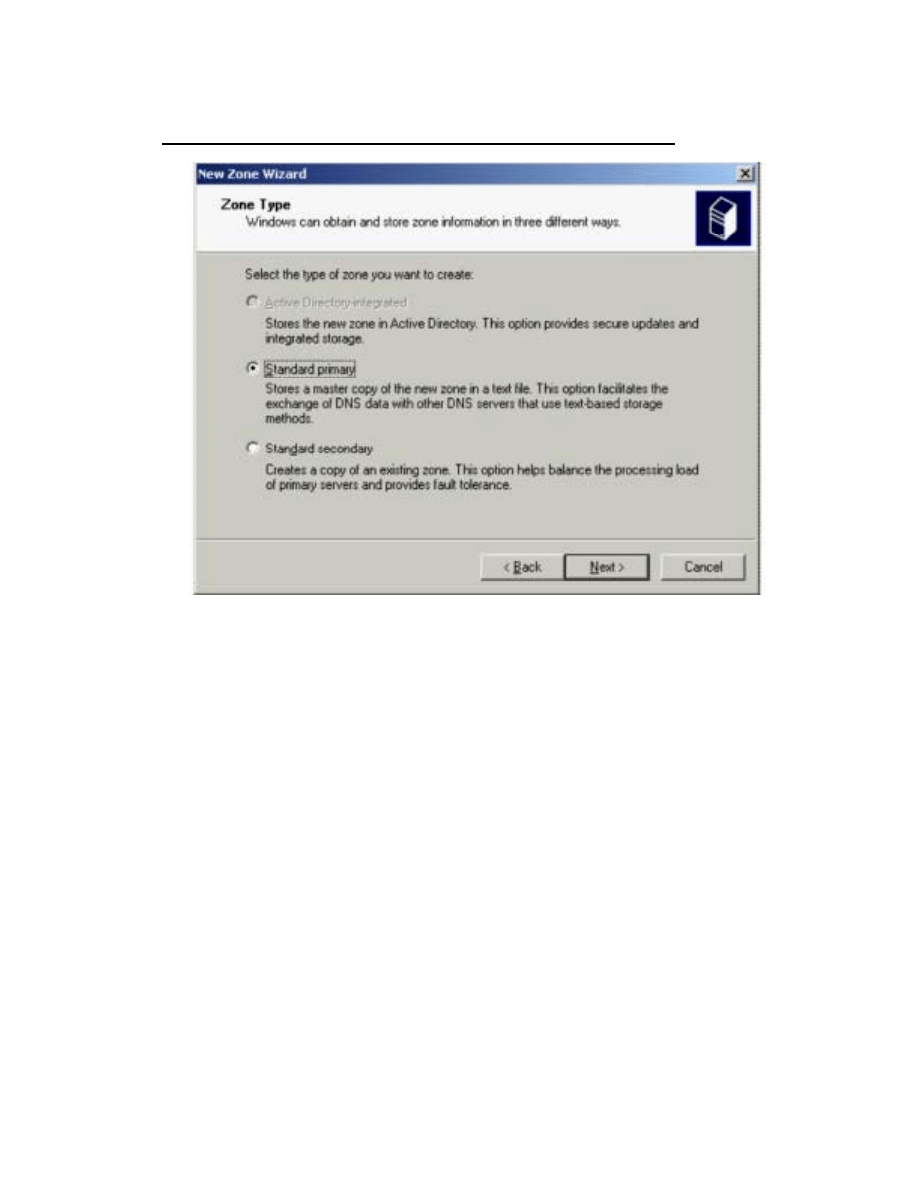
7. The Configure DNS Server Wizard will prompt you to create a Forward Lookup Zone. If
Active Directory is installed, then you will be able to use the Active Directory-integrated
option. However, if the server is a stand-alone or member server and you attempt to create a
Forward Lookup Zone, you will see that the Active Directory Integrated option is grayed out,
as shown in the following figure. Not to worry, simply select the second option to create a
Standard Primary for now, and click Next.
DNS and Active Directory
4
Copyright 2003 Syngress Publishing, all rights reserved
Active Directory Integration Not Available as a Stand-Alone DNS Server
8. The Configure DNS Server Wizard will provide a Summary page. If you need to make
changes, you can click Back. If not, click Finish to close the wizard screen.

How to Cheat…
Copyright 2003 Syngress Publishing, all rights reserved
5
TOPIC 3: Setting Up a Windows 2000 Domain Controller
The first domain in the Active Directory forest is the root domain. This domain is special, not only
because it automatically is given all the Flexible Single Master Operations (FSMO) roles until you move
them at a later time, but also because it is the test bed for your installation routines. As you add more
domains to the forest, you will become more proficient at the process. The first domain, though, is where
you cut your teeth.
The first DC in Active Directory receives the honor of being the DC for the root domain of the
first forest. In other words, the installation of Active Directory on the first DC is the same thing as the
installation of the root domain. Performing the installation of the DC requires that you know something
about it. The following table lists the types of information needed to install the first Windows 2000 DC.
Information Required for Windows 2000 Installation
Server Information
Example
Domain name
Root.com
Server DNS name
Server.root.com
Server NetBIOS name
Server
Partition and size
C: and 2 GB
File system
NTFS
System directory
\WINNT
Name of license owner
M.Y. Name
Organization of license owner
My Org
Language English
Keyboard U.S.
License mode (per seat or per server)
Per seat
Administrator’s password
Hx346xqmz3
Time zone
Arizona GMT -7
Before you install DNS, you must have a static IP address assigned to the server. If you selected
all the defaults during the server installation, then you will automatically be using a DHCP address on the
server. You must change this to a static address:
1. Log on to the server as an Administrator or equivalent.
2. Open
the
Control Panel.
3. Open
Network and Dial-up Connections.
4. Right-click the network connection where you want to assign the IP address, likely named
Local Area Connection.
5. Click
Properties in the pop-up menu.
6. Click
Internet Protocol (TCP/IP).
7. Click
Properties.
8. Type in the appropriate IP address, subnet mask, and gateway addresses where indicated.
9. Click
the
Advanced button.
10. Click the DNS tab.
11. Select Append primary and connection specific DNS suffixes.
12. Check the box for Append parent suffixes of the primary DNS suffix.
13. Check the box for Register this connection’s addresses in DNS.
DNS and Active Directory
6
Copyright 2003 Syngress Publishing, all rights reserved
14. Enter the DNS Server’s own IP address is in the Addresses for DNS servers area. You
should remove all other IP addresses and make certain that the forwarder is configured for the
server.
15. Click OK to close the dialog, then click OK to accept the changes to TCP/IP.
16. Click OK to close the connection properties dialog.
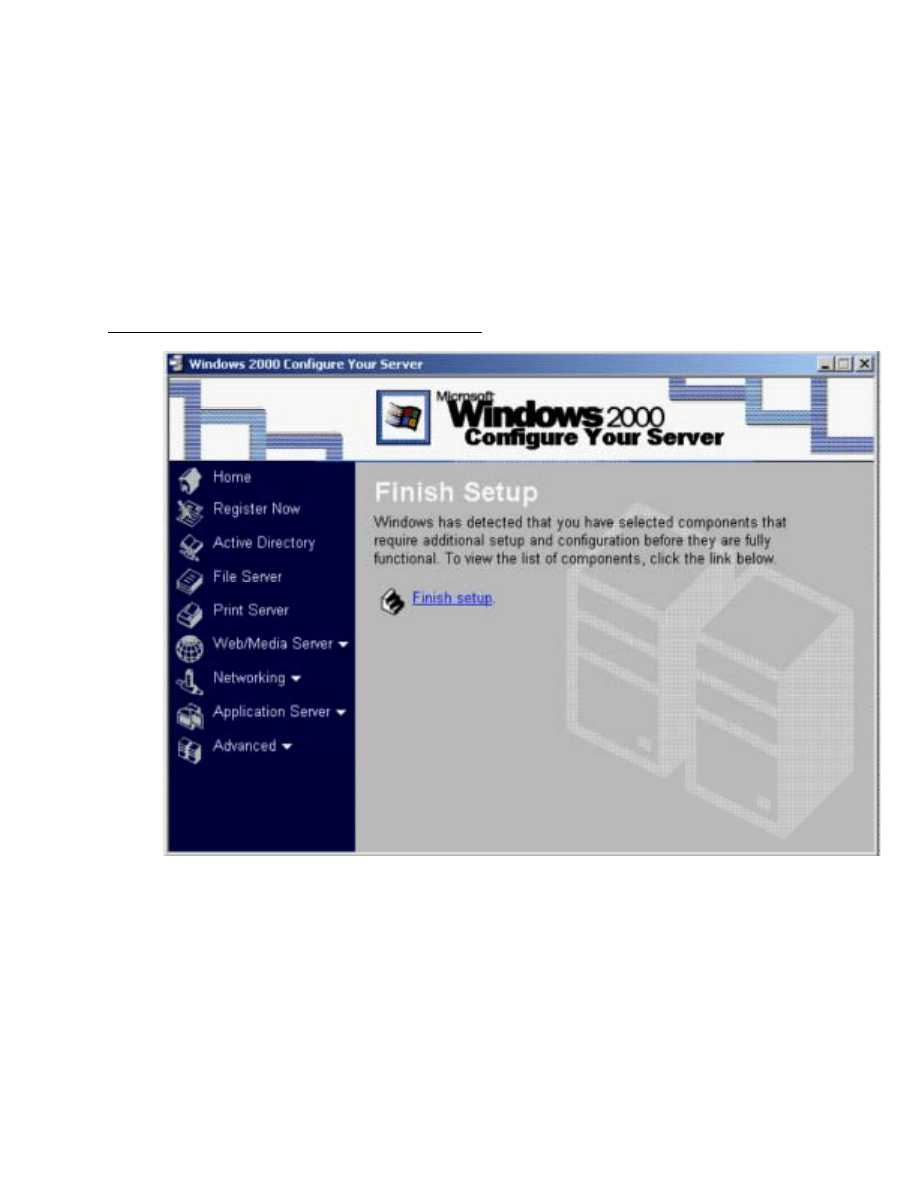
When logging on to the Windows 2000 Server for the first time, you will see a new screen as
shown below. You will continue to see this same dialog thereafter, unless you’ve configured the screen to
no longer appear. This wizard has been designed to provide a single interface to assist in configuring
Windows 2000 Server.
Configuring Windows 2000 Server for the First Time
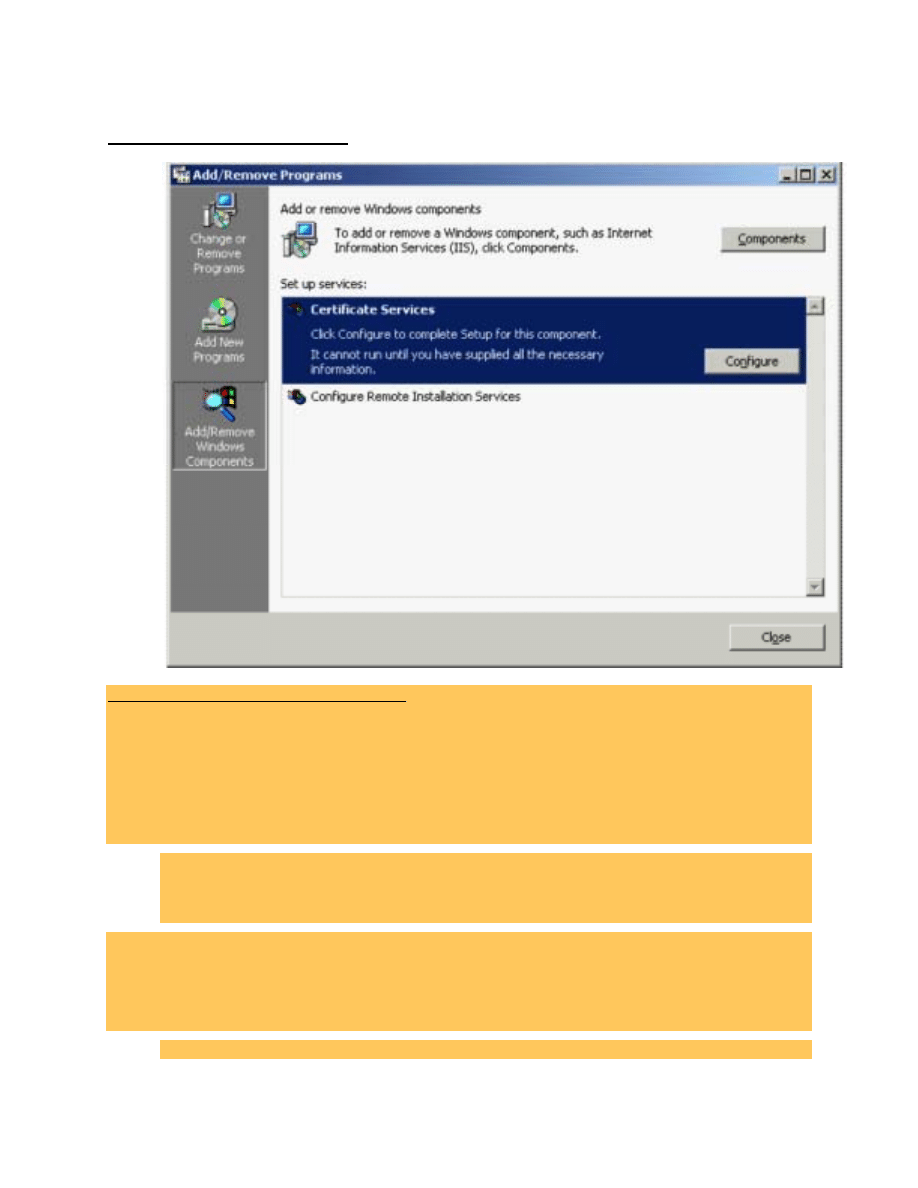
This screen also prompts you to complete the Windows 2000 Server setup. When you click
Finish Setup, a new screen appears that displays the Add/Remove Programs utility from Control Panel.
In fact, the original screen remains available for you to return to. As you browse through its contents, you
will realize that it is simply a single compilation of all the utilities that are useful during the first
installation of a new Windows 2000 Server. All of these items can be accessed through the Control Panel,
the Administrative Tools, or through the command-line interface. This console utility was developed to
simplify the Administrator’s tasks for configuring any new Windows 2000 Server.
How to Cheat…
Copyright 2003 Syngress Publishing, all rights reserved
7
The Add/Remove Programs Panel
A
A
u
u
t
t
o
o
m
m
a
a
t
t
i
i
n
n
g
g
I
I
n
n
s
s
t
t
a
a
l
l
l
l
a
a
t
t
i
i
o
o
n
n
f
f
o
o
r
r
W
W
i
i
n
n
d
d
o
o
w
w
s
s
2
2
0
0
0
0
0
0
If you have multiple servers to install that have identical hardware configuration, you can create a setup
file to automate the installation of each of them. Automated installation is a function that Windows 2000
inherited from Windows NT. An automated installation will reduce the deployment time for multiple
machines, but it buys little time for just a few of them because of the setup file development time
involved. One benefit that is worth the extra time is that all the servers deployed with the same setup file
will have the identical configuration.
In order to automate a Windows 2000 installation, you will need:
• The WINNT.exe program
• A network share that includes a copy of the files that are on the Windows 2000 CD-ROM
• An answer file that you create
To run the automated installation, you need to boot the server to a DOS prompt and run the command
winnt /u:answer.txt /s:<path to the Windows 2000 source share>.
The Windows 2000 source share is the network directory that contains the installation files, including
Windows 2000 files from the CD-ROM, new device drivers, and any additional files that you want to
copy. The structure of the Windows 2000 source files for an Intel server would be:
\I386 Windows 2000 source directory

DNS and Active Directory
8
Copyright 2003 Syngress Publishing, all rights reserved
\i386\$oem$ All OEM files
\i386\$oem$\Textmode txtsetup.oem, scsi, and HAL files
\i386\$oem$\$$ Maps to %systemroot%
\i386\$oem$\$1 Maps to %systemdrive%
\i386\$oem$\<drivers_dir> Plug-and-play drivers
\i386\$oem$\<drive letter> Maps to a drive on the computer
You can create an answer file using the Setup Manager tool. Setup Manager will also create the
network share for the Windows 2000 source files. The answer file is a plain text file that can also be
created and edited in any text editor, such as Notepad.
Active Directory Wizard
Windows 2000 Server installs automatically as a standalone server, unless an upgrade has been performed
on a legacy NT primary or backup domain controller (BDC). When an upgrade is performed, the Active
Directory Wizard begins automatically. The Active Directory Wizard is available from the Configure
Windows 2000 Server screen under Active Directory.
The Active Directory database can be placed on an NTFS disk partition only. If the server’s file
system is not NTFS, it will need to be converted to NTFS before Active Directory will install. To convert
the file system quickly, the command CONVERT /FS:NTFS can be executed from the command prompt.
The next time the server boots, it will convert the file system to NTFS.
To execute the Active Directory Wizard, select Active Directory from the navigation bar in the
Configure Windows 2000 screen, which will take you to the Active Directory screen. This page will not
only lead you to the Active Directory Wizard, but also offers you links to more information about DCs,
domains, and forests. If you prefer, you can click Start | Run and type Dcpromo in the dialog box, then
click OK to execute the Active Directory Wizard directly.
The first screen of the wizard is a Welcome screen. Click Next to continue. The Domain
Controller Type page appears asking you to select whether this will be the first DC in a new domain, or a
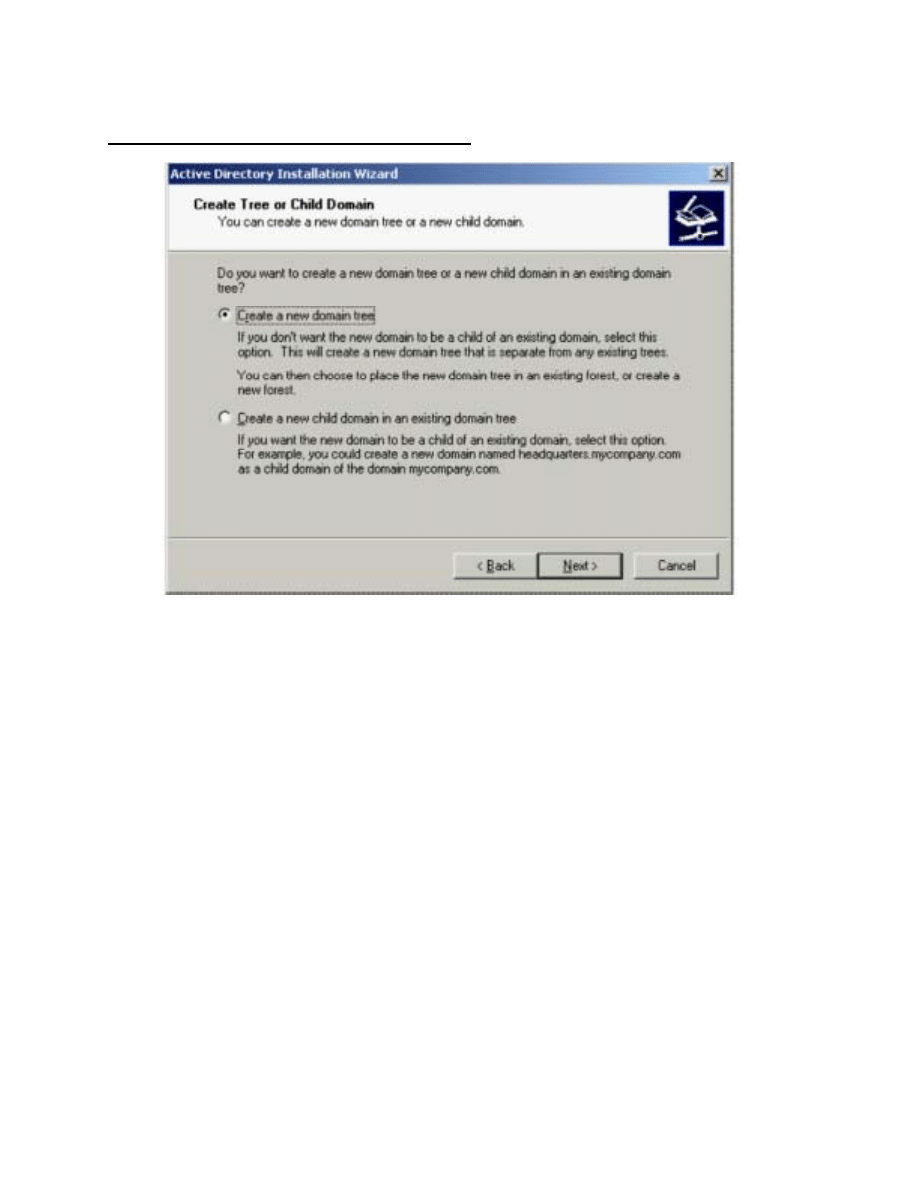
DC in an existing domain. Since this is the first DC, select that option. After clicking Next, the Create
Tree or Child Domain window appears, as shown here. This allows you to select whether this is the first
domain in a tree, or if it is a child domain. Since this is a DC for a root domain, select the Create a new
domain tree option.
How to Cheat…
Copyright 2003 Syngress Publishing, all rights reserved
9
The Create Domain Tree or Child Domain Window
The Create or Join Forest page appears, which will allow you to create a new forest, or to place
this domain tree in an existing forest. For a forest root domain, create a new forest. The Active Directory
Wizard displays its DNS component in the next screen. It will detect that DNS is not running on the
current computer and will ask to configure the client or to install this server as a DNS server.
At this point, if you want the installation to proceed smoothly, click the Start button and
manually configure either the DNS client or the DNS server. If you are configuring the server, make
certain to configure the zones to accept dynamic updates, or manually input the RRs. You will need to
configure the DNS client to use the server’s own IP address if it is the DNS server. Then, when you have
completed these tasks, go back to the Active Directory Wizard and click the Back button. Then click
Next again and hopefully you will not see this dialog screen again. If you do see the screen shown here,
the server has not discovered itself or been able to register itself in DNS. This may be due either to a
misconfiguration, or there is a disconnection somewhere in the network.

DNS and Active Directory
10
Copyright 2003 Syngress Publishing, all rights reserved
Active Directory Depends on DNS
The RRs that a DC will register are the following. In this example, we are assuming that the
server is named DC1.corp.syngress.com, with an IP address of 10.10.204.5:
Dc1.corp.syngress.com. A 10.10.204.5
_ldap._tcp.corp.syngress.com. SRV 0 0 389 dc1.corp.syngress.com
_kerberos._tcp.corp.syngress.com. SRV 0 0 88
dc1.corp.syngress.com
_ldap._tcp.dc._msdcs.corp.syngress.com. SRV 0 0 389
dc1.corp.syngress.com
_kerberos._tcp.dc. msdcs.corp.syngress.com. SRV 0 0 88
dc1.corp.syngress.com
Every DC will have similar RRs. If a query is executed against DNS looking for
_ldap._tcp.dc._msdcs.corp.syngress.com, then the response will include all the names and IP address
locations for each DC in the corp.syngress.com domain.
If you look through your DNS console, you may notice that there are other records registered in
the zone for a DC. Each DC runs the NetLogon service. That service will register SRV records in DNS
based on the server’s capabilities. These SRV RRs are listed below, and are using DC1.corp.syngress.com
as the name of the DC, SITE as the name of the site, and syngress.com as the Forest name because
syngress.com is its root domain. GUID represents a Globally Unique Identifier (GUID) for a domain even
though that GUID will be a lengthy series of letters and numbers separated by dashes.

How to Cheat…
Copyright 2003 Syngress Publishing, all rights reserved
11
SRV RRs Registered by NetLogon
SRV RR
Which Servers
Register This
RR
Used for
_ldap._tcp.corp.syngress.com
All DCs and
servers
Finding an LDAP server
_ldap._tcp.SITE._sites.corp.syngress.com All
DCs
Finding an LDAP server
in a particular site
_ldap._tcp.dc._msdcs.corp.syngress.com
All DCs
Finding a DC in a
particular domain
_ldap._tcp.SITE._sites.dc._msdcs.corp.syngress.com
All DCs
Finding a DC in a
particular domain and
site
_ldap._tcp.pdc._msdcs.corp.syngress.com
Only PDC or
PDC emulator
Finding the PDC or PDC
emulator
_ldap._tcp.gc._msdcs.syngress.com All
Global
Catalog servers
Finding a Global Catalog
server in the forest
_ldap._tcp.SITE._sites.gc._msdcs.syngress.com All
Global
Catalog servers
Finding a Global Catalog
server for a particular site
_gc._tcp.syngress.com An
LDAP
server serving
a GC server
Finding a Global Catalog
server
_gc._tcp.SITE._sites.syngress.com An
LDAP
server serving
a GC server
Finding a Global Catalog
server in a particular site
_ldap._tcp.GUID.domains._msdcs.syngress.com
All DCs
Finding a domain using a
GUID—used only if the
domain name has been
changed
_kerberos._tcp.corp.syngress.com
All servers with
Kerberos
Finding a Kerberos Key
Distribution Center
(KDC) in the domain
_kerberos._udp.corp.syngress.com
All servers with
Kerberos
Finding a KDC in the
domain using UDP
_kerberos._tcp.SITE._sites.corp.syngress.com
All servers with
Kerberos
Finding a KDC in the
domain and site
_kerberos._tcp.dc._msdcs.corp.syngress.com All
DCs
with
Kerberos
Finding a KDC in the
domain
_kerberos._tcp.SITE._sites.dc._msdcs.corp.syngress.com All
DCs
with
Kerberos
Finding a DC with KDC
in the domain and site
_kpasswd._tcp.corp.syngress.com
All servers with
Kerberos
Finding a KDC that
changes passwords on
Kerberos in the domain
_kpasswd._udp.corp.syngress.com
All servers with
Kerberos
Finding a KDC that
changes passwords on
Kerberos in the domain
using UDP
Before going further with the Active Directory Wizard, a DNS server that is locatable on the
network must have the new domain’s DNS name registered as a zone. That DNS server must be
authoritative for the new domain as well. The new DC’s RRs must be in the zone already, or the zone
must accept dynamic updates.

DNS and Active Directory
12
Copyright 2003 Syngress Publishing, all rights reserved
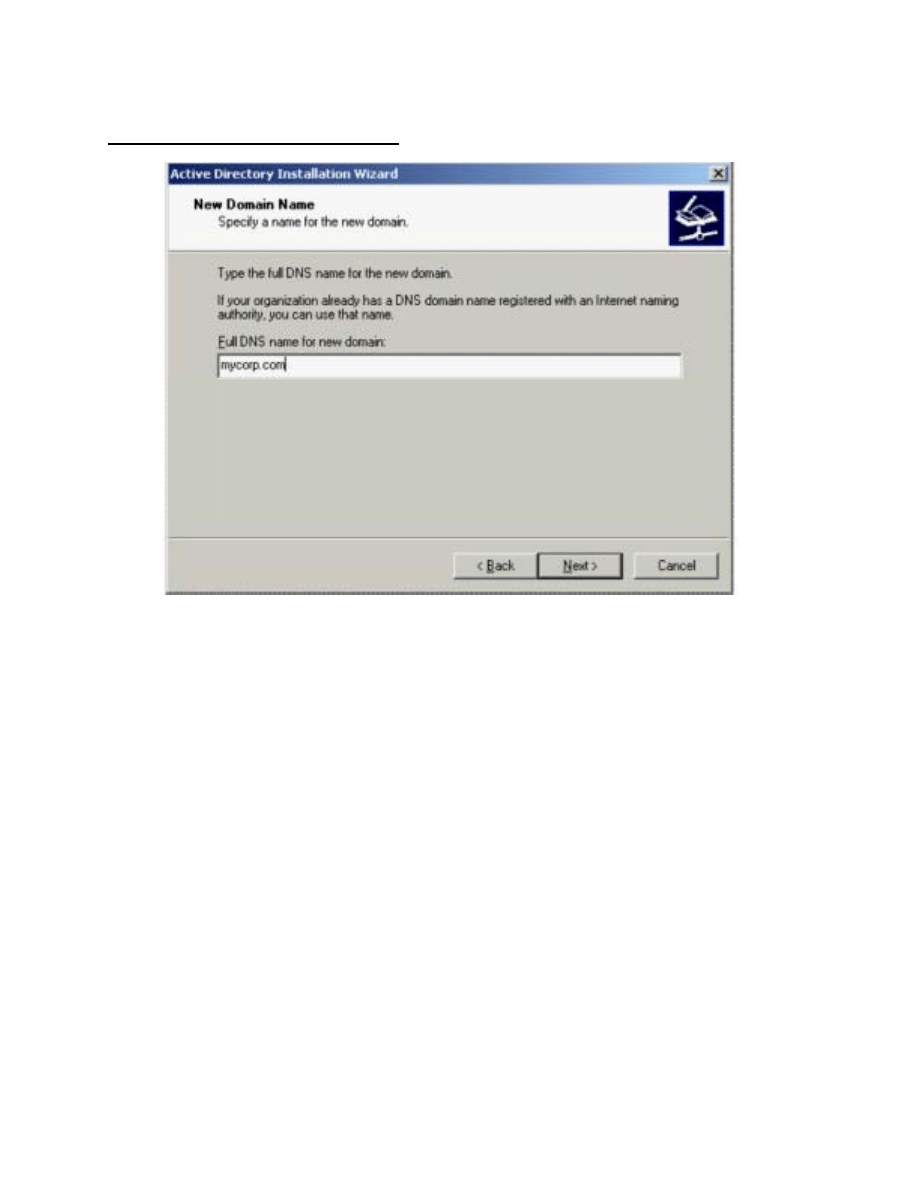
The new domain being created will need a DNS name. Unlike Windows NT, this name is not a
NetBIOS name such as MYDOMAIN, but a true DNS name such as mydomain.com. The wizard dialog
that appears after prompting for the DNS configuration establishes the DNS name for the domain, as
shown here.
How to Cheat…
Copyright 2003 Syngress Publishing, all rights reserved
13
Establishing the New DNS Domain Name
Even though the domain will have a DNS name, it will also have a NetBIOS name for
compatibility with legacy domains. The following screen prompts for the NetBIOS name. This does not
have the same format as the DNS name, nor does it have to have the same name. For example, if the
domain’s DNS name is mydomain.com, the NetBIOS name could be something totally unrelated to the
DNS name, such as CAPNKIRK. Even though this is a capability for backward compatibility, using a
similar name for both the DNS and NetBIOS names will make the domain easier for users to use. For
example, a DNS name will end with a .com (or .edu, or .gov, or .local, etc.), and a company named My
Domain Inc. may use mydomain.com as the DNS name; then the name MYDOMAIN can be the
NetBIOS name for the same domain. Type the NetBIOS name and click Next to access the following
wizard screen.
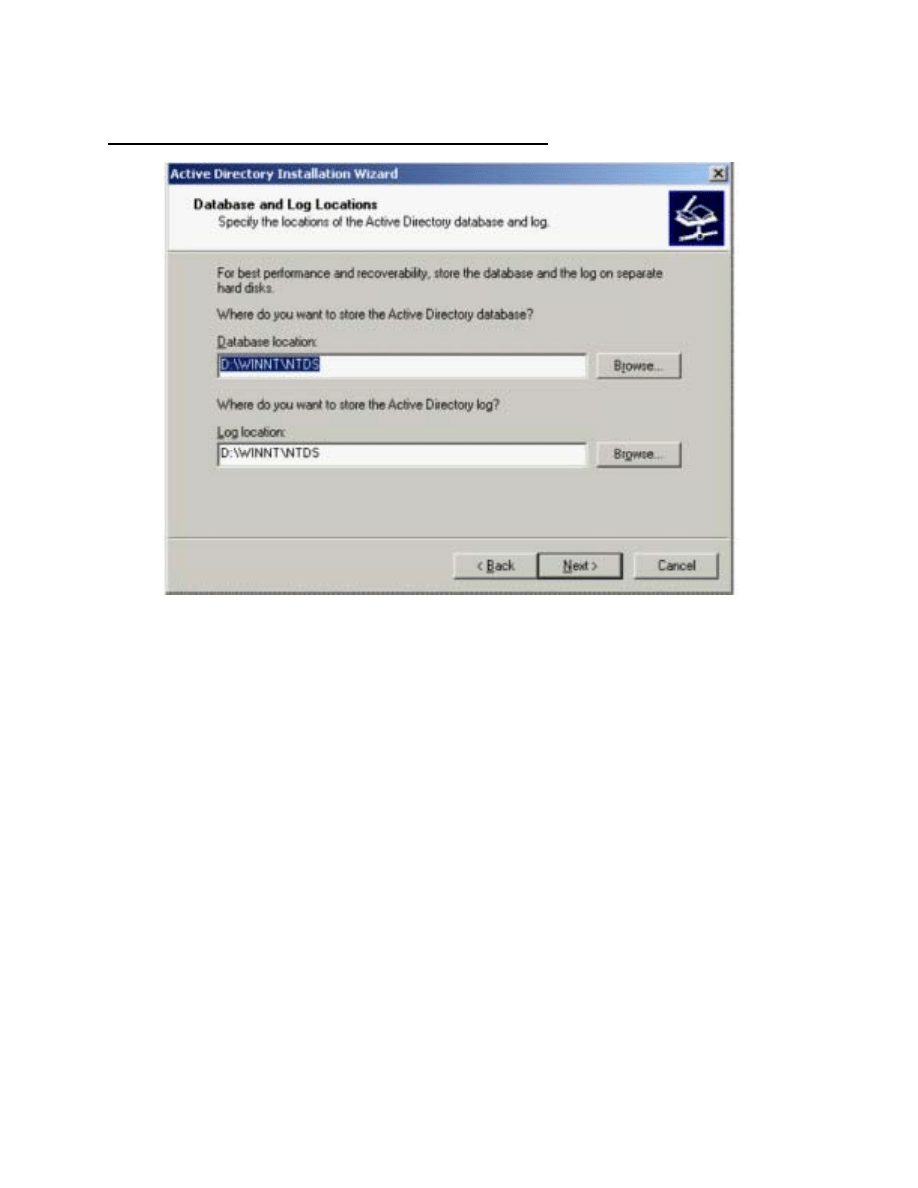
You are next prompted to select the location for the Active Directory database and logging files.
Make sure that the location has enough space for growth of the directory. For optimal performance and to
be able to recover the server, these two files should not be in their default locations, but on separate
partitions of separate physical disks. The default locations for these files are on the system partition
within the WINNT directory:
DNS and Active Directory
14
Copyright 2003 Syngress Publishing, all rights reserved
Default Locations for Active Directory Database and Log Files
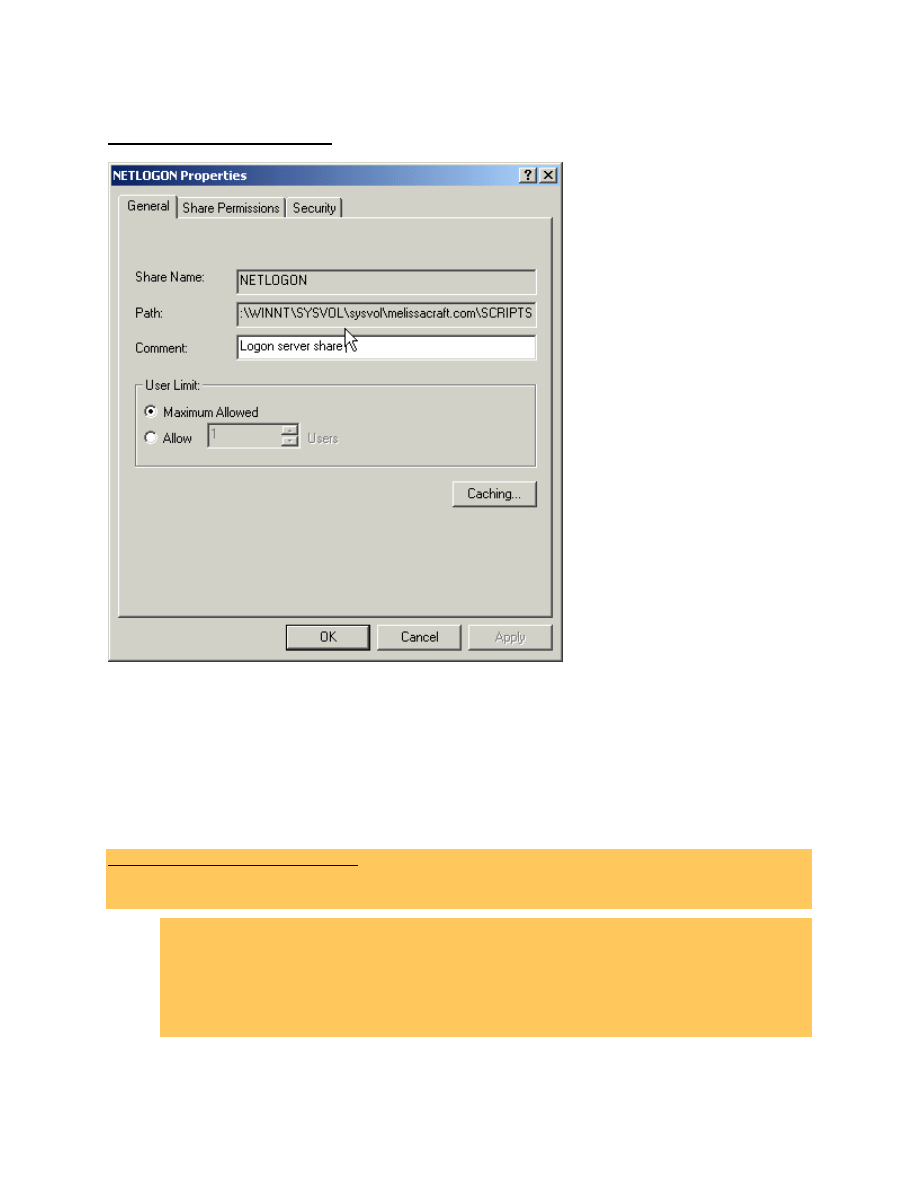
The next wizard dialog lets you select a folder for the system volume. The system volume is a
folder that is replicated to every DC. SYSVOL contains the directory service information that must be
replicated. Because of the replication, the SYSVOL directory must be placed on an NTFS 5.0 partition.
Information that must be replicated for the Active Directory includes the files necessary to enable logon.
Traditionally, the NETLOGON share handles this. Logon still is handled by NETLOGON, but now that
NETLOGON folder is a subdirectory of SYSVOL, which means that it will be replicated with the Active
Directory system information and will enable logon. The folder properties showing the NETLOGON
share location are depicted in the following figure. Group policy templates and information are also
replicated by being placed within SYSVOL since they are required by all DCs when applying group
policy. The default folder is the WINNT\SYSVOL directory. Like the database and log files, it is optimal
to make sure that this folder is on a partition that will have enough space for growth, which may not be
the default folder in the system partition.
How to Cheat…
Copyright 2003 Syngress Publishing, all rights reserved
15
NETLOGON Properties Screen
After clicking Next, the Active Directory Wizard will ask whether this is a mixed domain that
uses Windows NT 4 RAS (Remote Access Service) servers. The issue is related to security. In order to
use Windows NT 4 RAS servers, permissions must be less secure. Select the option that makes sense for
your network, and click Next.
The following dialog will provide the Administrator password to be used when restoring the
Directory Services. This is a different password than the server’s local Administrator account, which
means that the password can be the same or may be different. Make sure that the password is available for
use in case of a disaster. Click Next.
Active Directory Recovery Console
Directory Service Restore mode is applicable only to Windows 2000 DCs for restoring the Active
Directory service and SYSVOL directory. Restore mode is a command-line console that can be used to
• Start or stop services
• Format a hard drive
• Copy or view files on the server’s NTFS drives
• Repair the system by copying a file from a floppy or other drive
• Reconfigure a service that is preventing the system from starting

DNS and Active Directory
16
Copyright 2003 Syngress Publishing, all rights reserved
If the Recovery Console has been installed, it is available from the list of operating systems in the
startup of the computer. If it has not been installed, you can run it from the Windows 2000 Setup program
on the CD-ROM. This will function only if the server can boot from the CD-ROM.
To install the Recovery Console as a startup option for Windows 2000:
1. Start Windows 2000 Server and log on as Administrator.
2. Click
Start | Run and type CMD in the box to open a command prompt.
3. Make sure that the Windows 2000 Server CD is in the drive, or that the CD’s contents are
available on a network share.
4. At the command prompt, change to the drive that contains the I386 directory.
5. From the I386 or ALPHA directory, type WINNT32 /CMDCONS.
6. The first dialog will allow you to bail out of the install by clicking No, or continue by
clicking Yes. Click Yes to continue.
7. After files are copied, a final dialog screen appears stating that the console has been installed.
Click OK to close the screen.
8. To run the Recovery Console, restart the server and select the Recovery Console option from
the list of operating system options in the Boot menu.
The wizard will display a summary page. Review this page to ensure that the options selected are the ones
required for your installation. If the options are not correct, this is the last chance to click Back to change
those options. If they are correct, click Next and . . . wait. The Active Directory Wizard will take a
considerable amount of time to install Active Directory Services, and even longer if installing a DC that is
not the first in the forest, and must replicate to an existing, populated Active Directory.

How to Cheat…
Copyright 2003 Syngress Publishing, all rights reserved
17
TOPIC 4: Locate Domain Controllers In Windows
In order for clients to log on to Active Directory, DNS is required to locate the DCs. The NetLogon
service requires a DNS server that supports the SRV RRs because SRV RRs both register and identify the
DCs in the DNS namespace.
SRV (service locator) RRs are used to locate Active Directory domain controllers (DCs). This
type of RR enables multiple servers that provide the same type of service to be located with a single DNS
query. Under Active Directory, the SRV RR is the means by which clients locate DCs using LDAP
(Lightweight Directory Access Protocol) via TCP port 389.
SRV RR fields consist of service.protocol.name ttl class SRV preference weight port target:
• Service A name for the service. RFC1700 defines the names used for well-known
services. Otherwise, the Administrator can specify his or her own name.
• Protocol The transport protocol used. RFC 1700 defines the available protocols, but
usually this is TCP or UDP.
• Name The DNS domain name.
• TTL Time to Live. This field can be left blank.
• Class One of four classes. IN is the most common and represents the Internet. This field
can be left blank.
• Preference The number between 0 and 65,535 representing whether the target host
should be contacted first. The lowest number has priority over others.
• Weight The number between 1 and 65,535 used to load balance when two or more target
hosts have the same priority. Usually set to 0 when load balancing is not used.
• Port The transport protocol port represented by a number between 0 and 65,535. well-
known services use ports that are listed in RFC 1700.
• Target The host’s DNS domain name that is providing the service.
An example of an SRV RR that will look for a service from one of two different servers is:
ldap.tcp.name SRV 0 0 389 dns1.root.com
SRV 1 0 389 dns2.branch.root.com
DNS servers for the zones that supply the RRs for an Active Directory must be compatible with
Active Directory or Active Directory will not function. If even one DNS server is incompatible for that
zone, then problems ensue. For example, if a secondary DNS server for AD.DOMAIN.COM is not
compatible because it doesn’t support SRV RRs, at any point in time some host on the network could
query that incompatible DNS server and not find the SRV RRs needed to locate Active Directory
(because they are eliminated automatically from that secondary zone file due to not being understood).
This situation is worse if the incompatible DNS server is primary for the domain, because then all zone
transfers update the secondary servers with a database that does not include SRV RRs.
The requirement of being able to contact a compatible DNS server by Active Directory DCs is
absolute. When a Windows 2000 Server is promoted to a DC, it must have a DNS server available to it. If
there is no DNS server discovered, then the wizard offers to install the DNS service. However, this does
not resolve the need for DNS because it will not create the RRs needed for the Active Directory domain’s
zone. The best way to handle this situation is to stop the Active Directory installation process, then install
and configure a compatible DNS server on the network, and after that, resume the installation.
Windows 2000 DNS can interact with WINS, the Windows Internet Naming System. In a pure
Windows 2000 network, using WINS is not necessary. However, for backward compatibility with older
Windows networks, WINS is required to provide NetBIOS computer name mappings to IP addresses. The
Windows 2000 DNS service can provide name resolution responses for any names that it learns from
WINS.

DNS and Active Directory
18
Copyright 2003 Syngress Publishing, all rights reserved
After Active Directory is installed, there are two ways to store and replicate DNS zones:
• Standard text-based file storage for the zone, either primary or secondary
• Active Directory integrated storage for the zone
In Windows 2000 DNS, the local text files that store zone information use a .dns extension and
are stored in the %SystemRoot%\System32\DNS directory on each Windows 2000 server acting as a
DNS server. The first part of the name is the name of the zone; for example, the ARABLE zone will be
stored in the ARABLE.dns file.
How Active Directory Uses DNS
Windows 2000 DCs register SRVs so that Administrators can use several servers for a single domain and
move services among the DCs. Every DC that has registered SRV RRs also registers an A RR so that its
individual host address can be found. For example, when looking for the address
http://www.mycorp.com, the lookup is for http.tcp.www.mycorp.com. The www, in this case, refers to a
service that is shared by multiple individual servers. The query retrieves a Web document from any of the
available servers.
The main impact that SRV records have on the internetwork is that the DNS servers must support
them. Preferably, DNS servers should support dynamic updates via Dynamic DNS (DDNS) as well. SRV
records are described in RFC 2052, and DDNS is discussed in RFC 2136. These requirements limit the
versions of DNS that can be used with Active Directory. The following DNS servers are supported:
• Microsoft’s Windows 2000 DNS, which supports SRV records and dynamic updates for DNS
• UNIX BIND version 4.9.7, which supports SRV records
• UNIX BIND version 8.1.2 and beyond, which also supports Dynamic DNS updates
N
OTE
The only option that you have if your DNS does not support SRV RRs is to upgrade or migrate to
a DNS version that does. Then, install it on all DNS name servers for the zone that provides the
Active Directory domain name.
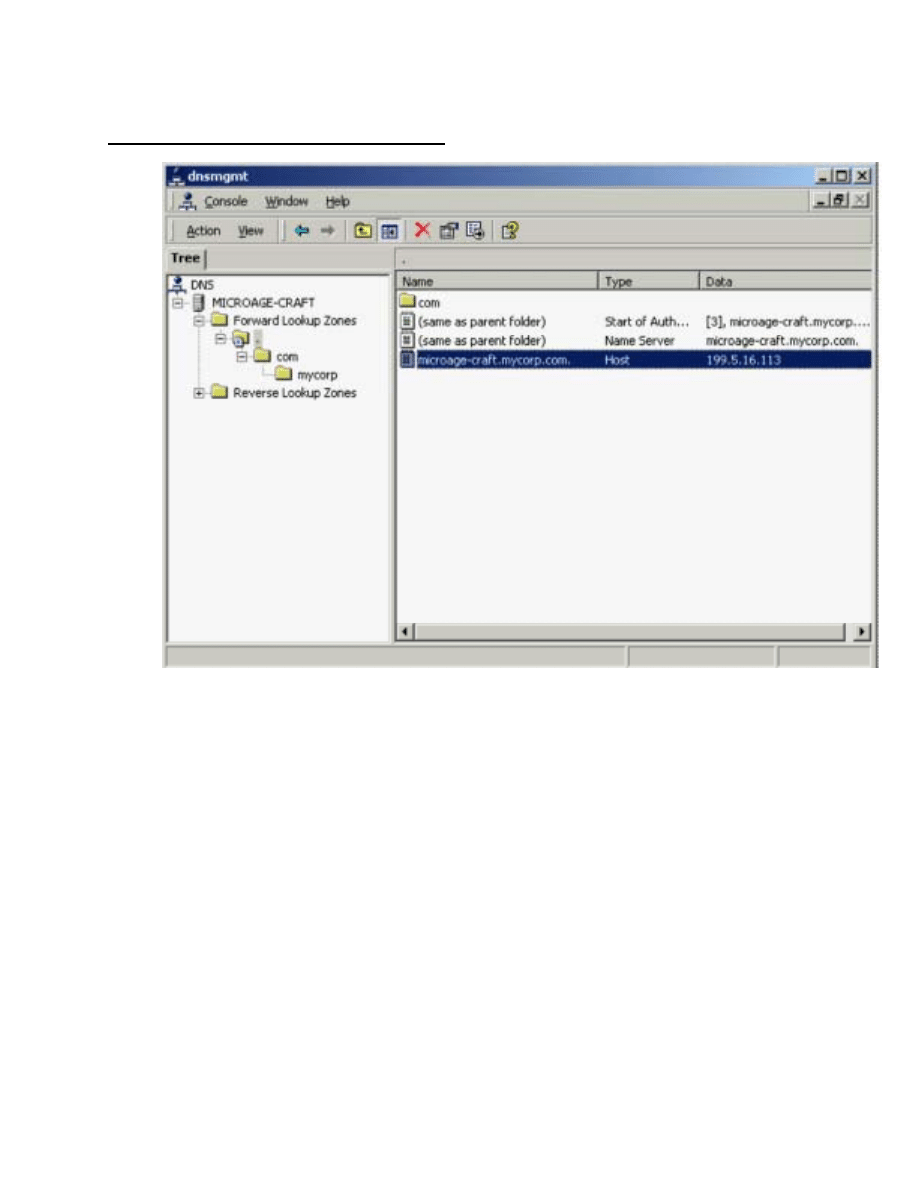
On a Windows 2000 Server, DNS uses its own Microsoft Management Console (MMC) snap-in
utility. All management for DNS can be executed from this utility, which is displayed below. If you are
tied to the command line, Microsoft also provides a command-line tool for DNS called DNSCMD.
How to Cheat…
Copyright 2003 Syngress Publishing, all rights reserved
19
Microsoft Management Console Utility for DNS
If you are using Windows 2000 DNS and install it on DCs, you have the option of using Active
Directory-integrated zones. When DNS is integrated into Active Directory, the DNS zone benefits from
Active Directory’s native Multi-Master replication. An update is received for a zone by any DC. The DC
writes the update to Active Directory, which is then replicated to all other DCs installed with DNS via
normal intersite and intrasite replication. Any DNS server, which is also a DNS server with that Active
Directory-integrated zone anywhere in the internetwork, will receive the updated information. When you
use the Microsoft Windows 2000 DNS integrated with Active Directory, there is no need to implement
any other type of replication for DNS other than that already configured for Active Directory.
One of the benefits of Active Directory-integrated zones is that it removes the single point of
failure for updates being written to a primary DNS zone file. If you are using DDNS, then you cannot be
certain when a host will register itself in the DNS database. DDNS’ dynamic updates are helpful for
reducing the administration needed for DNS since updates no longer require an Administrator to
personally enter the RRs into the zone. However, a standard primary DNS server can become a single
point of failure if it becomes unavailable. Since the primary server holds the only DNS database that can
be updated, a dynamic update will fail when that server is down.
There is always the chance for conflicts when Multi-Master replication exists. When Microsoft’s
DNS is integrated with Active Directory, name-change conflicts are handled on a first-come, first-served
basis. If two DNS servers create the same name or make changes to an RR, the first one to write it to
Active Directory wins.

DNS and Active Directory
20
Copyright 2003 Syngress Publishing, all rights reserved
You can convert a zone to any other type of zone. For example, you can convert a primary zone
to a secondary zone, a secondary zone to a primary zone, a primary zone to an Active Directory-
integrated zone, and so forth. If you perform a conversion of an Active Directory-integrated zone to a
primary zone, you must delete the zone from all DCs that were also DNS servers authoritative for the
zone.
When a zone is converted to an Active Directory-integrated zone, DnsZone and DnsNode objects
are added to Active Directory. Each zone becomes a DnsZone container, which then contains a DnsNode
leaf object for each unique host name in the zone. The DnsNode objects have an attribute called
DnsRecord, which can contain multiple record values associated with the DnsNode object.
N
OTE
Active Directory is loosely consistent, and that can affect results for name resolution. With Multi-
Master replication, the Active Directory database occasionally can have conflicts, and those
conflicts can affect an Active Directory-integrated zone. For example, a person in Site 1 can
change the DNS record for Server1.Domain.com and at the same time, a person in Site 2 can
change the records with different values. If a query is made to a DNS server in Site 1, the results
will reflect one value and a query made in Site 2 will reflect the other value. After Active
Directory synchronizes, the last change is replicated to all DNS servers for that zone. However,
while the conflict exists, the name can be resolved in two different ways.
One benefit for Active Directory-integrated zones is being able to use Secure DDNS updates.
Because Active Directory includes the ability to grant access rights to resources, once a DnsZone object is
added to Active Directory, an Access Control List (ACL) is enabled. You can then specify users and
groups who are allowed to modify the Active Directory-integrated zone. Secure DDNS is available only
when you implement Active Directory-integrated zones.

How to Cheat…
Copyright 2003 Syngress Publishing, all rights reserved
21
TOPIC 5: Promote and Demote Domain Controllers in
Windows 2000
Even though a server was a member server in a legacy Windows NT domain, it can easily be promoted to
an Active Directory DC after it is upgraded to Windows 2000 Server. This is a change from legacy
Windows NT where DCs had to be specified during installation only. The legacy Windows NT server’s
role could not be changed afterward. Now, the server can be promoted to a DC and demoted to a member
server whenever deemed necessary.
Windows 2000 Server provides a tool with which to promote a member server to a DC: the
Active Directory Wizard, or DCPROMO.EXE. As a member server, the Windows 2000 Server uses DNS
to contact a DC and check to make sure that requesting users actually have the correct rights to use
whatever resource they are requesting. When a member server is promoted to a DC, the server copies the
Active Directory locally. As a DC, the server simply uses its local database to ensure that there are
appropriate permissions.
Another change that occurs when a member server is promoted to a DC is that it can now make
changes to the Active Directory on its locally stored database. The server then participates in the
replication topology, which increases the traffic between it and its peer DCs on the network.
Uninstalling Active Directory
Uninstalling Active Directory will demote the domain controller to either a stand-alone or member server.
This process removes the system from any forest and from DNS. By demoting a server, you remove
Active Directory and all security principals, which are replaced by the default security database installed
during a new installation. If you are demoting a domain controller, and it is not the last domain controller
in the domain, it will perform a final replication among the other domain controllers. If an attempt to
demote a domain controller is unsuccessful, you will need to manually remove the metadata from the
directory by using the Ntdsutil.exe utility. For further information on using the Ntdsutil.exe utility to
remove Active Directory, see article number Q216498 in the online Microsoft Knowledge Base.
1.
To uninstall Active Directory, start the Active Directory Installation Wizard.
2.
The Active Directory Installation Wizard will tell you that the computer is already an
Active Directory domain controller, and proceeding will remove Active Directory.
Click N
EXT
to continue.
3.
From the Remove Active Directory page , specify whether this is the last domain
controller in the domain, and click N
EXT
.
4.
Place a check mark next to This server is the last domain controller in the domain
if there are no more domain controllers in the domain and you want to convert this
server to a stand-alone server.
5.
Leave the check box empty if this is not the last domain controller in the domain and
you wish to remove Active Directory from this computer. Doing so will demote the
server to a member server.
6.
To remove Active Directory, you need to enter the account details of an account with
Enterprise Administrator privileges to the forest, and click N
EXT
.
7.
Enter and confirm an Administrator’s password, which will be used once the server
has been demoted.
8.
Review and confirm the details by clicking N
EXT
on the Summary page.
9.
The Active Directory Installation Wizard will begin the demotion process of removing
Active Directory and returning the system to a member or stand-alone server status.
10. Click
F
INISH
from the Completing the Active Directory Installation Wizard page to
close the wizard. You must restart your computer for the changes to take effect.

DNS and Active Directory
22
Copyright 2003 Syngress Publishing, all rights reserved
TOPIC 6: Design a Global Active Directory Domain and Trust
Infrastructure
There are four areas to document for an Active Directory and DNS namespace design. These will
encompass both a logical organization of your network, including joint ventures, business units, and
workgroups, and the physical network, including the geographic distribution of the users and the network
topology. The four areas include:
• Forest plan
• Domain and DNS strategy
• Organizational units (OUs)
• Site topology
Forest Plan
The forest plan document for most enterprises will be a short document because of the nature of forests. A
forest is a collection of multiple domain trees with multiple namespaces that trust each other, and share a
common configuration, schema, and global catalog (GC). The trust relationships within a forest are
transitive, and configured automatically. A forest is a logical formation that does not significantly impact,
nor is impacted by, the network’s topology. The structure within a forest is transparent to users. The GC
shields them from domains and OUs. A forest should encompass most of the computers in any enterprise
network, if not all of them. The forest plan should document the namespaces and trust relationships
expected between domains. There are causes for having two or three forests, however. Since a forest will
share:
• Common schema Collection of objects and attributes allowed in the Active Directory
database.
• Common configuration Globally available configuration for replication and interdomain
activity.
• Common GC Actual user accounts and published resources in the tree.
the production network will benefit by being separated from any domains and forests that are connected
to the Internet. This also applies to lab networks, since testing a different configuration or adding to the
schema should be kept outside the production network until deployment. A separate lab forest or Internet
forest keeps test users and public user accounts out of the GC.
The final reason that a network may implement more than one forest is for administrative
separation. This is a common situation in companies that interconnect for joint ventures, or for those that
have subsidiaries. The forest is the absolute separation of administrative authority. Two forests allow
Administrators to have the authority over the configuration, the schema, the GC, and security, completely
separated from another
Administrator’s sphere of control. When a domain is initially created, it must join a forest. That
domain cannot be moved between forests; it is a permanent member of the original forest. Furthermore, a
forest cannot be split or merged (yet), but there is a tool for importing and exporting Active Directory
objects, LDIFDE.EXE, which is found in the WINNT\SYSTEM32 directory. LDIFDE stands for LDAP
Directory Import File Directory Export, and uses the LDAP protocol to access the forest’s GC, and export
the objects into a text file that can be imported into another forest.
Designing Active Directory on a Network Connected to the Internet
When you select your Active Directory domain names and you are planning to be connected to the
Internet, you can do one of the following:

How to Cheat…
Copyright 2003 Syngress Publishing, all rights reserved
23
• Select a brand new, unique DNS name (or names) that you must register with InterNIC.
• Use an existing DNS namespace that has already been registered with InterNIC and is
running on the Internet providing Web services.
• Use a subdomain of an existing DNS namespace that has already been registered with
InterNIC, but is NOT running on the Internet providing Web services.
• Use a local DNS name that is completely outside the Internet.
You can have a separate DNS zone for a new DNS namespace, for a subdomain of an Internet-used
DNS namespace, or for a local DNS namespace. However, you will have the most problems when you
use an existing DNS namespace and share it with Internet Web servers. Sharing a DNS namespace with
Internet Web servers provides a way for unintended persons to access your network simply by having the
names of your Windows 2000 servers available in the DNS server that services the Internet. A person can
run nslookup and check out the entries against your DNS server. The way to get around this is to establish
two DNS servers with primary zone authority for the same namespace. Place one of the DNS servers
inside your firewall and include all the Active Directory servers in that zone, as well as the Internet
servers required for users to access the Internet. Place the second DNS server outside the firewall and
make certain to exclude all the Active Directory servers. While this setup is confusing and requires extra
management, it does provide a way to use the same namespace and maintain a measure of security.
Domain and DNS Strategy
Domains are the top-level division within a forest. The domain should be treated as a logical division and
as a physical division. The reason for this is that there is significantly more traffic within the confines of a
domain than there is between domains. New domains should be added only when the replication, query,
and authentication traffic will overwhelm the available bandwidth of a slow network link and it is not
feasible to upgrade the link. The domain is an administrative division, offering a boundary for security
policies. All objects within a domain are granted identical security policies, which can be accessed
through the Security Settings Microsoft Management Console (MMC) utility found in the Administrative
Tools menu. These include:
• Password policy
• Account lockout policy
• Kerberos ticket policies
Since the domain is the division for policies, it is also the division for authentication. In this case,
a user authenticates for logon and access to resources to any of the DCs that belong to the user’s domain.
The user cannot authenticate to any other domain even if it is in the same namespace or forest.
Root Domain
The first domain that that is installed within the forest is the root domain. This domain will be the
first domain created in the forest, and since it contains the management information for the schema of the
entire forest, it should contain servers that are distributed to all physical sites (if feasibly possible). The
Domain Admins group of the forest root domain is, by default, the schema administrator group for the
entire forest. In view of this requirement, there are two ways to design the root domain:
• As a standard domain that contains user accounts and published resources
• As an empty domain that has no purpose other than to publish the schema and make it
available to all other domains

DNS and Active Directory
24
Copyright 2003 Syngress Publishing, all rights reserved
The advantages of dedicating a root domain as in the second option is that there are no Domain
Administrator conflicts and the domain never becomes obsolete. The first option has the advantage,
especially when there is only a single domain, of being able to distribute more than just the schema to
multiple sites.
About Domains
The main recommendation for planning domains and DNS is simply to delegate a separate DNS zone for
each Active Directory domain. You should ensure that there are at least two DNS servers running on
DCs, or available to those same DCs, in the Active Directory domain. When planning domains, there are
a few rules to consider that may impact the decisions you make for your network:
• A domain’s name cannot be changed.
• Two domains cannot be merged.
• A single domain cannot be split into two.
You can, however, still use the import/export tool called LDIFDE.EXE to move objects outside
both the domain and the forest. To move objects within the forest, but to a different domain tree, use the
MOVETREE tool from the Windows 2000 Resource Kit.
DNS Servers
Active Directory requires DNS servers to be available at all times. While it is convenient to use Active
Directory DCs to provide the DNS services, this may not always be feasible. In order to ensure that DNS
is always available for Active Directory, the recommendation is to provide, at a minimum, one primary
and one secondary name server per domain. This will enable:
• Load balancing between the name servers
• Faster access, especially when placing the secondary name server across a WAN link
• Redundancy, in case of failure of one of the name servers
If possible, it is recommended that there is at least one DC running the DNS service in each site.
This will enable much faster access and ensure that DCs are not cut off from DNS if a WAN link goes
down. These servers can be secondary servers for the zone, rather than primary. The minimum hardware
requirements for a Windows 2000 DC running the DNS service on an Intel processor server are 100 bytes
of RAM per RR on top of the RAM required for the server operating system, and at least a Pentium II
500MHz processor.
Organizational Units (OUs)
OUs are the container objects that exist within domains. They are a logical arrangement of objects, that
can be nested, and have no impact on the network traffic. Two items will impact the OU design:
• Group Policy
• Administration
Naming Conventions for the IT Manager
Naming conventions for user accounts are sometimes the keys to the internetwork for hackers. Many
organizations use a standard of the first letter of the first name and the first five to seven letters of the last
name as a standard for usernames. Hackers find it effortless to discover a user’s name. The only other
piece of information is the user’s password, which is sometimes written on a Post-It note and pasted on
the PC itself, or sometimes given by an unsuspecting user to a call from “IT Support” (a.k.a. the hacker).

How to Cheat…
Copyright 2003 Syngress Publishing, all rights reserved
25
The other thing that organizations typically do is to leave the default administrator name for the
network. In Windows 2000, this is a domain administrator named “Administrator.” Again, hackers have
half the key to the network when an organization leaves this account with its original name intact.
Finally, organizations that are on the Internet already have a widely published domain name for their
Internet presence. Many of them use that same name, or a subdomain of it, for their private, internal
network. Again, there is no guessing involved in locating servers on the private network for a hacker.
So what does an IT Manager do to secure the network through naming conventions?
• Do not use the user’s name, or permutations of it, as the user’s logon ID unless you add
numbers or other data to the logon ID to disguise it.
• Do not be tempted to use a United States social security number for a user’s ID. A social
security number not only places a user’s personal information at risk, but companies with
international sites will have users who do not have social security numbers.
• Rename the Administrator account. Remember, however, some applications are written
to look for the “Administrator” account in order to be installed, although most allow you
to input a different name.
• Create Administrator accounts with randomly generated names using both upper and
lowercase letters and numbers. Who is to know that the Administrator’s name is
X3460GzwGm?
• Always remember to enforce a strict password policy, especially if the organization is
connected in any way to the Internet.
• Register a new domain name with InterNIC for your internal network that is completely
different from the one used on the Internet. This will provide you with flexible naming
options.
Aside from DNS naming conventions, there are other interoperability issues with names for most
internetworks because of legacy systems. The following rules will help evade many trials and tribulations
when connecting to legacy systems:
• Always create unique names for users, computers, printers, and other resources.
• Avoid the following characters when creating user or computer names, since many
computers will translate these as encoding characters or will not understand them:
!@#$%^&*()_?<>’”;:[]{}\|/.,
• Keep object names for logon IDs to eight characters or less. Many legacy systems stop
after eight characters.
• Keep object names for computers to eight characters or less. Many legacy systems stop
after eight characters.
• Do not depend on the letter case (upper and lower) to create unique names. Many
computers translate both Frank and fRANK to equate to FRANK, so they would no
longer be unique.
• Do not depend on a distinguished name to create unique names. Legacy systems may not
understand context-sensitive names, and will translate
/CN=M1craft3/CN=USERS/DC=Panther/DC=MicroAge/DC=com to simply be
M1craft3.

DNS and Active Directory
26
Copyright 2003 Syngress Publishing, all rights reserved
Therefore, if there is another M1craft3 in the Active Directory, but in a different tree location or
domain, the name will not be unique.
In both of these cases, the OU is the boundary. Different group policies can be applied to
different OUs. Different Administrators can be granted administrative access to different OUs, without
concern for conflicts over administrative control.
How you create the OU hierarchy can reflect the company org chart, or some other tree structure
that seems sensible. The Microsoft utilities do not require users to navigate the hierarchy of OUs,
although some tools do expose them, so there is no true need to create OUs that serve no purpose other
than the reflection of an org chart. Instead, focus on the purpose that the OU will serve, whether to
provide group policy, administrative area, or to group a set of users logically together.
OUs are the most flexible container objects in the Active Directory. Unlike forests and domains,
OUs can be created, moved, added, or deleted whenever needed. These changes have no impact on the
network. Objects within OUs can also be easily moved, created, added, and deleted. When these changes
are made, the major considerations are simply about how the group policy and administration issues will
change.
Group policies will affect the time that it takes for a user to log on; the more group policies there
are, the longer it takes. If an Administrator applies multiple group policies to a single OU, the user’s
logon time will suffer. If the user is located three nested groups down, and the Administrator has applied a
single group policy at one of the levels, that user will log on faster than the user with multiple group
policies applied to a single OU. Group policies are the reason for logon times being increased. The
problem, however, with OU design is that when there are multiple nested OUs, Administrators are more
likely to apply group policies to each OU in the hierarchy than apply multiple group policies to a single
OU. When planning the OU structure, make sure to state where group policies will be applied, and
whether multiple group policies will be acceptable.
Site Topology
The site topology is a representation of the physical network. It consists of sites that are connected by site
links. (Note that this is very similar to Exchange Server’s directory in which sites are connected by site
connectors.) The site is a physical division of the network. When users authenticate to the network, their
authentication traffic will be directed to a DC within their own site. Additionally, sites will maintain more
query and replication traffic within them.
Sites, as well as their Active Directory names, should represent the physical network, and should
have a DC within each. The site should consist of networks that are connected by fast and reliable links.
They can be LAN or extremely high-speed WAN links. A site should not span a mediumor low-speed
WAN link (e.g., less than 10 Mbps). Unlike domains, sites are easily added, moved, changed, or deleted.
This is one of the methods that make Active Directory scalable with the internetwork’s growth. In order
to manage sites, you can use the Active Directory Sites and Services MMC utility. This can be located by
clicking
Start | Programs | Administrative Tools | Active Directory Sites and Services.
Naming Conventions
The key to a solid namespace design is simplification. The simpler the namespace design, the easier it is
to manage and add to later on. The namespace should fit the ideal network for the enterprise, even if the
ideal network is not what exists currently. After designing the ideal network’s namespace, make
adjustments only for the anomalous network devices. Eventually, the network will adjust toward the ideal
by taking this approach.
Finally, the namespace design should be enabled for change management. Most enterprises are
not static entities. People are promoted to new positions, move to different departments, start new

How to Cheat…
Copyright 2003 Syngress Publishing, all rights reserved
27
business units in another city or country, leave the company, and so on. The PCs that they use either
move with them, or change hands and are reconfigured. New PCs, servers, and printers are added to the
network, and old ones are retired. All organizations experience these changes to some degree. If the
Active Directory namespace does not support changes, it will not be a success. Instead, it should support
changes so that it is easy to move objects around the tree. One way to enable the Active Directory for
change management is to standardize unique names throughout the tree. This simple standard will ensure
that no conflicts from moves, adds, or changes will ensue.
Defining DNS Names
The rules regarding DNS names are simple:
• Each host in the DNS database is allowed to have a name of up to 63 characters in length,
and many allow names up to 255 characters.
• All hosts must have unique names. For example, a host named george.microage.com and
a host named george.eng.microage.com are each considered unique.
• All subdomains must have unique names within their parent domain.
DNS names for each domain should be defined when creating the domain plan. Each domain
should be assigned a name that follows the format of root.com. Domains that will share the same
namespace as the forest root domain will have a subdomain name format of parent.root.com. Any
domains beneath them in the domain tree hierarchy will have the subsubdomain name format of
child.parent.root.com. Further subdomains are allowed, but not recommended because of the complexity
added to the internetwork. Trust relationships will follow the tree structure. Each DNS root domain
namespace should be registered with InterNIC. This will avoid conflicts if there is another one being used
on a connected network or the Internet.
The DNS name for a domain in the Windows 2000 is defined when the first DC for that domain
is installed with Active Directory.
Naming Convention Rules
Microsoft’s DNS service that comes with Windows 2000 is more forgiving when it comes to naming
conventions than the DNS applications from other vendors. Even if you are using Microsoft’s version of
DNS, you may, at some point in time, connect to a network that uses a different vendor’s DNS. When that
happens, the naming conventions that you are using will need to be compatible with both DNS versions.
Otherwise, you will encounter a few problems. Standard DNS naming rules, which are understood by all
DNS versions, are as follows:
• Use a registered DNS name. You can register DNS names with InterNIC.
• Use the standard character set of A through Z, a through z, and 0 through 9 and the dash
(-) character. Note that the Windows 2000 DNS will support both the underscore (_)
• and Unicode characters.
• When in doubt, verify your naming strategy with RFC 1123, which is available on the
Internet at http://freesoft.org/CIE/RFC/1123/index.htm.
Defining DNS Zones
All DNS zones and RRs are managed in the DNS Management Console. To add a zone, follow these
steps:
1. Click
Start.

DNS and Active Directory
28
Copyright 2003 Syngress Publishing, all rights reserved
2. Select
Programs.
3. Select Administrative Tools.
4. Choose DNS. The DNS Microsoft Management Console utility will start.
5. Select either Forward Lookup Zones or Reverse Lookup Zones below the server that will
be managing the zone, depending on which type of zone you are adding.
6. Click the Action menu.
7. Select Create a New Zone. The Add New Zone Wizard will begin.
8. Select the zone type.
9. Assign a name and complete the wizard. The new zone will appear in the DNS utility.
Adding an RR also occurs in the DNS Microsoft Management Console utility.
Naming Conventions for Active Directory
Active Directory is an open directory service in that it supports a wide range of protocols, objects, and
application programming interfaces (APIs). These are the mechanisms that define the availability of the
Active Directory to various types of clients. As a result of Active Directory’s support for diverse
protocols, Active Directory supports many different name formats:
• Internet e-mail addresses, as described in RFC 822—name@mycorp.com
• Uniform Resource Locators (URLs) for HyperText Transfer Protocol (HTTP)—
• Lightweight Directory Access Protocol (LDAP) names—
LDAP://myserver.mycorp.com/CN=myname,OU=Users,O=Mycorp,C=US
• Universal Naming Convention (UNC) names—\\myserver.com\myvolume\file.ext
Such diversity in naming format support enables companies to select nearly any names that are
appropriate for their company. The major influence on a naming convention will be the connectivity to
external systems on the internetwork. Windows 2000 Active Directory is more forgiving than other
systems for names in that it supports a wider variety of characters and character sets, and even lengthier
names.
Migrating an Existing Exchange Server Design
The Active Directory inherited many of its characteristics from Exchange Server’s directory system.
Additionally, the design premises are nearly identical. If an organization already has a well-tuned
Exchange Server directory with basically the same scope of sites, users, computers, and servers, then it
can mirror the design of the Active Directory and expect good results.
Migrating an Existing Novell Directory Services Design
Many organizations have invested a significant amount of time and effort in a Novell Directory Services
design. This design is generally a geographical division at the top of the tree and an organizational
division lower down. If the Novell Directory Services design follows this scheme and it has the same
scope, it is easy to translate it into an Active Directory design. Instead of each top-level OU, replace it
with an appropriate domain. Then retain the hierarchy of OUs that exist within that top level and place
them within the domain. You will find a handy wizard for migrating Novell Directory Services
information into the Active Directory in the Administrative Tools menu.
Virtual Containers
The Active Directory can incorporate information from other directory services through a virtual
container. The other directory service must be LDAP compliant for this to work. The Active Directory
implements a virtual container in what amounts to a pointer to the foreign directory service. The foreign

How to Cheat…
Copyright 2003 Syngress Publishing, all rights reserved
29
directory server’s DNS name is contained as part of the virtual container’s properties. When a client
performs a query on the virtual container, DNS locates the foreign directory and passes an LDAP query to
it. The response to that query is returned to Active Directory, which then presents it to the client.
Designing Active Directory Domains
The previous sections barraged you with an alarming number of new terms and concepts, but in fact by
now you should be able to discuss the importance of trees and forests so naturally that people mistake you
for a Green Peace activist. The strategy for constructing domains involves leveraging these concepts to
provide a comprehensive and detailed design statement. The enterprise’s business requirements will guide
the Active Directory domain design. The design will depend not only on business requirements, but also
on the network that already exists and the way that the enterprise is organized. Rules regarding network
design are never hard and fast; some network designs simply result in more optimal performance than
others. However, performance is not necessarily the top business driver for an organization. Each
company, organization, or government office is different and has its own requirements for technology.
Windows 2000 Server with Active Directory Services is flexible enough to meet most business
requirement sets, but its implementation will vary widely.
Providing a detailed domain design involves generating the following:
• Forest plan
• Domain/DNS strategy
• Organizational unit (OU) structure
• Site topology
It also implies that you should be in possession of a great deal of supporting information about
the enterprise. This information will reflect both the network’s physical structure and the enterprise’s
logical organization. The following list represents the types of documents that are recommended to
discover the network’s physical structure. Note that the documentation of your network may be structured
differently, and will not map directly to this list.
• Topology maps detailing the WAN links of the internetwork
• Topology maps detailing the LANs that make up the internetwork
• Lists of servers, including current NOS version, service pack updates, and services that
are provided to the network (file, print, RAS, SQL, e-mail, etc.)
• Hardware specification of relevant computing infrastructure
• Lists of printers and their locations
• DNS structure
• Lists of other network resources and their locations
• Traffic flow and network baseline performance
• Inventory of the client workstations
Aside from the physical structure of the network, you will also need information on the logical
organization of the enterprise. This information is typically documented in:
• Org charts
• Lists of users and their locations
• Lists of groups and their purpose
• Workflow between groups
• Information regarding future growth plans

DNS and Active Directory
30
Copyright 2003 Syngress Publishing, all rights reserved
Forest Plan
The first thing to do is review what a forest is, what belongs in a forest plan, and the rules surrounding
forests. Remember that a forest is a group of multiple DNS namespaces (and multiple domains) that
shares a common configuration, schema, and global catalog (GC). A forest plan typically contains the
number of forests, the reasons they were selected, the names of the root forest domain, and an optional
pictorial representation. Rules surrounding forests are few:
• A forest cannot be merged with any other forest.
• A forest cannot be split.
• The root domain of the forest is the name the forest takes on.
• A forest is a logical grouping, and has little impact on network bandwidth.
Domain Plan Including DNS Strategy
You should begin your domain planning session with the same step as in the forest planning, with a
review of domains, DNS, and the rules surrounding them.
A domain is the top-level division within a forest. There is significantly more traffic within the
confines of a domain than there is between domains. The traffic between domains is mainly replication of
schema, configuration, and GC data. The traffic within a domain includes query, authentication, and
further replication of the domain objects in the Active Directory. Sites centralize this traffic somewhat by
formalizing the paths for replication traffic. There is a preference to send query and authentication traffic
to domain controllers (DCs) within the same site as the user making the request. New domains should be
added only when the total of the replication, query, and authentication traffic will overwhelm the
available bandwidth of a slow network link and it is not feasible to upgrade the link. With the capability
of domains and sites to be able to cross each other’s boundaries, determining the traffic needs becomes
somewhat of an art. The following traffic guidelines are not absolute, but look for minimum bandwidth
of:
• 512 Kbps available bandwidth within a site, whether or not it spans multiple domains.
• 256 Kbps available bandwidth within a domain that spans multiple sites, where no sites
span it and other domains.
• 56 to 128 Kbps available bandwidth where a domain and site share a boundary—larger
for those GCs with more than half a million objects.
• If using a single domain model, these issues do not apply.
Aside from traffic issues, a domain should be added when the domainlevel security policy for
passwords and account lockouts must be different for two separate sets of users. Other reasons for
implementing separate domains include wanting to decentralize administration, and support of
geographical boundaries. DNS provides mapping between IP addresses and hostnames. It can also map to
further information such as service resource records (SRV RRs). DNS is used by the Active Directory as
a locator service for logon, for locating DCs, and GC servers.
Rules surrounding domains and DNS are as follows:
• A domain’s name cannot be changed if it is a root domain, or easily changed otherwise.
Note that the domain’s globally unique identifier cannot be changed, but display names
for nonroot domains can be renamed in the Active Directory.
• Two domains cannot be merged.
• A single domain cannot be split into two.
• DNS must support SRV RRs.
• DNS must be available for DCs at all times.
• At a minimum, there should be one DC and one DNS server in each site.

How to Cheat…
Copyright 2003 Syngress Publishing, all rights reserved
31
• A DC is allowed to also be the DNS server running Microsoft’s DNS service.
• One recommendation is to have a single root domain hold the schema, and lower-level
domains contain the resources and users in the tree.
• Domains are an administrative and security boundary, so plan domains accordingly.
• DNS names should be registered with InterNIC. InterNIC does not require subdomains to
be registered, simply the parent domain level.
Organizational Unit Strategy
OUs are container units that can be nested into a tree structure, or hierarchy, within a domain. OUs can
contain user accounts, resource objects, and other OUs. OUs reside within a single domain. The OU
strategy is an initial hierarchy within each domain. OUs are flexible enough to be changed as needed, so
this strategy may change over time, or at any time, to better meet the changing needs of the enterprise.
The rules regarding
OUs are as follows:
• OUs can be created, moved, added, or deleted whenever needed.
• OU changes have no impact on the network traffic.
• Objects within OUs can also be easily moved, created, added, and deleted.
• OUs are containers for implementation of group policy.
• OUs are containers for delegation of administration.
Organizational Unit Structure
OUs are containers within a domain that can nest within each other to develop a hierarchy. They are not
used for user account policy, but are used for group policy and for the delegation of administrative
authority. An Active Directory user does not always have to navigate the OU hierarchy to locate services
and information, so the optimal structure for OUs should reflect the boundaries needed for applying group
policy or for delegating authority. It is a good rule of thumb to keep the OU names short enough to
remember.
OU Objects in the Active Directory
OUs are container objects within the Active Directory. They contain other objects, but they also have
attributes and values applicable to them. Policies can be applied to OUs, and those policies can be
inherited by sub-OUs. This facilitates administration of group policy.
Group Policy and OUs
Group policy settings are applied to users and computers in order to manage the desktop configuration. A
specific policy is applied to a site, domain, and/or an OU as needed. The group policy can be filtered to
control access. Group policies will affect users’ logon time when they are in a nested OU that has
multiple group policies. Longer names for OUs will also affect processing at logon time.
Designs
There is more than one right way to design a network. Optimal designs take into account the business
requirements, current network environment, and potential growth of a company. The designs for forests,
domains, OUs, and sites could be completely different for two companies and still be considered
“correct” or “good.” This reflects the flexibility of Active Directory more than it does the benefits of a
good design.
In many cases, network design and selection is based on the business requirements for the company
and its existing environment. Here are some design tips:

DNS and Active Directory
32
Copyright 2003 Syngress Publishing, all rights reserved
• Do not be afraid to create a design that seems aberrant from standard models, if it
supports business requirements.
• Try to keep your designs as simple as possible.
• Pay strict attention to the design of items that cannot change or be moved, merged, or
split, such as forests and domains.
• Play with a couple of design scenarios before you select a final design. Make sure it
supports each of your business objectives, and you can justify that design above the
others.
• Make sure that whatever design you specify, you will have enough servers to support its
creation.
• Always register your DNS names with InterNIC.
Delegating Administration
The Legacy NT delegation of administration did not offer much in the way of flexibility.
• Administrators were forced to use built-in local groups on the servers for administrative
authority.
• They had to adjust predefined rights, if they were not sufficient or too lax.
• Their administrative design typically resulted in oodles of Domain Administrators so that
everyone could access what they needed to.
• They created resource domains just to delegate administration, which then resulted in too
many domains and complex trust relationships.
Delegating administration is more powerful and flexible in Windows 2000 than it was in earlier
versions of NT. Using the flexibility of the Active Directory, delegation of administrative responsibility
can be applied at the OU level. The Administrator can assign administrative rights for each object’s
attributes and whether that control can be inherited. The result is that the appropriate Administrators are
granted the appropriate control of their assigned users and published resources. If an Administrator
delegates “Full Control” to another user, then that user is able to delegate administrative authority to
others. Otherwise, the delegation of administration is completed by selecting the authority level over each
object class and the ability to modify specific attributes. The process is fairly simple:
1. Create
a
group.
2. Grant the group specific access.
3. Populate the group with users.
Site Topology
For the final design component, we should consider Active Directory sites. A site is a collection of IP
subnets that are connected by fast, reliable links. Sites are typically LANs, and do not contain WAN links
except where the WAN link is very fast and reliable. The site is used to create physical divisions of the
network. It directs authentication and query traffic for users within a site to a DC within a site.
Replication traffic is similarly controlled. The following design rules apply to sites:
• The site topology should reflect the network’s topology.
• Each site should have a dedicated DC.
• No site should span a slow or unreliable network connection, especially WAN
connections.

How to Cheat…
Copyright 2003 Syngress Publishing, all rights reserved
33
• Sites do not need to be created for clients that connect via remote access.
• Sites are easily added, moved, changed, and deleted.

DNS and Active Directory
34
Copyright 2003 Syngress Publishing, all rights reserved
TOPIC 7: Integrating DNS into the Active Directory
Today, the only way to integrate DNS with the Active Directory is to implement the Microsoft Windows
2000 DNS service on a Windows 2000 Server. When DNS is integrated in the Active Directory, there are
some immediate benefits:
• It can coexist with other DNS servers.
• It automatically supports DHCP, and no DHCP-integration testing is required.
• It will support multi-master replication of the DNS within the Active Directory.
•
It is able to scavenge stale records and keep the DNS database up
to date.
If the Windows 2000 Server DNS service is implemented exclusively on the network, it will add
the additional capability for using the Unicode extended character set. (Briefly, Unicode is a character set
that is based on 16 bits of information. Compared to standard 7- or 8-bit ASCII or 8-bit EBCDIC, which
have 128 or 256 characters, the Unicode character set can have up to 65,536 characters. This enables it to
encompass most of the world’s languages in one set of characters.) Additionally, the Windows 2000
Server DNS supports all the requirements for Active Directory such as Service resource records (SRV
RRs) and dynamic updates.
Configuring DNS
If the network does not have DNS installed or configured on it, it will not have Active Directory installed
either, because Active Directory depends on locating a DNS server. To configure DNS before running the
Active Directory Wizard:
1.
Either select Start | Programs | Administrative Tools | DNS, or from the Windows 2000
Configure Your Server screen, select the Networking option in the left-hand pane.
When it expands, select DNS, and finally click the Manage DNS option in the right-
hand pane that appears.
2.
Select the server that you will be configuring DNS on.
3.
Click the Action menu.
4.
Choose the Configure the Server option.
5.
The Configure DNS Server Wizard appears with a Welcome screen. Click N
EXT
.
6.
If this server will be a root server for DNS, select the first DNS server on the network.
If DNS is already installed and configured on the network, select the second option.
7.
The Configure DNS Server Wizard will next prompt to create a forward lookup zone.
If Active Directory is installed, then you will be able to use the “Active Directory-
integrated” option. However, if the server is a stand-alone or member server and you
attempt to create a forward lookup zone, you will see the Active Directory Integrated
option is grayed out. Not to worry, simply select the second option to Create a
Standard Primary for now and click N
EXT
.
8.
The Configure DNS Server Wizard will provide a Summary page. If you need to make
changes, you can click B
ACK
. If not, click F
INISH
to close the wizard screen.
Active Directory Integrated Zones
If you install Active Directory after configuring DNS on a server, you can still create Active Directory
Integrated zones. To create an Active Directory Integrated zone, do the following:
1.
Enter the DNS Management Console by clicking Start | Programs | Administrative
Tools | DNS, or from the Windows 2000 Configure Your Server screen, select the

How to Cheat…
Copyright 2003 Syngress Publishing, all rights reserved
35
Networking option in the left-hand pane. When it expands, select DNS, and finally
click the Manage DNS option in the right-hand pane that appears.
2.
Click the plus sign (+) next to the server you are adding the zone to and expand it.
3.
Select the Forward Lookup Zones folder below the server.
4.
Click the Action menu, and click New Zone.
5.
The New Zone Wizard will display a Welcome screen. Click N
EXT
.
6.
The Zone Type screen will appear. Select the “Active Directory-integrated” option.
(This will be grayed out if Active Directory is not installed.) Click N
EXT
.
7.
Type in the name of the zone, such as myzone.com or myzone.mydomain.com. Click
N
EXT
.
8.
The New Zone Wizard will display a Summary page. If the summary is correct, click
F
INISH
. If not, click B
ACK
and change the options.
About Zones
The DNS namespace can be divided up into zones. Each zone stores information about a DNS domain
and is the source of information for that domain. A zone can include information about subdomains, or a
new zone can be created for the subdomain. When a subdomain is contained in a new zone, the parent
domain’s zone must still contain a few records, called Name Server (NS) records, to be able to delegate
information to that new zone. Zones can be fault tolerant by creating secondary servers for them. Any
time a zone is replicated to a secondary server, that replication is considered a zone transfer.
A forward lookup zone is the most common. This type of zone represents a query by a client
based on the DNS name of another computer that is stored as an Address (A) RR. The DNS server will
respond to a forward lookup with an IP address. A reverse lookup zone is used to find the DNS name of a
computer with a certain IP address. It is the same as a forward lookup, but backwards.
The client will submit a query with an IP address, and the DNS server will respond with the
hostname of that computer. Dynamic updates function in a similar fashion to DHCP addresses. The
dynamic updates self-register DNS names on a DNS server without requiring an Administrator to set the
DNS name and address. This is similar to DHCP, which applies updates to the workstation without
requiring an Administrator to set the IP address. In both cases, from the user’s perspective, it is a
transparent process. In fact, the two work quite well together. When a DNS server supports dynamic
updates, clients can register and update their own A RRs with the server. With DHCP, for example, a
client can receive an IP address and register it with the A RR on the DNS server. If the client does not
renew the DHCP lease and is granted a new IP address the next time it accesses the network, it can update
the A RR on the DNS server with its new IP address. This functionality is especially helpful for
companies with active intranets published on users’ computers. Until dynamic updates are enabled on the
network, dynamic addressing via DHCP would make parts of the intranet difficult, if not impossible, to
access and manage, because the DNS servers would need to be updated each time a new address was
granted to a computer.
Dynamic updates must be supported by both the client and the server, if the client needs to
register its DNS name. Legacy Windows 9x and Windows NT 4 clients do not currently support this
functionality. There is a DS Client that can be installed to overcome this problem. To manage the
Windows NT 4 Servers that may remain on the network, it is recommended to statically list their DNS
names until they are retired, upgraded, or replaced by Windows 2000 Servers.
Windows 2000 clients will attempt to register A RRs dynamically for their IP addresses. This
process can be forced by entering the command ipconfig /registerdns from the client. The DHCP service
will register the IP address dynamically on the Windows 2000 client.
Scavenging is a new option within the Microsoft Windows 2000 DNS service. It enables the
automatic management of RRs. What the scavenging system does is set a timestamp on all RRs. Then the
DNS service attempts to refresh the record at a set interval called the “no-refresh interval.” If the RR
cannot be refreshed, the DNS service will wait a second period of time, called the “refresh interval,” and

DNS and Active Directory
36
Copyright 2003 Syngress Publishing, all rights reserved
if the record is not refreshed during that second interval, the DNS will then scavenge the record. These
intervals can be set within the MS DNS Microsoft Management Console (MMC) for a server by selecting
the server, clicking the Action menu, and selecting the “Set Aging/Scavenging for all zones” option. Or, a
zone can have its own unique aging and scavenging properties. This is performed by selecting the zone,
then clicking the Action menu, and selecting Properties. On the General tab, click Aging.
Service Resource Record Registration
SRV RRs are not created the same as a standard A RR. To create an A RR, the Administrator would
simply add a new computer to the zone by right-clicking on the zone and selecting New Host. But to
create an SRV RR, the Administrator must select Other New Records. This prompts a dialog box that
allows the Administrator to select from a list of RR types. The Service Location record is actually an SRV
RR. After selecting the Service Location option, a dialog appears for selecting the SRV RR properties.

How to Cheat…
Copyright 2003 Syngress Publishing, all rights reserved
37
TOPIC 8: Remove Data in Active Directory After a Failed
Domain Controller Demotion
The directory service maintains metadata for each domain and server known to the forest. Normally,
domains and domain controllers are created by means of promotion using the Active Directory
Installation wizard and are removed via demotion using the wizard as well. Start the Active Directory
Installation wizard by typing dcpromo at the command prompt.
Promotion and demotion are designed to clean up the appropriate metadata. In the directory,
however, you might have domain controllers that were decommissioned incorrectly. In this case, their
metadata is not cleaned up. For example, a domain controller has failed, and rather than attempting to
restore it, you decide to retire the server. This leaves some information about the retired domain controller
in the directory. The general model of operation is to connect to a server known to have a copy of the
offending metadata, select an operation target, and then delete it.
This table lists metadata cleanup commands.
Command Description
Connections
Invokes the Connections submenu.
Remove selected domain
Removes the metadata associated with the domain
selected in the Select operation target submenu.
Remove selected server
Removes the metadata associated with the domain
controller selected in the Select operation target
submenu.
Select operation target
Invokes the Select operation target submenu

DNS and Active Directory
38
Copyright 2003 Syngress Publishing, all rights reserved
TOPIC 9: Create a Child Domain in Active Directory
Child domains are installed with the first DC of the child domain in a domain tree. When that child
domain is formed, Active Directory creates a two-way transitive Kerberos trust automatically between it
and the parent domain. Schema and configuration data for the forest are copied from the parent domain to
the new child DC.
The relationship of a parent domain to a child domain is strictly one of the DNS subdomain name
and trust relationship. For example, a parent domain in a domain tree would be PARENT.COM. The
child domain would be CHILD.PARENT.COM. The trust relationship is bidirectional and transitive. An
Administrator in PARENT.COM does not have administrative authority in CHILD.PARENT.COM.
Instead, the Administrator in PARENT.COM must be granted administrative authority to
CHILD.PARENT.COM. Likewise, group policies set in PARENT.COM are not applicable to
CHILD.PARENT.COM. There is no domain-level inheritance of rights, authorities, or Group Policies.
Another change to Active Directory occurs with a new child domain—a new replication partition
is created.
W
ARNING
You cannot add a child domain before you add the parent domain to the forest. You must begin
with the parent domain, follow with its child domains, and then follow that with its grandchild
domains. If you try to add the parent after the child, the domain tree will not be recognized,
resulting in errors.

How to Cheat…
Copyright 2003 Syngress Publishing, all rights reserved
39
TOPIC 10: Dynamic DNS
In a network where IP addresses are statically assigned to servers and workstations, it is a simple extra
step to update the DNS zone file with the IP address. DNS originally was designed for manual
administration. However, networks have become increasingly dynamic. DHCP (as well as BOOTP)
assigns IP addresses to network hosts, pulling the IP addresses from a pool, resulting in a merry-go-round
of IP addressing for any single network host. Keeping up with DHCP changes is too difficult with a
manual DNS system. However, being able to use automatically assigned IP addresses is too easy to let go.
DDNS was designed to keep up with the constantly evolving IP addresses on a network. Up to this point,
DDNS has been mentioned as one of the recommended features of a DNS server in an Active Directory
network. Once you become familiar with DDNS, and experience how well it works, you will discover
why it is so effective.
First, Active Directory publishes their addresses using SRV RRs, where the name of the Active
Directory service is mapped to the address of the DC offering the service. SRV RRs use the form of
<service>.<protocol>.<domain>. When the Active Directory server is installed, it must have all the
appropriate SRV RRs listed in DNS in order for other DCs and clients to contact it. There are several
complex SRV RRs per DC in the zone file. The SRV RRs include priority and weight for the DC so that
clients can select the most appropriate server.
Dynamic updates allow computers to register themselves in the DNS system. Windows 2000
computers and its DNS service all support this, as well as the Windows 2000 DHCP service. The
Windows 2000 DHCP service will remove any records that it registered upon the DHCP lease’s
expiration. In order to use the benefits of dynamic updates, the DNS server must support RFC 2136.
DCs can use DDNS to publish themselves. These DCs periodically will confirm their RRs to
make certain that they are up to date. In Windows 2000 DNS, the server timestamps each RR as an aging
mechanism. RRs are then refreshed periodically. When an RR does not refresh for a number of intervals,
it is considered stale and is then scavenged from the database. This process greatly reduces the time and
effort involved in administering DNS. In order to enable the aging and scavenging of Active Directory-
enabled DNS:
1. RRs must be timestamped.
2. Zones must have a refresh interval and a no-refresh interval set.
3. Scavenging must be enabled for each zone and name server.
4. The name server must have a scavenging period established.
DDNS uses a message format called update that can add or delete RRs from a specified zone after
checking for prerequisites. If update does not discover the prerequisite conditions, then it will not update
the zone file. Prerequisites include checking for a primary zone file and making certain that a zone
transfer is not currently in progress.

DNS and Active Directory
40
Copyright 2003 Syngress Publishing, all rights reserved
TOPIC 11: DNS Namespace Planning
There are four areas to document for an Active Directory and DNS namespace design. These will
encompass both a logical organization of your network, including joint ventures, business units, and
workgroups, and the physical network, including the geographic distribution of the users and the network
topology. The four areas include:
• Forest plan
• Domain and DNS strategy
• Organizational Units (OUs)
• Site topology
Designing Active Directory on a Network Connected to the Internet
When you select your Active Directory domain names and you are planning to be connected to the
Internet, you can do one of the following:
• Select a brand new, unique DNS name (or names) that you must register with InterNIC.
• Use an existing DNS namespace that has already been registered with InterNIC and is
running on the Internet providing Web services.
• Use a subdomain of an existing DNS namespace that has already been registered with
InterNIC but is not running on the Internet providing Web services.
• Use a local DNS name that is completely outside the Internet.
You can have a separate DNS zone for a new DNS namespace, for a subdomain of an Internet-used
DNS namespace, or for a local DNS namespace. However, you will have the most problems when you
use an existing DNS namespace and share it with Internet Web servers.
Sharing a DNS namespace with Internet Web servers provides a way for unintended persons to access
your network simply by having the names of your Windows 2000 servers available in the DNS server that
services the Internet. A person can run nslookup and check out the entries against your DNS server. The
way to get around this is to establish two DNS servers with primary zone authority for the same
namespace. Place one of the DNS servers inside your firewall and include all the Active Directory servers
in that zone, as well as the Internet servers required for users to access the Internet. Place the second DNS
server outside the firewall and make certain to exclude all Active Directory servers. Although this setup is
confusing and requires extra management, it does provide a way to use the same namespace and maintain
a measure of security.
Unless you register a private DNS name, using a local DNS namespace is easier said than done if
you try to use a namespace that ends in “.com” or any other of the common Internet domains. However,
Microsoft Active Directory supports the use of the “.local” domain for a private, local DNS namespace.
In this scenario, a company called Cyberlabs could implement cyberlabs.com on the Internet and then
implement cyberlabs.local on the private network. There would be a clear distinction between local and
Internet resources, and there is no need to maintain near-mirrored, split-brain DNS servers because the
internal namespace would not be exposed to the Internet.
Forest Plan
The forest plan document for most enterprises will be a short document because of the nature of forests. A
forest is a collection of multiple domain trees with multiple namespaces that not only trust each other, but
share a common configuration, schema, and global catalog. The trust relationships within a forest are
transitive, and configured automatically. A forest is a logical formation that by itself does not
significantly impact, nor is impacted by, the network’s topology. The structure within a forest is
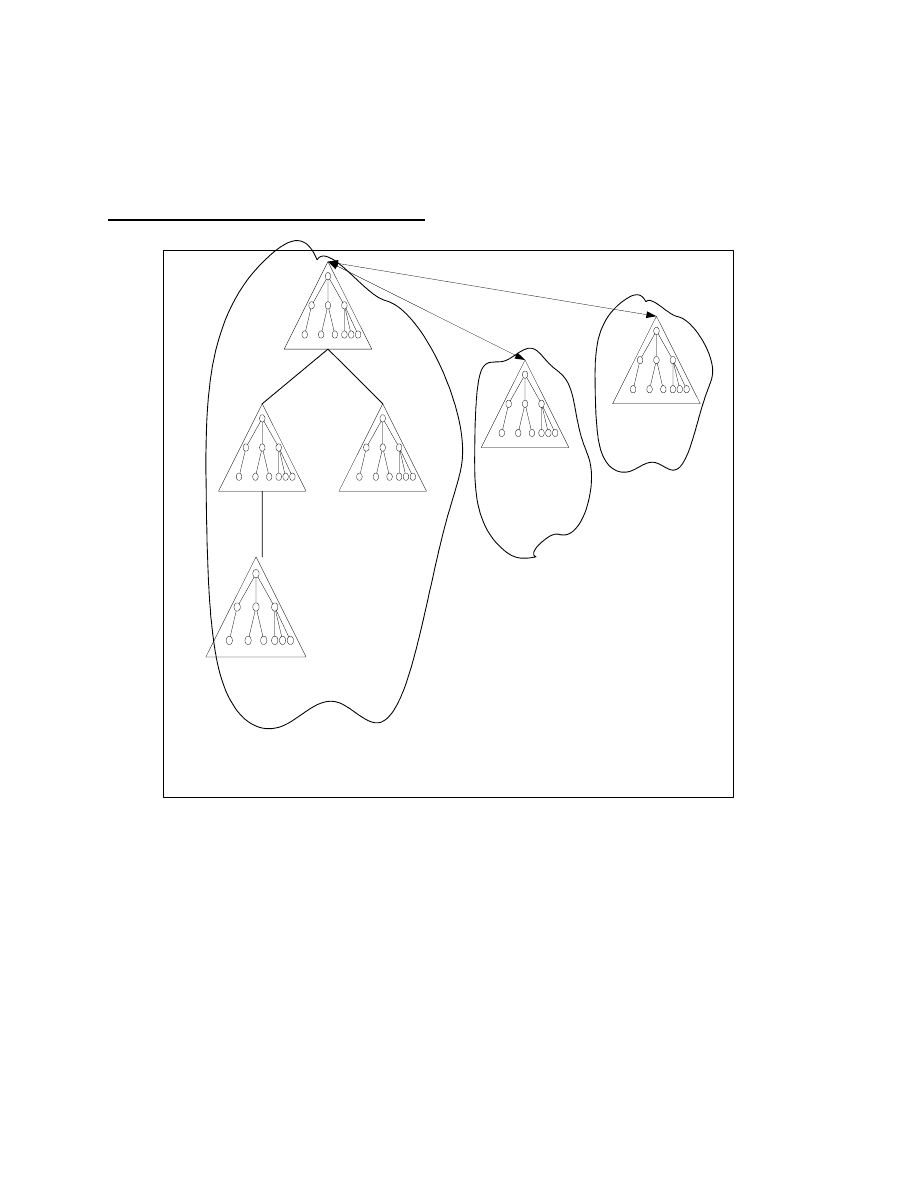
How to Cheat…
Copyright 2003 Syngress Publishing, all rights reserved
41
transparent to users. The Global Catalog shields them from domains and OUs. A forest should encompass
most of the computers in any enterprise network, if not all of them. The forest plan should document the
namespaces and trust relationships expected between domains. A pictorial representation of a forest is
shown here:
Multiple Namespaces Exist in a Single Forest
Forest
root.com
sub1.sub.root.com
Intranet.com
myroot.com
sub2.root.com
sub.root.com
Intranet.com
Namespace 3
myroot.com
Namespace 2
root.com
Namespace 1
There are causes for having two or three forests, however, since the forest shares
• A common schema A collection of objects and attributes allowed in the Active Directory
database.
• A common configuration A globally available configuration for replication and interdomain
activity.
• A common Global Catalog index An actual user accounts and published resources in the
tree.
The production network will benefit by being separated from any domains and forests that are
connected to the Internet. This also applies to lab networks, since testing a different configuration or
adding to the schema should be kept outside the production network until deployment. A separate lab
forest or Internet forest keeps test users and public user accounts out of the production network’s Global
Catalog.

DNS and Active Directory
42
Copyright 2003 Syngress Publishing, all rights reserved
The final reason that an organization may implement more than one forest is for administrative
separation. This is a common situation in companies that interconnect for joint ventures, or for those that
have subsidiaries. The forest is the absolute separation of administrative authority. Two forests allow
Administrators to have the authority over the configuration, the schema, the Global Catalog, and security
completely separated from another Administrator’s sphere of control.
Once a domain is created, it joins a forest. That domain cannot be moved between forests; it is a
permanent member of the original forest. Furthermore, a forest cannot be split or merged (yet), but there
is a tool provided for importing and exporting Active Directory objects, LDIFDE.exe, which is found in
the WINNT\SYSTEM32 directory. LDIFDE (LDAP Directory Import File Directory Export) uses the
LDAP protocol to access the forest’s Global Catalog, and to export the objects into a text file that can be
imported into another forest.
Domain and DNS Strategy
The DNS strategy requires you to examine the capacity requirements for your DNS servers. You should
consider what performance you will require and ensure that your DNS servers have adequate processing
power and memory to achieve that performance level.
DNS Sizing
The minimum hardware requirements for a Windows 2000 DC running the DNS service on an Intel
processor server are 100 bytes of RAM per RR on top of the RAM required for the server operating
system, and at least a Pentium II 400 MHz processor. A Windows 2000 DNS Server requires at least
4MB of RAM just to start up the service, before you have even configured zones on that server. As you
add zones and RRs, the server consumes more RAM.
As previously stated, each RR consumes about 100 bytes of memory, which isn’t much if you
have a small internetwork. If you have a zone with 50,000 hosts only having A RRs, then you will need at
least 4.6MB of additional RAM for the associated records. If you also require PTR RRs for each of those
hosts, then you will need 9.2MB more RAM. If you have a significant number of hosts requiring other
types of RRs, this figure could grow by another 4MB. Most servers have hundreds of megabytes of RAM,
or even gigabytes of RAM, so ensuring that there is sufficient RAM for Windows 2000 DNS Server is not
going to be a difficult task. Just be aware that you should ensure that the server has sufficient resources to
ensure good performance.
Domain Divisions
Domains are the top-level division within a forest. The domain should not only be treated as a logical
division, but also as a physical division. The reason for this is that there is significantly more traffic
within the confines of a domain than there is between domains. New domains should be added only when
the replication, query, and authentication traffic will overwhelm the available bandwidth of a slow
network link and it is not feasible to upgrade the link.
The domain is an administrative division, offering a boundary for security policies. All objects
within a domain are granted identical security policies, which can be accessed through the Security
Settings MMC utility found in the Administrative Tools menu. These include:
• Password policy
• Account lockout policy
• Kerberos ticket policies
Since the domain is the division for policies, it is also the division for authentication. In this case,
a user authenticates for logon and access to resources to any of the DCs that belong to the user’s domain.
The user cannot authenticate to any other domain even if it is in the same namespace or forest.

How to Cheat…
Copyright 2003 Syngress Publishing, all rights reserved
43
Requirements
All DNS Servers for zones that encompass Active Directory domains must support SRV RRs. At least
one DNS Server must be installed and configured prior to the first Active Directory DC installation. In
order to install the first DC:
1. Verify that DNS is configured on a server on the network.
2. Ensure that the network is connected to the server and functioning properly. (You can test it
using PING, if you are not certain.)
3. Configure the server’s connection to the network as a DNS client with the IP address of a
DNS server.
4. Verify that the DNS server has DDNS enabled for the zone, so that the server can register
itself when it is promoted.
5. When the server has been promoted to a DC, validate that the server has registered its RRs in
the zone.
Root Domain
The first DC for a domain that should be installed for the forest is a DC in the root domain. This domain
will be the first domain created in the forest, and since it contains the management information for the
schema of the entire forest, it should contain servers that are distributed to a majority of physical sites (if
possible). Be careful not to try installing a DC for a different domain in your plan before you install at
least one of the root domain DCs. For example, if you have a plan that includes two domains, Root.com
and Trunk.Root.com, and you installed a DC for the Trunk.Root.com domain, you would not be able to
install a DC for the Root.com domain. You are limited to installing subdomains of a DNS namespace or a
completely different namespace. The Domain Admins group of the forest root domain is, by default, the
schema administrator group for the entire forest. In view of this requirement, there are two ways to design
the root domain:
• As a standard domain that contains user accounts and published resources
• As an empty domain that has no purpose other than to publish the schema and make it
available to all other domains
The first option has the advantage, especially when there is only a single domain, of being able to
distribute more than just the schema to multiple sites. The advantages of dedicating a root domain as in
the second option is that there are no Domain Administrator conflicts and the domain never becomes
obsolete. There is another benefit with the second option: If you have an empty domain, then you can
limit the members of the Domain Admins, Enterprise Admins, and Schema Admins groups without fear
of unintentionally granting people membership to a group that gives them access to more rights than
necessary. For example, if you upgraded an existing Windows NT domain to Windows 2000, then all the
users who were members of the legacy Domain Admins group would be upgraded automatically to
Administrator status in the Windows 2000 domain. Not only that, but being members of that group
automatically would enable those users to become Enterprise Admins and Schema Admins. In the wrong
hands, a user could make serious changes to the network, and in the case of the schema, irreversible
changes.
About Domains
The main recommendation for planning domains and DNS is simply to delegate a separate DNS zone for
each Active Directory domain. This makes it easy to manage, especially in a decentralized administrative
environment. You should ensure that there are at least two DNS servers available to DCs, or even running
on DCs, in the Active Directory site.

DNS and Active Directory
44
Copyright 2003 Syngress Publishing, all rights reserved
When planning domains, there are a few rules to consider that may impact the decisions you
make for your network:
• A domain’s name cannot be changed.
• Two domains cannot be merged.
• A single domain cannot be split into two.
You can, however, still use the import/export tool called LDIFDE.exe to move objects outside
both the domain and the forest. To move objects within the forest, but to a different domain tree, use the
MOVETREE tool from the Windows 2000 Resource kit. Both LDIFDE and the MOVETREE tool are
described in Chapter 10, “Building Trees and Forests.”
DNS Servers
Active Directory requires DNS servers to be available at all times. Although it is convenient to use Active
Directory DCs to provide the DNS services, this may not always be feasible. To ensure that DNS is
always available for Active Directory, the recommendation is to provide, at a minimum, one primary and
one secondary name server per domain. This will enable
• Load balancing between the name servers
• Faster access, especially when placing the secondary name server across a WAN link
• Redundancy, in case of failure of one of the name servers
If at all possible, it is recommended that there is at least one DC providing the DNS service in
each site. This will enable much faster access and ensure that DCs are not cut off from DNS if a WAN
link goes down. These servers can be secondary servers for the zone rather than primary.
You should consider placing DNS servers on different subnets. This will provide a level of fault
tolerance should the subnet become somehow disconnected from the remainder of the network. It will
also provide a boundary in case of attacks against the subnet, especially attacks where a subnet is flooded
with so much garbage traffic that legitimate traffic is rejected.
N
OTE
All of the client computers on the internetwork should be configured to query both a primary
DNS server and a secondary DNS server. Clients will use the DNS service to locate a DC in their
local site in order to log on to the network, as well as for queries for services.
Organizational Units
OUs are the container objects that sit within domains. OUs were designed to be flexible. An administrator
can create them, delete them, and reorganize them at any point in time. They are a logical arrangement of
objects that can be nested, and have no impact on the network traffic. Two items will impact the OU
design:
• Group Policy
• Administration
In both of these cases, the OU is the boundary. Different group policies can be applied to
different OUs. Different Administrators can be granted administrative access to different OUs, without
concern for conflicts over administrative control.
How you create the OU hierarchy can reflect the company organizational chart, or some other
tree structure that seems sensible. The Microsoft utilities do not require users to navigate the hierarchy of
OUs although some tools do expose them, so there is no true need to create OUs that serve no purpose

How to Cheat…
Copyright 2003 Syngress Publishing, all rights reserved
45
other than the reflection of an organizational chart. Instead, focus on the purpose that the OU will serve—
to provide group policy or administrative area, or to group a set of users logically together.
OUs are the most flexible container objects in Active Directory. Unlike forests and domains, OUs
can be created, moved, added, or deleted whenever needed. These changes have no impact on the
network. Objects within OUs also can easily be moved, created, added, and deleted. When these changes
are made, the major considerations are simply about how the group policy and administration issues will
change.
Group policies will affect the time that it takes for a user to log on. The more group policies there
are, the longer it takes. If an Administrator applies multiple group policies to a single OU, the user’s
logon time will suffer. If the user is located three nested groups down, and the Administrator has applied a
single group policy at one of the levels, that user will log on faster than the user with multiple group
policies applied to a single OU. Group policies are the reason for logon times being increased. The
problem, however, with OU design is that when there are multiple nested OUs, Administrators are more
likely to apply group policies to each OU in the hierarchy than to apply multiple group policies to a single
OU. When planning the OU structure, make sure to state where group policies will be applied, and
whether multiple group policies will be acceptable.
Site Topology
The site topology is a representation of the physical network. It consists of sites that are connected by site
links. (Note that this is very similar to Exchange Server’s directory in which sites are connected by site
connectors.) The site is a physical division of the network. When users authenticate to the network, their
authentication traffic will be directed to a DC within their own site. Additionally, sites will maintain more
query and replication traffic within them.
Sites, as well as their Active Directory names, should represent the physical network, and should
have a DC within each. The site should consist of networks that are connected by fast and reliable links.
They can be LAN or extremely high-speed WAN links. A site should not span a medium- or low-speed
WAN link (e.g., less than 10 Mbps).
Unlike domains, sites are easily added, moved, changed, or deleted. This is one of the methods
that makes Active Directory scalable with the internetwork’s growth. To manage sites, you can use the
Active Directory Sites and Services MMC utility, which can be located by clicking Start | Programs |
Administrative Tools | Active Directory Sites and Services.
Naming Conventions
The key to a solid namespace design is simplicity. The simpler the namespace design, the easier it is to
manage and scale up later on.
The namespace design should fit the ideal network for the enterprise, even if the ideal network is
not quite what exists currently. After designing the ideal network’s namespace, make adjustments only for
the anomalous network devices. Eventually, the network will adjust toward the ideal by taking this
approach.
Finally, the namespace design should be enabled for change management. Most enterprises are
not static entities. People are promoted to new positions, move to different departments, start new
business units in another city or country, leave the company, and so on. The PCs that they use either
move with them, or change hands and are reconfigured. New PCs, servers, and printers are added to the
network and old ones are retired. All organizations experience these changes, just in varying percentages.
If the Active Directory namespace does not support changes, it will not be a success. Instead, it should
support changes so that it is easy to move objects around the tree. One way to enable Active Directory for
change management is to standardize unique names throughout the tree. This simple standard will ensure
that no conflicts from moves, adds, or changes will ensue.
Naming Conventions for the IT Manager

DNS and Active Directory
46
Copyright 2003 Syngress Publishing, all rights reserved
Naming conventions for user accounts are sometimes the keys to the internetwork for hackers. Many
organizations use a standard of the first letter of the first name and the first five to seven letters of the last
name as a standard for usernames. Hackers find it effortless to discover a user’s name. The only other
piece of information is the user’s password, which is sometimes written on a Post-It note and pasted on
the PC itself, or sometimes given by an unsuspecting user to a call from “IT Support” (a.k.a. the hacker).
The other thing that organizations typically do is to leave the default Administrator name for the
network. In Windows 2000, this is a domain Administrator named “Administrator.” Again, hackers have
half the key to the network when an organization leaves this account with its original name intact.
Finally, organizations that are on the Internet already have a widely published domain name for their
Internet presence. Many of them use that same name, or a subdomain of it for their private, internal
network. Again, there is no guessing involved in locating servers on the private network for a hacker.
So what does an IT Manager do to secure the network through naming conventions?
• Do not use the user’s name, or permutations of it, as the user’s logon id unless you add
numbers or other data to the logon id to disguise it.
• Do not be tempted to use a United States social security number for a user’s id, either. A
social security number not only places a user’s personal information at risk, but companies
with international sites will have users who do not have social security numbers.
• Rename the Administrator account. Remember, however, that some applications are written
to look for the “Administrator” account in order to be installed, although most allow you to
input a different name.
• Create Administrator accounts with randomly generated names using both upper- and
lowercase letters and numbers. Who is to know that the Administrator’s name is
X3460GzwGm?
• Always remember to enforce a strict password policy, especially if the organization is
connected in any way to the Internet.
• Register a new domain name with InterNIC for your internal network that is completely
different from the one used on the Internet.
Aside from DNS naming conventions, there are other interoperability issues with names for most
internetworks because of legacy systems. The following rules will help evade many trials and tribulations
when connecting to legacy systems:
• Always create unique names for users, computers, printers, and other resources.
• Avoid the following characters when creating user or computer names since many computers
will translate these as encoding characters or will not understand them:
!@#$%^&*()_?<>’”;:[]{}\|/.,
• Keep object names for logon ids to eight characters or less. Many legacy systems stop after
eight characters.
• Keep object names for computers to eight characters or less. Many legacy systems stop after
eight characters.
• Do not depend on the letter case (upper and lower) to create unique names. Many computers
translate both Frank and fRANK to equate to FRANK, so they would no longer be unique.
• Do not depend on a distinguished name to create unique names. Legacy systems may not
understand context-sensitive names and will translate
/CN=M1craft3/CN=USERS/DC=Panther/DC=MicroAge/DC=com simply to be M1craft3. So
if there is another M1craft3 in Active Directory, but in a different tree location or domain, the
name will not be unique.

How to Cheat…
Copyright 2003 Syngress Publishing, all rights reserved
47
Defining DNS Names
You can’t use just any name in a DNS zone database. For example, it wouldn’t accept someone’s street
address with spaces and punctuation in the DNS database, so you couldn’t name a computer after its
postal location. The rules regarding DNS names are simple:
• Each host in the DNS database is allowed to have a name of up to 63 characters in length, and
many allow names up to 255 characters.
• All hosts must have unique names. For example, a host named george.microage.com and a
host named george.eng.microage.com are each considered unique.
• All subdomains must have unique names within their parent domain.
DNS names for each domain should be defined when creating the domain plan. Each domain
should be assigned a name that follows the format of root.com. Domains that will share the same
namespace as the forest root domain will have a subdomain name format of parent.root.com. Any
domains beneath them in the domain tree hierarchy will have the sub-subdomain name format of
child.parent.root.com. Further subdomains are allowed, but not recommended because of the complexity
added to the internetwork. Trust relationships will follow the tree structure.
Each DNS root domain namespace should be registered with InterNIC. This will avoid conflicts
if there is another one being used on a connected network or the Internet.
The DNS name for a domain in the Windows 2000 is defined when the first DC for that domain
is installed with Active Directory. The Active Directory Service is installed with the Active Directory
Installation Wizard, as shown here.
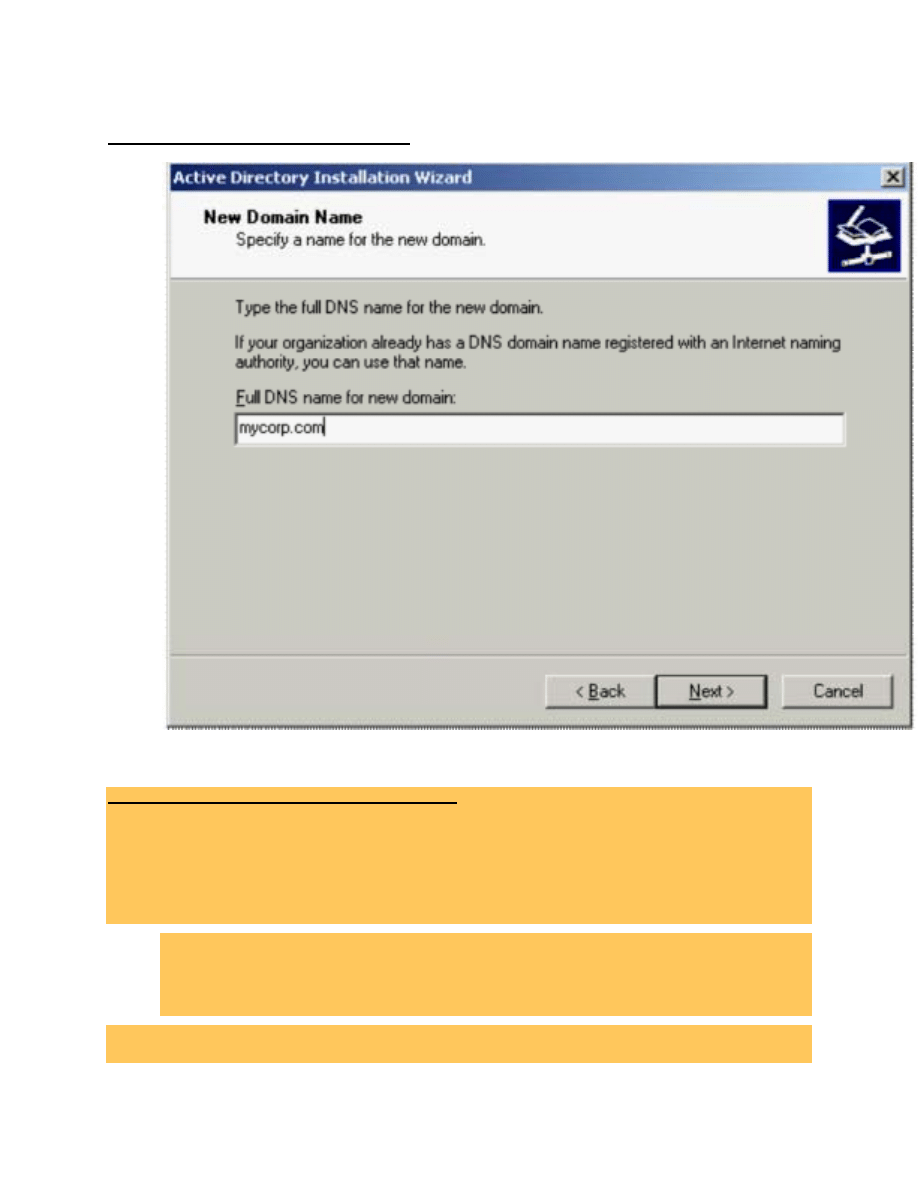
DNS and Active Directory
48
Copyright 2003 Syngress Publishing, all rights reserved
Naming a New Domain in Active Directory
Naming Convention Rules for the IT Professional
Microsoft’s DNS service that comes with Windows 2000 is more forgiving when it comes to naming
conventions than the DNS applications from other vendors. Even if you are using Microsoft’s version of
DNS, you may, at some point in time, connect to a network that uses a different vendor’s DNS. When that
happens, the naming conventions that you are using will need to be compatible with both DNS versions.
Otherwise, you will encounter a few problems.
Standard DNS naming rules, which are understood by all DNS versions, are as follows:
• Use a registered DNS name. You can register DNS names with InterNIC.
• Use the standard character set of A through Z, a through z, and 0 through 9 and the hyphen (-
). Note that the Windows 2000 DNS will support both the underscore (_) and Unicode
characters.
When in doubt, verify your naming strategy with RFC 1123, which is available on the Internet at

How to Cheat…
Copyright 2003 Syngress Publishing, all rights reserved
49
Defining DNS Zones
All DNS zones and RRs are managed in the DNS Management Console. To add a zone, follow these
steps:
1. Click
Start.
2. Select
Programs.
3. Select
Administrative Tools.
4. Choose
DNS. The DNS Microsoft Management Console utility will start.
5. Select
either
Forward Lookup Zones or Reverse Lookup Zones below the server that will
be managing the zone, depending on which type of zone you are adding.
6. Click
the
Action menu.
7. Select
Create a New Zone. The Add New Zone Wizard will begin.
8. Select the zone type.
9. Assign a name and complete the wizard. The new zone will appear in the DNS utility.
Adding an RR also occurs in the DNS Microsoft Management Console utility.
Naming Conventions for Active Directory
Active Directory is an open directory service in that it supports a wide range of protocols, objects, and
application programming interfaces (APIs). These are the mechanisms that define the availability of
Active Directory to various types of clients.
As a result of Active Directory’s support for diverse protocols, Active Directory supports many
different name formats:
• Internet e-mail addresses, as described in RFC 822—name@mycorp.com.
• Uniform Resource Locators (URLs) for HyperText Transfer Protocol (HTTP)—
• Lightweight Directory Access Protocol (LDAP) names—
LDAP://myserver.mycorp.com/CN=myname,OU=Users,O=Mycorp,C=US.
• Universal Naming Convention (UNC) names—\\myserver.com\myvolume\file.ext.
Such diversity in naming format support enables companies to select nearly any names that are
appropriate for their company. The major influence on a naming convention will be the connectivity to
external systems on the internetwork. Windows 2000 Active Directory is more forgiving than other
systems for names in that it supports a wider variety of characters and character sets, and even lengthier
names.
Workstation DNS Names
When a Windows 2000 workstation or Windows 2000 Server starts up, and periodically thereafter, it
updates the DNS attributes for its own object in Active Directory. These attributes are dnsHostName and
ServicePrincipalName. A failure to update these attributes can occur if the DNS domain name for the
computer does not match the Active Directory domain name to which it belongs plus the Change
primary DNS suffix when domain membership changes checkbox is unchecked in the Properties for
My Computer on the Network Identification tab. To resolve this issue, you have two options:
1. Require the computer to change its domain name to that of the Active Domain. Simply check
the box for Change primary DNS suffix when domain membership changes and restart
the computer.

DNS and Active Directory
50
Copyright 2003 Syngress Publishing, all rights reserved
2. Allow disjointed computer and domain names—this is not recommended because it opens a
security breach. Open the Active Directory Users and Computers MMC in the domain. Make
certain you have selected the View menu and checked Advanced Features. Right-click on
the domain and select Properties from the pop-up menu. Click the Security tab, click Add.
Select the Self group and click Add then OK. Click on Advanced, click Self. Select the
View menu and then Edit. Select the Properties tab. Click on Computer Objects in the
Apply onto area. Under permissions click Write dnsHostName and check the Allow check
box.

How to Cheat…
Copyright 2003 Syngress Publishing, all rights reserved
51
TOPIC 12: Modifying the Active Directory Schema
Knowing that making a change to the schema could be a disaster, one might wonder why it would ever
need to be modified. Microsoft created Active Directory to be a customizable service that would provide
more than simple logon and network security service. Network administrators can modify Active
Directory to meet business requirements.
For example, a corporation can use Active Directory for Human Resource information tracking.
For some corporations this may be an ideal usage, since the identity information will be maintained in a
single place with the network security rights. Additionally, Active Directory will automatically replicate
the identity information throughout the enterprise network.
Making changes to the schema can be destructive to the enterprise network if mishandled.
Whenever possible, the existing objects and attributes should be used instead of creating new ones.
When to Modify the Schema
Change management procedures should always be followed when modifying the schema. Modifying the
schema is a task that can interrupt how Active Directory works, especially if there is a failure of some
sort. Use the following evaluations to determine when to modify the schema:
• Review the existing schema to ensure that the attributes or objects required are not already
available in Active Directory.
• Make sure to plan the schema changes before testing and implementing them.
• Always test a schema modification on a separate forest before implementing.
• Reserve universal changes for weekend implementations. Universal changes are those that
affect a majority of users in a majority of sites. Schema changes fit this definition.
• Only modify the schema when necessary, because the changes cannot be reversed.
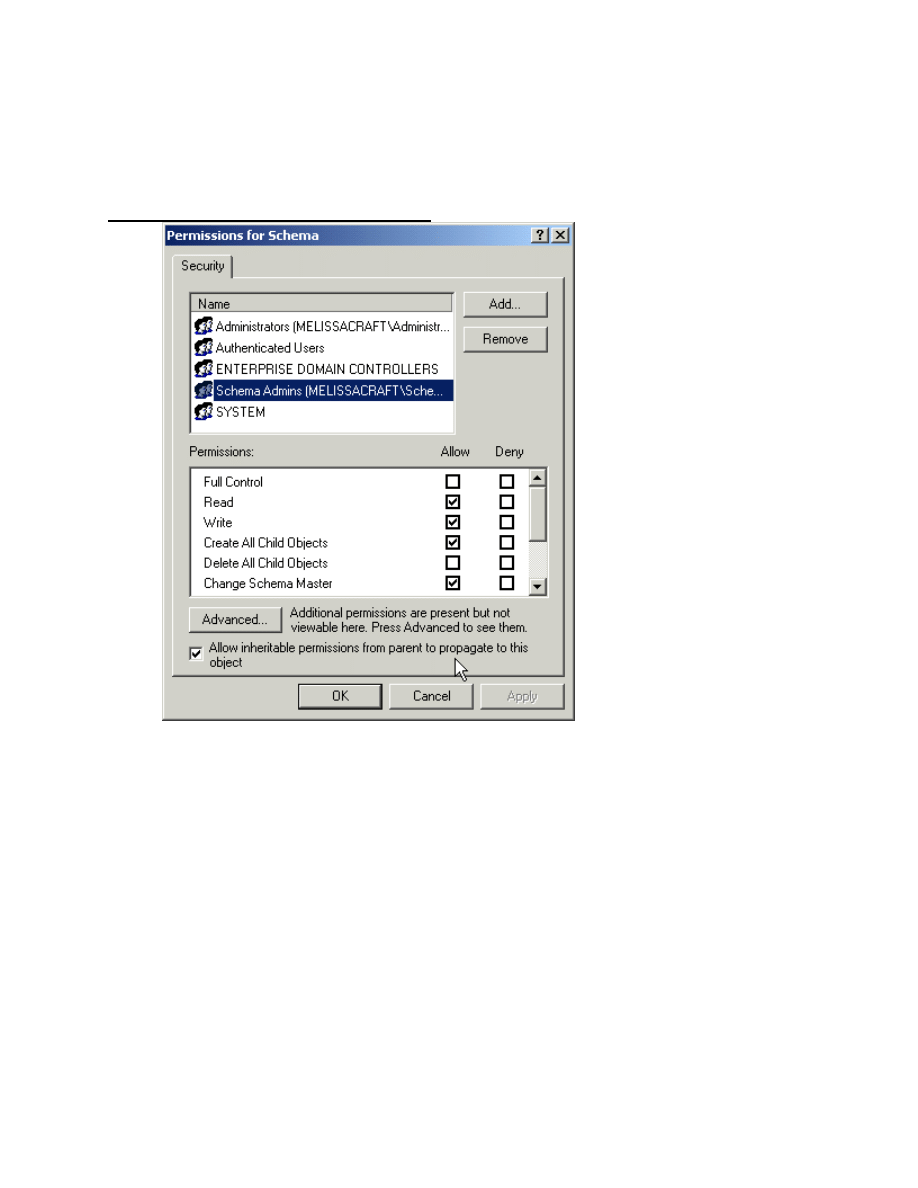
DNS and Active Directory
52
Copyright 2003 Syngress Publishing, all rights reserved
Who Should Modify the Schema?
There is a Schema Admins global group in Active Directory that has full control over the schema. The
properties for this group in the Schema Management console are shown below.
Schema Administrators Group Properties
To ensure that schema changes are controlled so that unexpected changes are not propagated
throughout a production network, there should be guidelines established for all members of the Schema
Admins group to follow. These guidelines include:
• The criteria for changing schema
• The criteria for being able to join the Schema Admins group
• The membership of the Schema Admins group
• How users can apply for a schema change
• The evaluation of the schema change
Finally, the Schema Admins group should consist of a small, select group of administrators with
the skills and authority to make changes to the schema.
When you plan your Active Directory, you should be careful about upgrading an existing
Windows NT domain into the forest root domain. When you do so, the members of that domain’s Domain
Admins group are migrated to Enterprise administrators. These members have the ability to add
themselves to the Schema Administrators group. If one of them had the access to the Schema FSMO, or
captured that role to another DC, that person could extend the schema unintentionally. Consider also that
any existing user accounts that are used for services such as backup applications will also have this
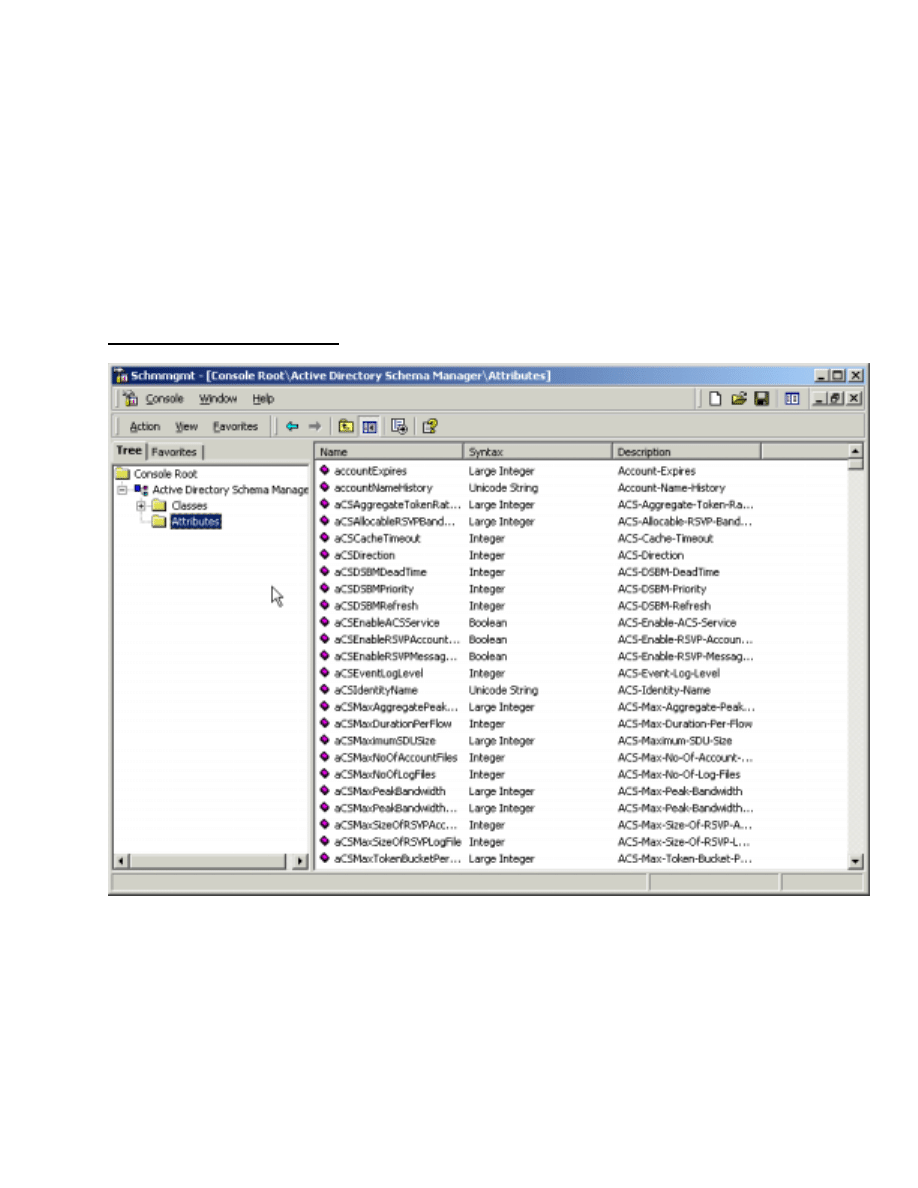
How to Cheat…
Copyright 2003 Syngress Publishing, all rights reserved
53
extended capability. Since many applications use default names and some even offer default passwords
for such accounts, these can be easy for a hacker to break into and grab control of your entire Active
Directory. This is one of the reasons for creating an “empty” new domain at the root of the forest—to
secure the Enterprise Administrators and Schema Administrators memberships.
Schema Management Console
The Schema Management console enables the Schema Administrators to access and change the schema in
Active Directory using a graphical interface. Not only does it enable the Schema Administrators to edit or
create schema object classes and attributes, it also lets them select which object classes and attributes
should be available in the Global Catalog (GC). This console is shown below.
Schema Management Console
In the Schema Manager, the left pane displays the scope of the schema, and the right pane
displays the results. The top container, or node, in the left pane is the root node containing the forest
schema, and the two below it are the class node and the attributes node, which contain schema specifiers
for classes and attributes, respectively.
Flexible Single Master Operation
Make sure that the Schema Manager console specifies the Operations Master for the schema of your
forest. The Operations Master for the schema is a role that is granted to a single DC for making updates to
the schema. Only one DC at a time can occupy this role. After the changes are completed, they are

DNS and Active Directory
54
Copyright 2003 Syngress Publishing, all rights reserved
replicated to the remaining DCs in the forest. To see the Operations Master role, open the Schema
Manager console, right-click on Active Directory Schema Manager root, and select Operations
Master from the pop-up menu. Make sure that the box for The Schema may be modified on this server
is checked. Checking this box sets the value “Schema Update Allowed” to 1 under the registry key
HKLM\System\CurrentControlSet\Services\NTDS\Parameters . This method of enabling any DC to be a
single master of the schema is called the Flexible Single Master Operation model, or FSMO (pronounced
FIZZ-MO, a name which, I believe, reflects the excessive consumption of cola at Microsoft).
N
OTE
The Schema Manager is not a utility that shows up in any menu, and can only be found in the
Resource Kit utilities. First, the Resource Kit must be installed. Then, open the Schema Manager
(schmmgmt.exe) and select the Console menu. Click Save As and save the file to the Documents
and Settings\<your username>\Start Menu\Programs\Administrative Tools directory. You can
rename the file from schmmgmt to Schema Manager at the same time.
There are five FSMO roles in Windows 2000:
• Schema Master Controls schema updates.
• Domain Naming Master Controls all the additions and removals of domains from Active
Directory.
• RID Master Controls the allocation of Relative IDs (RIDs). Relative IDs are allocated as a
sequence of numbers to each domain. The RID is concatenated with the domain’s SID
(Security Identifier) whenever a new object is created, and then assigned to the new object as
a unique object SID.
• PDC Emulator In mixed mode, the primary domain controller (PDC) emulator controls
backup domain controller (BDC) replication and backward compatibility. In native mode, the
PDC emulator controls password updates.
• Infrastructure Master Controls group-to-user references, so that updates of group
memberships are propagated throughout Active Directory.
You can view various FSMO roles whenever you see the Operations Master option in an Active
Directory console menu or pop-up menu.
How to Modify the Schema
The schema can be modified through the addition, deletion, or updates to any objects or attributes within
it. The schema is the structure of Active Directory and manages how the content of Active Directory is
presented to users, administrators, and applications. When changes are made to the schema, Active
Directory validates the changes to make sure that the entire Active Directory database retains integrity.
Mergers and acquisitions of companies are complicated by the need to merge infrastructure
technology. You cannot merge two forests without using a third-party tool to move user and computer
objects from their old domain to a new destination domain. You also need to consider the schema of those
objects. If you need to move an object from a forest that supports a schema extension to a forest that does
not include that extension, be aware that either the entire object or the extended attributes will not be
understood by the destination forest (depending on what part of the schema was extended in the former
forest). You should be vigilant when selecting your tool—make certain to choose one that can determine
schema extensions and their effect during migration. If the schema extensions are not needed, you may
decide to create an entirely new forest and migrate objects from both former forests to it.
Class
It is recommended to create attributes before creating classes so that new attributes can be designated as
Mandatory in the class. A new class can be created without creating any new attributes, however. Before

How to Cheat…
Copyright 2003 Syngress Publishing, all rights reserved
55
creating a new class of object in the schema, the information listed in the following table should be
determined.
Object Class Information Needed for New Object
Class
Object
Dialog
Options
LDAP Property
Name
Function Example
Common
name
Cn
Name of the class of object.
This name must be unique in
the schema.
My Object
LDAP
Display
LDAPDisplayName
This name, similar to the
common name, is used by
programmers and is guaranteed
to be unique. It has a format of
being multiple words
concatenated with capitals
separating each word, but the
first letter being lowercase.
myObject
X.500
Object ID
X.500 OID
objectIdentifier
This is a unique number where
each set of numbers is
separated by a period. It is
guaranteed to be unique
worldwide for standard object
classes since it is usually
issued by a standards
organization, including the
ISO, ITU, and ANSI. If
creating a new class, the OID
(Object ID) can be obtained
from these standards groups. It
is not recommended that you
make up a number for this,
since it could conflict with
other classes that are added
later.
1.1.111.111111.1.1.111
Parent Class PossSuperiors
The class from which the new
class will inherit default
attributes. If a new object is a
subclass of Person, it will
inherit all the Person attributes.
Person is a subclass of top, and
inherits all the top attributes.
ParentClass
Class Type
objectClass
The class type is an X.500
class type. There are three from
the 1993 X.500 definition:
Abstract: Template class for
all three types of classes.
Auxiliary: List of attributes
that can be included in
Abstract
Auxiliary
Structural
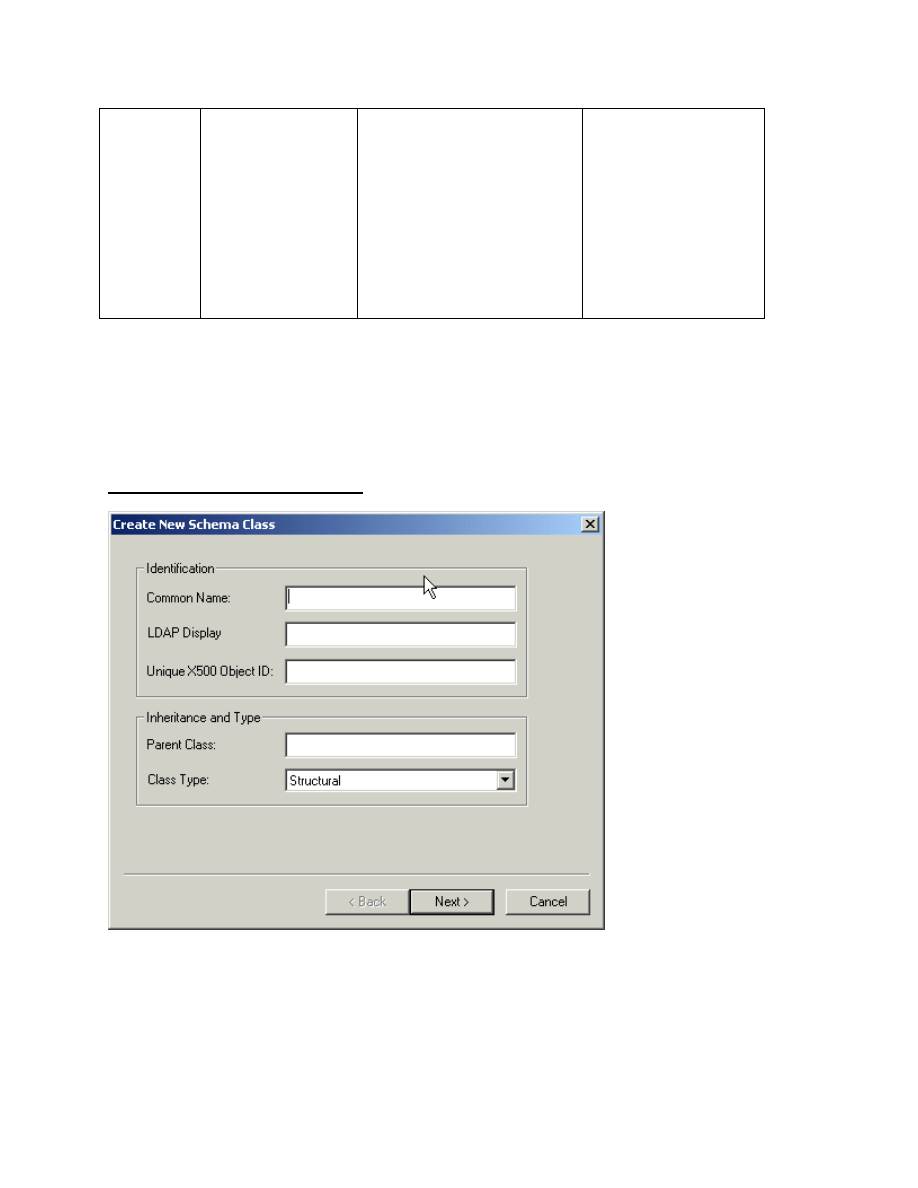
DNS and Active Directory
56
Copyright 2003 Syngress Publishing, all rights reserved
Structural and Abstract classes.
Structural: True object class
that will enable new objects to
be created within Active
Directory.
There is one class type from
the 1988 X.500 definition: 88.
88 does not have the same
structure as the other classes,
and is not available within
Active Directory.
Follow these steps to create a new class in the Schema Manager console:
1. Right-click
the
Classes Node in the Schema Manager.
2. In the pop-up menu, click Create Class…
3. A warning will appear, as shown below. Click Continue to bypass it.
4. In the Create New Schema Class dialog box illustrated below, complete the information, and
click Next to continue.
Create New Schema Class Dialog
5. In the next dialog, you can select the attributes that will be part of this class. Add any
attributes that an administrator must fill out when creating one of the instances of this object
to the Mandatory section by clicking Add next to the section and selecting the attributes. Add
any discretionary attributes to the Optional section by clicking Add next to the Optional
section. You do not need to add any attributes, although some will be added by default.
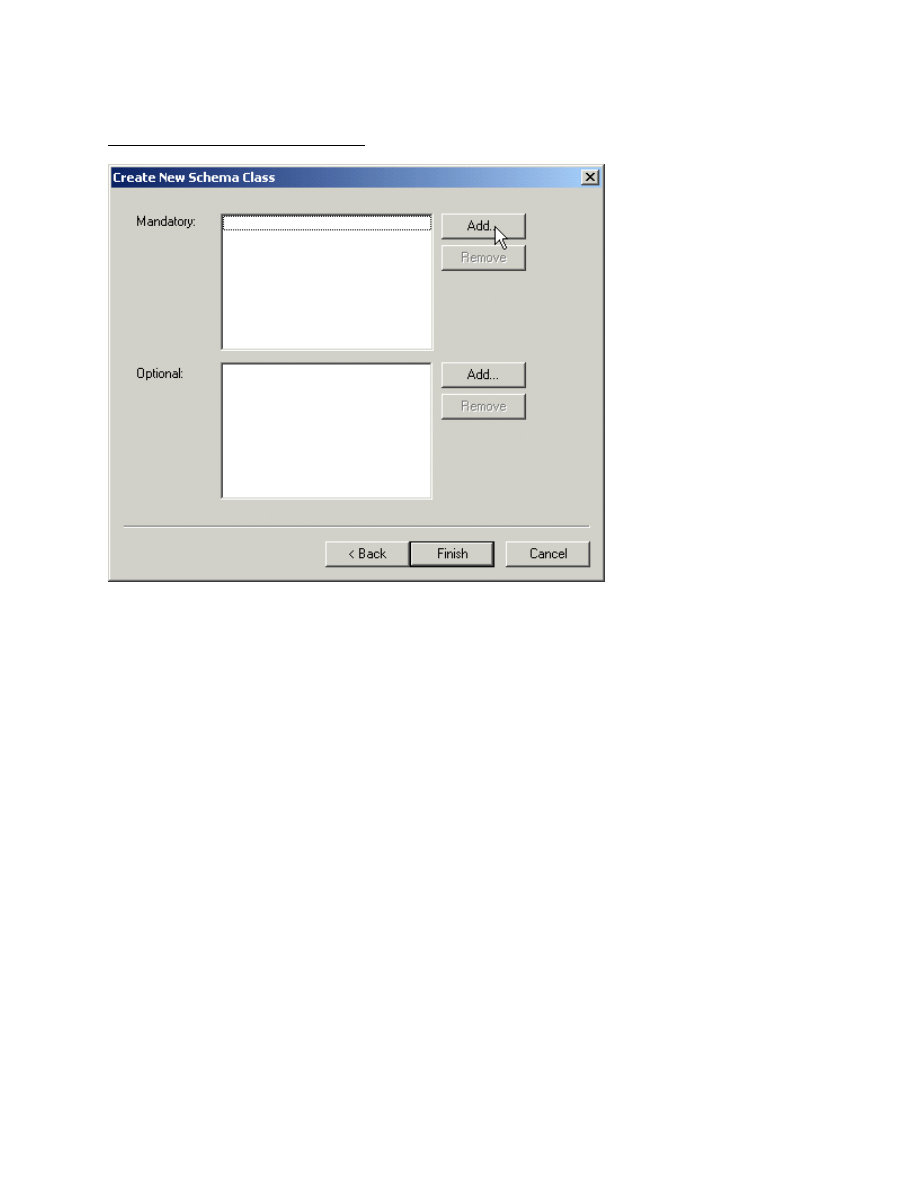
How to Cheat…
Copyright 2003 Syngress Publishing, all rights reserved
57
Adding Attributes to a New Class
6. Click
Finish to create the object.
7. Expand the Classes node by clicking the plus sign to its left in the scope pane.
8. Under the Classes node, locate the new object and select it. The Results pane will display all
the attributes that were added, along with many that are automatically defaults of that type of
class. The attributes that are inherited are displayed with the name of the parent class in the
Source Class column. These are shown below.
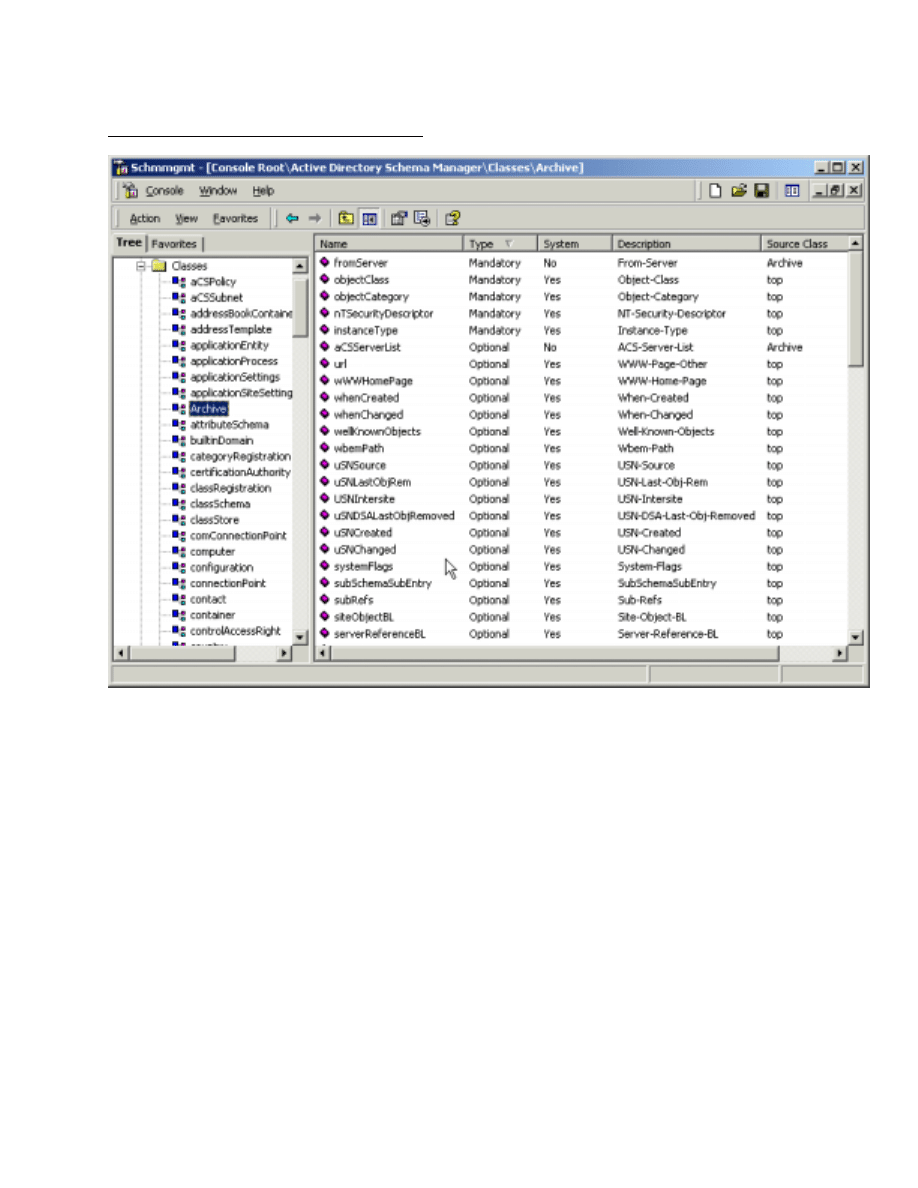
DNS and Active Directory
58
Copyright 2003 Syngress Publishing, all rights reserved
New Class Object and Default Attributes
Once a class has been created, it can be modified by right-clicking the class and selecting
Properties. The resulting dialog allows the administrator to change the selected attributes, the
description, the possible superiors, and security. It also lets the administrator deactivate the object or
enable it to be browsed in Active Directory by checking the boxes for these options on the General tab,
which is shown here. Note that some of the properties are grayed out, and therefore cannot be changed.
These include the Common Name, the X.500 Object Identifier, and the Class Type.
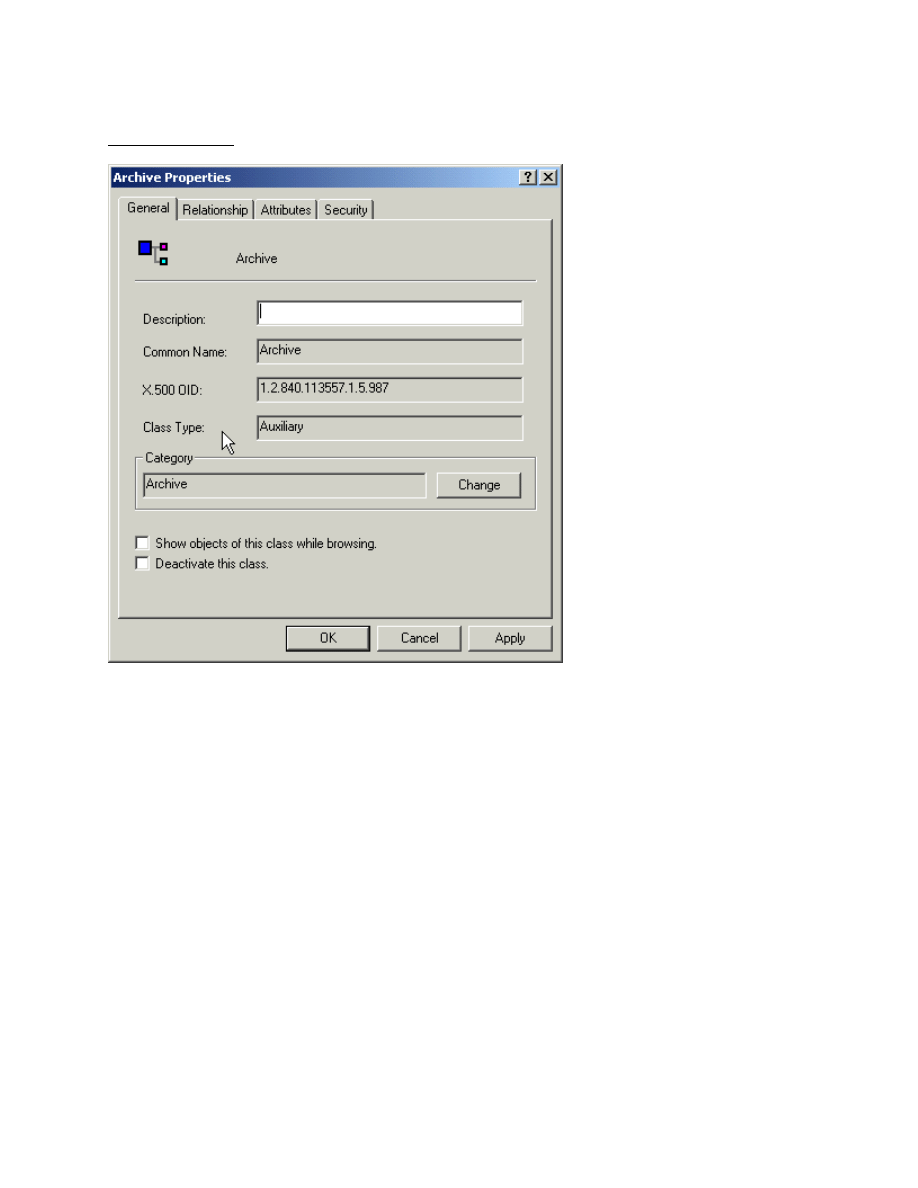
How to Cheat…
Copyright 2003 Syngress Publishing, all rights reserved
59
Class Properties
Inheritance occurs when one object class is designated as a parent to another. This designation
enables the attributes of that parent class to flow down to the child class. For example, when making a
new class a child of a User class, all the attributes of Users will be available as part of the new class. To
change the inheritance of the object or the attributes that it uses by default, select the Relationship tab.
Click Add next to Auxiliary classes in order to select a list of attributes that should be included in this
class. Then select an Auxiliary class from the list of available schema objects and click OK. The new
attributes will be added to the defaults in the results pane when you are finished.
To add the inheritance from parent classes, click Add next to the Possible Superiors box, and
Add a class from the list that appears. After clicking OK for either of these operations, the possible
superior’s or auxiliary class’s X.500 Object Identifier will appear in the window.
To select or deselect attributes for the class, click the Attributes tab, which is shown below. You
cannot add or remove any Mandatory attributes, but you are able to add or remove Optional attributes,
even if they were added during the object’s creation. The process is the same as during the creation of the
class.
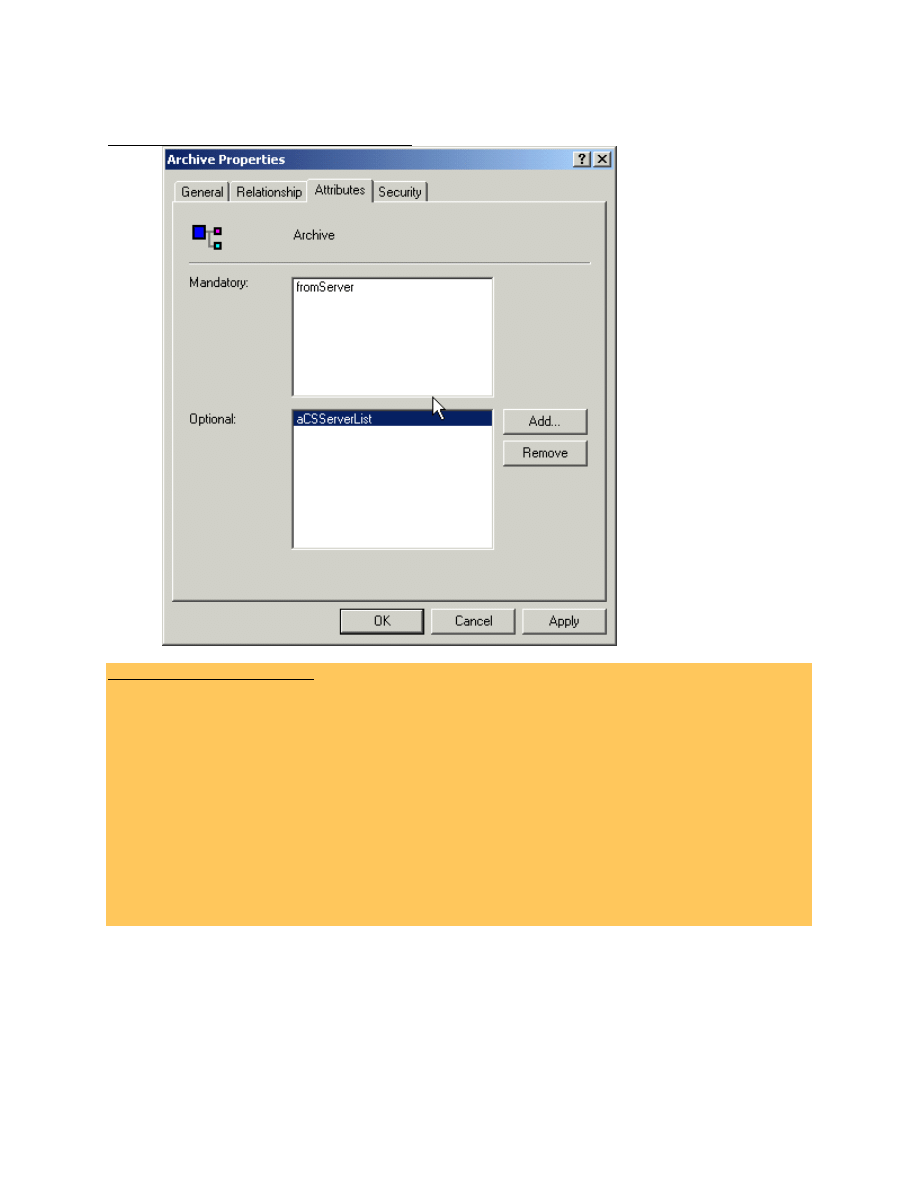
DNS and Active Directory
60
Copyright 2003 Syngress Publishing, all rights reserved
Adding Attributes After Class Creation
Deactivating an Object Class
The objects in the original Active Directory schema cannot be deactivated; however, those that are
added later can be. Deleting a schema object is not supported by Active Directory because of the
inconsistencies that could result. Deactivation is the next best thing since the object class is unusable, but
the instances of the class can still exist, just not be newly created.
The object class can be deactivated by checking the box in the Schema Manager. The object class can
be reactivated by unchecking it later.
When a class is deactivated, it cannot be added as an instance afterward. Those existing instances
cannot be modified. Queries made by users, or deletions of Active Directory instances, can still occur as
though nothing has happened.
After deactivation, schema updates will only modify the isDefunct attribute of the schema object. The
isDefunct attribute is set to true when the object is deactivated. No other modifications will be made
except for that isDefunct attribute value.
Attributes
When creating new object class that includes new attributes, it is recommended that the attributes be
created first. Then, the new class can use the new attributes immediately upon creation. The attribute
requires the same common name, Lightweight Directory Access Protocol (LDAP) display name, and
Unique X.500 Object Identifier that is required by a new class object. Additionally, the new attribute will
require the information shown here.

How to Cheat…
Copyright 2003 Syngress Publishing, all rights reserved
61
Required Information for a New Attribute
Dialog Options
Purpose
Syntax
The syntax determines what type of information can be contained. This
field is a drop-down list with several options, including Octet string
(such as an IP address) and Boolean (true and false values).
Minimum
This is the lower limit on the syntax’s value. For example, if using an
Integer syntax, the default lower limit is 0, but placing 1 here will
eliminate 0 from being used.
Maximum
This is the maximum limit on the syntax’s value. If using a String
syntax, the maximum limit would be the length of the string. Placing 50
in this field would limit a String syntax attribute to 50 characters.
Multi-Valued
When checking this box, it means that the attribute can have a one-to-
many relationship with the resulting properties. For example, a multi-
valued item is the Possible Superiors attribute. There can be many
superior class objects. However, each Boolean attribute (true/false)
can only be single-valued, since an item should not be true and false at
the same time.
In order to create a new attribute, you must start with the Schema Manager.
1. Right-click on the Attributes node in the Scope panel.
2. Select
New Attribute.
3. Click
Continue to bypass the warning.
4. The Create New Attribute dialog box will appear. Type in the Common Name, LDAP
Display, and X.500 OID, as well as the information determined for the items in Table 15.2,
and click OK.
The object will be created and will appear in the Results window in the Attributes node.
The attribute can be modified somewhat after it is created. This is done by double-clicking the
attribute in the Results pane, or right-clicking it and selecting Properties. Note that the Common Name,
X.500 OID, and Syntax are grayed out and cannot be changed. There is a statement about whether the
attribute is multi-valued or single-valued, and that cannot be altered either. The remaining items can be
updated.
System Checks After Schema Modification
Two types of safeguards have been put in place to ensure that no problems will result from schema
modification:
• Safety checks
• Consistency checks
The safety check reduces the possibility of schema modifications interrupting an Active Directory
application that uses the object class or attribute that has been changed. Safety checks are simply the
items that cannot be modified after a class has been created, and the items that cannot be changed on
default schema objects, such as adding a new Mandatory attribute on a class.
Consistency checks are the method that Active Directory undertakes to ensure that certain values
must remain unique, such as the LDAP Display, Common Name, and X.500 OID. An addition of a new
object will only be successful if these items and any other unique attributes are verified as unique
throughout the Active Directory forest. Aside from these and other verifications, the Consistency check
will ensure that:
• All attributes and classes designated during object class creation or modification already exist
within the schema.

DNS and Active Directory
62
Copyright 2003 Syngress Publishing, all rights reserved
• All classes designated as Auxiliary have an Auxiliary class specification.
• The rDNAttID attribute uses the syntax for String(Unicode).
• The minimum value of an attribute is lower than the maximum value.
N
OTE
The rDNAttID attribute defines the naming convention used in the Active Directory schema.
Because its applicability is universal, it is critical that it is consistent.
Schema Container
The Schema container holds the entire schema, inclusive of attribute and class definitions. It must be
replicated to each DC that is part of the same forest. The Schema container is located in the Configuration
container, at cn=Schema, cn=Configuration, dc=mysubdomain, dc=mydomain, dc=com. The Schema
Configuration container cannot be viewed with the default Windows 2000 Active Directory tools;
however, it can be seen using the following Resource Kit utilities:
• Schema Manager
• ADSI Edit
• LDP
The first time that ADSI Edit is executed, the user must connect to a naming context. This
requires right-clicking the ADSI Edit container and selecting Connect to from the pop-up menu. The
ADSI Edit tool must be pointed to the schema in order to see it. This requires right-clicking the root and
selecting Settings, then changing the Naming Context to Schema. The result will be the screen shown
here.
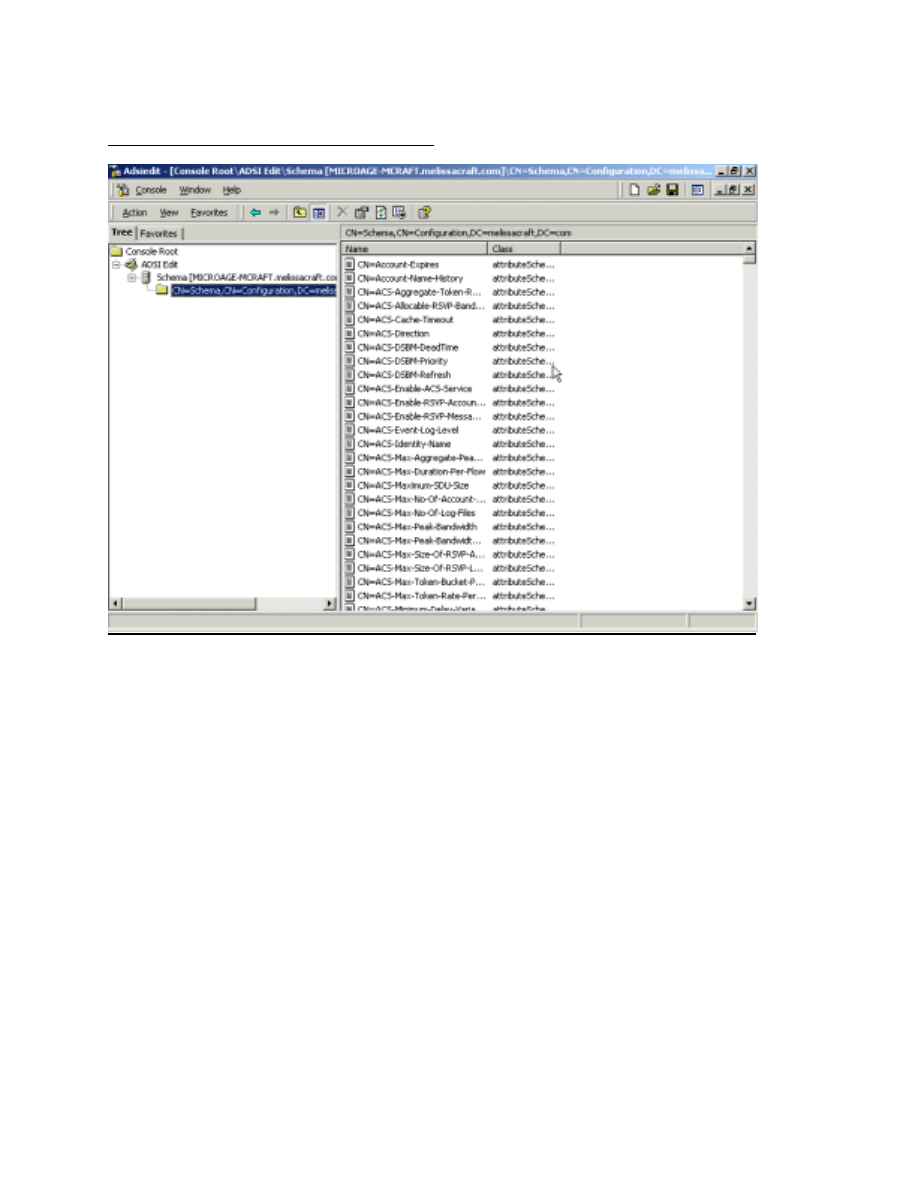
How to Cheat…
Copyright 2003 Syngress Publishing, all rights reserved
63
ADSI Edit Displays the Schema Container
The Cache
When a DC initializes, it reads the schema from the Schema container into memory. This version of the
schema sitting in RAM is called the schema cache. Whenever changes are made to the schema, they are
validated against the schema cache rather than the schema on the hard drive to enhance performance.
Whenever replication or changes are made, they are first made to the schema on the DC’s hard drive and
then are automatically updated in the cache five minutes after the first change was made. The file on the
hard drive that initializes the schema when it is first installed is the SCHEMA.INI.file located in
%systemroot%\ntds. The Active Directory database is the NTDS.DIT that is located in the
%systemroot%\ntds directory by default. NTDS.DIT contains the entire Active Directory, including
schema and GC.
The tables in the schema cache are called ATTCACHE and CLASSCACHE, and represent each
attribute and class in the schema. There are hash tables of ATTCACHE and CLASSCACHE to enable
lookups in the cache. The table sizes are dynamic, based on the number of items (attributes and classes)
that exist in the schema. The table sizes increase or decrease based on the schema changes made.
The schema cache is updated every five minutes. This means that changes made to the schema
may not appear immediately. To update the schema cache from the hard drive without waiting for the
five-minute interval to pass, in the Schema Manager, right-click the Active Directory Schema Manager
root node and select Reload the Schema as illustrated here.
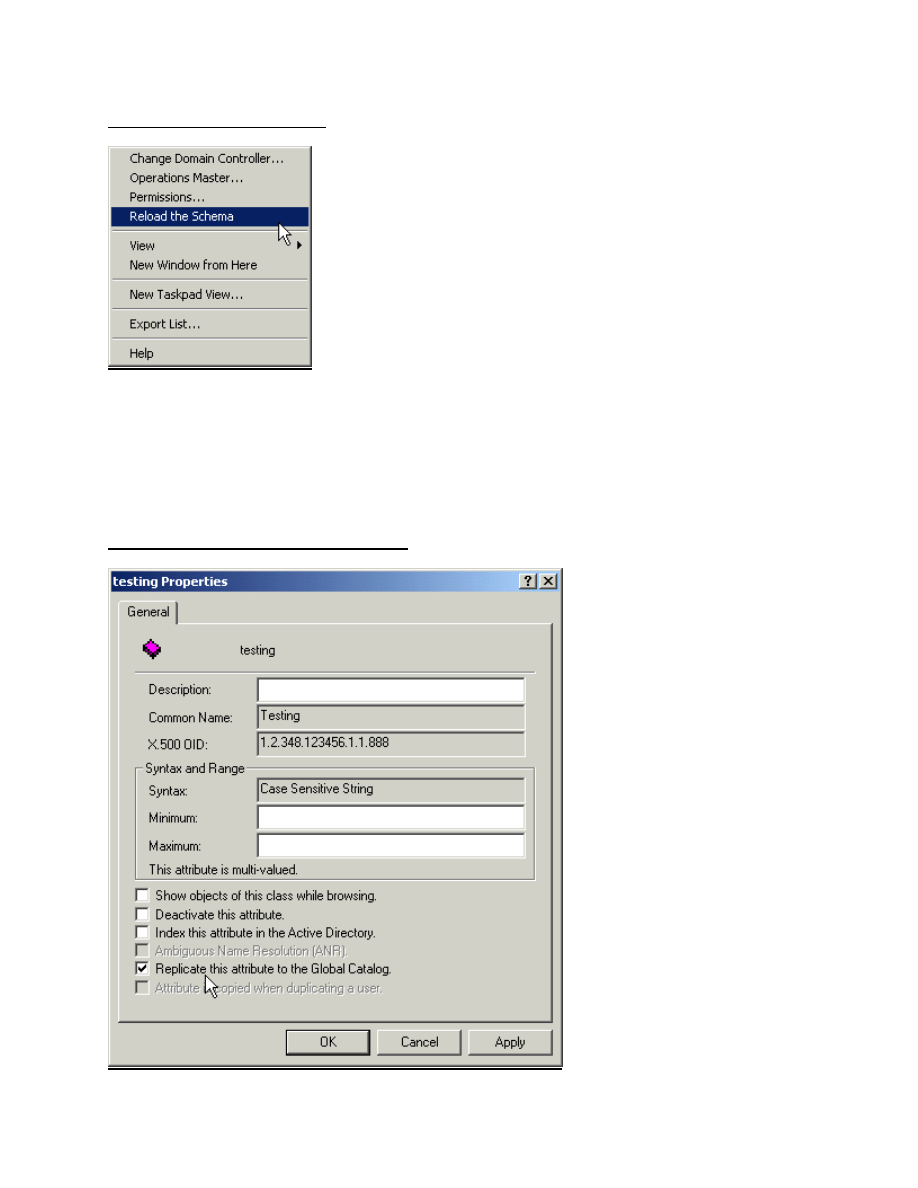
DNS and Active Directory
64
Copyright 2003 Syngress Publishing, all rights reserved
Updating the Schema Cache
Querying Active Directory
The schema affects end users in a fundamental way. It provides the basic layout of information about
users, computers, and other Active Directory objects. This layout is copied fully within each domain and
partially to the forest’s GC.
First, an attribute has to be replicated to the GC. This is accomplished in the Schema Manager by
double-clicking any attribute and selecting Replicate this attribute to the Global Catalog.
Making Attributes Available in the GC

How to Cheat…
Copyright 2003 Syngress Publishing, all rights reserved
65
TOPIC 13: What Can Go Wrong, Will…
Think Twice Before Modifying the Schema
Modifying the schema is an advanced administrative right for a good reason. There are impacts and
potential problems that can raise their ugly little heads whenever a change is made. The issues revolve
around:
•
Creating invalid objects in Active Directory
•
Replication impacts to the network
No one intends to create invalid objects, but as an example let’s look at a user account named Joe.
It has an attribute that is called Spouse that the administrator added to the schema and then placed the
value “Mary” into the Joe object instance. Later, it is decided that the Spouse attribute is not required, so
the administrator deletes it from the schema. Joe’s object is not like the rest because it has the Mary value
in an attribute that does not exist. Active Directory lets Joe’s object remain in the forest, but it does not
clean up the invalid attribute. Instead, the administrator must perform a query and delete that attribute
manually.
Replication is affected whenever a schema change is made. That change is replicated to every
domain controller (DC) in a forest. Latency inherent in the propagation process and exacerbated by
replication schedules will cause a temporary inconsistency in the schema between various DCs. Objects
that are created during the inconsistency period can be replicated before the schema changes, which
results in a failure. Active Directory responds to the failure by initiating a new, explicit schema
replication from the DC where the schema was changed.
Active Directory Disaster Recovery
Each domain controller (DC) contains a set of files that hold its portion of Active Directory. The file
structure is a fault-tolerant transaction–based database, which is based on the Extensible Storage Engine
(ESE). Transactions occur in a short sequence of actions:
1. The administrator creates an object, which initiates the transaction.
2. The transaction is written to a log file.
3. The transaction is then committed to a database buffer.
4. The transaction is completed when the database on the disk is written.
Several files are involved in this process. The NTDS.DIT file is the database file that stores all
the objects for that DC’s partition of Active Directory. There are also several log files:
• Transaction logs
• Checkpoints
• Reserved logs
• Patch files
Transaction log files can reach 10MB in size. A current transaction log, called edb.log, is used
until it reaches the 10MB limit. At that point, the log is saved as a separate file, edb00001.log—where the
numerical portion of the filename is incremented as new full logfiles are saved—and the edb.log is
emptied for new transactions.
Circular logging will not create the past transaction log files, such as edb00001.log,
edb00002.log, and so on. Instead, it will rewrite over the current transaction log. The circular logging can
be turned on to reduce the number of log files on the hard drive. The default behavior of Windows 2000

DNS and Active Directory
66
Copyright 2003 Syngress Publishing, all rights reserved
Active Directory is to execute circular logging. Since Active Directory is redundant, and replication will
update a DC to the latest version of the directory service database, it is not important to save the latest
logs for the latest data recovery. Instead, you simply allow the DC to replicate with its replication
neighbors to reach the latest version of the Active Directory contents.
There is a checkpoint file named edb.chk, which is stored in the same directory as NTDS.dit. This
file holds the pointers to the transactions in the transaction logs that have actually been written to the
database. The file literally checks the point at which the log file and the database are consistent.
Two reserved log files, res1.log and res2.log, are also placed in the same directory as NTDS.dit.
These files are each 10MB in size and will become log files if there is not enough space on the disk to
create a new edb.log file. Any outstanding transactions are copied from memory into the reserved logs,
and then Active Directory will shut down with an “out of disk space” error.
Patch files are used to track transactions written to the Active Directory database during backup.
Split transactions are those that are written across multiple database pages. A split transaction can be
written to a portion of the Active Directory database that has already been backed up. The backup process
is as follows:
1. A patch file with a .pat extension is created for the current database written to disk.
2. Backup
begins.
3. Active Directory split transactions are written both to the database and to the patch file.
4. The backup writes the patch file to tape.
5. The patch file is deleted.
Do not delete log files. Active Directory will automatically run a Garbage Collection process to
delete unused objects, delete unused files, and defragment the database. When files are manually deleted,
Active Directory can become corrupted. Garbage collection will take place on a 12-hour interval basis.
Offline database management is performed with the NTDSUtil.exe program. To run the offline
database tool, start the server and at the initial boot menu screen press F8. Select the Directory Services
Repair Mode option, and then run the ntdsutil.exe tool.
How to Cheat…
Copyright 2003 Syngress Publishing, all rights reserved
67
Backup
Windows 2000 has a Backup utility program found in the Programs\Accessories\System Tools menu.
Backup
The Backup utility provides the following features:
• Data backup of files, folders, Active Directory, and system information
• Scheduled backups
• Storage of backup data on networked systems and removable media
• Data and Active Directory restoration
• Emergency repair disk creation
To create a backup job, you will select the files and folders to back up, the location to place the
backed up data on, and options such as data verification or compression of the data. One of the new items
in the Backup utility is the System State data. System State data refers to the server’s registry, component
services Class Registration database (storing COM data), startup files, Certificate services data, Active
Directory, and SYSVOL. Whenever creating a backup that is intended to be able to repair a server, select
the System State in addition to the data that is being backed up. The System State data is selected by
checking it off.
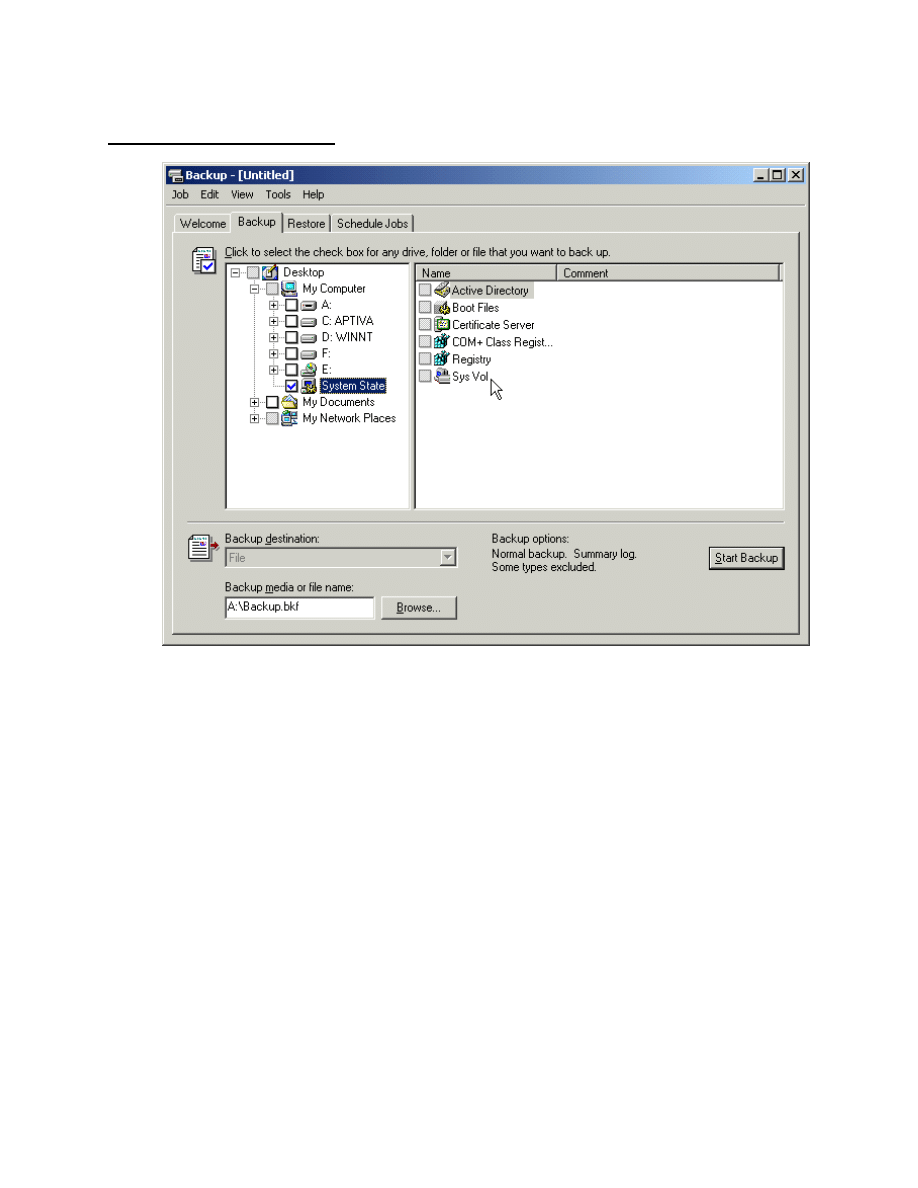
DNS and Active Directory
68
Copyright 2003 Syngress Publishing, all rights reserved
Checking Off System State Data
The Backup utility does support a scheduled backup. This is a common feature in many backup
utilities, where a backup automatically executes after standard business hours and is completed when
administrators return. Scheduling backups to occur after standard business hours reduces the impact to
network performance that a backup might cause.
Creating an Emergency Repair Disk
In Windows 2000, the emergency repair disk is included as a backup option, rather than a separate
application. Emergency repair disks contain minimal system data, although typically enough to get a
downed server to restart. To create an emergency repair disk, select the option in the Backup utility as
shown in the following figure. The Backup utility will prompt for a diskette to be placed in the default
drive A:.
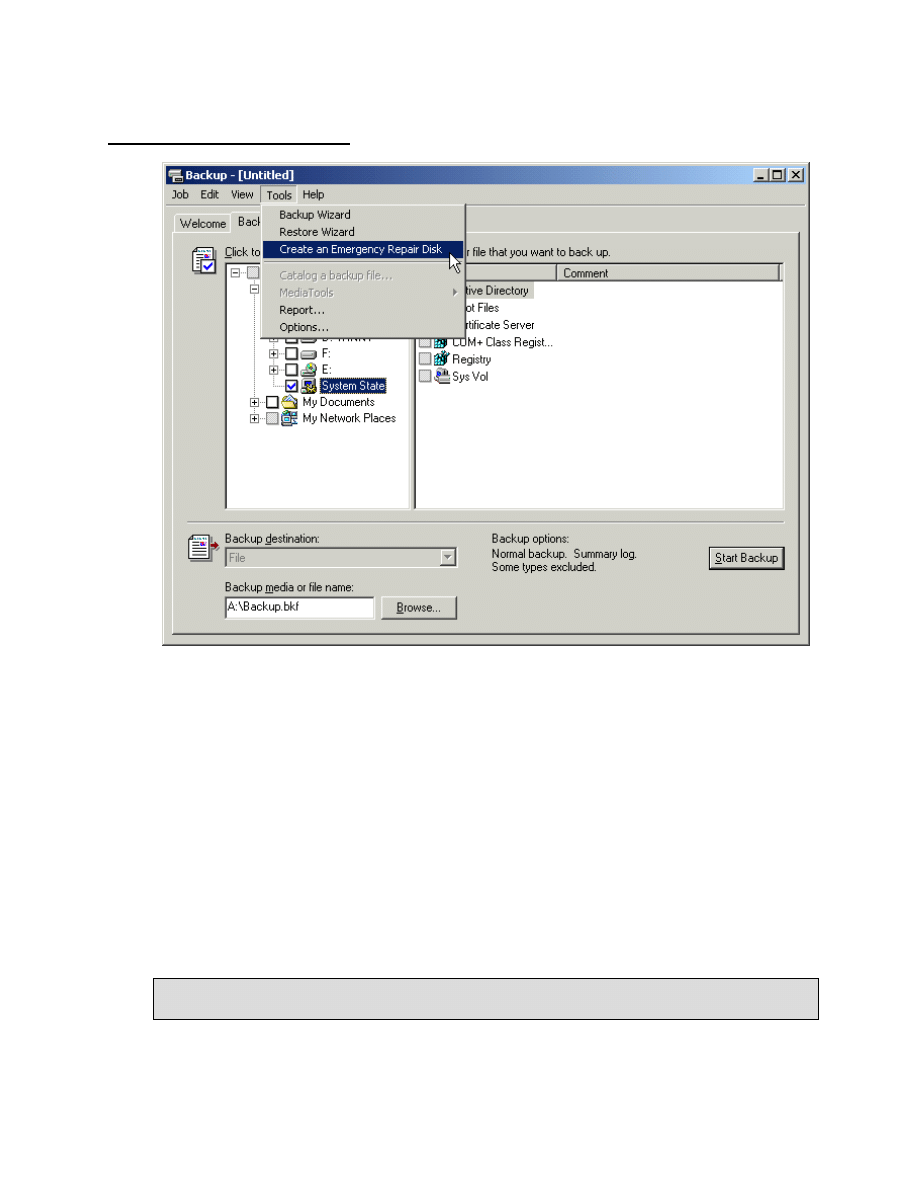
How to Cheat…
Copyright 2003 Syngress Publishing, all rights reserved
69
Create an Emergency Repair Disk
Recovering a Failed Domain Controller
When a DC fails, there is typically more to be restored than just files and folders. There are two issues
involved:
• Transactions might not have been written to disk, but were written to log files for Active
Directory.
• Data in the Active Directory databases on other DCs might have had additional changes since
the failure.
This means that the log files must be used to bring the written transactions to a current state. It
also means that when the Active Directory database is brought online, it must be synchronized with the
rest of the domain and forest. To ensure that this happens, make certain to restore the System State data.
After that is restored, an automatic consistency check occurs on the DC’s Active Directory database and
then indexes it. After that, replication takes place and Active Directory is updated with the latest
information, and file replication services restore the latest data versions from other DCs.
W
ARNING
If the DC has a corrupted Active Directory database, you must use the Directory Services Restore
Mode startup option before restoring the System State data.

DNS and Active Directory
70
Copyright 2003 Syngress Publishing, all rights reserved
Non-Authoritative Restore versus Authoritative Restore
When you restore data to Active Directory, you can do it in one of two ways:
• Authoritative
• Non-authoritative
An authoritative restore will put objects into the Active Directory partition and essentially state
that even though they are restored from objects with older versions or older dates, they are to be
considered the latest version and date of the object. If you perform a full authoritative restore, then you
will roll back the domain and Global Catalog to the point in time when you performed that backup (from
which you performed the authoritative restore).
By contrast, a non-authoritative restore will simply place data onto a DC and retain its original
versions and dates. After an object has been restored using this method, objects and attributes with newer
dates and versions on other DCs will synchronize the DC to their own latest version. This method of
restoration is useful for reducing replication time when you have to restore a failed DC.
Authoritative Restore of Deleted Objects
It is going to happen at some point. Someone will delete an organizational unit (OU) filled with user
accounts or other objects. It will be an accident, of course, but an accident that you will need to fix
quickly. The place to start is restoring your last backup—but there will be a problem . . .
When you restore deleted objects from Active Directory, those objects will be deleted—actually
become tombstones—the next time that replication takes place. The reason that this happens is that the
objects have been marked for deletion in another DC’s replica of Active Directory, and replication will
redelete them in the database you just restored. This is normally the behavior you want, except in the case
of accidents.
To prevent this behavior, you can execute an authoritative restore. This process will enable the
objects that are restored to resist deletion when replication occurs. Each object that is restored in this
manner will be marked as authoritative. The authoritative attribute prevails over the tombstone attribute
when replication next occurs. The tombstone, by default, is retained for 90 days. To perform this
operation:
1. Boot the computer.
2. At the startup screen, press F8 for Advanced startup options.
3. Select
Directory Services Restore mode.
4. Restore the System State data of a backup that contains the objects that you want to restore.
5. After restoration has finished, close Backup.
6. Run
NTDSUtil.exe.
7. Type
authoritative restore at the prompt.
8. Type
restore subtree and the distinguished name of the object or OU (for example, restore
subtree ou=labs,ou=eng,dc=microage,dc=com).
9. Exit the NTDSUtil program and restart the computer normally.

How to Cheat…
Copyright 2003 Syngress Publishing, all rights reserved
71
Startup Options
There are several options available when Windows 2000 starts. These can assist in returning a failed
server to normal operations in different ways.
Startup Modes
Startup Option
Function
Purpose
Debugging mode
Sends the debug data to another
computer through a serial cable.
Only use this when you need to do
high-level debugging or are sending
a report to a debugging expert.
Directory Services
Restore mode
Allows restoring of Active Directory
and SYSVOL files.
Use this whenever you need to do
offline defragmenting of the
NTDS.DIT file using the
NTDSUtil.exe utility, or when you
need to restore or repair Active
Directory on a DC.
Enable Boot
Logging
Creates an ntbtlog.txt file in the
systemroot showing all device
drivers loaded during startup.
Use this if you want to find out which
device drivers are loading. This is
helpful if you suspect one of them is
causing problems on the server.
Enable VGA mode
Runs Windows 2000 using a
standard VGA driver.
Use this if you accidentally selected
the wrong display driver and it will
no longer load properly. When in
this mode, you can change the
display driver and then test it by
rebooting normally.
Last Known Good
Configuration
Starts up Windows 2000 with the
last configuration that a full logon
was executed on.
Use this if you changed the server’s
configuration and the server will no
longer get to the point of a logon
screen. Or, if you have reached the
logon screen, but really don’t want
to save your changes, reboot
instead of logging on and select this
option.
Safe Mode
Runs Windows 2000 with the most
basic drivers, creates a log file.
Use this if the server will not function
properly and you suspect a device
driver of some type is causing the
problem. If it starts properly in Safe
Mode, it is most likely a new device
driver.
Safe Mode with
Command Prompt
Runs Windows 2000 with the most
basic drivers at a command prompt
rather than the GUI, creates a log
file.
Use this if you want to change that
device driver by copying over a file
from a command prompt. This
option is rather handy.
Safe Mode with
Networking
Runs Windows 2000 with the most
basic drivers, loads networking
drivers, creates a log file.
Use this if you need to get the
server into a file and print sharing
mode and you have been able to get
the server into Safe Mode, or if you
want to test that the network device
driver is not the one that has caused
the server to stop functioning—if it
has, this option will not work.

DNS and Active Directory
72
Copyright 2003 Syngress Publishing, all rights reserved
The Recovery Console
The Recovery console does not automatically install on a Windows 2000 machine, nor does it have to be
installed to be used. It can be executed from the Windows 2000 CD-ROM using the Recovery Console
option when given the Repair Options screen. If you want to install the Recovery console, open a
command prompt and execute:
<cdrom drive>:\i386\winnt32 /cmdcons
When you use the Recovery Console option, you can configure a service to start or stop when the
server boots—a handy tool for corrupted services that cause a server to hang before logons can begin.
You may also copy files to the NTFS hard drive, which is handy in case one of the files on the hard drive
has become corrupted. (Previously, this could only be attempted with a third-party tool that could access
an NTFS drive from a DOS prompt.) Finally, you can manage files, folders, partitions, and disk drives,
even deleting and recreating partitions and formatting them. However, changing partitions and formatting
them should be a last resort when you have a server with errors.

How to Cheat…
Copyright 2003 Syngress Publishing, all rights reserved
73
TOPIC 14: Handy Active Directory Tools and Links
Schema Utilities
The Schema Manager is not the only utility that can update the schema, although it is probably the most
user friendly. LDIFDE and CSVDE are two command-line tools that can also update it, as well as ADSI
Edit.
LDIFDE and CSVDE are two data format exchange utilities. The first, LDIFDE, uses LDAP
Data Interchange Format. The second, CSVDE, uses a Comma Separated Value. Both of these utilities
take files that contain data to be added or modified in Active Directory (LDIFDE can modify, CSVDE
can only add), and import them to Active Directory. Both of these utilities can also export directory data
from Active Directory.
It is recommended that the Schema Manager be used to update the schema. For die-hard
command-line utility users, the following is an LDIFDE file format representing an addition to the
schema. Because CSVDE does not have as many features as LDIFDE, it is recommended that LDIFDE
be used for the command-line format tool.
dn:
CN=myAttribute,CN=schema,CN=configuration,dc=microage,dc=melissac
raft,dc=com
changetype: add
objectClass: attributeSchema
ldapDisplayName: myAttribute
adminDisplayName: my-attribute
adminDescription: A new schema attribute
attributeID: 1.2.840.113557.8.8.999
attributeSyntax: 2.5.5.12
omSyntax: 64
isSingleValued: TRUE
systemOnly: FALSE
searchFlags: 0
showInAdvancedViewOnly: FALSE
Active Directory Service Interfaces (ADSI)
http://www.microsoft.com/ntserver/nts/downloads/other/ADSI25/default.asp
ADSI is an API for Active Directory that is made up of a set of Component Object Model (COM)
programming interfaces. ADSI is intended to be used by network administrators to automate Active
Directory tasks, and by developers to connect their applications to Active Directory. ADSI has been
adopted by vendors to enable connectivity between their directories and any ADSI-enabled application.
Four ADSI objects are capable of extending a directory service schema. They are called schema
management ADSI objects.
• Schema container Contains the target directory service schema.
• Class container Defines object classes for the target directory service.
• Property object Defines object attributes for the target directory service.
• Syntax object Further defines the syntax used for a property object.
In addition to schema management objects, ADSI has directory objects that represent the
directory service components. There are two types of directory objects: container and leaf objects.
Container objects include namespaces, country, locality, organization, OU, domain, and computer. Leaf

DNS and Active Directory
74
Copyright 2003 Syngress Publishing, all rights reserved
objects include users, groups, aliases, services, print queues, print devices, print jobs, file service, file
shares, sessions, and resources.
To manipulate a property value, ADSI uses two commands: GetInfo to read information about a
directory service object and refresh cache from the directory, and SetInfo to establish new information for
a directory service object to ensure it is written to disk.
ADSI uses its own naming convention so that the object can be identified regardless of which
namespace it will be ported to. For example, the directory is identified in a string called AdsPath along
with the container and object names. A user named Joe in an Active Directory OU named Sales and a
domain called CyberLabs.com would have an AdsPath of:
LDAP://cn=Joe,ou=Sales,dc=Cyberlabs,dc=com
If you wanted to use ADSI to log on to Active Directory, you could use a script similar to the
following:
Dim dsobj As IADsOpenDSObject
Dim dom As IADsDomain
Set dsobj = GetObject(“LDAP:”)
Set dom = dsobj.OpenDSObject(“LDAP://DC=Cyberlabs,DC=COM”,
“MyUser”, “password”, ADS_SECURE_AUTHENTICATION)
Another ADSI script can be used to run a backup of Windows 2000 computers.
Set cntnr = GetObject(“LDAP://OU=W2Kpro, DC=Cyberlabs, DC=COM”)
Cntnr.Filter = Array(“computer”)
For each comp in cntnr
Comp.BackupNow()
Next
Active Directory Migration Tool
http://microsoft.com/windows2000/downloads/tools/admt/default.asp
Microsoft realized early on that using command line tools and those requiring heavy scripting on the part
of the network administrator could prove too time-consuming for migrating accounts from an existing
Windows NT domain. They needed a tool that was easy to use, and followed an intuitive migration
process. Rather than develop this tool themselves, Microsoft chose to license a migration utility from a
company called Mission Critical Software. This tool was christened the Active Directory Migration Tool
(ADMT).
ADMT not only can restructure domains by migrating objects, but it can be used as a tool for
detecting any potential problems before beginning the migration. ADMT can migrate users, groups,
computer objects, Exchange Server mailboxes, and grant rights to files—one-stop shopping for a domain
migration.
When you begin using ADMT, you install ADMT on a management workstation in the target
Windows 2000 domain. After you begin migrating users, you will be pulling them from the source
Windows NT domain. The ADMT is a zero-footprint utility. During the migration itself, ADMT installs
agents in the background on the source domain servers. These agents translate the security on the
resources and objects that are migrated. After the migration completes, the agents uninstall themselves.
ADMT provides a series of wizards:
• Computer Migration Wizard
• Group Mapping and Merging Wizard
• Group Migration Wizard
• Reporting Wizard
• Service Account Migration Wizard

How to Cheat…
Copyright 2003 Syngress Publishing, all rights reserved
75
• Trust Migration Wizard
• User Migration Wizard
You can use the wizards to migrate a set of objects from the domain directly into OUs, rather than
pull all objects over and then move them to your target OUs. You may even enable the user accounts to
remain active in both the source Windows NT domain and the target Windows 2000 domain. You can test
your migration, which determines the success of the parameters you’ve set for a migration without
actually making changes to the domains, and you can undo the last migration you performed.
ClonePrincipal
One utility used for migrating user accounts is called ClonePrincipal, and is found on the Windows 2000
Server product CD. The name is derived from the fact that it can clone a security principal, or an object
that can be granted rights and privileges to other objects within Active Directory. Security principals are
users and groups in Active Directory.
ClonePrincipal uses customizable Visual Basic scripts for migrating objects incrementally to
Active Directory from legacy Windows NT domains. Both user accounts and local groups can be
migrated using ClonePrincipal.
dcdiag
You can verify whether you have the DNS infrastructure deployed correctly with a utility called
dcdiag.
Document Outline
- Page One
- Installing DNS
- Configuring DNS to Support Active Directory
- Setting Up a Domain Controller
- Locating Domain Controllers
- Promoting and Demoting Domain Controllers
- Design a Global Active Directory Domain and Trust Infrastructure
- Integrating DNS into the Active Directory
- Removing Data in Active Directory After a Failed Domain Controller Demotion
- Creating a Child Domain in Active Directory
- Dynamic DNS
- DNS Namespace Planning
- Modifying the Active Directory Schema
- Backup and Recovery
- Active Directory Tools and Links
Wyszukiwarka
Podobne podstrony:
How to win at Poker and become a professional
How to Present at Meetings 2001
home dzine co za How to colour or tint cement and concrete
How to Draw Manga Anime Clothing And Folds Drawing
(ebook pdf) How to Make Love All Night (and Drive a Woman Wild)
How to Present at Meetings 2001
04 How to Cheat a Dragon s Curse Cressida Cowell
Master Your Fears How to Triumph Over Your Worries and Get on with Your Life Mantesh
A Robbins Jay Abraham How To Get Any Business Going and Growing
How To Live Well Without A Job And With No Money Dolly Freed
How To Get A Woman s Phone Number And Email Address Within Three Minutes Of Meeting Her
więcej podobnych podstron