
Multitrack Recording
Multitrack Mixdown
Common Connections
Balanced Connections
Unbalanced Connections
Microphones
Mic Pre-amps
Phantom Power
Basic Mic Technique
Bussing
Pre-fade and Post-fade
Correct Input Levels
Monitoring Effects
Effects Routing
Insert vs. Loop
The Compressor
Basics of EQ
Virtual Tracks
Bouncing Tracks
Track Management
Non-Linear Editing
Undo
Mastering
Backup
The Basics of
Modern
Recording

Audio recording has changed dramatically in recent years. Excellent digital
equipment with vast capabilities is now quite affordable. Technology has put
brand new, exciting features in the hands of a huge and growing number of
individuals.
Low cost and high technology has meant that many people are leaping
directly to sophisticated recording equipment for their first recording
experience. Others are moving across from digital sequencing - a very
different recording experience that will not necessarily prepare them for some
of the issues of audio recording. Both groups need to grasp certain
fundamentals to get the most out of modern recording equipment.
This book is designed to introduce the basics of modern recording in a simple
format, allowing musicians to ‘get up to speed’ quickly and easily.
You may wish to read this book through completely, or jump to the page you
need. If you are new to the recording process, we would encourage you to
read the entire book. Also, you may want to read through the glossary at the
end of the book to become familiar with some of the terms that will be used.
Basic Recording / Multitrack Recording . . . . . . . . . . . . . . . . . . . . . .2
Basic Recording / Multitrack Mixdown . . . . . . . . . . . . . . . . . . . . . .3
Common Connections . . . . . . . . . . . . . . . . . . . . . . . . . . . . . . . . . . .4
Balanced and Unbalanced Connections . . . . . . . . . . . . . . . . . . . .5-6
Microphones . . . . . . . . . . . . . . . . . . . . . . . . . . . . . . . . . . . . . . . .7-9
Mic Pre-amps and Phantom Power . . . . . . . . . . . . . . . . . . . . . . . .10
Basic Microphone Technique . . . . . . . . . . . . . . . . . . . . . . . . . .11-12
Bussing . . . . . . . . . . . . . . . . . . . . . . . . . . . . . . . . . . . . . . . . . . . . .13
Pre-fade and Post-fade . . . . . . . . . . . . . . . . . . . . . . . . . . . . . . . . . .14
Getting Correct Input Levels . . . . . . . . . . . . . . . . . . . . . . . . . . .15-16
Monitoring Effects . . . . . . . . . . . . . . . . . . . . . . . . . . . . . . . . . . . . .17
Effects Routing / Insert vs. Loop . . . . . . . . . . . . . . . . . . . . . . . . . .18
The Compressor . . . . . . . . . . . . . . . . . . . . . . . . . . . . . . . . . . . . . . .19
Basics of EQ . . . . . . . . . . . . . . . . . . . . . . . . . . . . . . . . . . . . . . .20-21
Bouncing Tracks . . . . . . . . . . . . . . . . . . . . . . . . . . . . . . . . . . . . . .22
Virtual Tracks . . . . . . . . . . . . . . . . . . . . . . . . . . . . . . . . . . . . . .23-24
Track Management . . . . . . . . . . . . . . . . . . . . . . . . . . . . . . . . . .25-26
Non-Linear Editing . . . . . . . . . . . . . . . . . . . . . . . . . . . . . . . . . .27-28
Undo . . . . . . . . . . . . . . . . . . . . . . . . . . . . . . . . . . . . . . . . . . . . . . .29
Mastering . . . . . . . . . . . . . . . . . . . . . . . . . . . . . . . . . . . . . . . . . . .30
Backup . . . . . . . . . . . . . . . . . . . . . . . . . . . . . . . . . . . . . . . . . . . . .31
Recording Overview . . . . . . . . . . . . . . . . . . . . . . . . . . . . . . . . . . .32
Summary . . . . . . . . . . . . . . . . . . . . . . . . . . . . . . . . . . . . . . . . . . . .33
Glossary . . . . . . . . . . . . . . . . . . . . . . . . . . . . . . . . . . . . . . . . . .34-37
1
The Basics of Modern Recording
Introduction and Table of Contents

The recording process, whether accomplished with a cassette recorder, digital
multi-track recorder, hard disk recorder, or any other recording medium, is
essentially the same. The goal is to capture sounds onto a master recording.
To do this, recording engineers employ a two-step system:
1. Multitrack Recording - the process of recording and overdubbing
various instruments and vocals, each to its own “track.”
2. Multitrack Mixdown - the process of simultaneously re-recording
these multiple tracks down to one set of stereo tracks (the “master
recording”) which can be reproduced by a typical playback system,
such as a CD player or cassette deck.
Multitrack Recording
Multitrack recording involves “stacking” multiple instruments and/or vocals
on top of each other so that when any one of them is played back, all of them
can be heard in time with each other. This is made possible by recording
products that have the capability of recording many different instruments,
each on its own “track.” Imagine the tape from 16 different cassette decks, all
laid side-by-side and glued together. This would give you a sixteen-track tape
(actually 32 tracks, because cassette tape is stereo and has two tracks), with
the potential of recording a different instrument on each track.
In other words, let’s say you record a drummer, a bass player and a rhythm
guitar player playing a song, each instrument being recorded onto its own
individual track of a multitrack recorder. Because they are all playing
together, their notes are all “in time” with each other, so that upon playback it
will still sound like they are playing together, even though their instruments
are recorded onto individual tracks. If you want to add a lead guitar to the
song, You will play the first three tracks so that the guitar player can “keep
time” with the other instruments while recording his guitar onto a fourth
track. This process is known as “overdubbing.”
Traditionally, recording engineers would record “rhythm tracks” first,
consisting of drums, bass, rhythm guitar, keyboards and a “scratch” (to be
replaced later) lead vocal, all recorded together. Next, the engineer would
begin the overdub process, adding other rhythms, leads, background vocals,
any other instruments, and finally re-recording the lead vocal. However,
modern recordings are often created a single track at a time, beginning with
sequenced instruments, drums loops, or even vocals.
The point is that eventually all of your instruments must be recorded onto
various tracks in time with each other. Once this is accomplished, the
mixdown process begins.
2
The Basics of Modern Recording
Basic Recording / Multitrack Recording

Multitrack Mixdown
The purpose of the mixdown process is to reduce all of your recorded tracks
down to two tracks (stereo) or even one track (mono). This allows your song
to be played on conventional playback systems, such as cassette or CD players.
Traditionally, multitrack recorders were connected to multichannel mixers, so
that each track has its own channel on the mixing board and can be processed
individually. In other words, the individual track outputs from a multitrack
recorder were connected to the individual channel inputs of a mixer, which
merged all these channels down to a single stereo output. This stereo mixer
output was connected to the stereo input of a master tape deck, which
recorded the stereo signal.
Along with merging many channels down to two channels, the mixer
performed other important processes, such as:
- adjusting the frequency content of the instruments, called “EQ-ing.”
- adding various effects, such as reverb, echo or chorus to the instruments.
- adjusting the volumes of each track so that no single instrument is too
loud or too soft.
These processes will be explained in greater detail later in this document.
Today, all of these functions, including multitrack recorder, multichannel
mixer, EQ and effects, can be found in a single unit. Furthermore, the master
recorder may be a CD recorder, DAT tape, or hard drive. What is important is
that all of your song’s instruments get recorded, processed and mixed down
onto some medium by which they can be heard by your audience.
3
The Basics of Modern Recording
Basic Recording / Multitrack Mixdown
Inputs
Before you begin recording, you will need to connect your instrument or
microphone to the input section on your recorder or mixer. You will probably
notice that there are a number of different connector types. Variations on the
connections include RCA type (the same connectors found on consumer
stereo equipment), XLR (most commonly used for microphones) and 1/4-inch
(mostly used for instruments).
Master Out
These outputs are usually connected to your studio monitors (or their power
amplifier, if the monitors are not powered) or to the analog inputs of your
cassette or DAT machine.
Monitor Out
The Monitor outputs are usually used in the same capacity as your Master
Outs (power amp, cassette recorder, DAT machine) but sometimes for the
purpose of sending a different mix out of the console. A common situation
would be for the Master Outs to be connected to a cassette deck or DAT for
recording the mix, and the Monitor Outs to be connected directly to the
power amp or studio monitors for listening to your mix.
Digital Out
A Digital Output is specifically made to send signal to another digital device.
Their most common use is to send your master mix digitally to a DAT
machine. The Digital Outs can also be used to connect to external effects
processing gear that has a Digital input.
Aux Sends
Aux Sends are usually used for sending data out of your console to get
processed by an effects processor (reverb, delay, etc.). You can also use Aux
Sends to send your mix to a different source, much like you would use a
Master Out or a Monitor Out, or as outputs for individual tracks to allow you
to transfer your tracks to a different recorder.
Aux Returns
Many consoles have Aux Returns, which bring the signal back in from the
external effects processor. These might also be used for just inputting a stereo
source, such as a CD player, into your console.
Phones Out
Where a pair of headphones would be connected to the console.
4
The Basics of Modern Recording
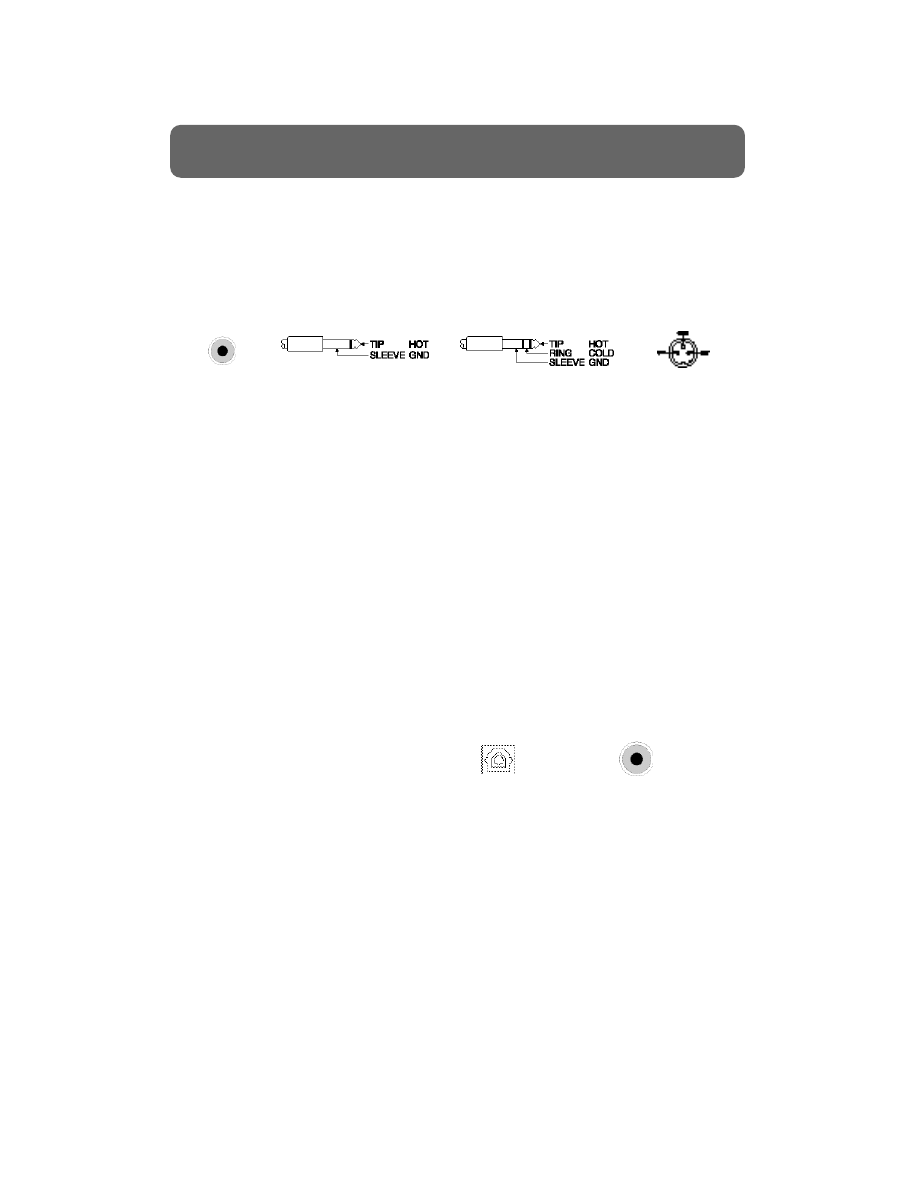
Common Connections
Unbalanced
RCA
Unbalanced 1/4-inch
Balanced 1/4-inch
tip, ring, sleeve (TRS)
Balanced
XLR
Digital
Optical
Digital
Coaxial

When dealing with the various connections discussed in the previous section,
there are two main issues to consider: impedance and balancing. These
concepts are important to understand in order to record each piece of gear at
its best possible quality.
Impedance
Impedance, also known as resistance, refers to the electronic hardware’s
inherent resistance to the flow of an AC circuit. In other words, all electronic
circuits, including cables, have a natural friction-type resistance to the free
flow of electricity, in the same way that a runner encounters resistance from
the wind. A runner is stronger when he or she runs with little resistance from
the wind. In the same way, a low impedance audio signal is stronger than a
high impedance signal because it encounters less resistance.
For practical purposes, impedance between various pieces of gear should
always match. Connecting an output that expects a high impedance input
into a low impedance input can cause problems because too much current is
being sent. For example, a low impedance microphone should be input into a
low impedance mixer input. If you need to connect two devices with different
impedances, you should use a matching transformer to convert the impedance
of one of the devices so that they match.
Impedance Types
Hi Impedance: A circuit whose impedance rating is 1,000 Ohms or greater.
Low Impedance: Any circuit whose impedance rating is 600 Ohms or less.
Balanced vs. Unbalanced
Generally, inputs and outputs of audio gear are either balanced or unbalanced.
Balanced cables use an extra wire as a shield to help prevent noise from being
picked up along the length of the cable run. Generally, quarter-inch cables and
RCA cables are unbalanced, and XLR or stereo quarter-inch cables are
balanced (three connecting pins instead of two).
Every piece of gear has either balanced or unbalanced ins and outs. If you are
connecting a balanced output to a balanced input, you should use a balanced
cable. The connectivity issues can be summarized as follows:
- Unbalanced in/out connected to unbalanced in/out - may as well use an
unbalanced cable; using a balanced cable will not hurt but the extra wire
will not be used and nothing will be gained by using it.
- Unbalanced in/out connected to balanced in/out - same as previous.
- Balanced in/out connected to balanced in/out - should use a balanced
cable; using an unbalanced cable will render the connection susceptible
to noise, particularly on cable runs over 10-15 feet.
5
The Basics of Modern Recording
Balanced and Unbalanced Connections
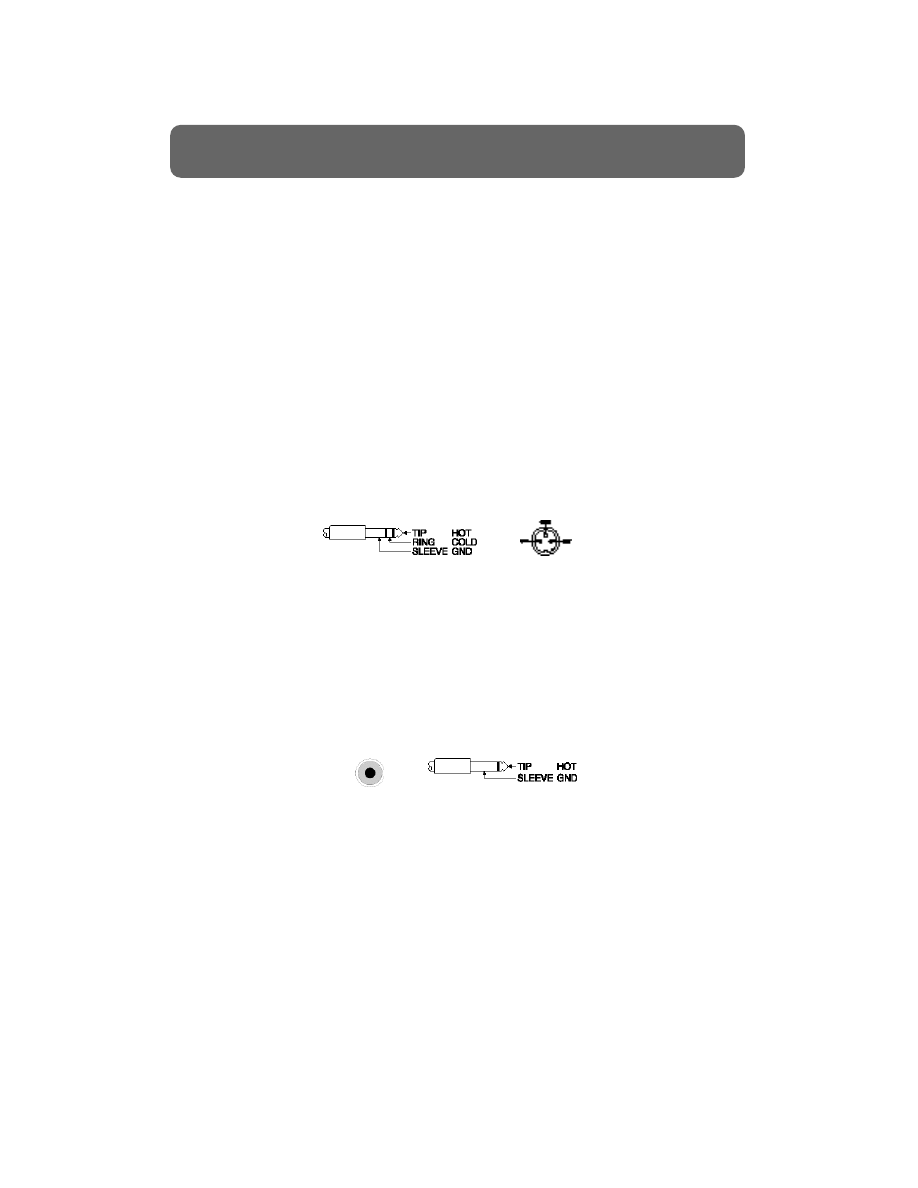
It’s helpful to note that balanced vs. unbalanced is usually, but not always,
related to impedance. For example, XLR cables are almost always low
impedance, but quarter-inch cables can be either balanced or unbalanced and
either low or high impedance.
Also, if you are connecting a balanced output to an unbalanced input over a
long cable run (10 to 15 feet or more), it’s a good idea to use a balanced cable
for the majority of the cable run and a direct box or matching transformer
right before you connect to the unbalanced input. That way you can take
advantage of the higher noise rejection capability of the balanced cable.
Balanced Line
An audio circuit consisting of three wires: High (+), Low (-), and a shield
connected to Ground. The High and Low wires are an equal potential
difference from the Ground. This is a common design used to help prevent
noise and interference for lengthy cable runs.
Unbalanced Line
An audio circuit consisting of two wires: High (+) and Low (-). The High wire
carries the signal while the Low wire is connected to Ground. The ground
conductor serves as a shield around the other conductor. Because the High
and Low wires are not at an equal potential difference to the Ground, they are
considered “unbalanced.”
6
The Basics of Modern Recording
Balanced and Unbalanced (continued)
Unbalanced
RCA
Unbalanced 1/4-inch
Balanced 1/4-inch
tip, ring, sleeve (TRS)
Balanced
XLR
Generally speaking, there are two ways to get a signal into a mixing console,
which makes it available to be re c o rded onto your multitrack re c o rd e r. The first
way is very simple: direct line input. Direct line input refers to a connection,
usually via common guitar-type 1/4” cable, from the output of an electro n i c
i n s t rument to the line input of your mixing console. This is the common method
for inputting signals from keyboards, drum machines, sound modules and guitar
or bass amps (via direct or line out from the back of the amp). If your mixing
console does not have 1/4” line inputs, you can use a Direct Box to translate
these line outputs into microphone inputs for your mixer.
The second way to get signal into your mixing console is to use microphones,
which connect directly into the microphone inputs of your mixer.
Microphones are typically used to record vocals, all acoustic instruments, such
as acoustic piano or guitar, and quite often guitar and bass amps. How
different types of microphones should be used to record various types of
instruments is probably the most critical and difficult aspect of a recording
engineer’s job. Different microphones sound different, and how they ar e
combined, along with how they placed, what angle they are placed at, and the
distance from the instrument at which they are placed, are all important
factors. Ask ten engineers and you’ll get ten different views on micing
technique. Although teaching micing techniques is beyond the scope of this
document, it is helpful to understand some basic differences between
microphones. This will allow you to begin to experiment knowledgeably,
which is how all engineers have learned about micing.
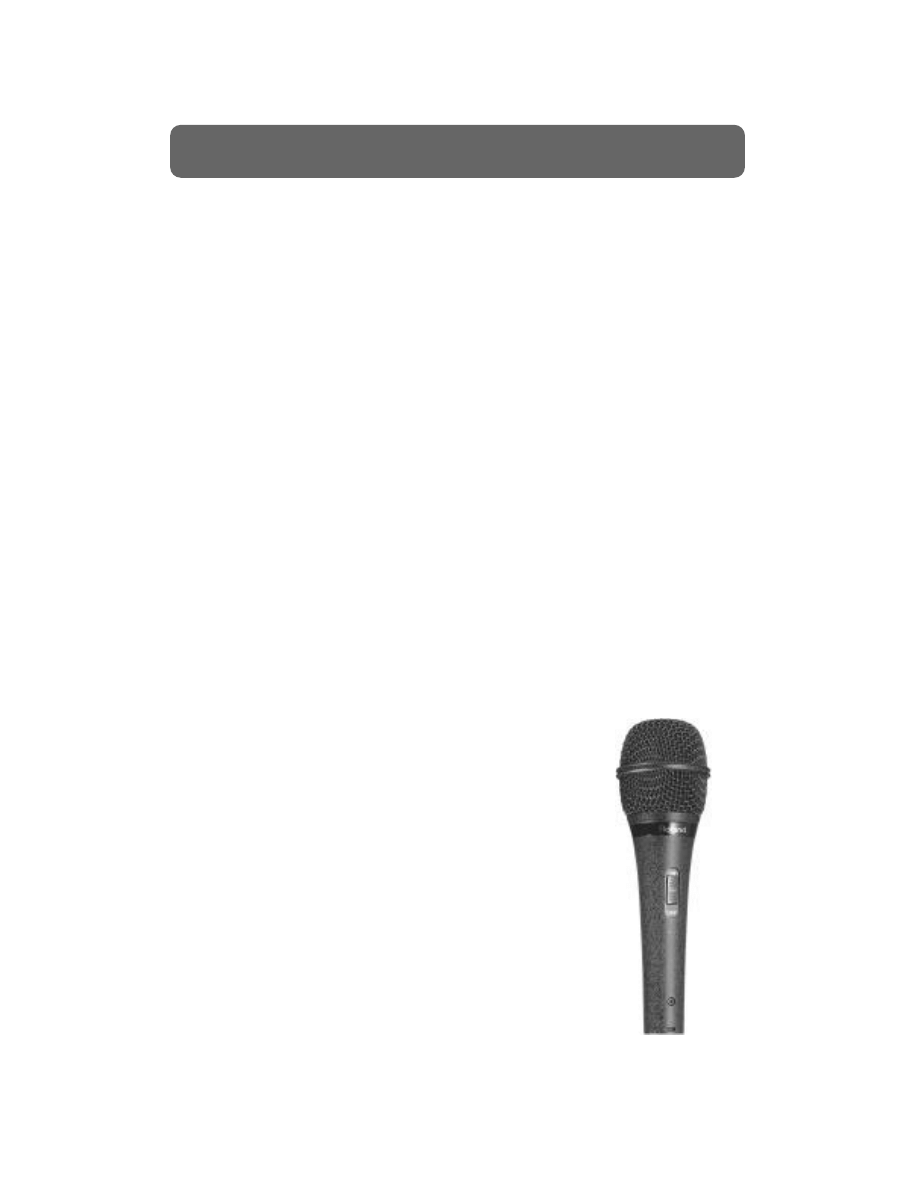
Types of Microphones
Microphones, like speakers, are transducers. Transducers
are devices that convert one type of energy to another
type of energy. Microphones convert acoustical energy
into electromagnetic energy. How this conversion is
done defines what type of microphone it is.
The most common type of microphone is the dynamic
(or “moving coil”) microphone. Dynamic microphones
use a coil wrapped around a magnet, which vibrates
when sound hits the thin diaphragm attached to it. This
vibration results in voltage waveforms which are
analogous to the acoustic waveforms which come into
the microphone. Your recorder is then able to record
these voltage waveforms.
Dynamic microphones are generally very sturdy,
relatively inexpensive and can handle high levels of
7
The Basics of Modern Recording
Microphones

sound. Therefore, they are very useful as the “workhorse” microphones for
your studio. Try them on drums, background vocals, guitar and bass amps,
and just about anything else. However, dynamic microphones often do not
have the frequency response needed for some critical applications, such as
lead vocals, cymbals or overhead drums. If you have a condenser microphone
available, use it for these types of applications.
Ribbon microphones are a less common type of microphone, which use a
ribbon suspended in a magnetic field rather than a coil. Ribbon microphones
have somewhat more high-end frequency response than dynamic
microphones, but have traditionally been more fragile as far as handling and
sound pressure level. Therefore, they are commonly used for instruments
which have a higher-range frequency content, but aren’t too loud, such as
orchestral instruments, hi-hat or vocals.
Condenser microphones simply use two plates, one of which vibrates
according to sound hitting it, with a magnetic field between them. Condenser
microphones typically have a very wide frequency response along with a very
realistic, transparent sound. However, condenser microphones require a
separate power supply and are often many times more expensive than
dynamic microphones. Therefore, most small studios will buy one or two of
these and only use them for critical applications, such as lead vocals, room
mics, cymbals or acoustic instruments.
Polar Patterns
Each microphone has a distinct polar pattern, also called a pickup pattern. This
defines the area around the microphone in which the microphone will “hear”
sounds. It is important to know the polar pattern of your microphone so you
will know how to place it effectively. For example, if your microphone only
picks up sound right in front of it, you’ll need to place it directly in front of
your instrument.
Most microphones have a cardioid pickup pattern. This
means that it will pick up sound directly in front of it, and
to a lesser extent along each side.
Hypercardioid microphones will pick up sound
in front from a greater distance, but less along the
sides.
Supercardioid microphones will pick up even a
greater distance in front and almost none along
the sides.
8
The Basics of Modern Recording
Microphones (continued)
Cardioid
Hypercardioid
Supercardioid

These microphones, also known as directional microphones, are perfect for
preventing leakage. Leakage is the undesired pickup of instruments other than
the one you are micing. For example, placing a directional microphone on
your snare drum prevents the pickup of the hi-hat sound.
Other microphones, called omnidirectional microphones, pick
up sound from all directions. These microphones are good for
picking up the ambiance of the room, as with overhead drum
mics, or for recording entire string sections or choirs.
Another type of microphone is a bidirectional microphone.
These microphones pick up sound on either side, but not from
the front or back. There are typically used by placing them
between two instruments so that both can be recorded together
while maintaining separation between them.
9
The Basics of Modern Recording
Microphones (continued)
Omnidirectional
Bidirectional
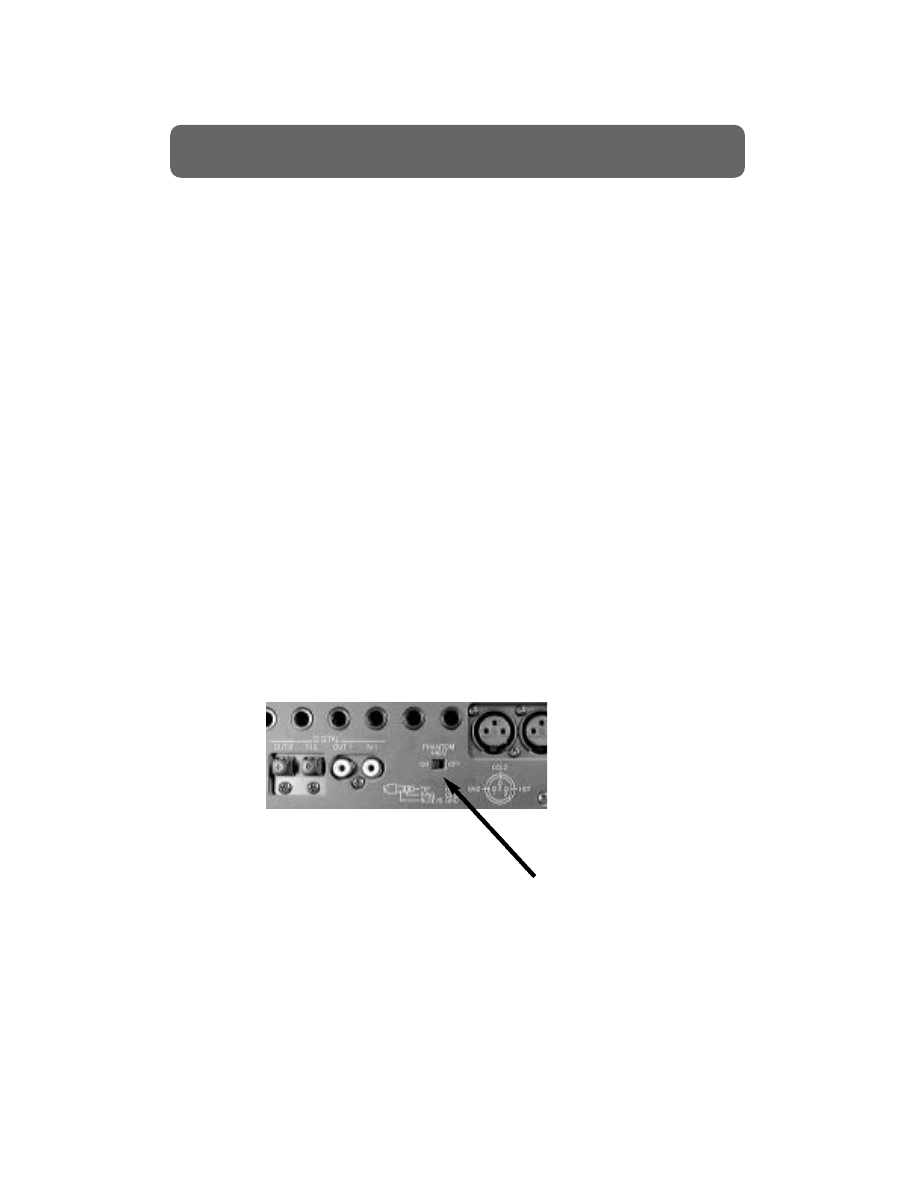
A pre-amp is a type of amplifier found on the input section of many
consoles, or as a stand-alone piece of outboard gear. The main purpose of the
pre-amp is to boost the microphone level signal (-50dBm) up to a line level
signal, which is what most consoles operate at. This provides you with greater
control of your signal level and provides a certain amount of isolation from
outside interference, which could cause noise in your signal path. Pre-amps
usually have an output or pre-amp trim knob to adjust the output level. If
the pre-amp’s output is too high, it can add distortion, noise, and a coloration
to the sound. A pre-amp should be used when all of the devices in the
recording chain are set at optimal levels and the signal level is still too low.
Also, most condenser microphones contain a type of built-in pre-amp that
requires power to operate correctly. This power, referred to as phantom
power, is usually supplied by an internal battery or by the mixing console.
Mixing consoles provide power by sending a voltage (usually +48 volts DC)
along the audio cable. On most mic pre-amps and input sections of mixing
consoles, there is an on/off switch that determines whether phantom power
will be sent or not, giving the condenser mic the voltage it needs to provide a
strong enough signal.
10
The Basics of Modern Recording
Mic Pre-amps and Phantom Power
Phantom Power switch
on a Roland VS-1680
Digital Studio Workstation
The most important thing to understand about microphone technique is that
there is no definitive right or wrong way to do anything. Mic’ing techniques,
like microphone selection, are subjective, and individual techniques are
developed over time. Furthermore, mic’ing techniques vary according to
musical style and tend to evolve or change over time. Therefore, this
document will merely provide some basic guidelines and suggestions, and
should be used as a jumping-off point for personal experimentation.
The basic microphone techniques can be roughly divided into four categories:
close mic’ing, distant mic’ing, accent mic’ing and ambient mic’ing.
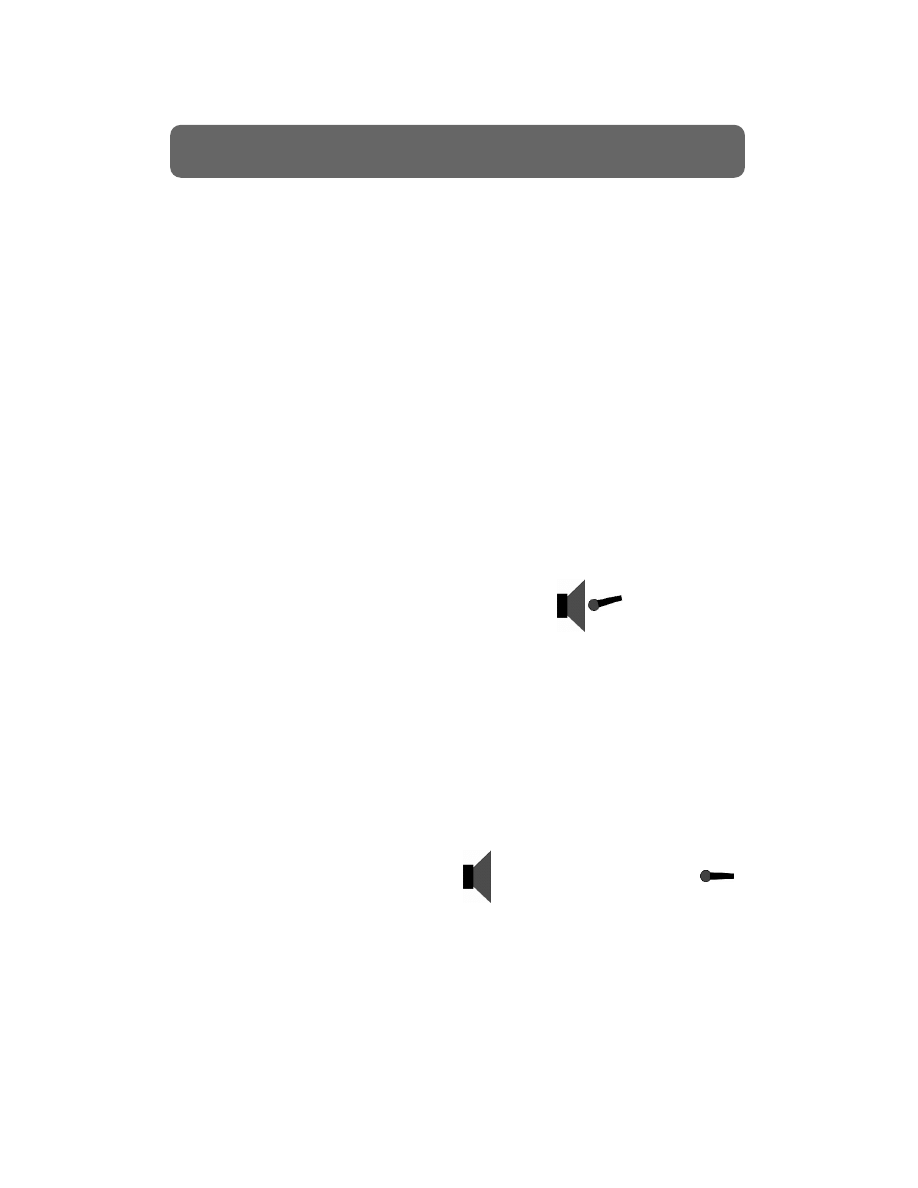
Close Mic’ing
Close mic’ing is the most common type of mic’ing used in typical recording
studios. Close mic’ing means that the microphone is placed very close to the
sound source, usually about 1 - 24 inches away. Close mic’ing allows the
sound source to be recorded relatively free from outside noises (called leakage),
such as other instruments in the studio. Close mic’ing also provides a tight,
“in-your-face” sound, which is generally preferable for multi-instrument
songs.
Generally, close mic’ing is done with a directional
microphone, such as a cardioid, hypercardioid or
super cardioid, by placing the microphone slightly
angled near the spot where the sound is emanating. For example, a guitar
amp is close mic’d by placing a microphone about an inch away from the spot
on the amp grill which is midway between the edge and the center of the
speaker, slightly angled toward the center. A trumpet would typically be
close-mic’d by placing the microphone about three inches away from the bell
of the horn.
However, always be sure to test your placement by moving the microphone
around the sound source while listening to the results. When you hear the
sound the way you like it, leave the microphone there.
Distant Mic’ing
Distant mic’ing involves placing one
or more microphones more then 2 to
3 feet away from the sound source. Distant mic’ing is most often used when
recording multiple instruments at once, such as a string section or chorus
ensemble. Distant mic’ing allows these groups to be recorded as a whole, so
that the overall natural tone balance can be captured without the need for
individual mic’ing. Distant mic’ing also allows the sound of the room (called
ambience) to be recorded, which is often desirable in good sounding rooms,
such as a recording studio or church.
11
The Basics of Modern Recording
Basic Microphone Technique
Close Mic’ing
1 to 24 inches
Distant Mic’ing, over 2 feet
Getting good distant microphone placement takes experimentation. Generally,
with a single microphone, the microphone is placed in the center of, for
example, a group of singers, about five feet out front. With two microphones,
place them equal distance off center, about four feet apart. However, it is
especially critical when distant miking to experiment with placement while
listening to the results in order to find the “sweet spot.”
Accent Mic’ing
Accent mic’ing is often used in conjunction with distant mic’ing, to provide
additional pickup of particular elements of a group of instruments. For
example, you may want to place a microphone in front of a soloist in an
orchestra. However, you must be careful to place the microphone close
enough to pick up the solo, yet far enough away so that the balance of the
ensemble is not affected when the soloist isn’t soloing. Usually this placement
is a bit farther away than a close microphone, but again this distance should
be finalized by experimentation.
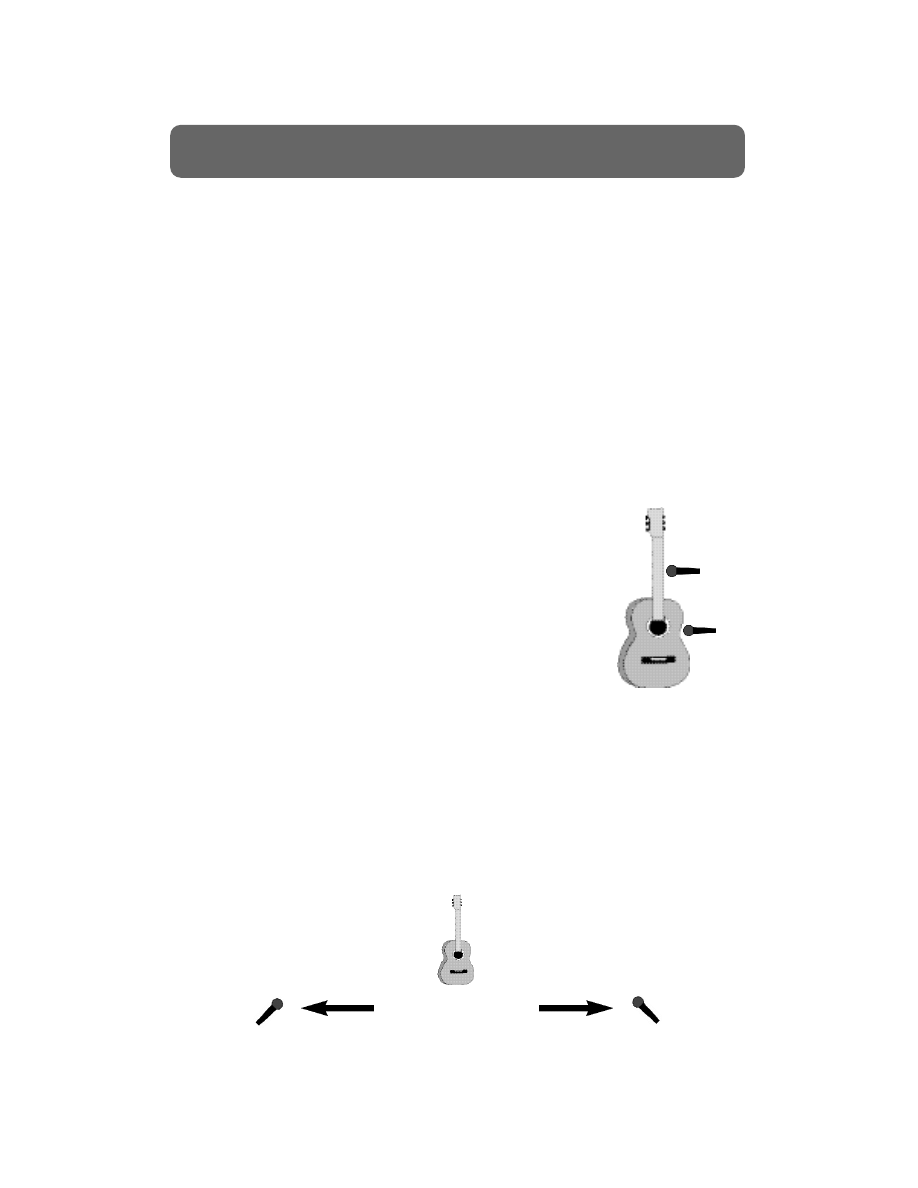
Accent mic’ing can be used when mic’ing even a single
instrument. For example, maybe you’ve gotten the perfect
acoustic guitar sound by placing one microphone near the
bottom of the sound hole and another up the fretboard.
You may want to consider placing a third microphone
directly in front of the picking location in order to mix in
just a touch of the pick noise, which can dramatically
enhance the realism of your recording, especially when the
guitar is the only instrument being recorded.
Ambient Mic’ing
Ambient miking is similar to distant mic’ing, except that its main function is to
restore the natural reverberation and room sound of a particular recording
environment. Ambient mic’ing is particularly important when making a live
recording, because the ambiance that these microphones pick up allows your
listeners to experience the feel of the live show.
Ambient mic’ing is usually achieved by placing a pair of microphones, either
cardioid or omnidirectional, out front of each side of the stage, often near the
sound board.
12
The Basics of Modern Recording
Basic Microphone Technique (continued)
Accent Mic
Ambient microphones
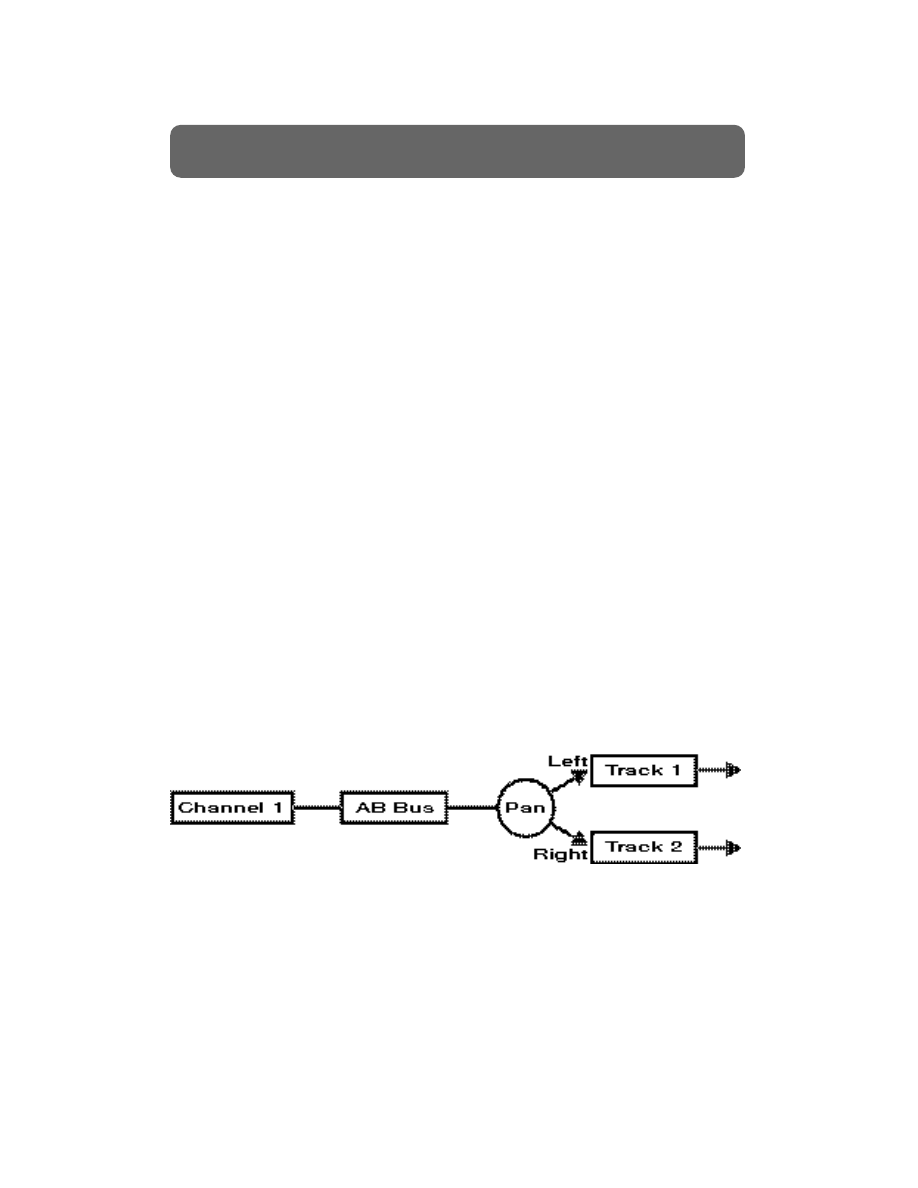
Beginner recording enthusiasts are often confused by the concept of how the
signal being input to the mixer or recording device gets through the console to
its final destination. A very important aspect of signal flow is the concept of
the Bus. Simply put, a bus is just a pathway for the signal to follow; from an
input to a track, from a track to a track, from a track or input to an effects
processor, etc.
When “bussing” signals from one place to another, your signals are passing
through a type of “routing matrix.” A routing matrix is just another name for
a summing amplifier; an amplifier used to combine multiple signals while
keeping their respective volume levels and pan positions. A good analogy for
record busses is the way you control the water in your house. The water
usually enters your house at a single location (barring any natural disasters
such as floods, hurricanes, tsunamis, etc). It is then routed through a series of
pipes to different locations in your house. The path that the water follows is
determined by which faucets you turn on or off.
It is common for most mixers to have “stereo busses” which direct your signal
to one or two locations. For example, record busses are usually setup in pairs
such as tracks 1 and 2 (or A and B), tracks 3 and 4, C and D, etc. The amount
of signal sent to each side of the stereo bus is controlled by the pan position. If
you assign a signal to the record bus for tracks 1 and 2 and pan that signal all
the way to the left, all of the signal will be recorded on track 1 and none of
the signal will be recorded on track 2. Setting the pan all the way to the right
would have the opposite effect. If you set the pan position to the center, the
signal will be recorded equally on tracks 1 and 2. Just think of a stereo bus
like a two-lane highway. The pan knob is your steering wheel and it controls
which lane you drive in.
13
The Basics of Modern Recording
Bussing
Stereo Bus
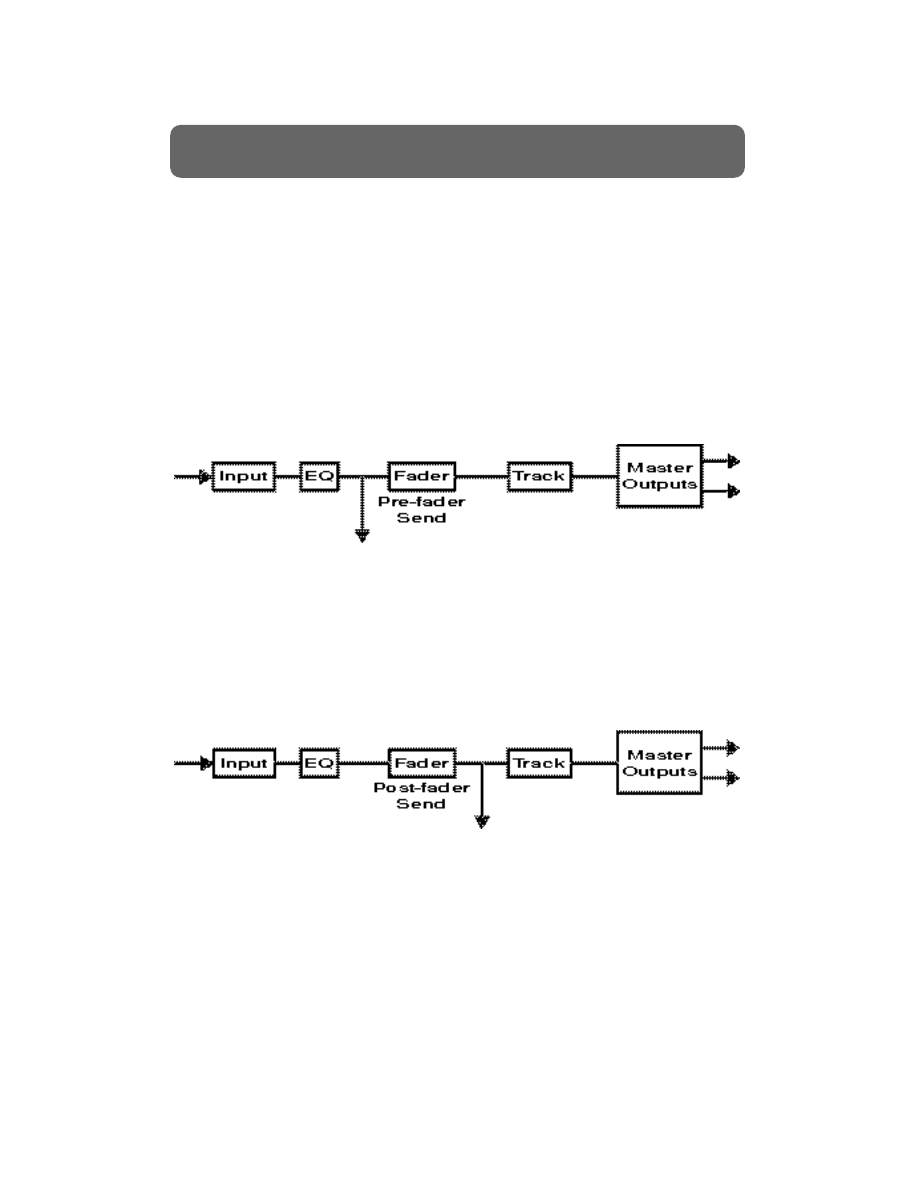
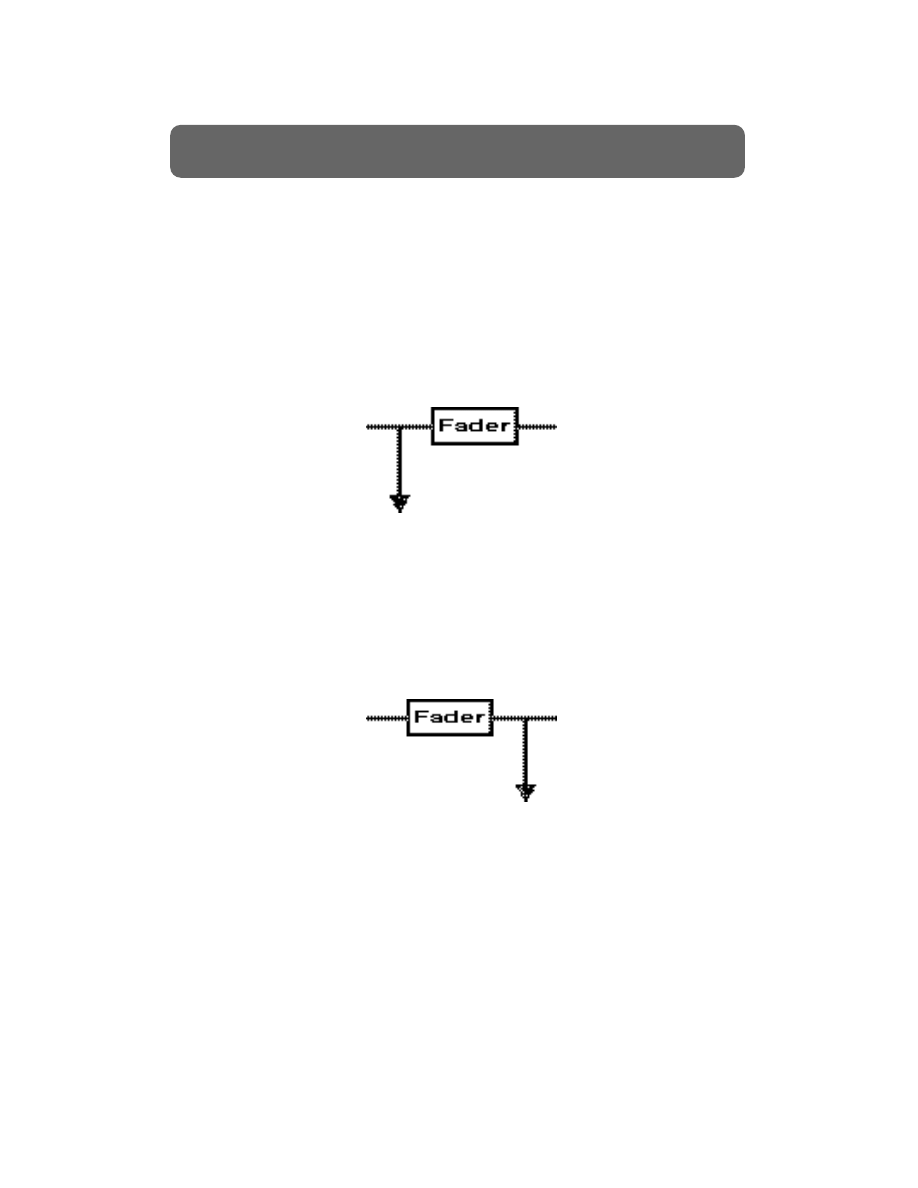
The concepts of pre-fade and post-fade are based upon fader control. Just as
their names imply, pre-fade relates to the audio signal before it reaches the
fader and post-fade is after the audio signal goes through the fader.
The pre-fader setting is most often used when the audio is to be independent
from the fader. You are able to hear the raw level of the audio signal without
using the fader to alter the level. This setting is invaluable when monitoring
input levels for recording. Pre-fader settings are also preferred when sending a
separate headphone mix without altering mixer settings. Using pre-fade in
this manner allows any instrument to be turned up in the headphones
without affecting the main mix. Pre-fade can also be utilized to lower the
fade level of the dry lead vocal while allowing the lead vocal’s reverb to
remain.
The post-fade setting is more widely preferred as it renders fader control. Post-
fade allows you to monitor the output levels and control over the independent
levels of each track. More control over effects are available while using post
fade effects, as you have total control over how much effect will be returned
to a specific track as well as the level of the original audio signal .
14
The Basics of Modern Recording
Pre-fade and Post-fade
Pre-fader Send
Post-fader Send
One key to great recording is starting with the right input levels. When you
cook, you know that having the temperature too high or too low can either
burn or undercook your meal. The same thing is true when you record. Levels
that are too hot or too low can destroy an otherwise great performance. If
your input level is too low, you will most likely add unwanted noise to your
mix when you raise the level of that track during mix down. On the other
hand, if your input level is too high, there will usually be distortion on your
tracks.
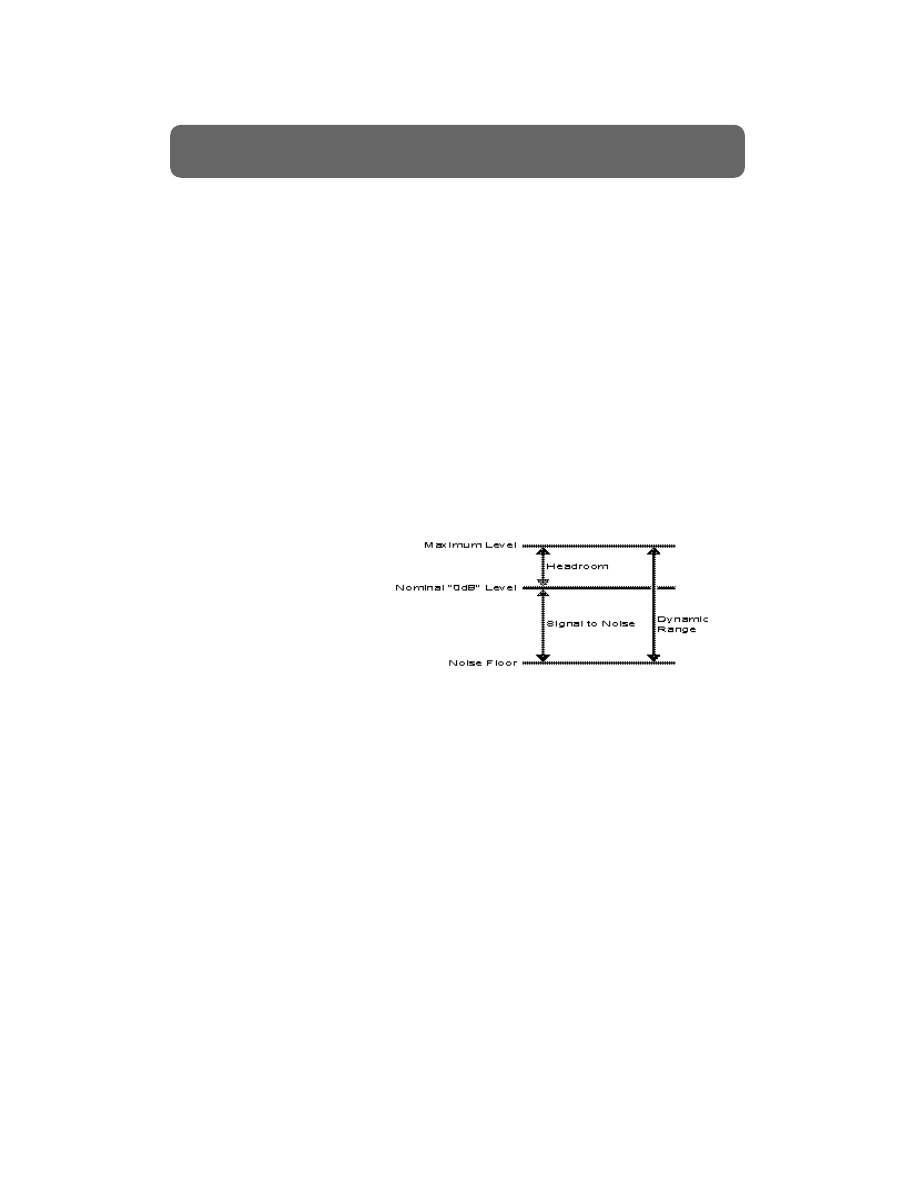
Dynamic Range
When you record, you may notice that the level seems to vary greatly
depending on the performance and the style of music you are working on. For
example, in a ballad, a drummer may be playing a rim shot during the verse
but then goes to a heavy snare during the chorus. This variance in level is
referred to as dynamic range. Dynamic range is different than volume. Volume
is the amplitude at any one moment in time. Dynamic range is the amount of
variation in terms of amplitude.
The DynamicRange
of Equipment
Analog vs. Digital
There are many differences between analog and digital recording when it
comes to setting levels. With analog recording, input levels can be recorded
over 0dB without distorting. Sometimes, recording input levels over 0dB can
help to get a hotter or warmer signal to the tape. Higher levels also help mask
some of the noise (tape hiss) that is present on most tape based recorders.
In the digital domain, input levels cannot exceed 0dB and, by definition, there
is nothing higher. In fact, most digital recorders will not display anything
above 0dB. If an input level does exceed 0dB, you risk adding distortion to
your recording. This type of distortion is usually referred to as "digital
distortion" and it is very undesirable for most recording applications. To get
the best results when recording digitally, your input levels should be recorded
between -12 and -4dB. Not only will this give you the equivalent of a good
analog recording level, but it will give some headroom for mixing after the
track is recorded. Digital recorders do not have the noise floor problems
associated with most analog recorders and are capable of recording at lower
levels without adding noise to the recording. When in doubt, record at lower
levels. A track that is recorded too low can usually be fixed whereas it is
virtually impossible to remove distortion from a recording.
15
The Basics of Modern Recording
Getting Correct Input Levels
Pre level and Post level
In order to ensure that you are recording at a good level, it is important to
understand how the meters on your mixer operate. Most mixers will allow
you to view the meters in one of two settings: pre level and post level.
A pre-fade level setting shows the signal level that is being sent to the mixer
before it passes through the fader. This is the most accurate indication of your
signal level as it is input to your mixer. When recording, it is recommended
that you set your faders to 0dB, set your meters to pre level, and use your
input trims to set a good recording level.
A post-fade level setting displays the level of the signal after it passes
through the fader. This is the most common setting for viewing the levels of
recorded tracks. After the signal passes through the fader it usually goes to the
mix buss or main outputs. This makes a post level setting ideal for viewing
levels during mix down.
16
The Basics of Modern Recording
Correct Input Levels (continued)
Pre-fade
Post-fade

Effects processing is the process of changing, augmenting or otherwise
modifying the audio signal. When an effect is applied to the audio signal it is
considered to be “wet.” When the audio signal has no effect applied to it the
signal it is considered “dry.”
Imagine if you had an aquarium filled with water and you wished to change
the color of the water to red. You could apply a red film over the viewing
area of the aquarium to give the effect of red water but the water is really
clear. You may even want to experiment with various film colors. In regards
to effects, this would be the equivalent of monitoring an effect without
recording it. Now, lets say you turned the same water red by applying red food
dye to the water. The water is now actually red and that cannot be changed.
In recording, this is similar to recording a signal “wet” or “printing” a track
with effects.
So, when is it best to record wet and when is it better to record dry? The
advantage of recording a signal wet is that you no longer need to use your
effects processor to create the desired effect. That effect is part of the recording
and that frees the effects processor to be used on another track or to create a
different effect. The advantage of recording a signal dry is that you maintain
the flexibility to change the effect at a later time. This is especially useful if
you are unsure what effect(s) you want to use.
Another common recording technique is to record the signal dry on one track
and wet on another. This allows you to create a mixture of dry and effected
signal and is particularly useful on effects such as reverb and delay. Also, by
maintaining a dry track, you have the advantage of changing the effect in the
future if desired. This technique can be used if you have lots of available
tracks or, if you have a recorder that offers Virtual Tracks.
17
The Basics of Modern Recording
Monitoring Effects

There are two common types of effect routing that are used in audio
recording: insert and loop (or send and return). When you insert an effect,
you are placing that effect between the source signal (usually an input or a
previously recorded track) and that signal’s destination (usually a mix or
record buss). Inserting an effect changes the physical characteristics of the
source signal. Effects commonly used in an insert fashion include
compression, distortion, hum canceler, mic simulators and guitar amp
simulators.
Insert Effect
It is important to note that, when routing an effect in an insert configuration,
you are dedicating that effect processor to the source signal that you are
sending to it . This means that you cannot use that effect processor on any
other input or track while it is routed this way.
When you use an effect in a loop (send and return) configuration, you are
splitting your source signal between its destination and the effects processor.
This gives you a separate dry signal (the original source signal) and wet signal
(the return of the effects processor). This allows you to control the mix of dry
and effected signal. The term "loop" is used because the source signal is
usually sent from the input section of the mixer to the effects processor and
then sent back to the input section, creating a "loop" of the source signal.
Effects commonly used in a loop fashion include reverb, delay, chorus and
flange.
Most mixing consoles give you the option of sending the signal to the effects
processor before it reaches the fader (prefade) or after it passes through the
fader (postfade). Prefade allows you to control the level of the track or input
without changing the effect send level. For example, to create the illusion of a
voice sounding as if it were falling off of a cliff, you might use a prefade send
to a reverb effect. That way you could use the fader to lower the volume of
the dry voice while the reverb remained at its original level. Lowering the dry
signal while maintaining the reverb level creates the illusion of a voice getting
farther away. Postfade, on the other hand, allows you to control the level of
the track or input and the effect send from the same fader. You will probably
use a postfade routing option for most of your effects applications.
Loop Effect
18
The Basics of Modern Recording
Effects Routing / Insert vs. Loop

A compressor is an effects processor that compresses the dynamic range of any
signal passing through it; basically, making the loud sounds softer and the soft
sounds louder. The compressor’s main duty is to lower the amplitude of the
loudest components of the signal it processes; this process is referred to as gain
reduction. Along with lowering the amplitude of the loudest signals, a small
amount of amplification is applied to boost the low level signal as well. These
actions work together to narrow the dynamic range of the signal.
Here is a brief description of some of the parameters common to most
compressors:
Threshold
The threshold control sets the amplitude level at which the compressor begins
to function. When the input level is above the threshold value, the
compressor begins to work.
Ratio
The ratio control determines the amount of input level to output level. For
example, a 4:1 ratio means that for every 4dB coming into the compressor
above the threshold setting, 1dB will be output. Basically, this control tells the
compressor how much to compress; that is, the amount of gain reduction.
Attack Time
The attack time setting controls how soon the compressor begins to attenuate
the signal after the input signal has gone above the threshold level. In other
words, the amount of time after the signal crosses the threshold before the
compressor begins to work.
Release Time
The release time controls how long the compressor will hold the signal at the
threshold level once the input signal drops below the threshold level. In other
words, the amount of time the compressor stays on after the signal drops
below the threshold level.
Output Gain
The output gain is used to adjust the output level of the compressed signal.
Using the output gain, you can bring the overall output level of the
compressor to its optimum setting.
19
The Basics of Modern Recording
The Compressor
Signal at Compressor Input
Signal at Compressor Output

EQ—short for equalization—is the process of adjusting the amplitude
(volume) of certain frequencies. The tone control of a car stereo, for example,
is a very crude EQ control. Usually one EQ can be used to boost or cut more
than one single group of frequencies, or bands. For example, an EQ that has
high, mid and low controls is referred to as a 3-band EQ.
Uses of EQ
EQ can be used for a variety of applications. The most common are:
Correctional EQ is, unfortunately, most often used to compensate for poor
sound or recording quality of instruments or vocals being recorded. For
example, maybe during mixdown you realize that your cymbals sound dull.
EQ can be used to add some high end to the cymbals and allow them to
“sizzle.” For another example, let’s say you are recording a vocalist and you
notice that your microphone is a bit nasal-sounding. By cutting out some of
the high-mid frequency range, you can get a warmer vocal sound out of
your singer. However, be careful here! EQ should not be used as a substitute
for poor recording techniques. When you have selected the proper
microphones and placed them properly, very little, if any, correctional EQ
should be needed.
Creative EQ is the process of adjusting frequencies for purely creative
reasons. For example, maybe you would like your vocalist to sound like
she’s singing through the radio. By severely limiting the bandwidth of the
vocal frequencies, you can obtain this effect.
Blending – Professional engineers are able to build a “wall of sound” by
assigning certain ranges of frequencies to certain instruments, so that these
ranges line up to each other to cover the entire frequency spectrum without
overlapping each other.
EQ can be applied either during the recording process or, more commonly,
during mixdown. Be careful when recording your track with EQ, because it
can’t be adjusted later. Also keep in mind that adding EQ can often add noise,
so it should be applied conservatively (this mainly applies to analog EQ, not
digital).
20
The Basics of Modern Recording
Basics of EQ
Types of EQ
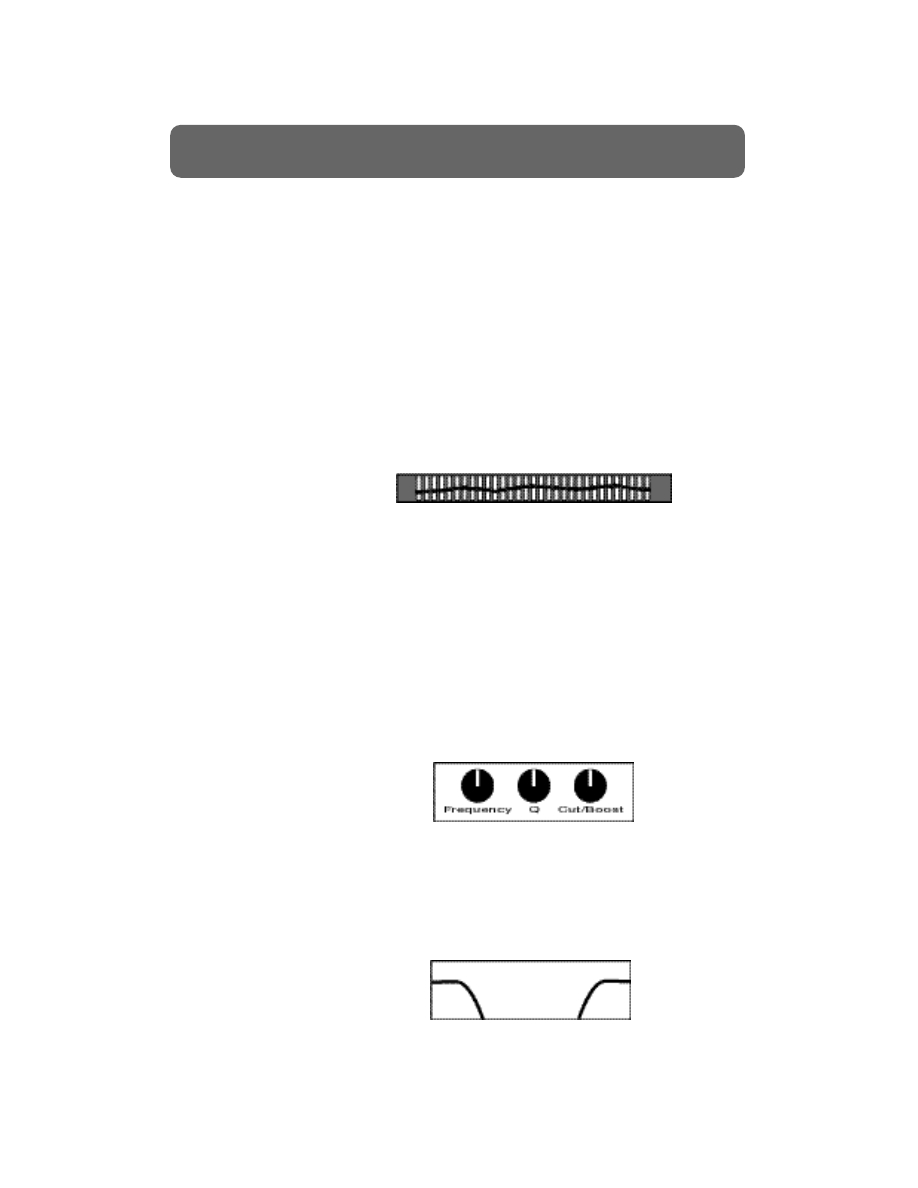
EQs come in a variety of shapes and sizes, from stand-alone rack-mount units
to the EQ controls built into a mixing console. Here are some of the more
common categories of EQs:
Graphic EQ
The most common type of EQ is the graphic EQ. The graphic EQ offers
boost/cut controls for a series of pre-selected frequencies that collectively
cover a wide range of frequencies. The graphic EQ can be easily recognized
because the controls are typically a series of sliders that are physically lined up
next to each other, providing a graphic representation of the overall EQ curve.
These EQs are commonly used to adjust the overall sound of a mix, and vary
according to the frequency characteristics of the room you’re in.
Parametric EQ
The parametric EQ allows you to select specific frequencies to boost or cut.
For example, the EQ section on your mixing console may have two controls
for each band: one control to select the frequency and one control to
boost/cut the selected frequency. Note that this is actually a description of a
sweepable or semi-parametric EQ, and not a full parametric EQ, although you
will often hear it referred to as such. A full parametric EQ has one additional
control per band: the Q adjustment. This control allows you to define how
wide or narrow the band of frequencies is. This will make more sense if you
understand that when an EQ boosts or cuts a selected frequency, it is actually
affecting a group of frequencies (the band) around the selected frequency. The
Q adjustment defines how wide the band is. Semi-parametric and full
parametric EQs are generally used to make specific frequency adjustments
without affecting the overall
sound.
Shelving EQ
Another type of EQ typically found on mixing consoles is known as a shelving
EQ. This type of EQ typically consists of a single boost/cut control for either a
high or low band. When you boost/cut the high or low band, you are
boosting/cutting a fixed frequency (typically 10KHz or 12KHz for the high
band and 80Hz or 100 Hz for the low band) as well as all the frequencies
above/below it. Shelving
EQs are useful for
adding brightness or
“bottom end” to a
particular track.
21
The Basics of Modern Recording
Basics of EQ (continued)
Low
Shelving
High
Shelving
It is often necessary or desirable to combine the data of previously recorded
tracks to a single track or a stereo pair of tracks in the same project - this
process is commonly referred to as track bouncing. It is very important to
understand that track bouncing is a recording process; instead of recording a
live instrument or vocal onto a track or tracks, you are recording previously
recorded tracks onto other tracks.
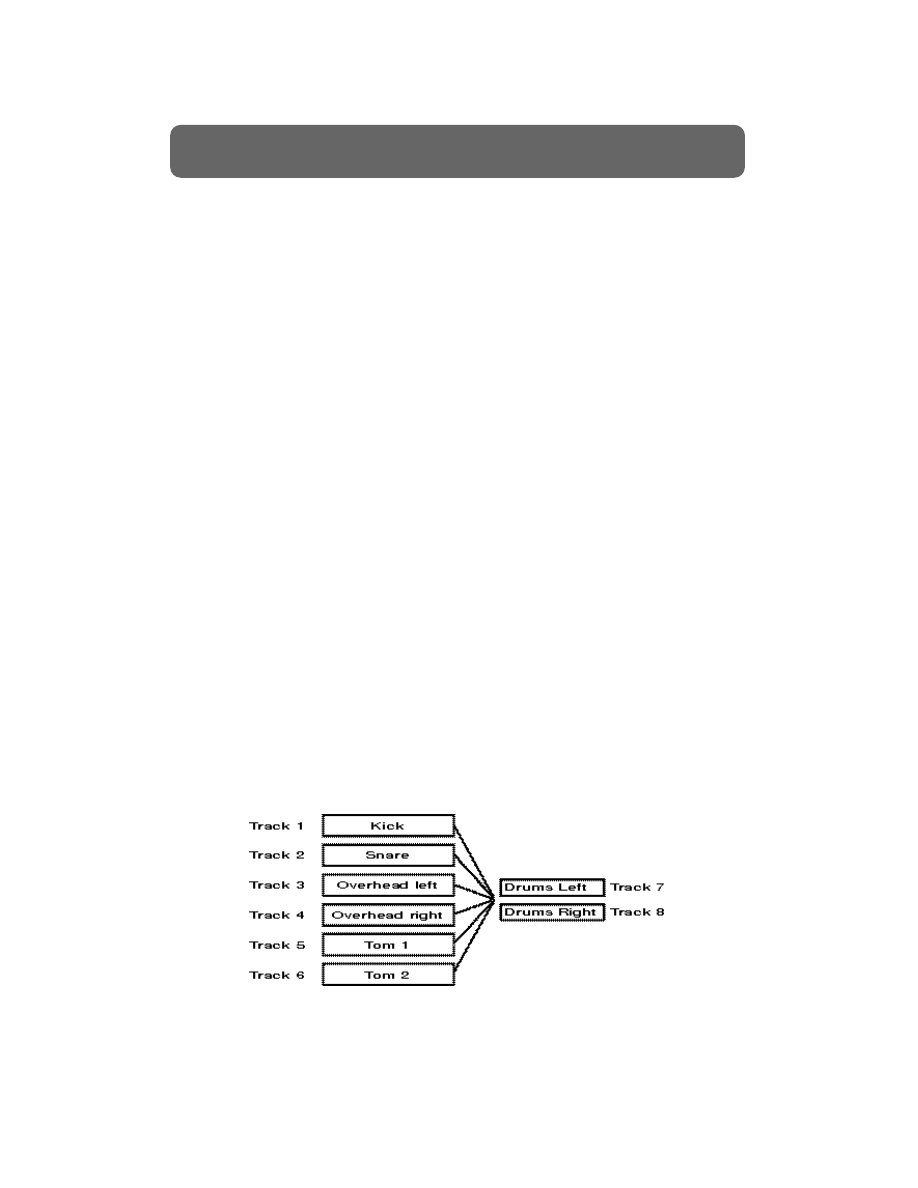
Engineers usually track bounce for several reasons: to combine the audio on
several individual tracks to fewer tracks, to re-record an already recorded track
with EQ settings, to “print” (record the audio output) effects applied to a track
with the original track itself, etc. Track bouncing has many benefits. For
example, if you bounced 8 individual drum tracks down to a stereo pair of
tracks, you would end up with a stereo drum mix that would sound the same
as the original 8 tracks but only uses 2. You then could re-record other
instruments on the first 8 tracks. Also, sometimes you might need more effects
in your song than there are effects processors in your studio. In this case, you
can bounce a track or tracks elsewhere while effects are applied to them, and
record both the original tracks and their respective effects. After the effects
are recorded, the processors are free to be used on other tracks.
When track bouncing, make sure that you adjust individual settings such as
level, EQ, and effects before you bounce tracks. Once your individual tracks
are “bounced” down and you record over the original tracks, you will be able
to adjust only the mixed version of those tracks. For example, if you bounced
8 tracks of drums down to a stereo pair, you would be unable to add reverb to
the kick drum without adding it to the rest of the drums. If you have the need
to bounce tracks, you might want to use a recorder that lets you keep your
original tracks after you bounce. This will give you the best of both worlds;
you can free up tracks for recording by bouncing while retaining individual
control over your original tracks. This concept is often referred to as “virtual
tracking” and we will discuss it in more detail in the next section.
22
The Basics of Modern Recording
Bouncing Tracks
Bouncing 6 Tracks to 2 Tracks

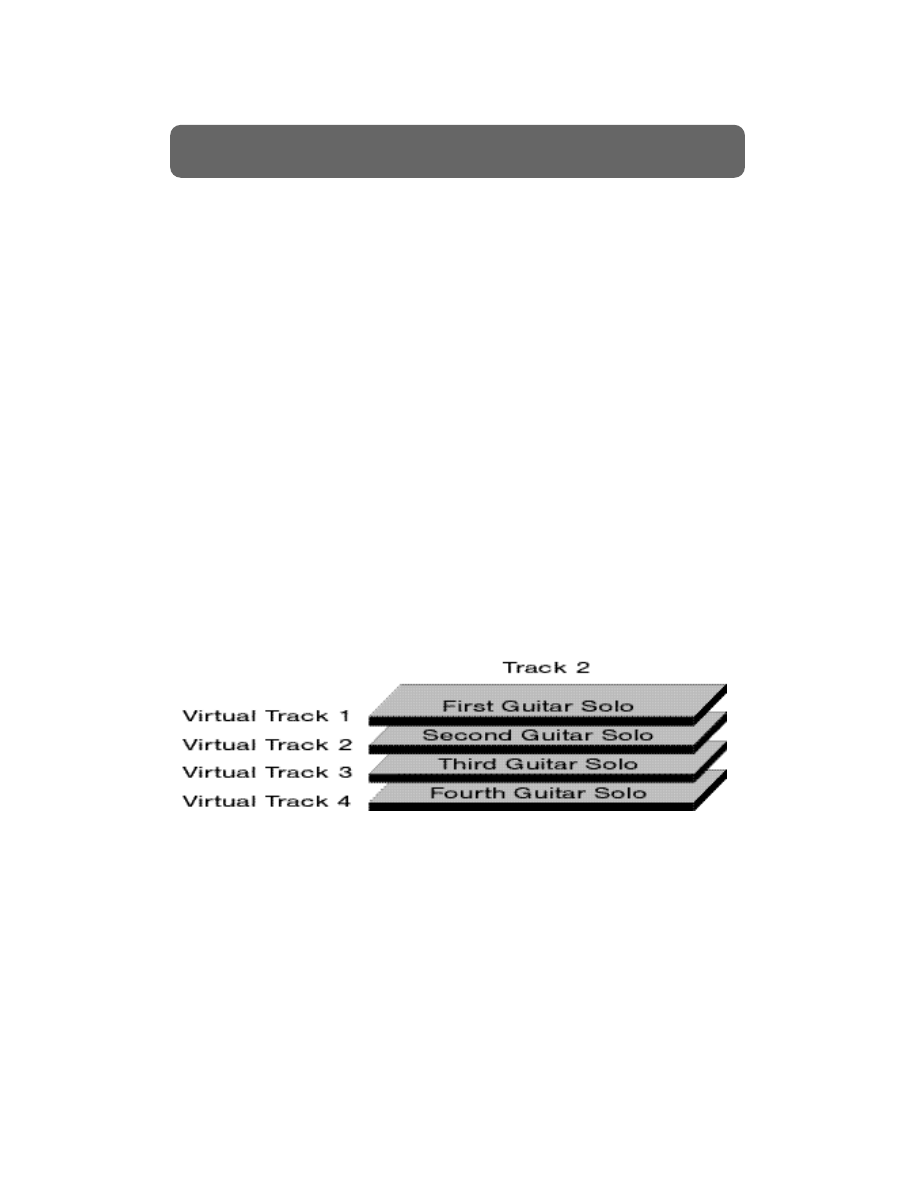
What Are Virtual Tracks?
In the “old days” most albums were recorded in studios with expensive tape
recorders with lots of tracks. Often the artist needed many tracks in order to
have several different versions of the lead vocal, or the guitar solo. Or, maybe
they wanted to have several background vocals on different tracks so they
could mix them later. They needed lots of tracks because they didn’t want to
throw away any of their recorded takes. Bouncing tracks, as we discussed
previously, would free up tracks for recording but, in order to record
additional tracks, it was necessary to record over the original tracks. Today
there is a new solution to the “I never have enough tracks” dilemma—Virtual
Tracks.
Virtual Tracks give you the ability to bounce tracks and still keep all of your
original takes for later comparison, editing, or re-mixing.
How Virtual Tracks work
Picture several stacks of file cards. Each stack has one card on top, with several
others underneath. By shuffling the cards, you can bring any individual card
to the top of the stack at any time. You can write on or read a card by
bringing it to the top of the stack.Virtual Tracks work in the same manner.
Each track has one Virtual Track selected. You can listen to anything that is
already recorded on that track or you can record new takes to that track.
Recording on one Virtual Track does not erase things that were recorded on
the other Virtual Tracks.
You can select any Virtual Track for playback. In fact, you can even combine
pieces of multiple Virtual Tracks into a single composite or “best of” track. You
can also mix multiple Virtual Tracks down to a single track. This is great for
creating fuller sounding string sections or thickening vocal tracks. Virtual
Tracks are great for trying new ideas because you can record new takes
without erasing something that you want to keep.
Here are just a few ideas on how you can use Virtual Tracks in the recording
process:
Recording a guitar solo with Virtual Tracks
When recording a guitar solo, try recording different takes of that solo on
different Virtual Tracks within the guitar track. You don’t have to erase
previous takes or lose other tracks, just change Virtual Tracks for each take.
This helps to keep the creativity flowing while you are recording. You can
decide which solo (or parts of solos) you want to use at a later time.
23
The Basics of Modern Recording
Virtual Tracks
Recording background vocals with Virtual Tracks
Record several takes of background vocals on different Virtual Tracks within
one playback track. When you are finished, temporarily assign each of these
Virtual Tracks to the various playback tracks so that you can hear all of them
at the same time. Keep one track open for recording then adjust the levels of
the other tracks as desired and bounce them to the open track. This will give
you a “mixed” version of all your background vocal takes on a single track.
You can now recall your original Virtual Tracks to be played back with the
new background vocal track. If you need to adjust some of the original takes,
don’t worry, they’re still safely stored as Virtual Tracks.
R e c o rding a dry and processed guitar at the same time using Vi rtual Tr a c k s
Try splitting your guitar signal so that you route the output of the guitar to
one input and the output of your effects processors to another input. Then,
record your guitar part to two different tracks. After you are finished
recording, mix the “dry” and “wet” tracks to your liking and bounce them
together to any available Virtual Track. You can use that track for playback
and keep the “dry” track on a spare Virtual Track. That way, if you want to
experiment with different guitar effects at a later time, you can recall the
“dry” guitar track and apply new effects to it.
24
The Basics of Modern Recording
Virtual Tracks (continued)
Virtual Tracks

In a perfect multitrack recording environment, each instrument or vocal is
recorded onto a separate track, so that it can be given its own particular EQ,
effects, panning and volume. Most of this processing is done during the
mixdown, when the goal is to blend all of these instruments together in order
to create a stereo master recording that sounds exactly the way you want it to.
However, for most recording engineers, there is no perfect multitrack
recording environment. Although 64- and even 128-track recording
environments do exist, they can usually only be found in large professional
studios at upwards of $400 per hour. Therefore, most of us work on recording
systems that have a limited number of tracks available. However, this does
not mean that we can’t produce lush, multi-layered recordings that sound
professional, it just means we have to plan ahead. The process of creating a
track plan for each instrument and vocal is sometimes referred to as track
management. If you don’t do this ahead of time, you may find yourself out of
tracks and options for finishing your song.
Bouncing Tracks
One of your most useful tools will be a process called “bouncing tracks.”
Bouncing tracks is essentially the process of doing mini-mixdowns during the
recording process (for more detailed information, see page 22). For example,
let’s say you have recorded your drums onto individual tracks, using up eight
tracks of your sixteen-track recorder. You can “bounce” these eight tracks
down to one stereo pair, freeing up six tracks. However, you must be careful
when bouncing tracks because, if you record over your original tracks, you
lose your option to individually mix these tracks during the main mixdown.
Of course, bouncing tracks works much better on digital recorders than it does
on analog recorders, because digital bounces do not lose sound quality. Also,
some digital recorders allow you to record new tracks without erasing the
previous tracks. This concept is sometimes referred to as “virtual tracking” and
it affords you the luxury of bouncing tracks without losing control of the
independent tracks (for more detailed information, see page 23). If you are
using an analog recording system, you should be aware that each bounce loses
some audio quality. Generally, more than two or three bounces for any given
track renders the track too noisy to be very useful.
Stacking Tracks
Another useful trick is to place more than one instrument on a particular
track, sometimes known as “stacking tracks.” For example, let’s say you have
a piano solo during the intro of your song, and a guitar solo during the fade-
out. In this case, you can record them both onto the same track because they
do not overlap.
25
The Basics of Modern Recording
Track Management
When stacking tracks, remember to use instruments that need little or no
effects processing or at least use similar types of processing, so that you don’t
have multiple changes to worry about during mixdown. If you need lots of
processing for a track, consider recording the processing along with the track,
so that you don’t have to do it during mixdown. Also try to select
instruments that are as far apart in the song as possible, so that you have
plenty of time between them to make any changes you do need to make.
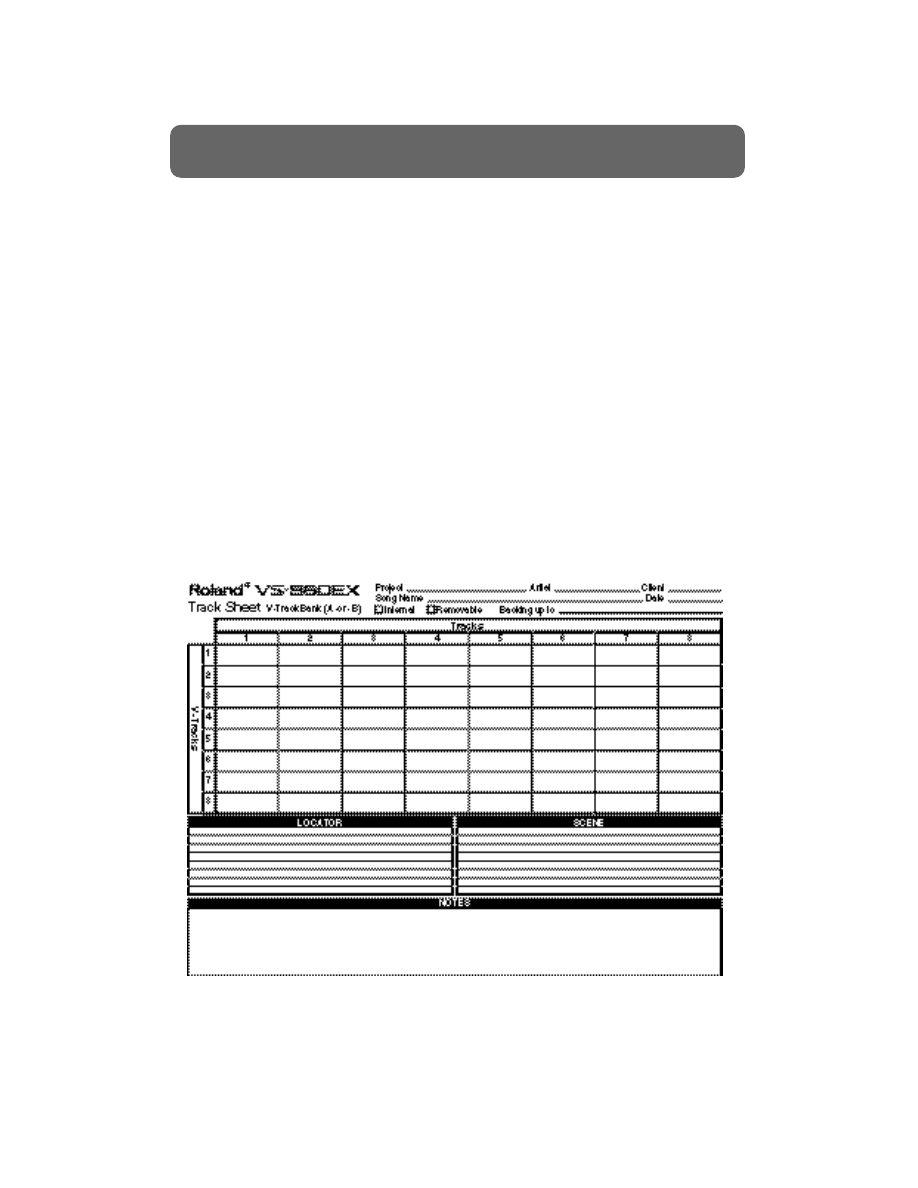
Track Sheets
It should be clear by now that these types of complex track management tools
should be well thought out ahead of time. Most engineers use tracks sheets,
which are sheets of paper that have a separate box for each track where
instruments that are going to be assigned to that track can be listed, along
with other track notes. By using track sheets, you can map out what will
happen on each track ahead of time. If you don’t have any tracks sheets
simply draw one out before you start. The small investment in time at the
beginning of your session will potentially save you countless hours and
headaches during your recording process.
26
The Basics of Modern Recording
Track Management (continued)
In analog days, the only way to edit the audio on tape was to actually break
out the razor and cut and splice the tape itself–not exactly the most efficient
means of editing. Imagine cutting the tape in the wrong place or not putting it
together properly. You could destroy countless hours of work with a single
misplaced edit.
With the introduction of digital hard disk recording, these problems are now
virtually non-existent. A hard disk recorder uses a hard disk to store your
recording instead of tape. When you edit audio on a hard disk, you are editing
in a temporary memory buffer and you are not actually changing your
original recording. This type of editing is referred to as nondestructive. Think
of it this way, if you create a memo on your computer’s word processing
program and then make some changes to that memo a few days later, the
changes don’t become permanent until you instruct your word processor to
save the changes in your document. Nondestructive editing works in a similar
fashion; you can make your edit, listen to the result, and then decide if you
want to keep the edited version or restore the original version. Some hard
disk recorders take this a step further by storing your original versions as
“Undo” levels even after you save the new version (see page 31).
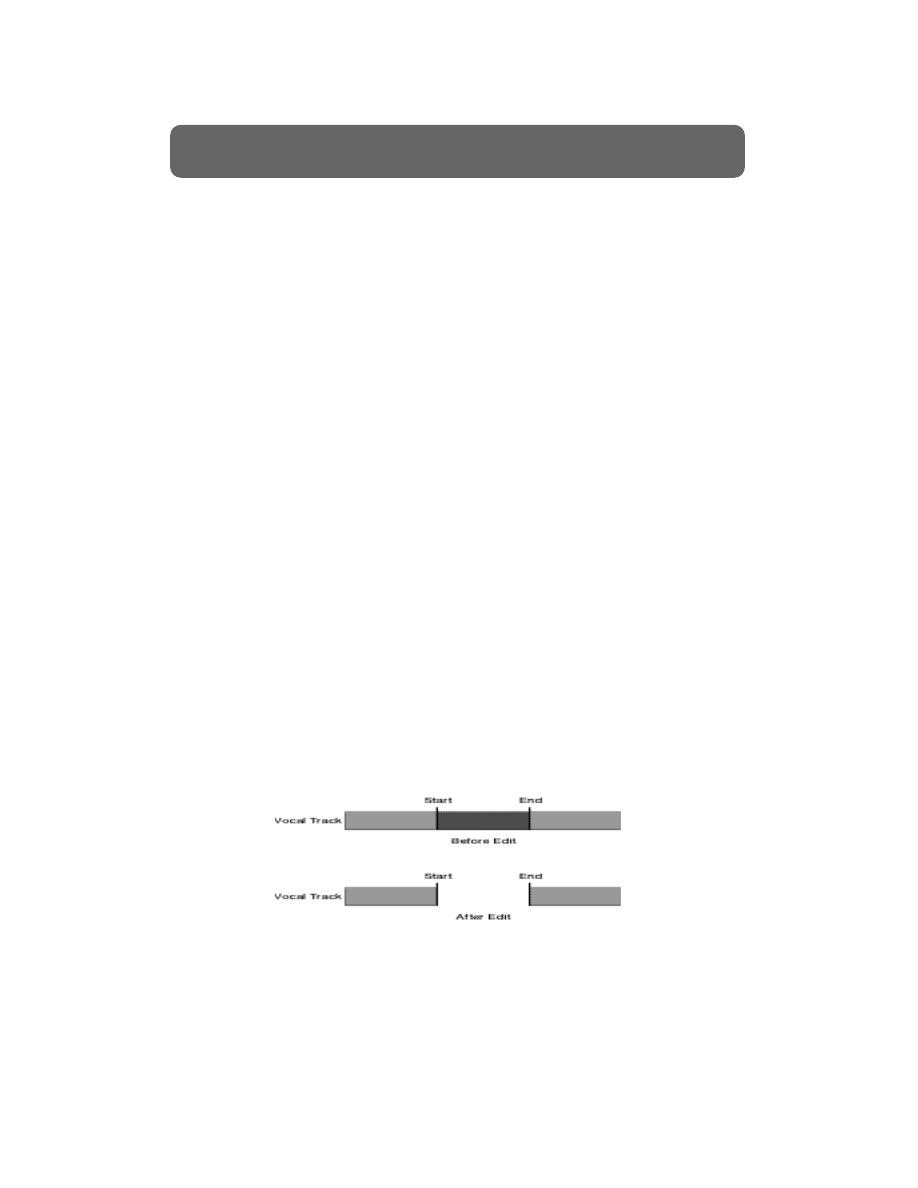
Setting your Edit Points
Digital editing sounds easy but can get a little tricky if you do not understand
the basics. Almost every edit you do will need to have a Start and End point.
For example, if you want to erase part of a track, you will need to determine
what portion of the track you want to erase. The start point would be where
you would want to start your erase and the end point would be where you
would want to stop erasing. In the example below, the start point is placed on
the vocal track where the vocalist came in too soon and the end point is
placed after the mistake. When you perform an erase, the area marked by the
start and end point is erased and the timing remains unchanged.
27
The Basics of Modern Recording
Non-Linear Editing
Start and End Points
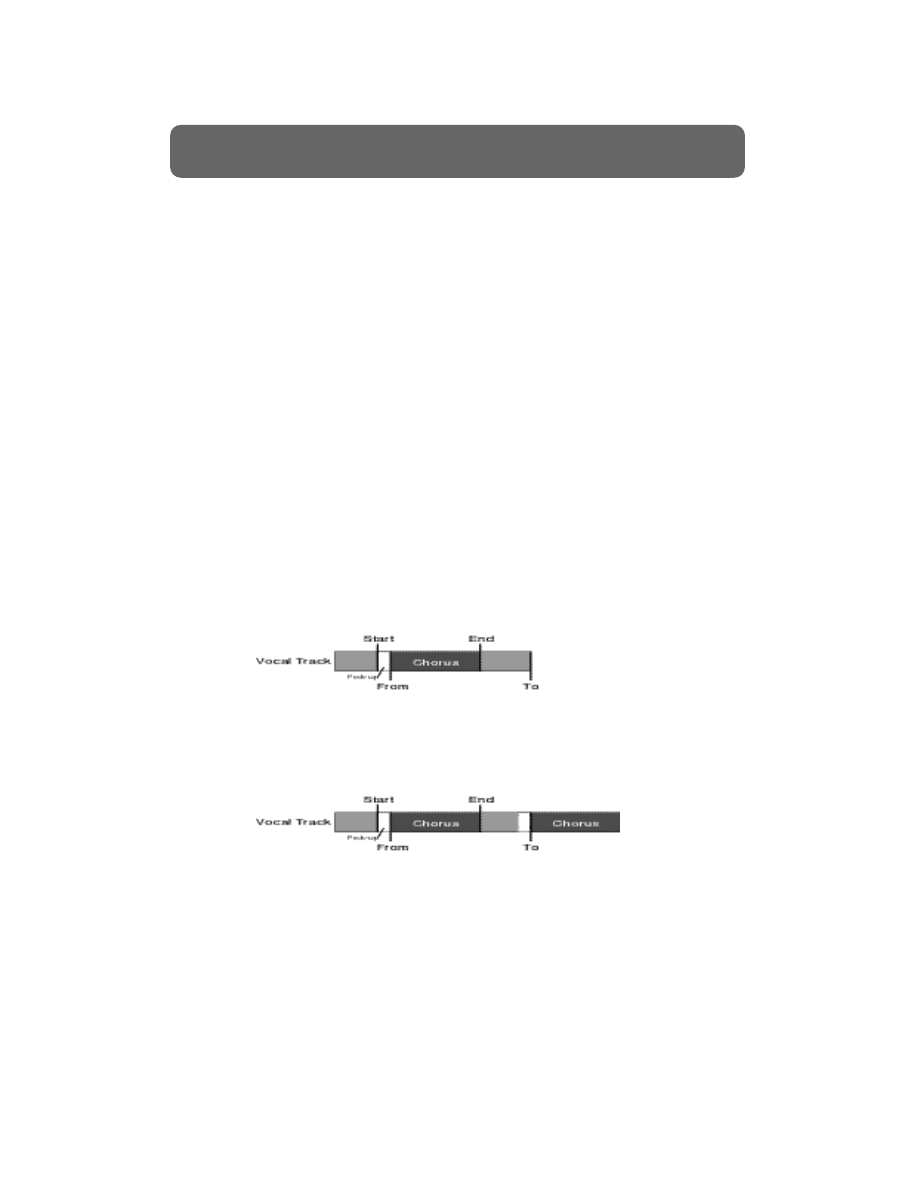
In addition to start and end, some edits require additional edit points. These
points are usually referred to as the From and To points. From and To points
are used in conjunction with Start and End points. Most edits that involve
moving or copying audio to a different track or a different time will require a
From and a To point.
When performing this type of edit, Start and End points are used to select the
portion of the track that will be moved or copied whereas From and To points
are used to determine how and where that portion of the track will be moved
to. In other words, the To point is simply a destination for the material
between Start and End. The From point is a location between Start and End
that will line up with the To point after the edit is made. For most edits, the
From point will be the same as the Start point.
If you have a key reference point (e.g., the downbeat of a measure, a sound
effect, etc.) that is not at the beginning of the section you want to edit, you
can use the From point to align that reference point with the desired time. For
example, let’s say you want to copy the lead vocal from the first chorus to the
second chorus but the vocalist starts singing a little before the chorus actually
starts. The example below shows how to use the From and To effectively to
achieve the proper edit.
28
The Basics of Modern Recording
Non-Linear Editing (continued)
Before Edit
After Edit
Using From and To Points
.Many current hard disk recorders have a function known as Undo. This
function allows you to cancel the last performed operation (usually this is
limited to the recording of a track or a track edit function) and return your
song to its previous condition.
Some hard disk recorders contain multiple levels of Undo, allowing you to
actually “go back in time” through your recording session. This is particularly
useful in situations where a track was accidentally recorded over or edited out,
a track was recorded at too low or high a level, etc. For example, say you
record a guitar part. Then you ‘punch in’ some new guitar playing to the
middle of the track. If you realise that you made the punch too early, just
Undo it!
Use the Undo function to remove the ‘punch in’ guitar edit, leaving you at
the place and time of the session where you just had your original guitar
track.
29
The Basics of Modern Recording
Undo
Original
Version
Punch In
Undo to
Original Version
“Why don’t my recordings sound as loud as the ones I buy in the store?” This
question has been asked by the vast majority of recording enthusiasts
struggling to make their project sound as professional as possible. The main
reason is that nearly all of the CDs and/or tapes you buy in a music store have
been professionally mastered. So, what is it that a mastering engineer does
that makes everything sound so much better? A mastering engineer is usually
responsible for aspects of the recording process such as maximizing and
balancing volume levels, adjusting the timing between tracks, and correcting
any frequency type problems that are common to all tracks. The mastering
process is also the last chance to fix any remaining problems with the mixed
version of the songs by using tools such as EQ and noise reduction.
The mastering engineer works exclusively with two track songs that have
already been mixed. The main tools of the mastering engineer (aside from his
or her ears) are compression and EQ. Effects applied during the mastering
process are applied to the entire mix, not individual tracks. Compression is
generally used to help increase the overall level as much as possible without
causing distortion. In digital recordings, 0dB is the loudest a signal can be
without distorting. EQ is usually used to shape the overall tonal balance of the
songs. For example, if the mixed version of your songs lack good bass
response, EQ can be used to boost the lower frequencies. The main advantage
of using a professional mastering engineer is that most pros have many years
of experience. They know what tools to use and, more importantly, when to
use them. If you are going to master your own recordings, it is probably a
good idea to read a few articles and/or books on the mastering process to
provide some insight on the various tips and tricks used by the professional
mastering engineer. Also, listen to some already mastered CD’s so that you can
get a better idea of the sound you want before you start.
30
The Basics of Modern Recording
Mastering
Having a single working copy of your platinum-selling breakthrough
masterpiece is never a good idea. Musicians are not immune to Mr. Murphy’s
law and it is usually not until we lose some important, irreplaceable data that
we start to learn that lesson. A backup is a second copy of your recording that
can be used in the unlikely event that your working copy is lost or damaged.
To make a backup of a tape based recorder you will most likely need two
recorders, one for recording and one for playback. Most hard disk recorders
make the backup procedure a bit easier. Usually backup functions are built-in
and allow you to store a copy of your song to storage mediums such as DAT
tape, magneto optical drives, and CD-R. Of these, CD-R and CD-RW disks are
rapidly becoming the most popular, and for good reason. They are
inexpensive, reliable, and readily available.
A final thought on backing up your recordings. If you make a backup copy of
a song, and then erase or record over the original version, you no longer have
a backup. You must have two copies of your recordings to have a backup. If
you are going to erase a song from a hard drive or record over a master tape,
make sure you make two backup copies of that song first. When it comes to
making frequent backups of your recordings, the shoe people have the right
idea—”Just do it!”
31
The Basics of Modern Recording
Backup
A Roland VS-CDRII

Now that we’ve discussed the recording process in general, let’s review the
steps involved in creating a multitrack recording.
1.
Connect your instrument or microphone to an input on your mixing
console and/or recorder.
2.
Route that input to an available track for recording.
3.
Adjust the input level for your instrument or microphone to a good
recording level.
4.
Record the track.
5.
Repeat steps 1-4 to record additional tracks as desired.
6.
Apply effects and/or EQ to your tracks as desired.
7.
Adjust the levels of your tracks to create a balanced stereo mix.
8.
Record your mixed tracks to a stereo pair of tracks or a two track
recorder such as a DAT or cassette recorder.
9.
Make any final adjustments (such as EQ and/or compression) to your
stereo mix and record your stereo mix to its finished medium (e.g., CD,
cassette, vinyl).
32
The Basics of Modern Recording
Recording Overview

33
The Basics of Modern Recording
Summary
So, there you have it. A complete history of everything you need to know
about the recording process. O.K, well, not exactly. But, we hope this book
has provided you with some of the fundamentals you need to start making
your own recordings.
We’ve quickly covered a wide variety of topics that are important to
understand before you can start using your recording gear to its fullest
potential. If you are interested in learning more about these subjects, there are
many books and articles covering every aspect of the recording process--from
amateur to professional.
The best teacher, however, is experience. This is certainly true when it comes
to making great recordings. We encourage you to take the knowledge gained
from this book and start applying it to your recordings. Remember, no one
gets in a car for the first time and heads off for Indianapolis the next day. Go
slowly and take one step at a time. As you progress, you will start to find the
techniques that will produce the types of recordings you are striving for. Until
then, remember to have fun along the way!

The following section contains definitions for some terms that you will likely
encounter in the recording process.
Aux Send / Return
Normally refers to the output Bus of a mixer used to “send”
a signal to an external processing device. The Aux Return is
the return input to the mixer used for the return signal
from the effects device.
Balanced
An audio circuit with 3 wires; two wires carry the signal,
high (+) and low (-), and the third is a shield which is con-
nected to a chassis or system ground.
Bass
The low audio frequency range, normally considered to be
below 500 Hz.
Bus
A signal path to which a number of inputs may be connect-
ed for feed to one or more outputs.
Compressor
A compressor is a dynamic effect that decreases gain as the
level of the input signal increases to reduce the dynamic
range of the audio. A compressor may operate over the
range of input levels, or it may operate only on signals
above or below a given level (the threshold level).
Condenser Microphone
A microphone utilizing a capacitor (condenser) as a pickup
element. Electronics are usually contained in the micro
phone body and a polarizing voltage is necessary, so exter-
nal or battery power is required, and output levels are usu-
ally higher than other types of microphones. Condenser
microphones are commonly used for recording vocals and
acoustic instruments.
DAT (Digital Audio Tape)
A recording medium that records audio signals to tape digi-
tally, via a hard w a re re c o rding device called a DAT re c o rd e r.
dB
The “dB” (decibel) is a unit of measurement for ratios of
sound level, power, voltage, and other quantities.
Dynamic Microphone
A type of microphone which converts acoustical to electrical
energy by means of a permanent magnet and a moving coil.
Dynamic microphones do not require external power. Some
dynamic microphones have very high quality and are com-
monly used in recording and sound reinforcement.
Effects Return
A mixing console input that receives the signal from an
effects device. Many mixing consoles have a level control to
adjust the amount of effects signal returned to the mix; this
control is called the effects return control.
Effects Send
A mixing console output that sends a signal to the input of
an effects device. Most mixing consoles have an effects send
level control for each input (channel).
34
The Basics of Modern Recording
Glossary

Equalizer (EQ)
An electronic device that will amplify (boost) and/or attenu-
ate (cut) certain portions of the audio frequency spectrum.
There are many different types of equalizers.
Graphic
An equalizer which operates simultaneously at a number of
preset frequencies, any of which may be boosted or cut
independently of the others.
Parametric
An equalizer where the center frequency is continuously
variable over a given frequency range, and where the “Q”
(slope rate) is usually adjustable.
Shelving
A boost or cut characteristic which has a response curve
resembling a shelf. Maximum boost or cut occurs at the
indicated frequency and remains constant at all points
beyond that frequency.
Fader
A potentiometer that controls the signal level for a console
input position or output channel.
Gain
The amount an amplifier increases the power of a signal, usu-
ally specified in dB.
Headroom
“Headroom” refers to the difference between the nominal
operating level and the maximum level at any point in an
audio system or device, usually expressed in dB.
Hertz
Abbreviated “Hz,” the unit of measurement for frequency; 1
Hz is equal to one cycle per second (cps).
Impedance
The total opposition to the flow of alternating current in an
electrical circuit. Impedance is measured in ohms.
Insert
When a track is routed to a Bus such as an effects Bus using
an INSERT path, the audio goes to the effect Bus and then
directly back to the channel in the mixer. Therefore, there is
no “dry” sound of the original without the effect because
the only audio path is through the effect and then to the
mixer. INSERTS are used when you don’t want to hear the
original sound without the processing (e.g., when you use a
compressor on a voice).
kHz
A b b reviation for kiloHertz, or one thousand cycles per second.
Locator
A position marker placed in your song to help you find sec-
tions quickly. Locator locations can usually be accessed
directly from front panel buttons.
Marker
A marker is any temporary mark placed within a song to
indicate a particular location you wish to return to. For
example, just like a bookmark points to a page in a book, a
marker points to a song location to make it easy to find later.
Media
Media is the term used to indicate the actual surface or
device your song is recorded on. For example, cassette tape,
reel to reel tape, hard drives, and removable media are
recording media.
35
The Basics of Modern Recording
Glossary (continued)

Microphone
A device for converting sound waves into corresponding
electrical signals. Microphones can be categorized in several
ways: their sensitivity patterns, the method by which they
convert sound to electrical energy, or other characteristics.
MIDI
Musical Instrument Digital Interface. A digital communica-
tions language that allows musical instruments and related
equipment to ‘talk’ to each other.
Mix
The pro c e d u re whereby two or more signals from live and/or
re c o rded sources are combined to achieve a desired balance.
Mixdown
The process whereby signals from a multi-track tape
recorder are routed to a mixing console and recombined to
make a stereo or monaural master tape.
Mixer
A device or system in which two or more signal sources
(mic or line level) can be combined and fed to another
device or part of the audio system. Larger mixers are often
called “mixing consoles.”
Mute
Reducing an audio signal to off (full attenuation).
Ohm
A measurement of electrical resistance.
Omni-Directional
Equal sensitivity in all directions. Usually refers to non-dire c -
tional micro p h o n e s .
Overdubbing
A recording procedure utilized in multi-track tape recording.
A performer (or performers) listens to previously recorded
musical tracks, typically with headphones, while recording
one or more additional tracks.
Pan Pot
The control that places a signal in stereo perspective to
appear acoustically between the left and right speakers.
Phantom Power
A method of remotely powering the preamplifier or impedance
c o n v e rter which is built into many condenser microphones by
sending voltage along the audio cable. Many professional mix-
ing consoles supply phantom power. In the cases where phan-
tom power is re q u i red, but not available from a mixer, you can
use an external power supply for the micro p h o n e .
Pre-Fader / Post-Fader
Audio signals from an external source or a recorded track
come into a mixer and are then routed to a Bus such as the
Mix Output. If the audio signal is routed to the Mix Output
Bus Pre-Fader, then the faders won’t have any effect on the
level of the sound in the mix. If the source or track is routed
Post-Fader, then the fader will control the level to the Mix
Output Bus. Generally, tracks will be routed to the Mix
Output Bus or the Aux Bus Post-Fader.
36
The Basics of Modern Recording
Glossary (continued)

Punch In
A procedure in multi-track recording that is essentially an
overdub, but instead of recording the new part on an adja-
cent track to already recorded material, the new part is
recorded by erasing a previous part from a given track. The
punch in is initiated, while the song is playing, by entering
record mode at some precise instant. For example, a punch
in at bar XX, or a punch in after a given word. (Punch out
refers to either stopping the recording or switching from
record back to play mode for the track or tracks involved.)
Sample Rate
The rate at which samples are taken in the analog to digital
conversion process, usually specified in Hertz (Hz).
Status
A mode selection to choose the monitoring and recording
condition of each channel (e.g., Record, Source, Play, Mute).
Stereo Bus
In a mixing console, the Bus or channel which is used to
feed a program to a stereo tape recorder, 2-channel sound
system or other stereo equipment. A stereo Bus actually
consists of two Buses: left and right.
Tracking
Refers to the original recording of live music when the first
tracks (usually rhythm instruments) are recorded.
Treble
The high audio frequency range, normally considered to be
above 5000 Hz.
Unbalanced
An audio circuit with 2 wires; one wire carries the signal,
high (+) and the second carries the low (-) and also is con-
nected to chassis or system ground.
Undo
A command to eliminate a previous action, command, or
recording.
Virtual Tracks
Virtual tracks are additional areas to record your takes and
ideas. They are found on some hard disk recorders. You can
usually edit several Virtual Tracks together to create a com-
posite track. On some recorders, you can even bounce sev-
eral Virtual Tracks to another Virtual Track to make a mix of
these tracks. For example: If you need to bounce some
background vocals together to make room for some guitar
parts, you can use the Virtual Tracks to store the original
vocal parts that you have bounced. Unlike a tape based sys-
tem, you can then add new material on the tracks you have
bounced from and still keep the originals in case you want
to re-mix the bounce later.
XLR
Describes any of several varieties of audio connectors having
3 or more conductors plus an outer shell which shields the
connection and locks the mating connectors. 3-pin XLR-type
connectors are commonly used to make balanced mic and
line level connections in professional audio systems.
37
The Basics of Modern Recording
Glossary (continued)
(Portions of this glossary are from the CAMEO Dictionary of
Creative Audio Terms; copyrighted and used by permission of
The WorkCenter Corp., dba Gary Davis & Associates.)

®ÂØÒňÎ
®
Roland Corporation U.S., 5100 S. Eastern Avenue, Los Angeles, CA 90040-2936
2 3 6 0 U S
© 1999 Roland Corporation
All rights reserved.
No part of this publication may be reproduced in any form without the written permission of ROLAND CORPORATION.
All trademarks are the property of their respective owners.
Wyszukiwarka
Podobne podstrony:
Lesley Jeffries Discovering language The structure of modern English
The?velopment of Modern Rap
Independence Day, Myth, Symbol, and the Creation of Modern Poland
Lesley Jeffries Discovering language The structure of modern English
Shunsuke Sumikawa The Meiji Restoration The Roots of Modern Japan
The Schizophrenia of Modern Ethical Theories
Independence Day, Myth, Symbol, and the Creation of Modern Poland
Wójcik, Marcin Rural space and the concept of modernisation Case of Poland (2014)
THE AURA OF MODERNISM Marjorie Perloff
Awakening the Power of a Modern God Unlock the Mystery and Healing of Your Spiritual DNA by Gregg Br
The Basics of Financial Mathematics Bass 2003
How?n the?stitution of Soul in Modern Times? Overcome
Basics I-lecture 4, working out the set of conceptions realizing the set need
Conan Pastiche Green, Roland Conan and the Mists of Doom
Brittan, Gordon G The Kantian Foundations of Modern Science
Taylor, Charles Modernity and the Rise of the Public Sphere
The Intellectual Origins Of Modern Catholic Social Teaching On Economics
The Forests of Gleor Roland J Green
więcej podobnych podstron