
How to create
your own
“UTAU” Voice bank.
Written By. Kirk
and
“
UTAU@英語部”
Rev0.40

Contents
Preface. ................................................................................................................................................3
Acknowledgments................................................................................................................................3
Before You Start...................................................................................................................................3
Step1. Create Phoneme Wave Files......................................................................................................4
Phoneme identifier. .........................................................................................................................4
Step indicator. .................................................................................................................................4
Step2. Create “oto.ini” file...................................................................................................................5
Alias.................................................................................................................................................5
Offset (aka Left blank).....................................................................................................................5
Consonant (aka Fixed part)..............................................................................................................6
Cutoff (aka Right blank)..................................................................................................................6
Pre-Utterance...................................................................................................................................7
Overlap.............................................................................................................................................7
Creation of "oto.ini" with a built-in tool .........................................................................................8
Note:...............................................................................................................................................10
Step3. Create Frequency Table Files..................................................................................................11
Step4. Create “prefix.map” file.(optional).........................................................................................12
Pitch. .............................................................................................................................................12
Octave. ..........................................................................................................................................12
Prefix or Suffix .............................................................................................................................12
Creation of "prefix.ini" with a built-in tool ..................................................................................13
Note. ..............................................................................................................................................14
Step5. Create "character.txt" and "readme.txt" (optional)..................................................................15
"character.txt"................................................................................................................................15
name=~......................................................................................................................................16
author=~....................................................................................................................................16
image=~....................................................................................................................................16
web=~........................................................................................................................................16
sample=~...................................................................................................................................16
"Readme.txt." ................................................................................................................................17
Postscript. ..........................................................................................................................................17

Preface.
I am a novice “UTAU” user and distribute with this pamphlet those who aim at creation of their
voice bank.
This pamphlet is written based on "UTAU Ver.0.2.41."
Acknowledgments
First I'd like to express respect to the author of "UTAU" system, Mr. 飴屋/菖蒲 (Ameya/Ayame)
and many predecessors who have educated me.
I'd also like to send my eulogy to developer of translation software and crew of the bulletin board
“UTAU@英語部”(English club@ “UTAU Gojokai”) .
Without their assistance such an activity of mine would have been impossible.
Before You Start
You may enjoy yourself, but do not break the law or violate somebody else's rights.
<WARNING !!>
All "UTAU" users must follow these rules!!
• Don't create voice bank from a real singer's voice without permission.
• Don't create voice bank from a real actor/actress's voice without permission.
• Don't create voice bank from a real voice actor/actress's voice
without permission.
• Don't create voice bank from the output of “Vocaloid” products, which
explicitly forbid such a usage.
• Don't create voice bank from the output of other voice synthesizers
without permission.
Breaking the rules will result in the accusation against you, and may even Mr. 飴屋/菖蒲
(Ameya/Ayame) as an accomplice.
Such a situation will terminate the free "UTAU" world and should be avoided definitely.
Do you understand it? OK, let's have fun!

Step1. Create Phoneme Wave Files.
First, you have to prepare phoneme wave (*.wav) files. You can use your favorite wave file
editor for this process.
Each wave file should be named by the following rules.
Naming rule:
Suffix style (preferred)
(Phoneme identifier)(Step indicator).wav
ex. Ka+.wav
Prefix style
(Step indicator)(Phoneme identifier).wav
ex. +Ka.wav
In each style, a step indicator is optional.
Phoneme identifier.
The name of a phoneme. Phoneme identifiers will be used to identify voice fragmnents in lyrics.
Step indicator.
In order for more natural voice generation, you may use several phoneme files in different steps
for a phoneme.
You should use letters as pitch indicator which will be distinguished clearly from the phoneme
identifier.
Example1(suffix style):
Example2(prefix style with fine tune):
Ka+
Ka in high octave
5Ga
Ga in octave 5
Ka
Ka in middle octave
4Ga
Ga in octave 4
Ka-
Ka in low octave
3Ga
Ga in octave 3
Caution!!
UTAU can handle following two kinds of phoneme data.
Only vowel
ex. A,I,U,E,O,(N)
Consonant+Vowel
ex. Ka,Kya,Ga,Gya
annotation: Utau handles "N" as a variable length.
Every phoneme data shold have a vowel (variable length part). Consonants (fixed length part)
are optional. In other words, it cannot handle phoneme without trailing vowel.
This limitation comes from that many of consonants cannot be stretched. (Imagine "p" of one
second length!)
If you need phoneme ending in a consonant, you have to use the heading consonant region of a
vowel-trailed phoneme by cutting off its vowel region on UTAU.
You may use a special phoneme file with long consonant for this purpose. (Like "ssssssa".)
Step2. Create “oto.ini” file.
"oto.ini" is the most important configuration file for a voice bank.
Whether this file is properly written or not determines the usability of the bank.
So you have to understand its function well and take special care for writing it.
If a voice bank without "oto.ini" is loaded onto UTAU, one is created automatically (without any
configuration). This will be the easiest way to create a template.
"oto.ini" is an ordinary text file and you can use your favorite text editor to edit it. However, I
recommend performing creation of this file by the built-in tool of UTAU which I mention later.
Inside the file, the configuration of each phoneme is described in a line.
A line (i.e. a phoneme configuration) is written in following format.
[phoneme wave file name]=Alias,Offset,Consonant,Cutoff,Pre-Utterance,Overlap
example: i.wav=yi,11,175,57,105,50
The definition of the parameters are described hereafter.
Alias
The name defined here can also be used to specify the phoneme as well as the phoneme file name
itself. It is useful when there is another notation of the phoneme.
The phoneme name written here is related with a phoneme data file name.
Although an Alias is a convenient parameter, please use it carefully.
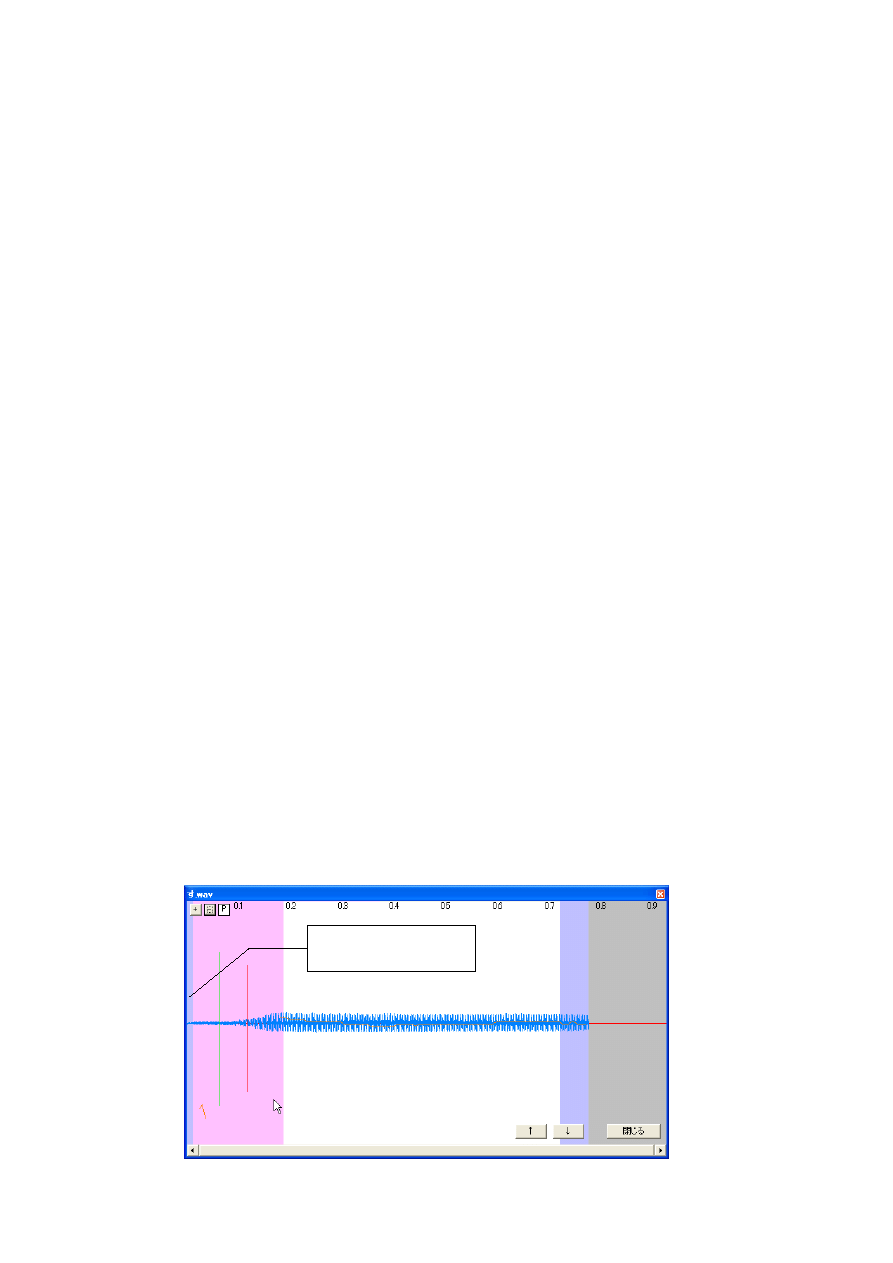
Offset (aka Left blank)
This parameter defines the length of the unused region in the beginning of the phoneme file in
milliseconds.
When there is no need to omit, set 0 here.
It is identical to actually cutting the phoneme wave file, except it does not actually modify the
phoneme file. Existence of this parameter makes creation of a phoneme data file easy.
This thin blue zone is an
“Offset”
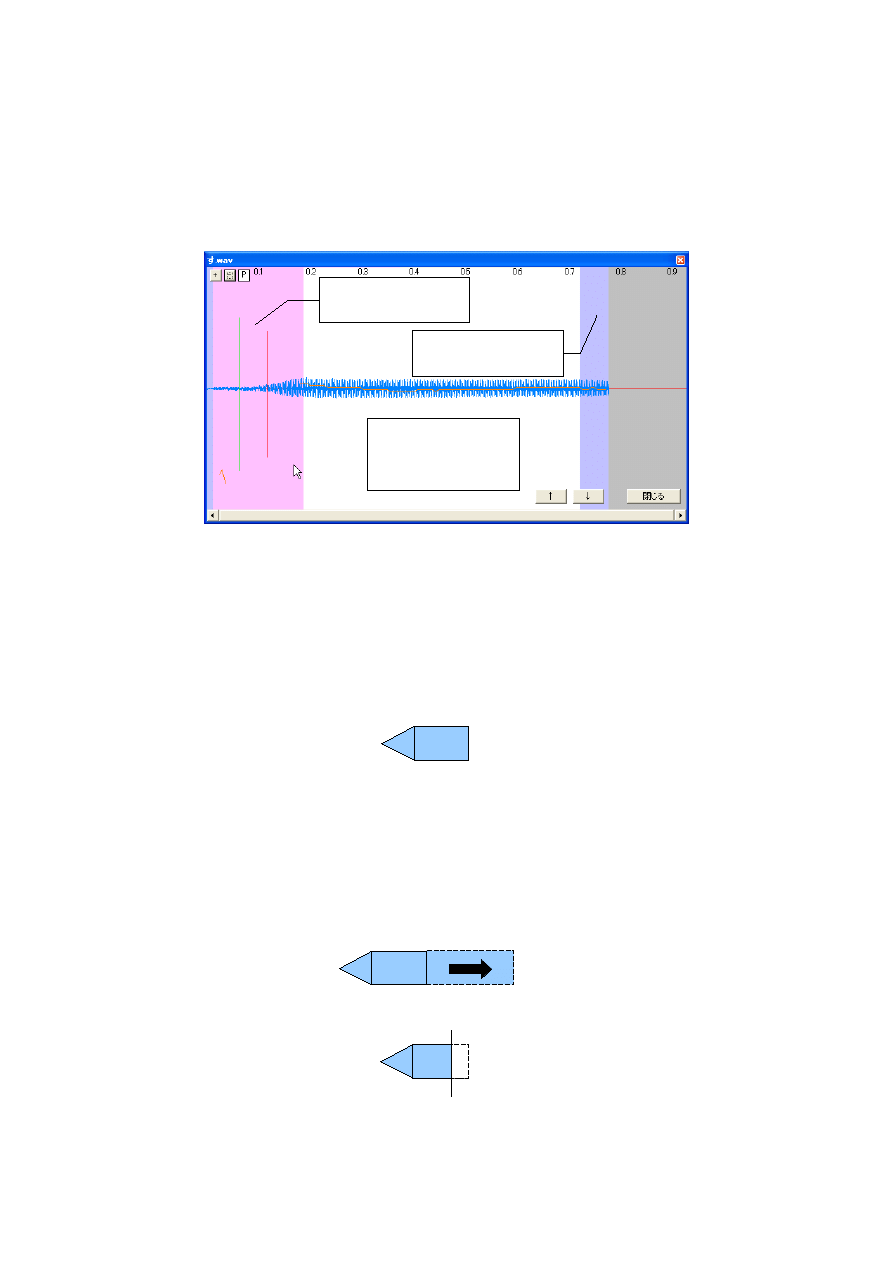
Consonant (aka Fixed part)
This parameter defines the length of the consonant of the phoneme in milliseconds.
The region from Offset to Consonant of the phoneme wave file won't be stretched in the note length
adjustment process of UTAU.
For vowel phonemes, set this parameter to the point where the voice (loudness, pitch, etc) is well
stabilized.
Cutoff (aka Right blank)
This parameter defines the length of the unused region in the end of the phoneme file in
milliseconds.
Fundamentally, it should be set to the point where the voice fading out starts.
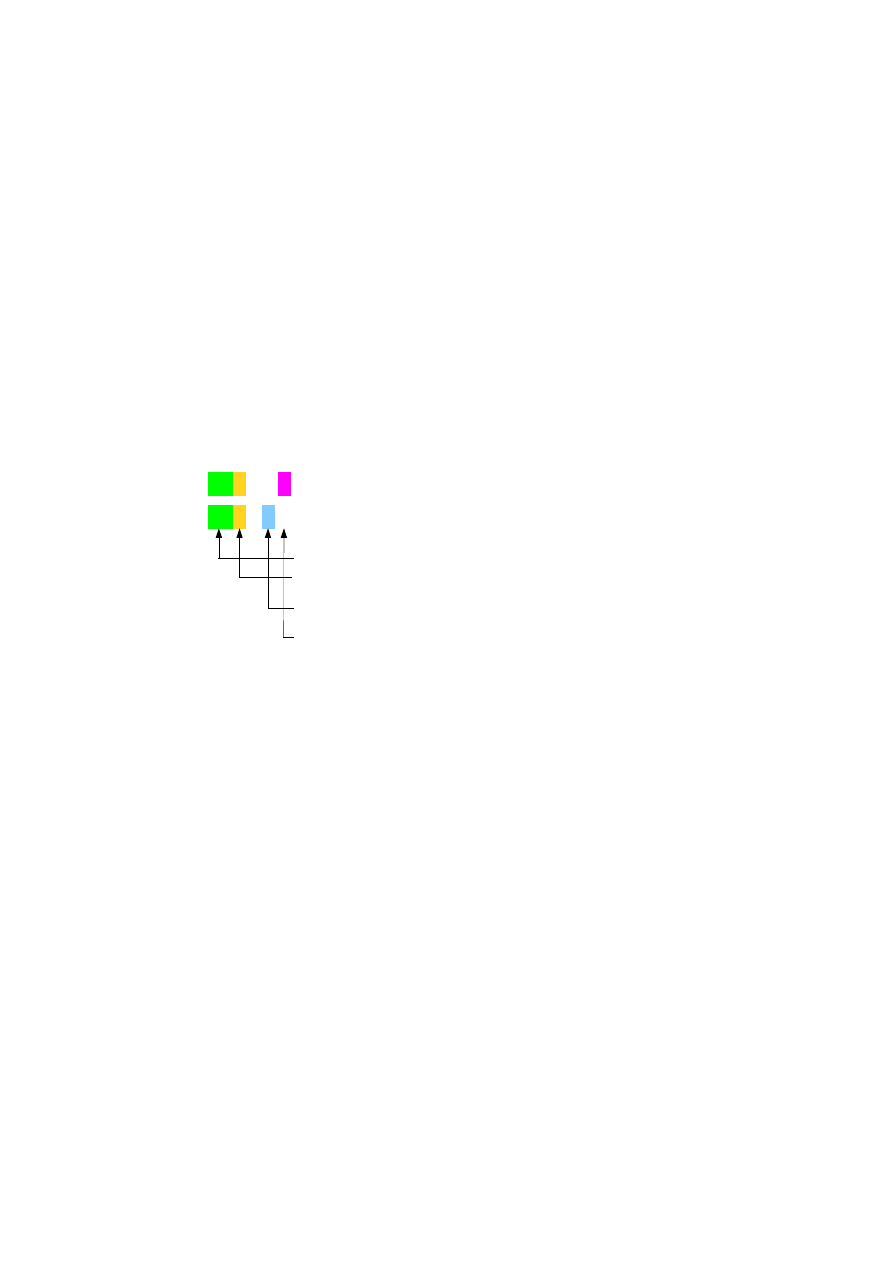
Utterance rendering of UTAU goes as follows. Phoneme "KA" is used as an example.
This is the rendering source. "K" is defined as Consonant. (Offset and Cutoff are already
removed.)
The region between Consonant and Cutoff ("A" region) is often called "variable part".
It is usually the vowel region as shown in this example.
If the note is longer in length than the source, the variable part is stretched to meet the request.
Consonant region is left untouched.
If the note is shorter on the other hand, the source is simply cut off from the end.
In the case of extremely short note, even Consonant region may be cut off.
This can be intentionally used as a technique to utter consonant alone.
This magenta zone is
a “Consonant”
This blue zone is a
“Cutoff”
This white zone is a
“variable part”
(Vowel)
A
K
A
K
A
K
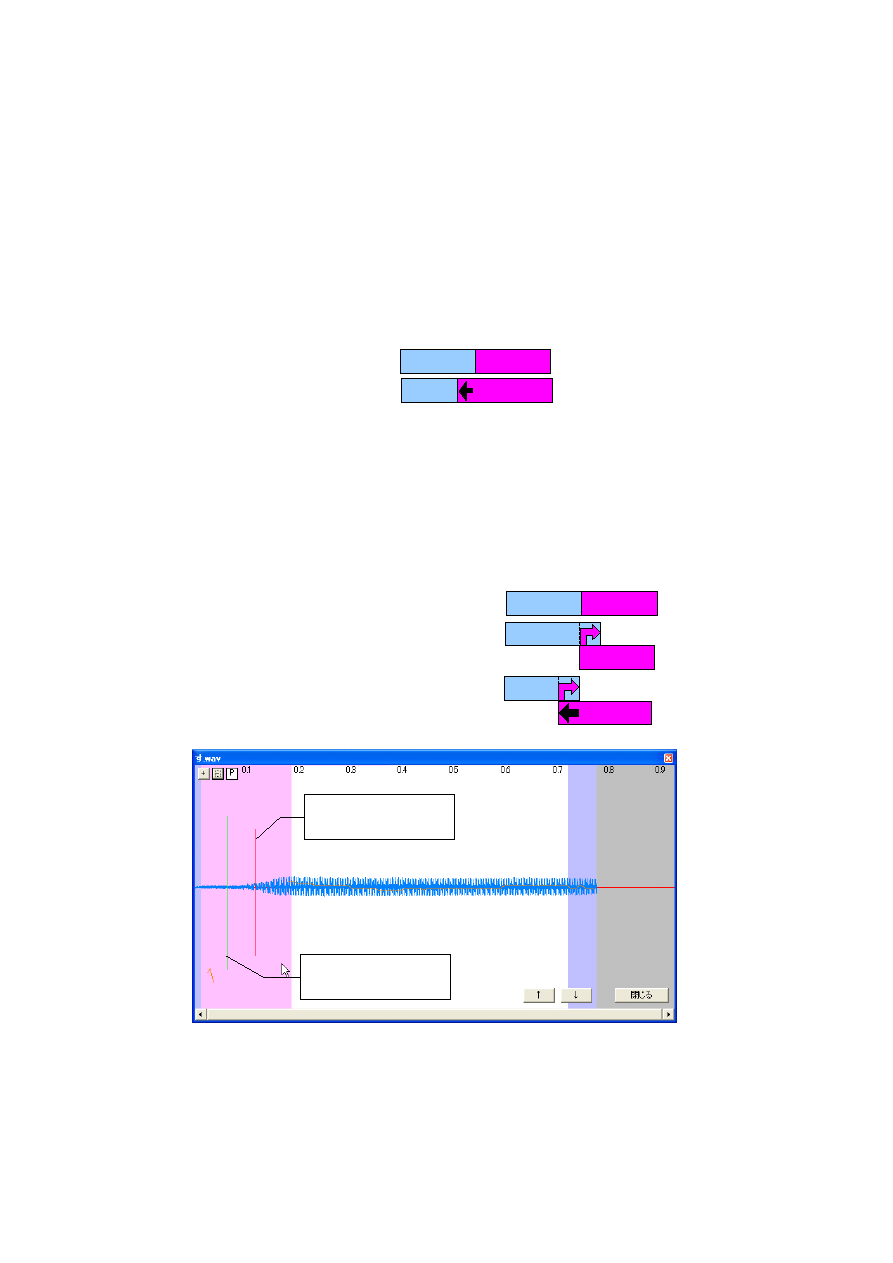
Pre-Utterance
If you use a voice bank without any Pre-Utterance configuration, you may notice some phonemes
are off the beat, uttering too late.
Some phonemes need to start its utterance earlier than the note-starting point to hear natural.
"Ka" (「か」 in Japanese) is one of these phonemes.
This parameter defines the starting timing of utterance *before* the note start in milliseconds.
Specifying 0 here makes the utterance starts at the same time as the note.
Note that setting positive value makes the previous note shorter. See the figure below.
On the Score editor
When you use Pre-Utterance to “To”
Overlap
As noted in the previous section, Pre-Utterance parameter shortens the length of preceding note.
This may sometimes result to another unnaturalness.
This parameter defines the length of utterance extention of the *preceding* note in milliseconds.
Specifying positive value here makes two phonemes to be uttered simultaneously in the overlapped
region.
On the Score editor
Overlap alone (“To”)
Both Pre-Utterance and Overlap (“To”)
Te
To
Te
To
Te
To
Te
To
Te
To
This green line is a
“Overlap”
This red line is a
“Pre-Utterance”
Creation of "oto.ini" with a built-in tool
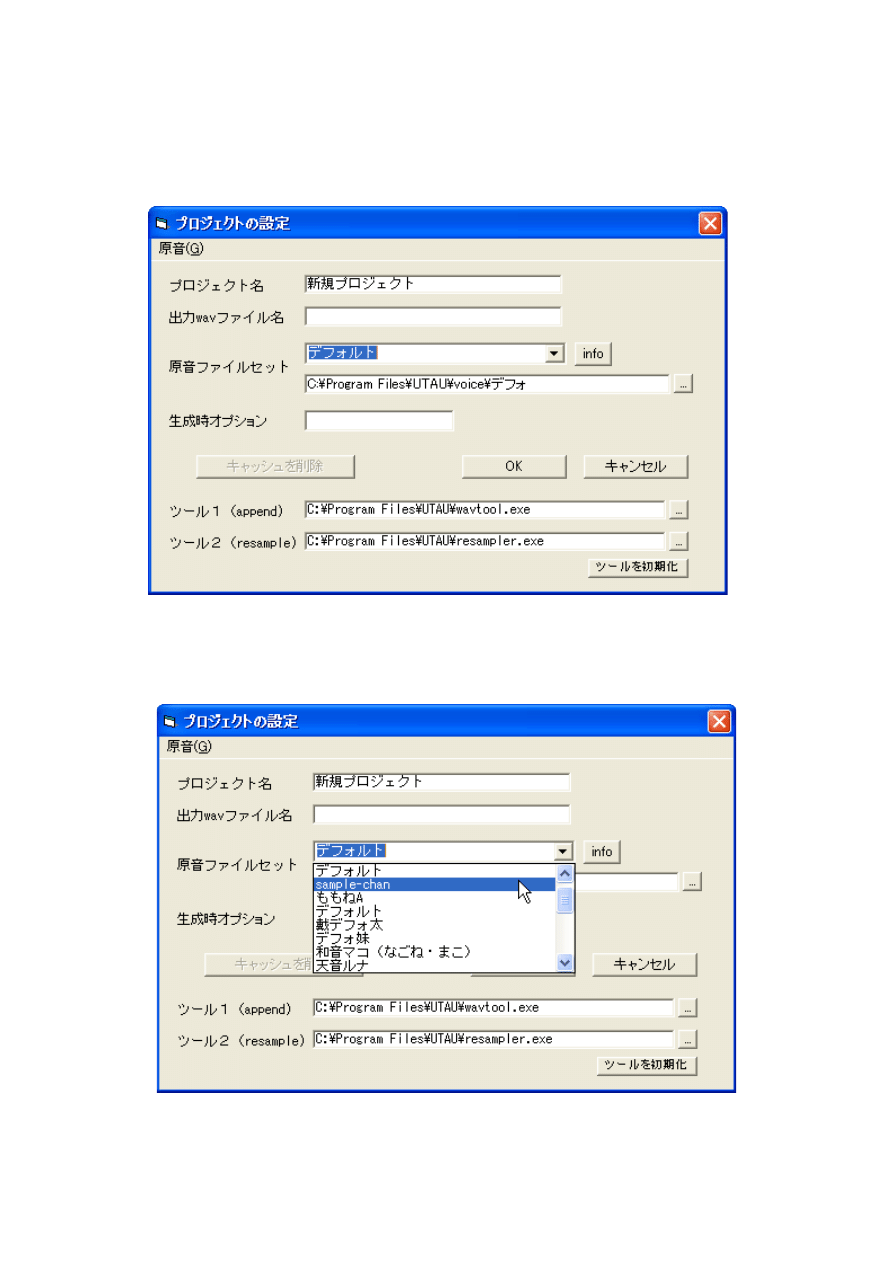
In starting creation, you have to make "UTAU" recognize your phoneme wave files.
Please open "プロジェクトの設定" (setting of project) dialog which appears in ALT+PR.
Next, with the pull down menu on the left of the [Info] button, please specify the holder name of
data and click the [O.K.] button.
Now, your work was ready. Let's begin creation of "oto.ini."
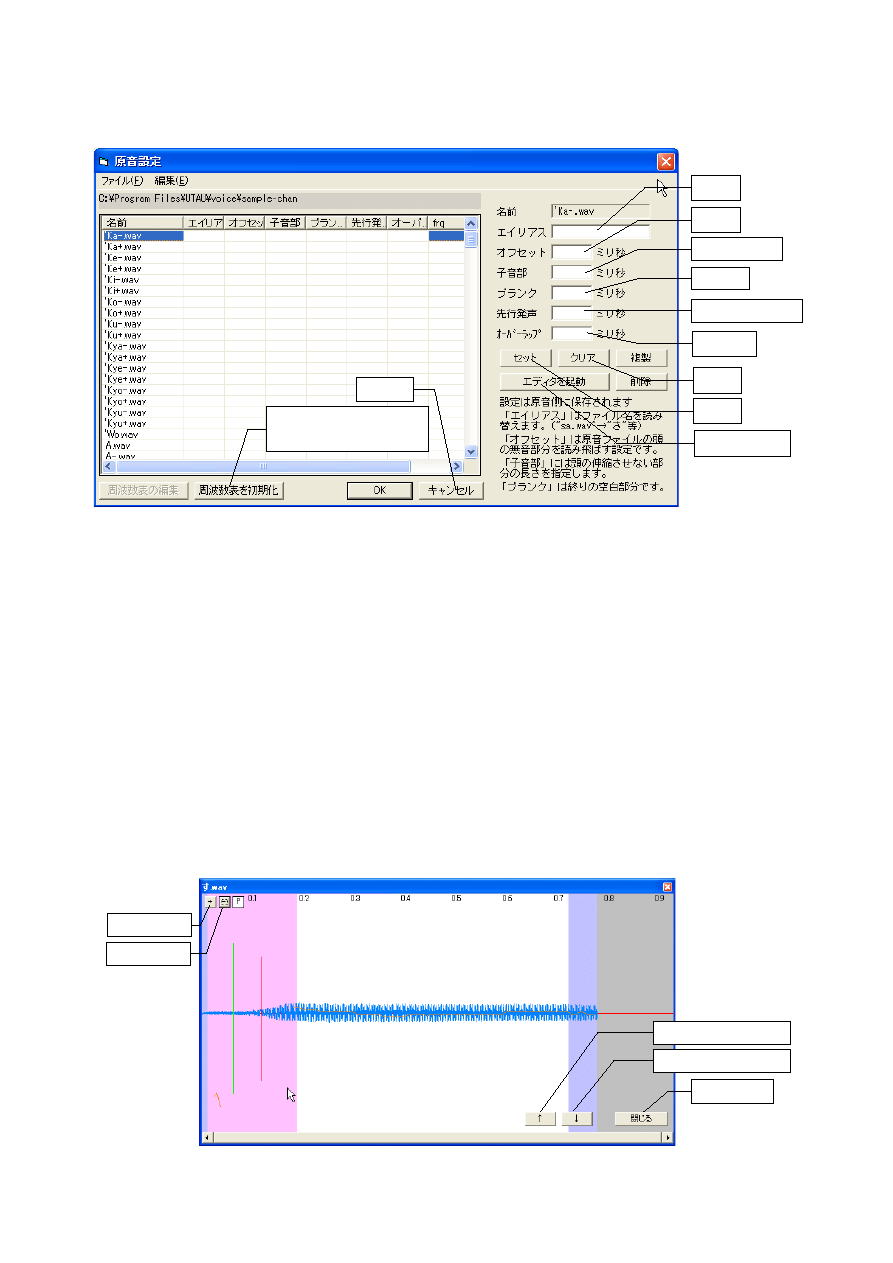
Please let an “原音設定”(Voice Configuration) dialog appear by pressing "ALT+T S".
You click the table on the left and can choose the phoneme file to set up.
Please set each parameter as the column on the right of a dialog, and press a [セット](set) button.
You repeat this by all the voice files.
In addition, a [クリア](Clear) button restores the parameter of the phoneme file chosen to
"Undefined".
A "oto.ini" file is created when you press the [OK] button.
By using this dialog, you can readjust "oto.ini" later.
In addition, once a parameter is set, it is also possible to adjust each parameter, looking at the
waveform of data under voice.
Please press a [エディタを起動](Open Editor) button. The dialog got it used to seeing in former
explanation appeared.
By dragging the boundary of a zone, a magenta line, or a green line, you can set a parameter.
Pre-Utterance
Alias
Offset
Consonant
Cutoff
Overlap
Set
Clear
Open Editor
Cancel
Initialize Frequency
Table
Magnify
Shrink
Previous phoneme
Next phoneme
Close
Note:
The parameters defined in "oto.ini" is used as the default throughout an UTAU project file.
The parameters can, and should be, adjusted again for each individual note depending on the
condition around the note.
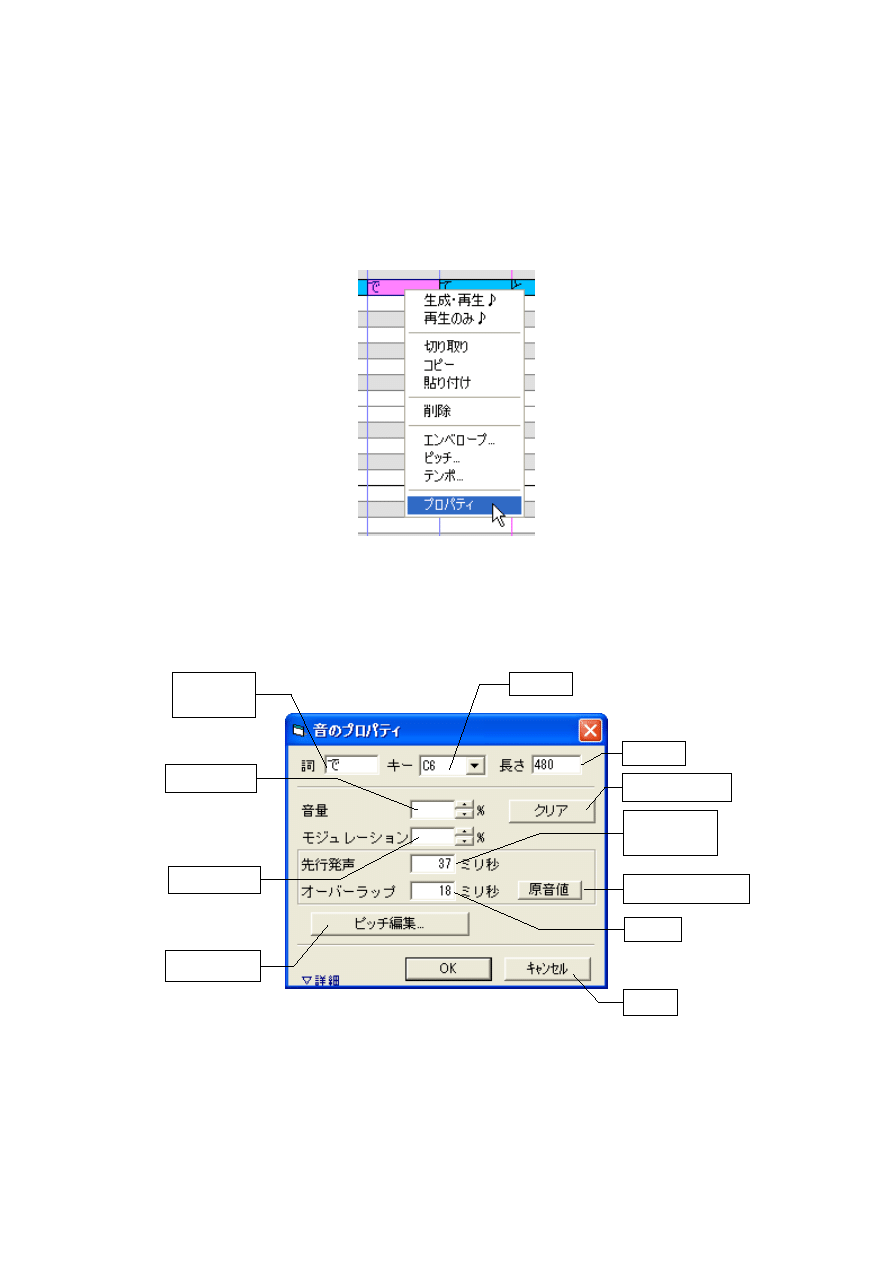
Note-specific parameter override can be done through 「音のプロパティ」 (Note Property) which can
be accessed by the menu or right-clicking the note.
The "Note Property" dialog has boxes for Pre-Utterance and Overlap.
Setting value here overrides the bank default values in "oto.ini".
When they are left blank, the bank default will be used.
Pre-
Utterance
Overlap
Bank Default
Cancel
Velocity Clear
Velocity
Modulation
Edit Pitch...
Length
Phoneme
Step
Note
Step3. Create Frequency Table Files.
Frequency table files "*_wav.frq" are used internally in combination with corresponding phoneme
wave files. They store frequency fluctuation data of the phoneme wave files.
UTAU uses these files to obtain accurate pitch output, regardless of inaccuracy and unstability of
humane voice.
If the required frequency file does not exist, UTAU generates one by itself. You do not usually have
to edit it manually. So in theory you do not have to take care of these files.
However, frequency file generation is a time consuming process, especially for lower spec PCs or
when processing large number of wave files.
Therefore, it is recommended to generate the frequency file in advance and bundle it with phoneme
wave files in public release.
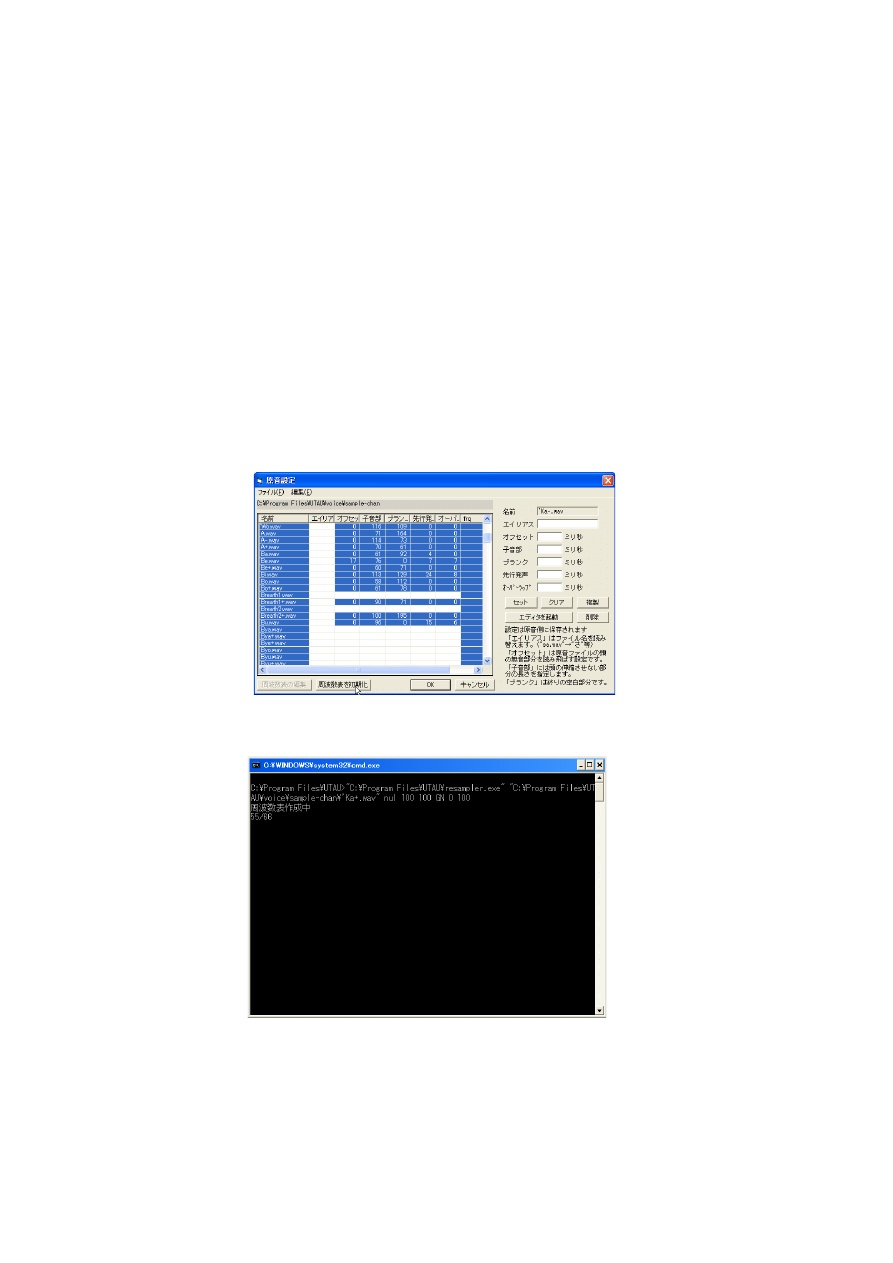
Please reopen “原音設定”(Voice Configuration) dialog again as you did previous step.
Then, pressing "ALT+E M" to activate Multiple selection. And pressing "ALT+E A" to select all
phoneme wave files like this.
Finally click “周波数表を初期化”(Initialize Frequency tables) button.
Now, your PC carries out a mission stoically. And you have only to wait for completion of
processing, tasting tea(coffee etc.) and/or a favorite snack.
On some occasions, such as very noisy wave file, voiceless phoneme, and voice with too much
pitch fluctuation, UTAU may fail to generate the frequency table file.
Check the wave file if it is clean enough on such a trouble.
Step4. Create “prefix.map” file.(optional)
In case your voice bank has wave files in several pitch, you can configure UTAU to switch among
those variations automatically according to the note pitch. "prefix.map" is the configuration file for
this switching.
It is an ordinary text file like "oto.ini" and you can use your favorite text editor. However, I
recommend performing creation of this file by the built-in tool of UTAU which I mention later.
Text editor which cannot indicate TAB code or CRLF newline code is not recommended because
they have special meaning in "prefix.map".
If this file is created, you should specify all the ranges of C1 to C#6 which UTAU supports.
The format of "prefix.map" is as follows.
Legend:
Tab.
Newline.
Suffix style
C#5
+
prefix style
C#5
+
Pitch
Step.
Prefix.
Suffix.
Pitch.
C, C#, D, D#, E, F, F#, G, G#, A, A#, or B
Octave.
Any of 1, 2, 3, 4, 5, and 6.
Prefix or Suffix
The step indicator prefix/suffix to use for a certain step of note.
When specifying "No prefix/suffix", leave it blank.
Cautions:
although it is also possible to describe both a prefix and a suffix to the same scale, I cannot
recommend it. I cannot expect what occurs.
Example(Suffix style)
C#6
+
:
C5
+
B4
:
C4
B3
-
:
C#1
-
C1
-
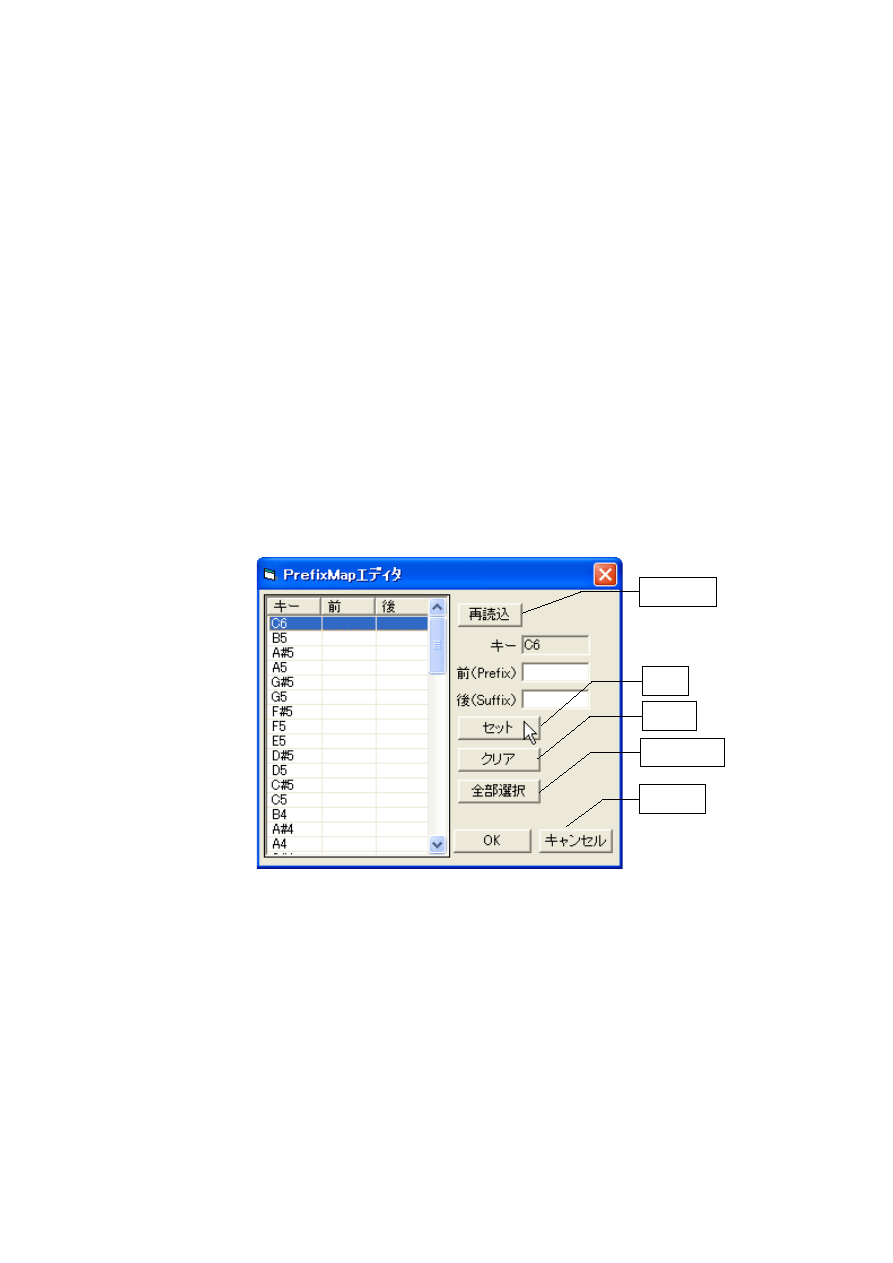
Creation of "prefix.ini" with a built-in tool
Please let an “PrefixMap エディタ”(Prefix Map Editor) dialog appear by pressing "ALT+T P".
You click the table on the left and can choose the note name to set up. You can choose multiple
note name by click with Shift or Control key.
Please set Prefix or Suffix parameter as the column on the right of a dialog, and press a [セット](set)
button.
You repeat this by all the voice files.
In addition, a [クリア](Clear) button restores the parameter of the Note name chosen to "Undefined".
A "oto.ini" file is created when you press the [OK] button.
By using this dialog, you can remake "prefix.map" later.
Reload
Set
Clear
Select All
Cancel
Note.
If you specify the full name of a variation like "KA+" instead of simple "KA" wheninputting into a
note, it explicitly overrides "prefix.map" and the setting is not used. In this case, UTAU will call
"KA+", even when there "KA" is designated for the pitch of the note.
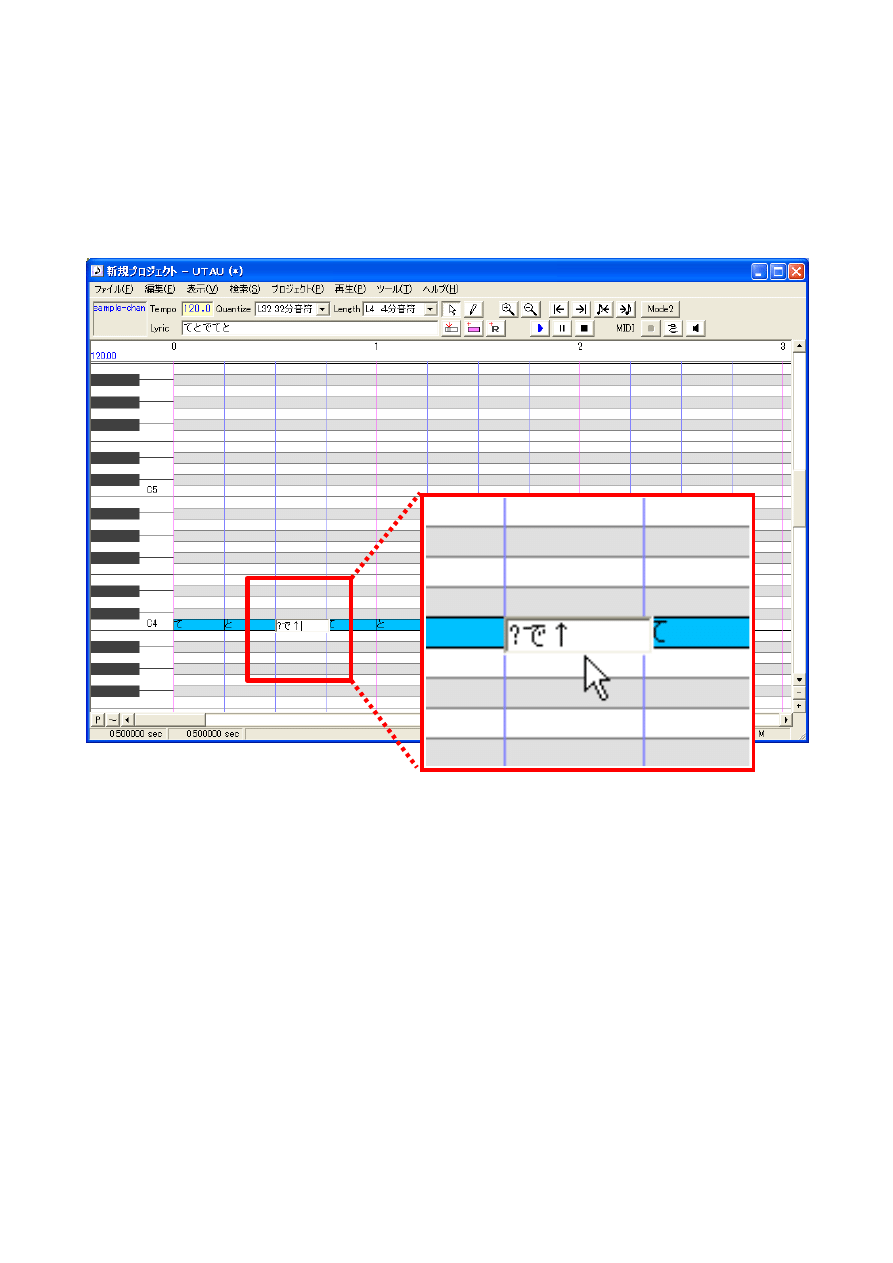
When you want to specify explicitly the phoneme without prefix/suffix, you can override the
“prefix.map" setting by adding "?" just before the phoneme name, as shown in the figure below.
Step5. Create "character.txt" and "readme.txt" (optional)
"character.txt"
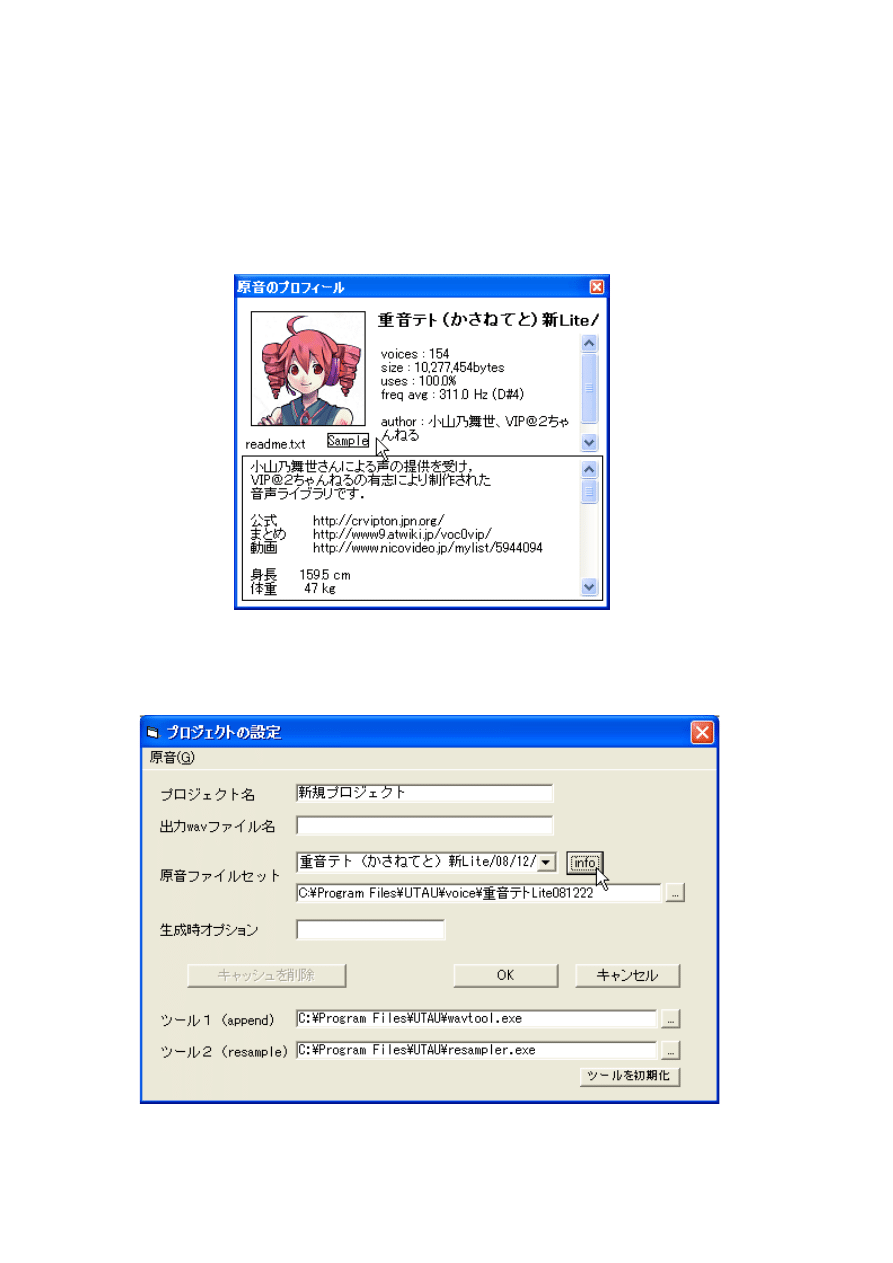
"character.txt" is a character profile file which may be useful to introduce your voice bank.
Properly written, its contents are displayed in the "原音のプロフィール" (Voice Bank Profile)
window.
This dialog is invoked by clicking "info" button "プロジェクトの設定" (setting of project) dialog
which appears in ALT+PR, or voice bank name shown in the top left corner of UTAU sequencer
window.

"character.txt" is an ordinary text file. It has simple "parameter=value" format, a parameter a line.
You can define arbitrary parameter in the file.
Three of them has some special effect. Other parameters are simply displayed in the profile
window, after voice bank technical characteristics.
name=~
The value of this parameter is displayed on top of the profile dialog, and also used as voice bank
name in the installed bank list.
author=~
Literally, "author" is your name. Although every parameter is omissible, this parameter should
describe.
image=~
The image file specified by this parameter is displayed in the profile window.
A 100x100 pixel bitmap (.bmp) or JPEG (.jpg) file can be used.
web=~
If you have a website, let's describe URL here.
sample=~
The phoneme wave file specified by this parameter is played on clicking "sample" button in the
profile window.
For a voice bank without this parameter, clicking the button plays a phoneme wave file in the bank
randomly.
Example.
name=Sample-chan
author=Jane Doe
image=Sample-chan.bmp
sample=SayHello.wav
web=http://fake_diva.example.jp/~Sample-chan/
Note: Data in this example are dummies. Don't take them seriously.

"Readme.txt."
The contents of this file is displayed in the bottom half of the voice bank profile window.
It is a custom to describe here the copyright notice, EULA (End User License Agrement), and
terms of use.
At the first access to a certain voice bank, UTAU automatically displays the profile window.
It may be bothersome work and not creative at all, but if you release your voice bank to public, it
is the only way to protect your rights legally.
Once released for free, it is impossible to fully control by whom and how your voice bank is
used.
At the same time, you must know that the EULA is the only way to allow people to use your
voice bank legally.
When a EULA is not given, your end-users can never use your voice bank without fearing:
he/she will think,
"The author of this voice bank (=you) may get angry when I release this song. Now I'll stop
using this."
If you like to allow anything with your bank, just write "I allow anything with this bank."
If not, write what you will allow and what you will not.
That's the one and only way to get your bank used by end-users in public.
Postscript.
Congratulations!!
Now your voice bank is accomplished finally.
You may use your voice bank for private use, or for a public release.
I am happy if this document was of some help to you.
A meddlesome Japanese.
Kirk.
Document Outline
- Preface.
- Acknowledgments
- Before You Start
- Step1. Create Phoneme Wave Files.
- Step2. Create “oto.ini” file.
- Step3. Create Frequency Table Files.
- Step4. Create “prefix.map” file.(optional)
- Step5. Create "character.txt" and "readme.txt" (optional)
- Postscript.
Wyszukiwarka
Podobne podstrony:
How to Create Your Future
How to make your own power Bleeder
How to Make Your Own Perfume
Bazooka How To Build Your Own
How to Publish Your Own Book Secrets from the Inside
How to Build your own Solar Cooker
How To Make Your Own Tubular Lockpick
How To Be Your Own Private Detective (Stein)
Bazooka How To Build Your Own
How to Create Your Future
How and When to Be Your Own Doctor
(Gardening) Wildflower Meadows How To Create One In Your Garden 1
How and When to Be Your Own Doctor
więcej podobnych podstron