2
being green
How to get the
best from your
green vehicles
by Jean-Baptiste Verlhac
It’s not easy
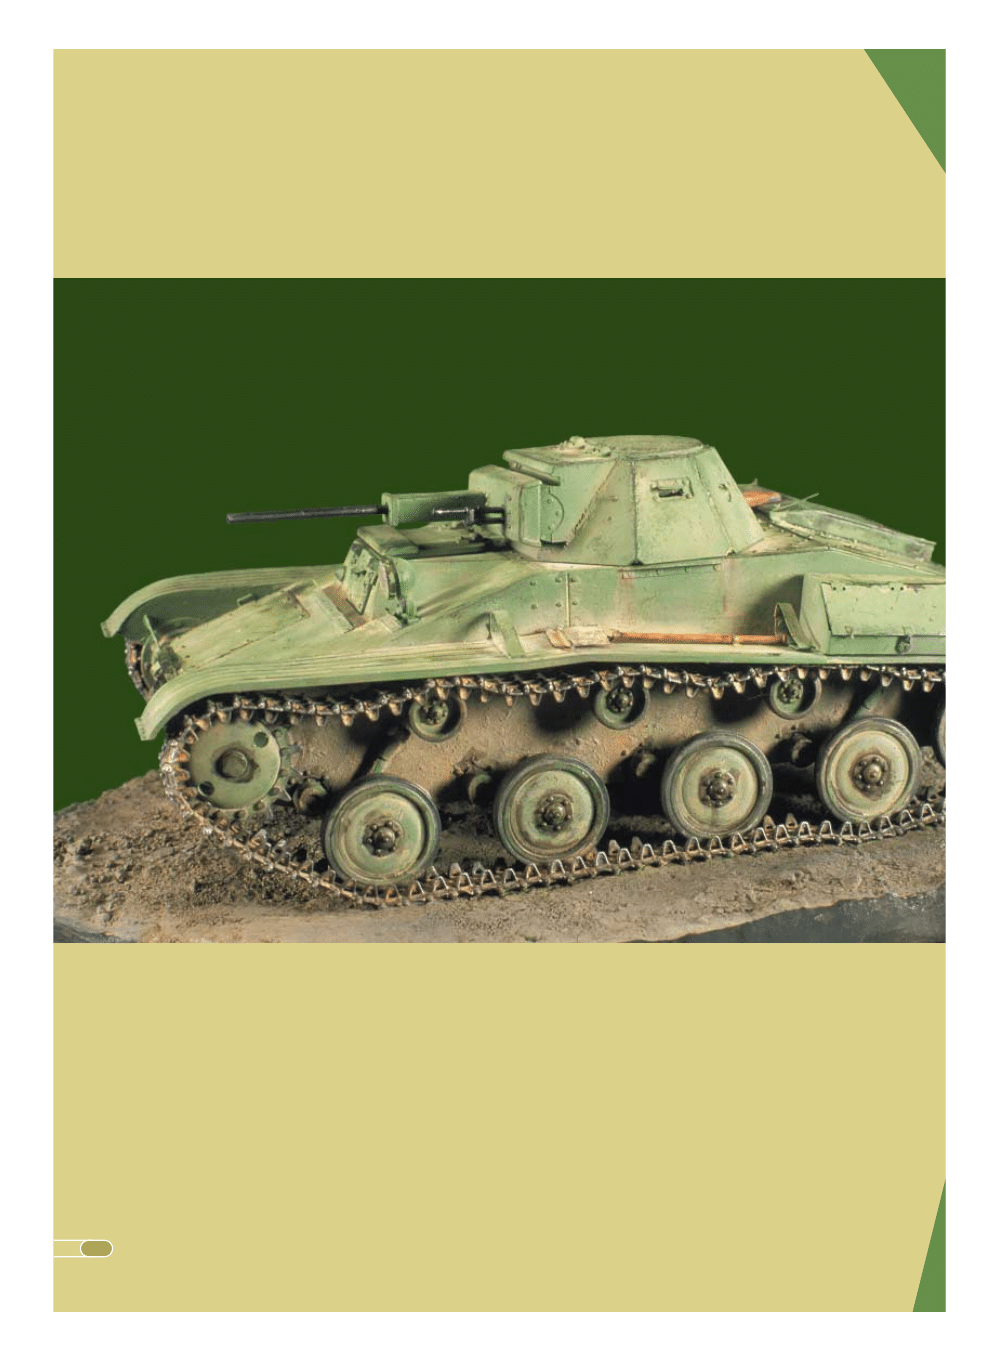
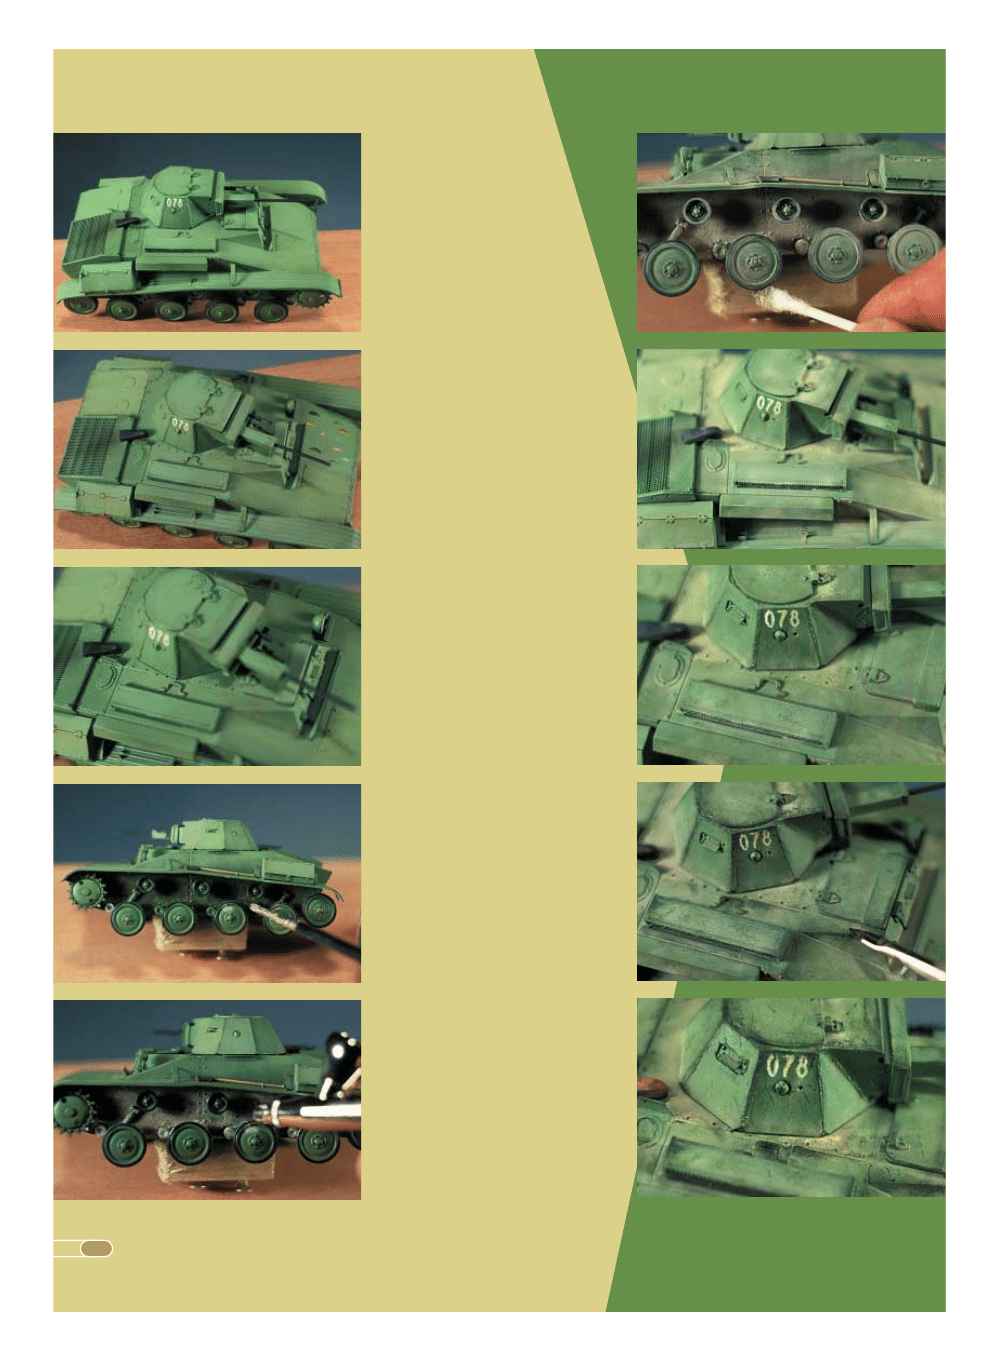
The T-60 is the successor of the T-40 amphibious tank,
and is the result of the requirement for a better armed
cheap and easily produced vehicle. Thus it shares a lot
of common features with its predecessor such as the
running gear and the tracks. It carried a crew of two
and the weakness of its armour (15 mm then 25 mm
on the sides, 20 mm upgraded to 35 mm on the front)
was responsible for its nickname “A two man coffin”.
The main gun was a 20 mm cannon (developed from
the aeroplane ShAK-20 gun) and it was used together
with a DT 7.62mm machinegun. The production of
about 4164 vehicles has stand until February 1943, and
then it was replaced by the better-armed T-70.
3
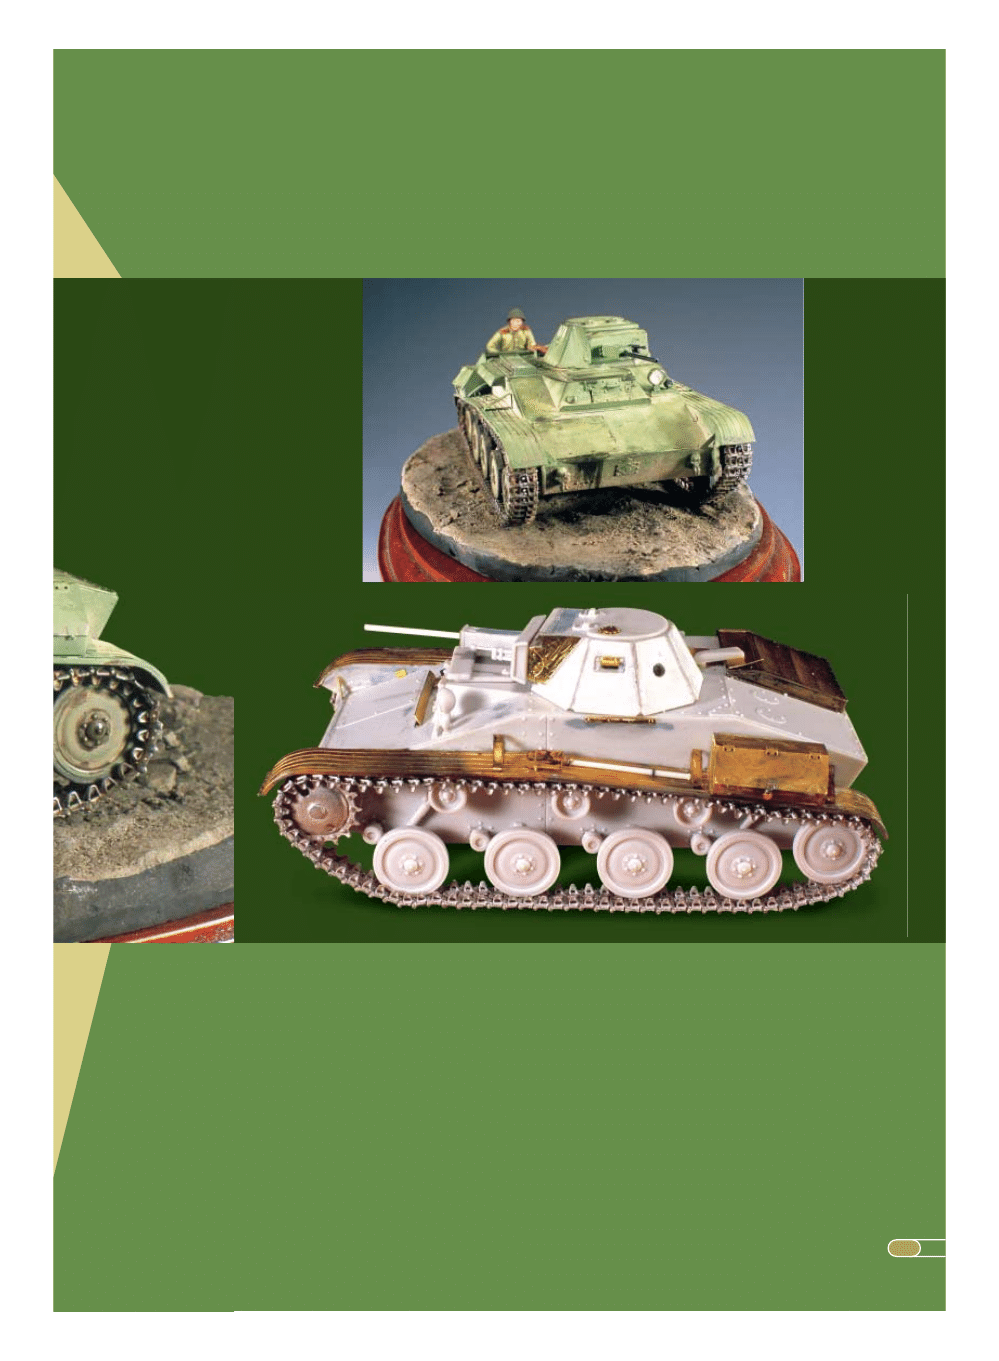
I found the RPM kit in a hobby shop during a trip to Paris and I must say that
I was attracted by the curious shape of this tank, more reminiscent of a
sports car than an AFV. Moreover, and this aspect forced my decision,
included in the kit was a splendid photoetched plate, making it something of
a bargain. However when I examined more carefully what was inside I had a
lot of doubts about the tracks. They are very poor but I was hopeful that the
TECHMOD T-70 tracks (a very cheap solution) or the more expensive
Fruilmodelismo Tracks could easily replace them. I have chosen the latter
option because the detail is indeed far superior in the Friulmodelismo tracks
and moreover the fact that they are workable will save me some of my
precious modelling time ... When I started to build this tank the only
references I had were the excellent, but small, photos from the website
4
Russian Battlefield as well as the step by
step construction article written by Lance
Whitford in his Kiwi tracks site. Thus I have
kept the details to the minimum and of
course, true to the Murphy’s law, I
managed to get Ground Power issue n°88
that was full of excellent (and big) T-60
photos when the construction was finished!
Anyway I have used this small tank in
order to test a rapid method for painting
these Russian green vehicle but the
method could easily be applied to any US
or British armour. First of all it seems that
there is no one Russian green but many
different tones and after having seen the
superb profiles on Russian Battlefield I
have decided to paint it in a clear tone,
thinking it will be more attractive. I will try
to describe how I have reproduce the
effects mainly due to accumulation of dust
and dirt from grease oil, etc.... I have
experimented the method with a T34-85
and a BT7 that are also shown in this
article.
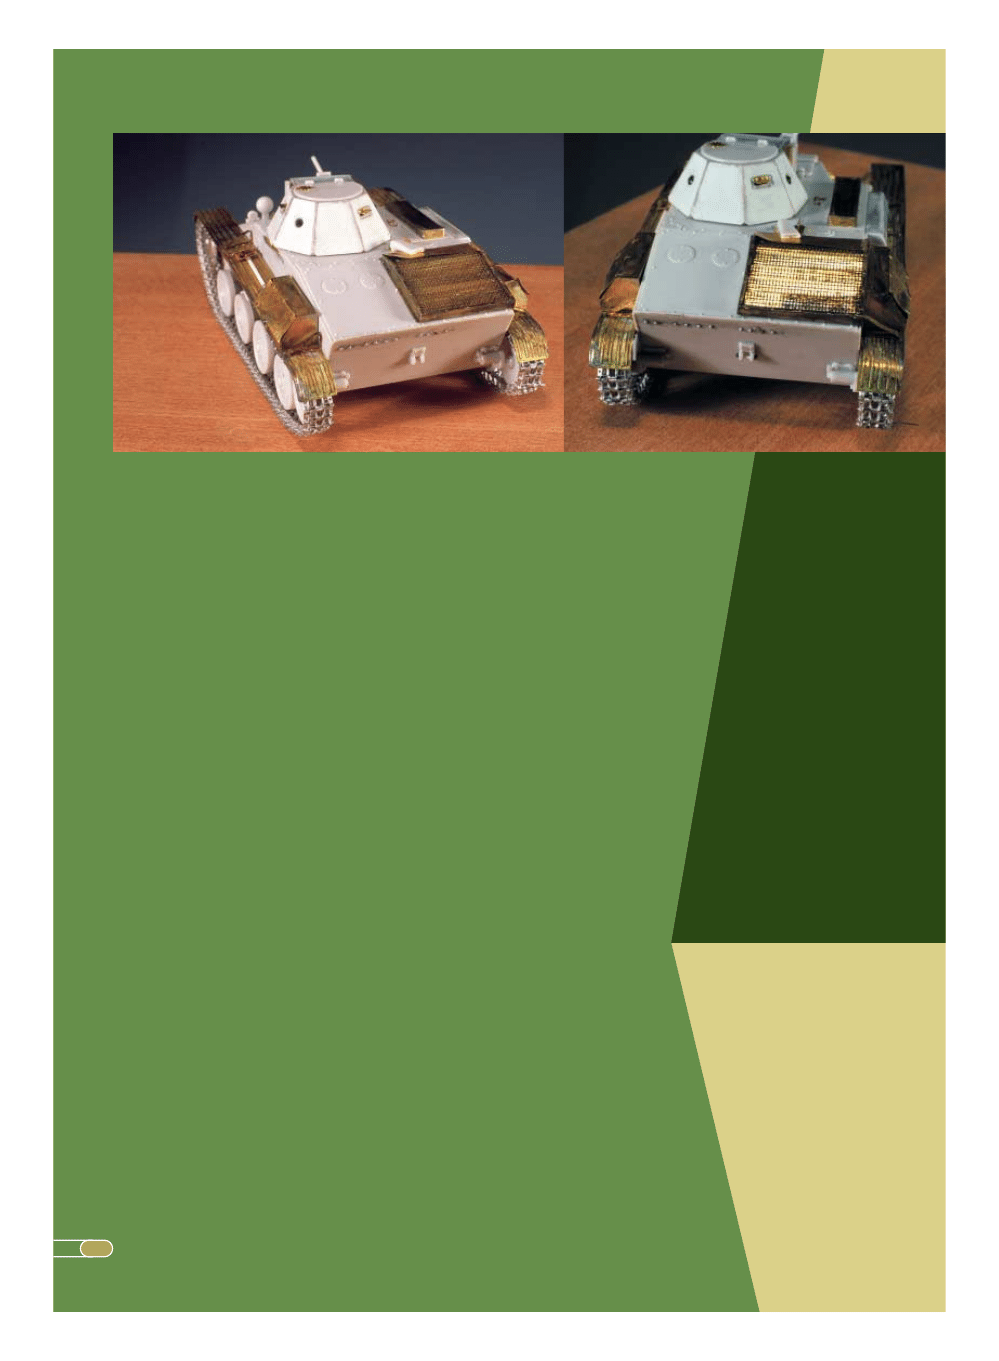
Building
The arrangement of the different pieces is
typical of Eastern European kits, with the
hull in many parts making for a tedious fit.
But it has to be admitted that the moulding
is good apart from minor moulding
problems on the thicker pieces that
required the use of putty. I preferred to use
the solid wheels rather than the spoked
ones because the reproduction of the
suspension arms is not outstanding. The
photoetched fret is very useful especially
for the engine radiator (the frame, the
louvers and the grille are provided) and the
engine air intake grills are also very nicely
represented. The improvements offered by
the brass parts are less evident for the
turret armour plates and I preferred to use
them as a template for making copies in
styrene as it is easier to represent the
welded joints this way. The gun shield is
best replaced, as the representation of the
overhanging front part of the turret doesn’t
look like the most common version fitted to
this tank, and the junction between the
gun shield and the cannon support is
lacking relief. As I was not planning to
produce the ultimate model of this tank I
only made small improvements such as
welding lines and some rivets or bolts on
various areas. The etched fenders are
really superb and they are very valuable
replacement parts that add realism to a
model, far more than missing rivets in the
right place. The sort of detail that
replicates scale thickness is very important
in my opinion. The fenders have been
glued to an angular support on the model
sides in order to increase the contact
surface and ensure better rigidity. These
supports (angular Evergreen profiles) will
be masked by the tracks when the model
is completed. The 20-mm gun was
replaced by a round Evergreen profile and
the tip is drilled out.
The Fruil tracks and the sprocket wheels
fitted the model without any problems and
the kit road wheels are glued before
painting in order to ensure perfect
alignment.
5
6
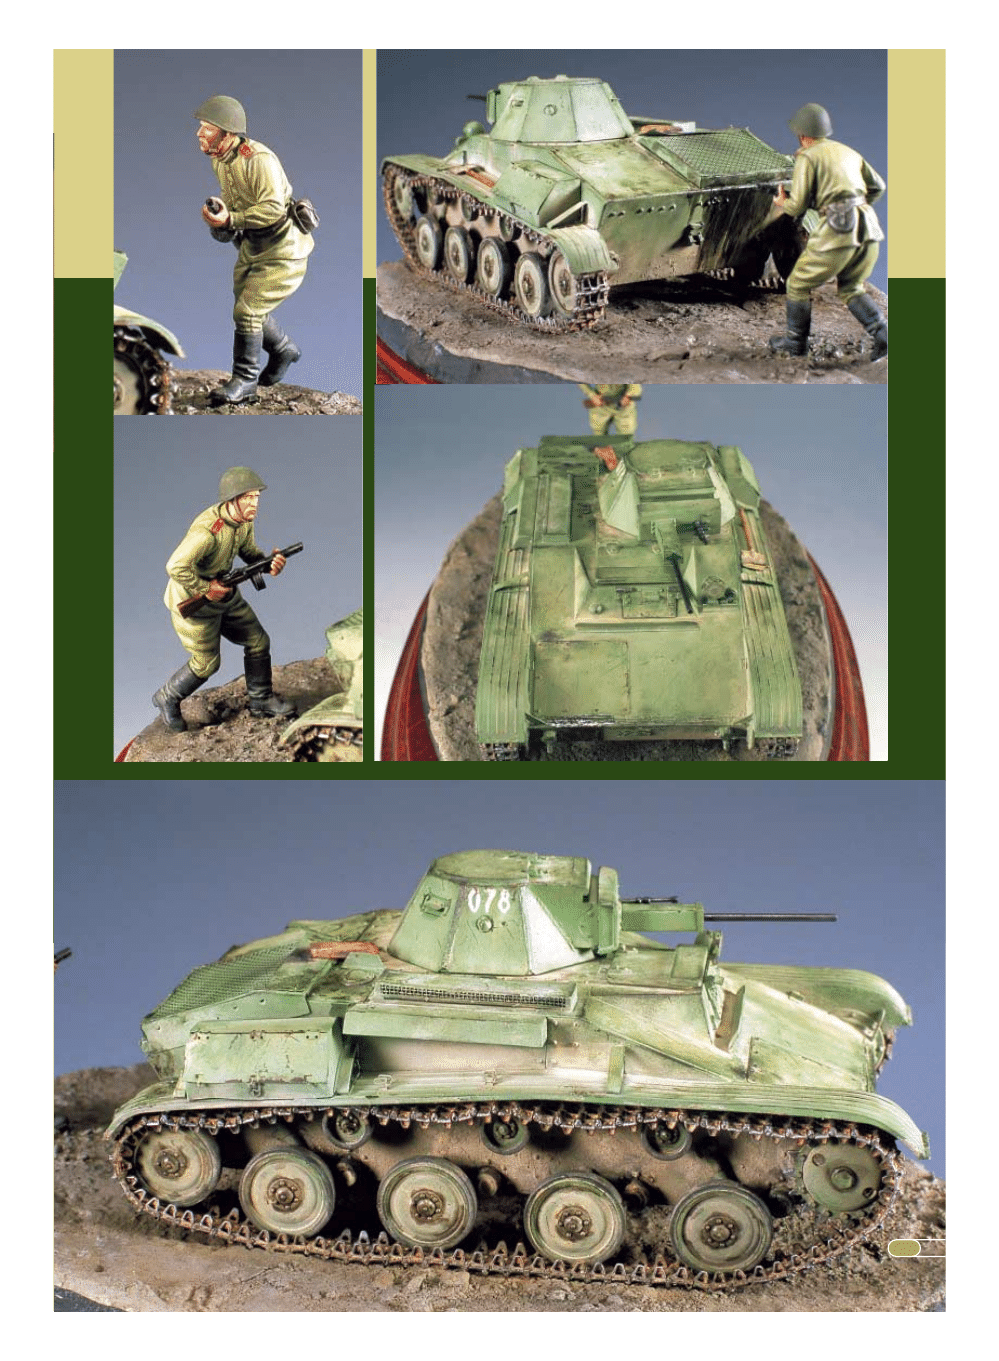
Painting
The general concept behind the painting
process is that the main weathering effect
on these tanks is due to the accumulation
of dust and mud along with the ageing of
this finish by crew movements as well as
the infantry often seen on these T-60
during WWII. Further dirt came from oil
leaks and grease used by the crew. In this
painting process, I have tried to rationalise
the procedure in order to minimise the
different painting steps.
The painting process could be performed
during two week-ends because I have
used Humbrol paints but this painting time
can be reduced to only one if acrylic-base
paints are used.
The entire model was airbrushed using a
mixture of Humbrol 120 and 150 green.
The proportion of the mix between these
two colours is slightly modified before
airbrushing each panel , and they are
masked using paper sheets. Some of the
horizontal panels are coated with a lighter
shade of this mixture, obtained by adding
Humbrol 175 or 187. Then the tools (only a
shovel in this case) and the rubber parts
are hand painted using Humbrol paints.
Once the paint as completely dried, filters,
consisting of a mixture of Humbrol 62 and
133 highly diluted with mineral spirit, are
applied over the whole surface. Some local
filters are then made on panels and
hatches with blue or yellow oil colours. This
gave more life and relief to the paint and
prepares the surface for the following
treatment with artist oils. In order to break
the uniformity of the tint on each panel,
some small portions of oil paint (fast drying
Windsor and Newton alkyds) of different
colour are laid on the surface and then
spread over the surface with the aid of
thinner and a paintbrush. It’s important to
keep a sort of vertical arrangement in the
colour variations. This step could be
omitted when the coat of dust is
particularly important. The benefit of the
quicker drying time of the oils is that our
attention can now focus on the running
gear. The textured surface is created with a
mixture of plaster, white glue and natural
pastel pigments (earth based such as
mixture of Sienna or Cassel) applied with a

7
brush on the lower chassis. Once dry the
dust is airbrushed, the mixture used is
Tamiya Buff and Desert Yellow and it is
applied especially on the recessed areas
and horizontal surfaces. A drop of black is
added to this mixture before airbrushing
the running gear. Particular attention is
paid to the roadwheels as they frequently
appear to be covered by dust in “in action”
photos. Any excess can be removed with a
piece of cotton and some alcohol.
Now all the elements are in place and it’s
time to start the weathering process. The
first step is to apply the base coat Humbrol
mixture with a paintbrush taking care to
draw irregular patterns and to focus on
areas that are submitted to intense crew
traffic. It’s important to have a good
dilution ratio as it’s possible to tune the
intensity of these spots just by varying the
amounts of thinner. Part of this job could
also be done using a dry-brush technique,
and It is important to use both methods in
order to have hard and soft edge green
8
spots. This kind of technique with more
emphasis on drybrushing is continued
using a darker green (Humbrol 86 for
instance) and narrowing the affected
surfaces to the more weathered areas.
Then add a drop of black to this green and
narrow down the area again. In order to
finish, the raised areas are dry-brushed
with a mixture of Humbrol 33 and 133. This
is exactly the reverse process from a
classical wash and dry-brush process with
the lighter tones are in the recessed areas
and the darker on the upper ones. This
effect is currently occurring on real
vehicles and especially those green
painted Russian of US tanks.
Now the acrylic paint job, and with this it’s
not necessary to wait for complete drying
of the previous paint coat. In order to
represent small paint chips, whether
superficial or deep, the best paints for the
brush are the Vallejo acrylics. As they are
water based paints the water used as
thinner is less volatile than enamel based
paints and they possesses a higher
superficial tension so the paint does not
spread over the whole surface as thinned
Humbrol paint does for instance. Some
acrylic washes are added on the lower hull
in order to introduce some colour
variations on this area. Then the tracks are
glued in place and pastel powder diluted
with lighter fuel is brushed in the track
crevices. The tones are light and rusty
tones for the first ones and the last ones
are of the same colour as the ground work.
In order to keep the superb sculpting of the
Friul tracks, I have been restrained with the
mud this time. These pastel mixtures are
9
also applied to the exhausts pipe and to
the metallic part of the shovel.
A very light coat of matt varnish is
airbrushed on the entire model and the
more polished areas (the darker ones) are
rubbed with a piece of cotton in order to
give a satin finish. Some graphite powder is
also rubbed on these prominent areas as
well as the cannon and machinegun. Some
grease and oil stains are reproduced with a
mixture of black oil colour, thinner and clear
varnish; these stains are often seen on the
back area as on the wheel hubs.
Scene
This was very simple and the figure was
added only to give the dimensions of this
vehicle. Moreover, I have chosen this
Hornet figure because the posing is typical
of infantry running under the tank cover.
The green of the uniform must relate to the
green tone of the tank, and care must be
taken with harmony. The figure has been
painted using Vallejo acrylics. The terrain is
made of plaster and some relief is given
with roughly powdered cat litter. It has been
painted with Tamiya and Vallejo acrylics,
the final tones done with pastels.
References
Web site « Kiwi tracks »
:/www.kithobbyist.com/AMPSNewZealand
Web site « Russian Battlefield », a must see
for on-line references and information on
WWII Russian tanks www.battlefield.ru/
Ground Power N°88 Delta Publishing
Wyszukiwarka
Podobne podstrony:
w geta26 Shine Using Brain Science to Get the Best from Your People
How to Get the Most Out of Your Coaching
How to get the new iPod Touch(8GB) for nothing (easy to complete)
How to Get the Most Out of Conversation Escalation
Ross Jeffries How to Get the Women you?sire into?d
010601 [English Dating Seduction] Ross Jeffries How to get the women you desire into bed
Brown Derren How to Get the Truth out of Anyone
Maureen Willmann How to Keep the Love of Your Life (After Mistaking Him for a Serial Killer)
How to assess the effectiveness of your anti virus
How to Get the Ultimate 6 Pack
Getting Fired How to Avoid Getting Fired from Your Job
(eBook) Sex How To Get The Women You Desire Into Bed
How To Get Massive Traffic With Your Own 3 Day Firesale
how to get money back from online casino download pdf tutorial free
How to Care for a Cancer Real Life Guidance on How to Get Along and be Friends with the Fourth Sign
Sisson Google Secrets How to Get a Top 10 Ranking On the Most Important Search Engine in the World
(ebook) How to get your wife to act like a porn star
więcej podobnych podstron