
HOW TO:
INSTALL A HOT WATER TANK
INTRODUCTION
If you are constantly running out of hot water, a new hot-water cylinder can
give you a faster heat-up time and increased capacity.
A direct cylinder with an immersion heater has just two connections so it
should be very easy to fit.
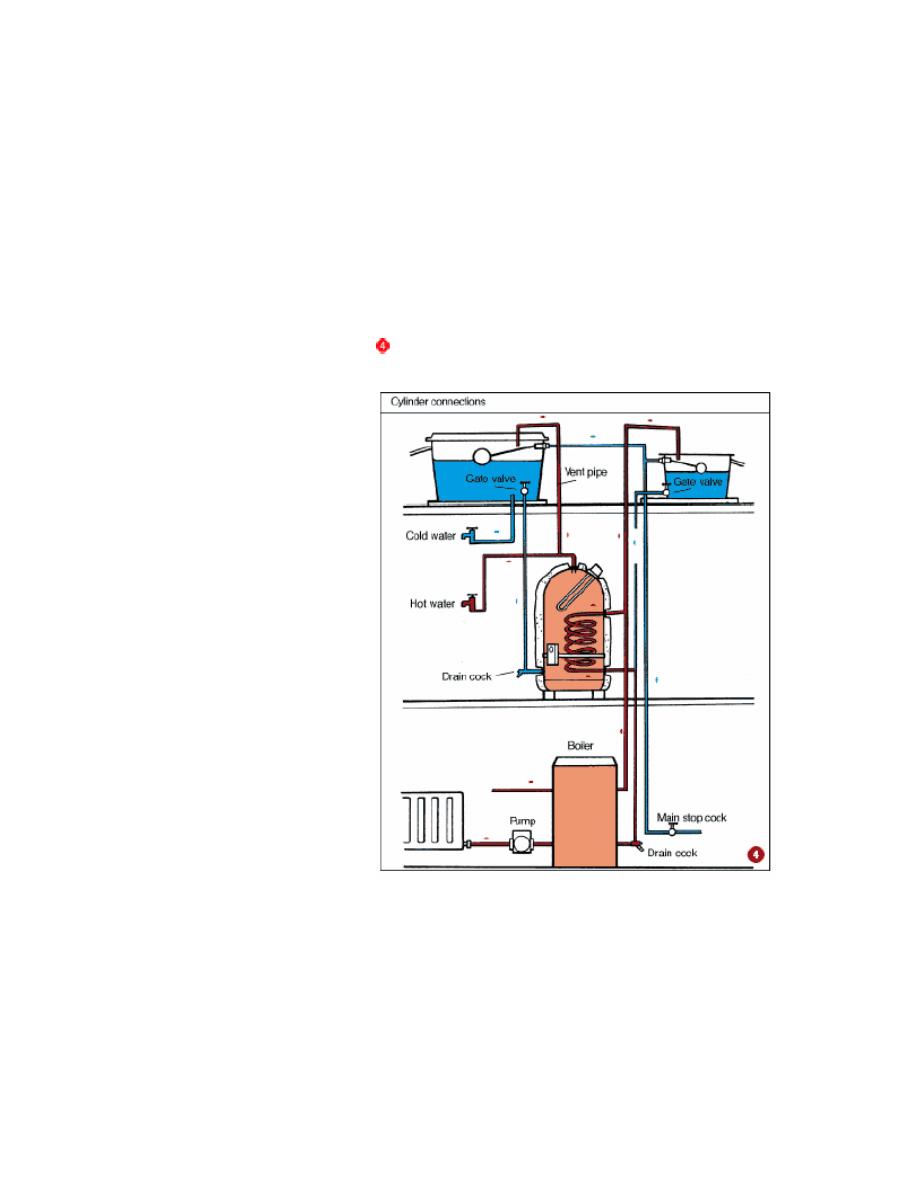
An indirect cylinder,
which has a coil inside for transferring heat from the
boiler, is a bit more involved because you need to drain down the boiler and
heating circuit.
If you have an older-style gravity primary hot-water circuit, you might also
want to change over to a more efficient pumped system.
SKILL LEVEL
Plumbing skills are required and electrical knowledge would be useful.
SAFETY FIRST
Turn off the hot water a few hours before you begin draining down. This will
prevent you being scalded if a hose slips off. Isolate electrics before
disconnecting the immersion heater. Get help carrying the cylinder, especially
on stairs.
TO COMPLETE THIS PROJECT
YOU WILL NEED...
• Adjustable
• Plumber’s Wrenches
• Blow Lamp
• Compression Fitting (28mm or 22mm)
• Copper Angled Connector
• Copper Tube (22m or 28mm)
• Cylinder
• Cylinder Unions
• Immersion Heater/Blanking • Plate
• Immersion-Heater Spanner
• Male Iron Thread (1in)
• Pipe Cutters
1 - CHOOSING A CYLINDER
New hot-water cylinders have factory-fitted foam insulation which helps
keep the water hotter for longer. A quick-recovery cylinder can also increase
the efficiency of your boiler by transferring heat faster. In a family home with
heavy demands on the hot water, it is worth fitting a larger cylinder. This can
usually be achieved with minimal changes to the pipework.
A hot-water cylinder can be heated by a boiler or with an electric immersion
heater. It is even possible to run them both at once if you want a really
quick heat-up time but most people keep the electric immersion heater for a
backup in case the boiler breaks down or for heating water in summer.
There are also Economy 7 cylinders for use with off peak electricity. These
have two immersion heaters; one in the top and one in the bottom. The top
heater is wired up to standard rate electricity to give you a daytime top up.
The lower heater is wired to the white meter supply for night-time heating of
the whole cylinder.
2 - PREVENTING FREEZING OF VENT PIPES
A very serious explosion can occur if the feed and vent pipes freeze in the
loft while the cylinder is heating up. It is essential to insulate the pipes very
well and make sure they are within the heated area of the house for as
much of their route as possible.
3 - DRAINING
To remove an existing cylinder you need to drain it down. Even when the
water is turned off and no hot water is coming from the taps there is still a
full cylinder of hot water which needs to be emptied from the bottom.
Turn off the cold supply to the hot-water cylinder and any heating appliance,
including the immersion heater. Turn off the heating and hot-water system
by switching off the boiler control's electricity supply. You should find a valve
on the supply pipe from the cold-water storage tank(s) to turn off. Check the
hot taps aren't running. If they are letting any water through, you will have to
turn off the mains water supply to the tank and then drain the cold-water
tank. This will cut off the water supply to the cylinder.
The water supply may be off for some time, so ensure there is plenty of
water available for drinking and cleaning by filling kettles and saucepans.
Push a hose pipe on the drain spigot, usually found where the cold supply
enters the bottom of the cylinder. Secure the hose with a clip or wire, run
the hose pipe to a lower point outside and open the small square nut on the
drain cock. You should hear water begin to run. You might have a few
dribbles of water around the nut but if the water runs quickly through the
hose it will suck in air rather than leak.
If the drain off point won't work, it is probably because the washer has
baked on or the outlet is full of limescale. The alternative way to drain the
cylinder is through the top connection. You'll need to undo the nut at the top
and lift out the pipe. A small amount of water might come out so have a
towel ready to mop it up. Poke the hose down through the hole in the top of
the cylinder and siphon the water out to a lower point by partially filling the
hose from a garden tap and then letting the water go at once.
Once the cylinder is completely empty, drain the water from the boiler or a
low point on the radiator circuit. Open any motorised valves by sliding the
manual lever against the spring to the open position.
When the heating and primary hot-water circuits have been drained you can
undo all the connections on the cylinder.
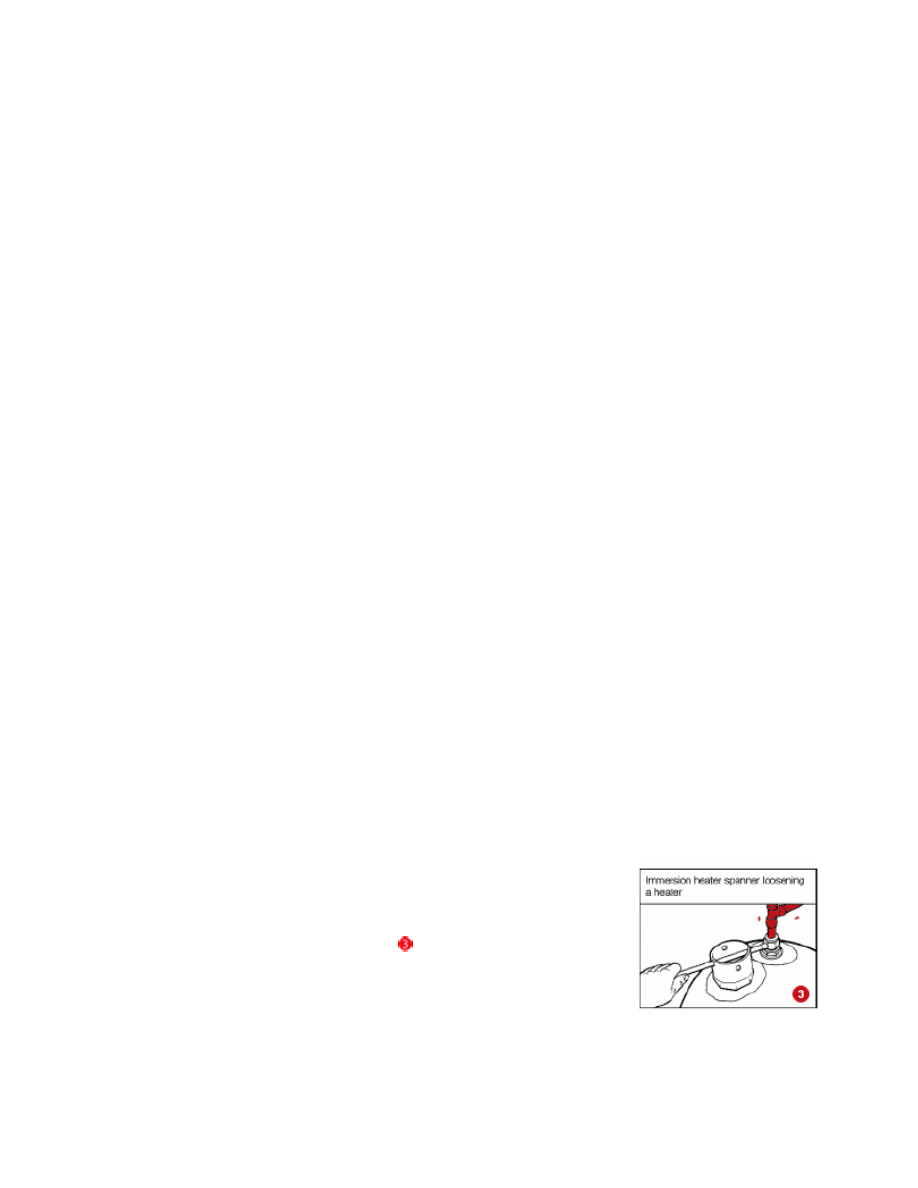
4 - REMOVING AND REFITTING AN IMMERSION HEATER
Turn off the electricity supply to the immersion heater at the consumer unit
by removing the fuse or MCB (miniature circuit breaker). Undo the cover on
the immersion heater and disconnect the three wires. Loosen the flex clamp
and pull the supply flex through.
Use an immersion-heater spanner to loosen the heater. It turns in an
anticlockwise direction. If it won't undo, don't force it or the cylinder will
buckle. Use a hammer and gently tap the spanner handle. If this doesn't
work, use gentle heat from a blowlamp or hot-air gun to warm the brass.
This will soften any linseed-oil-based sealant which has been used.
When you fit an immersion heater, make sure the sealing ring is placed on
the underside. If you want to use some additional sealant, make certain it is
a non-setting variety which is suitable for drinking water. This prevents
bacteria growth.
Again, don't use too much force in tightening the heater or the cylinder will
buckle. Once you fill the cylinder with water you can check for leaks and tap
the spanner slightly to tighten it. When you are sure there aren't leaks, you
can connect the wires. If you connect the wires first and need to tighten the
heater, you won't be able to get the spanner on without disconnecting again.
The live supply must be connected to the thermostat which fits in a dry
pocket. Set the thermostat to 60°C.
Make sure the heater is securely connected to the earth wire.
If the flexible cable from the wall switch to the heater needs renewing, make
sure you use heat-resistant PVC or butyl rubber flex. If you use 1.5mm2,
the length should not exceed 1m, otherwise use 2.5mm2. The supply cable
from the fuse box to the switch must be 2.5mm2.
5 - FITTING THE CYLINDER
Try to arrange all pipework so it is easily accessible.
If there are awkward
connections to be made behind the cylinder try to attach the fittings and fit short
lengths of pipe so the cylinder can be moved
into place pre-plumbed. You can then connect
to those pipes in a more accessible position.
6 - COLD FEED
The bottom connection must be made with a
threaded elbow or straight connector. Wrap the
thread with PTFE tape. Be generous with it or
you may find the connection leaks in the future.
The thread should be so tight that a spanner is
needed to complete it. However, don't tighten it
so hard that you damage the relatively thin
cylinder walls.
You must incorporate a drain cock in the lowest
connection to empty the cylinder in the future.
Secure the pipe to the wall and take it up to the
gate valve. The gate valve must be above the
cylinder level
7 - VENT PIPE
Wrap the top threaded connector and screw
into the hole so the elbow is in the right
direction to take the pipe to the vent pipe.
It will be either 3/4 in or 1in British Standard pipe
thread. The 22mm pipe must rise to the open
vent which hooks over the top of the cold-water
tank. Make sure the vent pipe doesn't dip into the water.
On no account must any valve be fitted to the vent pipe.
Avoid running a pipe over the top of the immersion heater or it will be impossible
to change the heater when it burns out.
Don't run the vent pipe directly up from the middle of the cylinder because the
hot water tends to rise and fall inside the pipe and this takes heat out of the
cylinder.
8 - HOT SUPPLY TO TAPS
The branch to the taps is taken from the vent pipe close to the cylinder. It must
fall away slightly towards the taps so any air in the pipe is automatically released
to the vent. If the pipe runs upwards even slightly, you will have problems with air
locks.
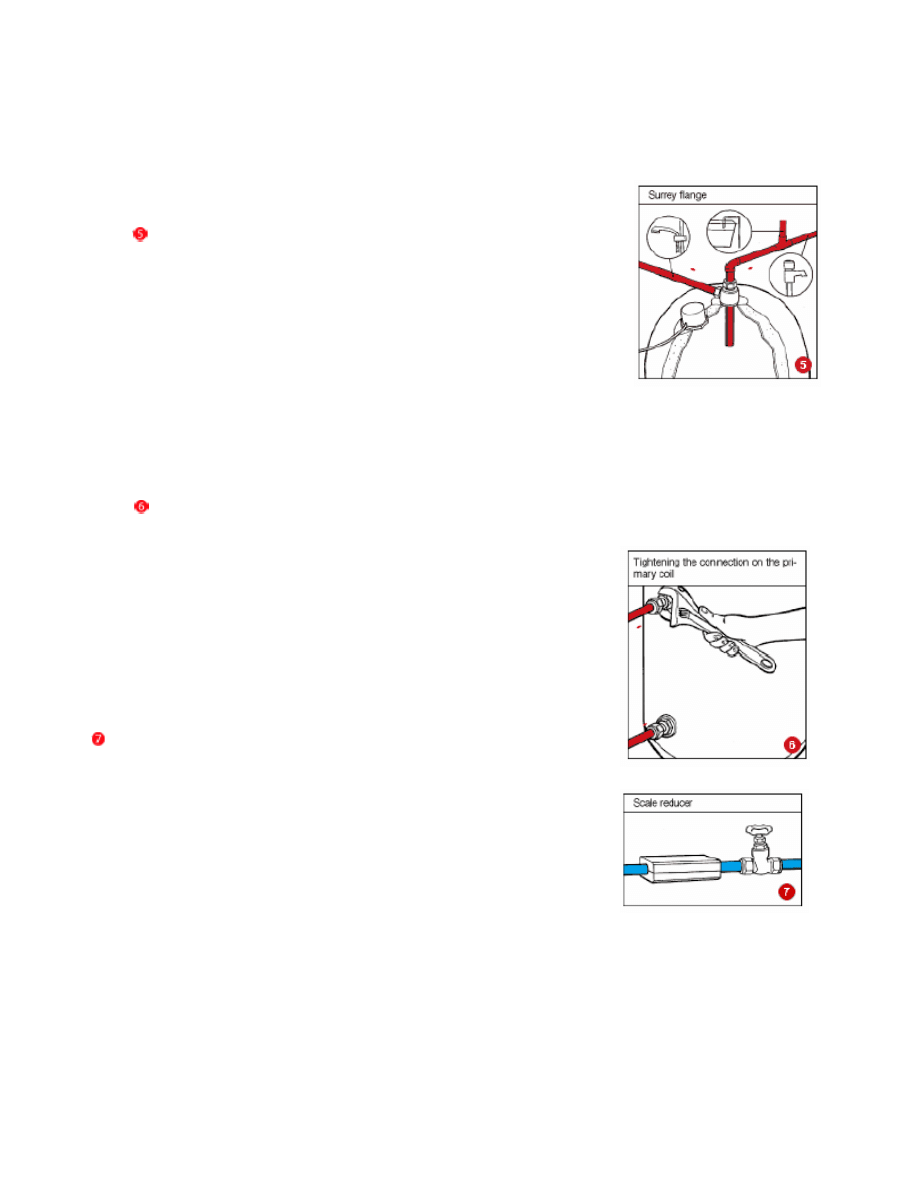
9 - SHOWER CONNECTIONS
If you have a pumped shower, you might want to fit a separate supply. This can
be done with a spe ial dip pipe flange (Surrey Flange) which screws into the top
c
of the cylinder .
10 - PRIMARY COIL CONNECTION TO THE BOILER CIRCUIT
On a gravity system, which uses the weight difference between hot and cold
water to circulate water from the boiler to the cylinder, it is essential that the flow
enters the side of the cylinder at the top of the coil. On fully pumped systems it
doesn't matter.
You can use 1in male threaded connectors to connect the primary pipework to
the cylinder, or use purpose-made cylinder unions (which look like large tap
connectors). If the system is fully pumped, 22mm pipes will be enough. Where
the pump only circulates the radiator water you will need 28mm pipework and
connections. Don't reduce the size going into the cylinder.
Check that the top primary connection is level or slightly rising from the cylinder
to the vent pipe
. Some systems have a venting mechanism at this point so the
pipework can drop down to a vent elsewhere.
The bottom connection returning to the boiler is connected in the same way. On
fully pumped systems there is often a valve at this point to balance the water
between the radiator circuits and the cylinder.
Do not connect copper pipes to galvanized-iron pipes (silver coloured) because
an electrolytic action will cause the pipes to corrode and block. If you need to
keep old pipework, connect plastic hot-water pipes to it.
11 - PREVENTING SCALE
If you live in a hard-water area, fit a scale-reducing device to the cold feed of the
cylinder .
Even a small build-up of scale will add several pounds to your fuel
bills and slow down the rate at which your cylinder will heat up.
12 - ATTACHING A CYLINDER THERMOSTAT
If you have a clamp-on thermostat on your old cylinder, you will need to fit it to
the new cylinder. Cut a small rectangle out of the insulation on the opposite side
to the boiler primary pipes. The height of the thermostat should be about one
third up the cylinder. See illustration (2) for reference.
Wyszukiwarka
Podobne podstrony:
How to Install the Power Quality Teaching Toy
How to install
How to install HD Audio driver?ter installation of slipstreamed XP SP3
HOW TO INSTALL PHOTOSHOP?TIONS
How to Be a Hot Guy
How to Install & Update the Language Packs the Tutorial
How to Install Windows`XP on SATA
how to install mb sd c4 wifi card
How to Install the Power Quality Teaching Toy
How to Install Ansys 14
How to install pvc downpipes
How to Install And Run Windows XP From USB drive
How to Install & Update the Language Packs the Tutorial
więcej podobnych podstron