Enterprise Collaboration with Liferay
The Way of the Ray
Liferay is a powerful and easily customizable CMS that is ideal for community collaboration - once you get it
configured.
By Ashley Wilson
Alex Timaios, Fotolia
Users on business networks often struggle to get increasingly heterogeneous infrastructures to work
seamlessly. As proprietary software loses market share to more open technologies, infrastructure
administrators must find ways to preserve ease of use across increasingly differing platforms. In addition to
interoperability problems, each company must move forward to more collaborative environments in order to
remain competitive and make the best use of its greatest (and largely untapped) asset - the ideas of its
employees.
The Liferay CMS has been around for years and it keeps getting bigger and better. Many companies have
implemented Liferay to address a whole spectrum of needs. From an e-commerce platform to a collaborative
intranet portal, Liferay has the scalability and functionality built-in to deploy quickly and grow as the needs of
the company grow.
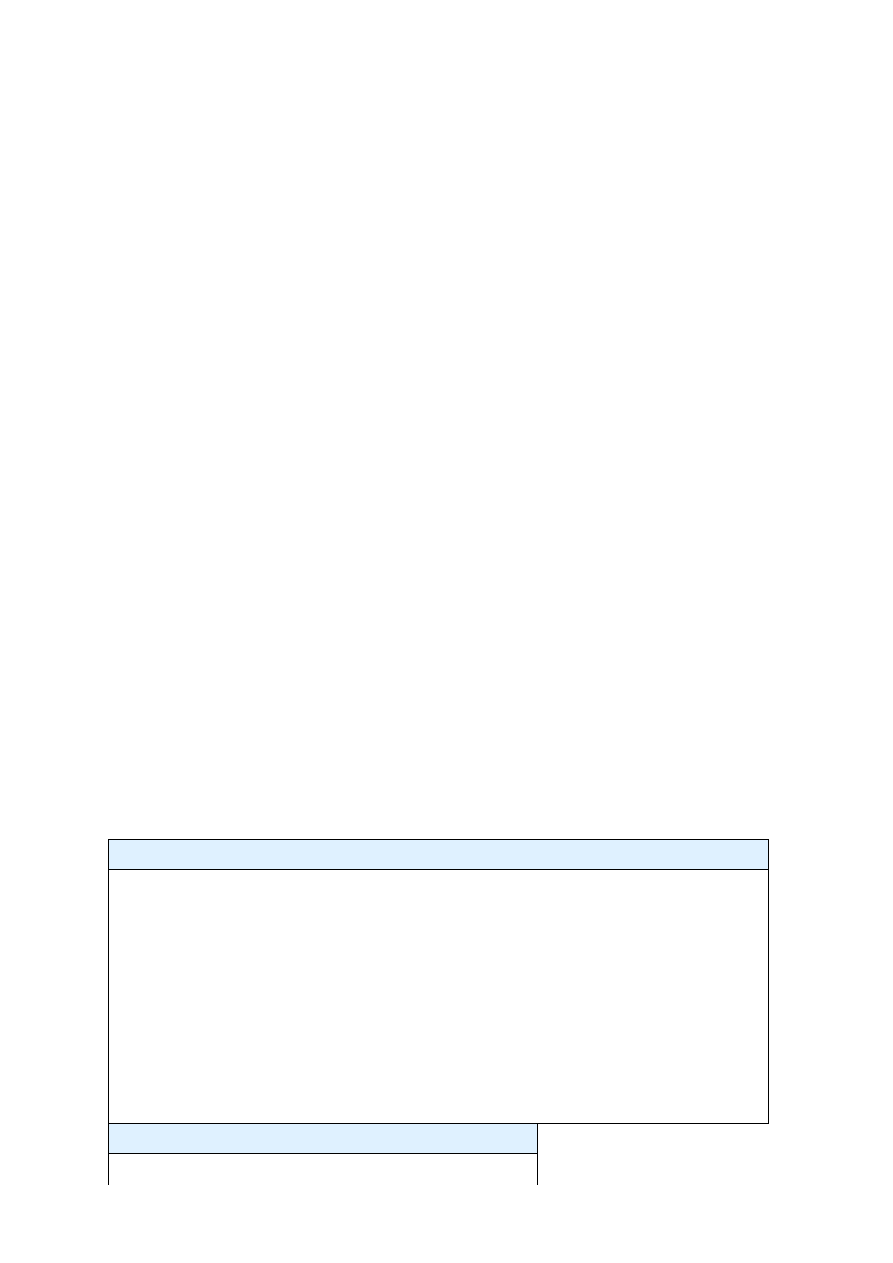
Liferay Portal (Figure 1) provides your organization with a powerful portal for creating and managing content
pages, message boards, and other collaboration tools. The Liferay CMS is not a `silver bullet' that will solve
every systematic transparency, communication, and collaboration issue for every company, but in my
experience, Liferay is just about the best portal/content management system out there and a superb foundation
for unifying and simplifying company communication.
The Way of the Ray
1

Figure 1:
The Liferay user interface supports the use of drop-in "portlets" for easy customization.
The Liferay CMS comes with a large number of useful portlets - ready-made tools that let you tailor your
Liferay site to the needs of your organization. But more importantly, Liferay makes it easy to bring together
many different systems in one place. Departments can arrange and rearrange content in their own web space,
relieving the sys admin from the duties of posting and arranging content for everyone in the organization.
So, why isn't everyone using Liferay? It is big, it is Java, and the documentation is a little intimidating. At
more than 86MB (bundled with Tomcat), Liferay is one of the larger CMS packages out there. Because it is
written in Java, extensibility might require some extra attention. Liferay has a steeper learning curve than the
traditional CMS running on a LAMP box. The "Getting Started" documentation is easy enough to find, but
because of the size of the Liferay project and the variety of configuration options, digesting it and getting
started quickly is a daunting task.
Liferay supports a variety of complex configuration scenarios. In a typical scenario, a company might need an
intranet site for all departments to contribute to, but access controls are necessary for preventing salespeople
from rooting around in accounting's private documents and keeping HR from dropping new hire
documentation in the middle of IT's web space. Different departments can use different aspects of Liferay for
different things. The company will make use of the Iframe Portlet or the Web Proxy portlet to bring the
web-management interfaces of several different systems like Nagios, Hobbit, or MRTG together under one
roof.
The Message Boards portlet serves as a very basic help desk. Human Resources will use the Document
Library portlet to post policy manuals. Sales and Marketing departments will use the Web Proxy portlet to
pull in a sales dashboard report from the CRM system and the portlets related to Liferay's Journal Content
portlet to store and disseminate press releases and information about product promotions.
Because Tomcat will not run on port 80 without root privileges, the configuration described in this article uses
Apache HTTP server and mod_jk to serve Liferay on port 80 and allow for vhosting with other web-based
applications existing on the same machine. Liferay comes set up to use a Hypersonic database, but this
configuration doesn't work well for production use. In this example, I will use MySQL as the production
database.
Getting Ready
When you set up your Linux computer, make sure the system includes development tools, development
libraries, and MySQL. Unless you need it, get rid of the GUI. If you decide to use the software firewall, make
sure you leave ports 22, 80, and 8080 open. When the testing is complete, 8080 will be closed. If you are not
familiar with manual firewall configuration, you can save some time by installing system-config-securitylevel.
Setting up MySQL
Your Liferay CMS will store and retrieve data from a back-end database system. In this case, configure the
system so MySQL starts on boot. Enable the system with chkconfig mysqld on and check it with chkconfig
--list mysqld. The numbers represent runlevels. The last command should produce output that indicates mysqld
is set to run on runlevels 2,3,4, and 5. Log in to MySQL and create the Liferay database:
mysql -u root -p
enter the password at the prompt
create database lportal
Next, create the Liferay user account and give it all privileges on lportal.*.
Infrastructure
The Liferay configuration described in this article requires Apache, Tomcat, and MySQL. Depending on your
Linux distro, some of these components might already be running on your system, or you might have the
The Way of the Ray
2

option of setting up the component through your distro's package management system. Compatibility of the
specific versions may vary. Alternatively, you can install the components from source code.
From the Source
If you set up these tools from source, create a staging area for the code and installer binaries:
mkdir /opt/install
After obtaining the Apache http server source and mod_jk binary [1], place them in the new directory
/opt/install. You can obtain Liferay 4.4.2 - bundled with Tomcat 5.5 and the SQL scripts bundle - from the
Liferay website [2]. Also, you will need the Java 6 binary [3] and the MySQL Connector for Java [4] - be sure
you get the right version! Check the MySQL version with mysql --version.
Next, create a directory for Liferay to reside in:
mkdir /opt/liferay-4.4.2
Then copy the Liferay bundle to the new directory and expand:
cp /opt/install/liferay-portal-tomcat-5.5-jdk5-4.4.2.zip /opt/liferay-4.4.2
cd /opt/liferay-4.4.2
unzip ./liferay-portal-tomcat-5.5-jdk5-4.4.2.zip
remove zip file: rm ./liferay-portal-tomcat-5.5-jdk5-4.4.2.zip
Create group apache and user tomcat as a member of Apache:
groupadd apache
useradd -g apache tomcat
make Tomcat startup scripts executable
chmod 755 /opt/liferay-4.4.2/bin/*.sh
Next, configure the database connection settings and mail server settings:
vi /opt/liferay-4.4.2/conf/Catalina/localhost/ROOT.xml
Edit the file so that it resembles the file in Listing 1. Note the username set earlier for the MySQL user lportal
and the password in mysql config.
Listing 1:
ROOT.xml
01 <Context path="" crossContext="true">
02 <!-- MySQL -->
03
04 <Resource
05 name="jdbc/LiferayPool"
06 auth="Container"
07 type="javax.sql.DataSource"
08 driverClassName="com.mysql.jdbc.Driver"
09 url="jdbc:mysql://localhost/lportal?useUnicode=true&characterEncoding=UTF-8"
10 username="lportal"
11 password="FullMetalJacket"
12 maxActive="20"
13 />
14
15 <!-- Mail -->
16
17 <Resource
18 name="mail/MailSession"
19 auth="Container"
20 type="javax.mail.Session"
The Way of the Ray
3

21 mail.imap.host="localhost"
22 mail.pop3.host="localhost"
23 mail.smtp.host="smtp.gmail.com"
24 mail.smtp.port="465"
25 mail.smtp.auth="true"
26 mail.smtp.starttls.enable="true"
27 mail.smtp.user="accountname@googleappsdomain.com"
28 password="emailpassword"
29 mail.store.protocol="imap"
30 mail.transport.protocol="smtp"
31 mail.smtp.socketFactory.class="javax.net.ssl.SSLSocketFactory"
32 />
33
34 <!-- JAAS -->
35
36 <Realm
37 className="org.apache.catalina.realm.JAASRealm"
38 appName="PortalRealm"
39 userClassNames="com.liferay.portal.security.jaas.PortalPrincipal"
40 roleClassNames="com.liferay.portal.security.jaas.PortalRole"
41 debug="99"
42 useContextClassLoader="false"
43 />
44 </Context>
Now, untar and drop the MySQL Connector into /opt/liferay-4.4.2/lib/ext:
cd /opt/install
tar -zxvf ./mysql-connector-java-5.1.5.tar.gz
cd mysql-connector-java-5.1.5
cp ./mysql-connector-java-5.1.5-bin.jar /opt/liferay-4.4.2/common/lib/ext
(Your MySQL Connector file name may be different.) To populate the MySQL database, create a directory to
expand the SQL scripts to and load the appropriate one into MySQL:
mkdir /opt/install/sql-scripts
mv /opt/install/liferay-portal-sql-4.4.2.zip /opt/install/sql-scripts
cd /opt/install/sql-scripts
unzip ./lilferay-portal-sql-4.4.2.zip
cd create-minimal
mysql lportal -u lportal -p < ./create-minimal-mysql.sql
This example uses the minimal install database script because this configuration doesn't require much cleanup
before production deployment. In the folder named create, you will find scripts that will load up a richly
populated instance of Liferay, much like the Liferay website. If you have time on your hands, you can load the
database from that folder to explore an environment with users, groups, content, and communities already set
up.
Starting Liferay
Change ownership of /opt/tomcat-4.4.2 to user tomcat, group apache:
chown -R tomcat:apache /opt/liferay-4.4.2
Create a startup script similar to the script showing in Listing 2.
Listing 2:
/etc/init.d/liferay
01 #!/bin/sh
02 # Script for starting Liferay (Tomcat)
03 # chkconfig: - 60 61
04 # description: Tomcat-Liferay
05 export JAVA_HOME=/opt/tools/java/jdk1.6.0_02
06 export CATALINA_HOME=/opt/liferay-4.4.2
The Way of the Ray
4

07 export TOMCAT_USER=tomcat
08 # You may want to set a different value for sleep.
09 # You want to make sure Tomcat has plenty of time to stop
10 # and release the port in case of restart
11 start() {
12 echo -n " Starting Liferay-Tomcat ..."
13 su $TOMCAT_USER -c $CATALINA_HOME/bin/startup.sh
14 sleep 2
15 }
16 stop() {
17 echo -n " Stopping Liferay-Tomcat ..."
18 su $TOMCAT_USER -c $CATALINA_HOME/bin/shutdown.sh
19 sleep 5
20 }
21 case "$1" in
22 start)
23 start
24 ;;
25 stop)
26 stop
27 ;;
28 restart)
29 stop
30 start
31 ;;
32 *)
33 echo $"{start|stop|restart}"
34 exit
35 esac
Now, make the script executable, set up Liferay as a service, and test Liferay:
chmod 755 /etc/init.d/liferay
chkconfig --add liferay
chkconfig liferay on
service liferay start
Tail the output of the log file to see that Liferay starts up ok:
tail -f /opt/liferay-4.4.2/logs/catalina.out
Errors involving the MySQL driver or an inability to determine the dialect for MySQL could indicate an
incorrect driver version. Verify the version of MySQL running on the server and the version of the MySQL
driver you have installed. Also make sure that ownership for the connector is tomcat:apache.
Point your browser to
to test the configuration. You should see the default
welcome page with a login prompt.
Looking Forward
Congratulations. You now have a working implementation of Liferay. Although it is still not
production-ready, it is ready for you to dive in and familiarize yourself with the system. The next steps are to
install the Apache http server and mod_jk Tomcat connector. Before building Apache, check out Liferay.
Using the password test, log in with test@liferay.com, and then change the password on the test@liferay.com
account by selecting My Account under the Welcome button in the upper right corner.
With the default setup, all new users get their own community. Users get a sort of sandbox, where they can
place portlets and switch around screen layouts without affecting the public pages.
Now would be a great time to take a breather and peruse some of the Liferay online documentation at
http://www.liferay.com/web/guest/community/documentation
The Way of the Ray
5
Onward to Apache Land
Install Apache as described by your Linux vendor, or go to the /opt/install directory and untar the Apache
source:
tar -zxvf httpd-2.2.4.tar.gz
See the Apache server documentation [4] for more on building Apache from source. Keep in mind that your
web server will need to access Java functionality through Apache Tomcat. The mod_jk module facilitates
communication between the Apache web server and Tomcat. Create a workers.properties file for mod_jk:
vi /opt/liferay-4.4.2/conf/workers.properties
A sample file is shown in Listing 3. Next, place the mod_jk apache module
cp /opt/install/ mod_jk-1.2.25-httpd-2.2.4.so / opt/apache2/modules/mod_jk.so
and edit the httpd.conf file:
vi /opt/apache2/ conf/httpd.conf
Make sure and set the user and groups for Apache to run under to user "apache" and group "apache." Also,
don't forget the ServerAdmin directive. Add the following lines in with the other include directives:
# Include mod_jk
Include /opt/apache2/conf/mod_jk.conf
Now, create the config file for the tomcat connector
vi /opt/apache2/conf/mod_jk.conf
and create the default vhost configuration file. Make a directory in which to put vhosts:
mkdir /opt/apache2/conf/vhosts
and create the vhost file.
vi /opt/apache2/conf/vhosts/w3.conf
Listing 4 is a default vhost that kicks anything that doesn't fit another vhost over to a w3 (intranet) site.
Listing 3:
workers.properties
01 workers.tomcat_home=/opt/liferay-4.4.2
02 workers.java_home=/opt/tools/java/jdk1.6.0_02
03 ps=/
04 worker.list=ajp13
05 worker.ajp13.port=8009
06 worker.ajp13.host=localhost
07 worker.ajp13.type=ajp13
08 worker.ajp13.lbfactor=1
09 worker.loadbalancer.type=lb
10 worker.loadbalancer.balanced_workers=ajp13
11 worker.inprocess.type=jni
12 worker.inprocess.class_path=$(workers.tomcat_home)$(ps)lib$(ps)tomcat.jar
13 worker.inprocess.cmd_line=start
14 worker.inprocess.stdout=$(workers.tomcat_home)$(ps)logs$(ps)inprocess.stdout
15 worker.inprocess.stderr=$(workers.tomcat_home)$(ps)logs$(ps)inprocess.stderr
Listing 4:
w3.conf
01 NameVirtualHost 192.168.25.129
The Way of the Ray
6

02 <VirtualHost 192.168.25.129>
03 ServerName nonexist.testdomain.com
04 RedirectPermanent / http://w3.testdomain.com
05 DocumentRoot /opt/apache2/htdocs
06 </VirtualHost>
07 <VirtualHost 192.168.25.129>
08 ServerName w3.testdomain.com
09 ServerAdmin info@testdomain.com
10 DocumentRoot /opt/liferay-4.4.2/webapps/ROOT
11 UseCanonicalName Off
12 ErrorLog /var/log/w3-error.log
13 CustomLog /var/log/w3-access.log combined
14 HostnameLookups On
15
16 <Directory "/opt/liferay-4.4.2/webapps/ROOT">
17 Options Indexes FollowSymLinks
18 SetOutputFilter Deflate
19 #Order Deny,Allow
20 Deny from all
21 </Directory>
22
23 <IfDefine SSL>
24 SSLEngine off
25 </IfDefine>
26
27 <Location "/WEB-INF/*">
28 deny from all
29 </Location>
30
31 <Location "/META-INF/*">
32 deny from all
33 </Location>
Remember to change your IP address to match your server's IP address. The Jkmount directives tell Apache
what to get from Tomcat.
Note that every vhost-- even the ones handled with Liferay - must have an entry in Apache's config. This
entry ensures that any weird hostname that might be requested will go directly to the default page. This will
also prevent users from adding their own vhosted domains without having access to the Apache configs.
So that Apache looks for this file instead of the default vhost config, edit http.conf by replacing:
# Virtual hosts
Include conf/extra/httpd-vhosts.conf
with
# Virtual hosts
Include /opt/apache2/conf/vhosts/*.conf
Now set up Apache as a service:
chkconfig --add apache2
chkconfig apache2 on
and bounce Apache and Tomcat:
service apache2 restart
service liferay restart
You should now be able to access Liferay through w3.testdomain.com (replace testdomain with your domain).
You must have a DNS record for w3 pointing to the proper IP address (or an entry in your hosts file).
The Way of the Ray
7
Setting up Your Site
If you are configuring Liferay to act as an intranet portal on an actual production network, you'll probably
want to tie Liferay to your organization's user database. On our network, Liferay uses an Active Directory
server for authenticating users. Other approaches are also possible depending on the structure of your
network. Consult the Life-ray user forums or your favorite search engine. Because authentication techniques
vary, this article will not cover the topic, but keep in mind that one of the principal benefits of Liferay is to
create communities of users within the network for the purpose of sharing content, and this process works best
when it is tied into the network's existing user database.
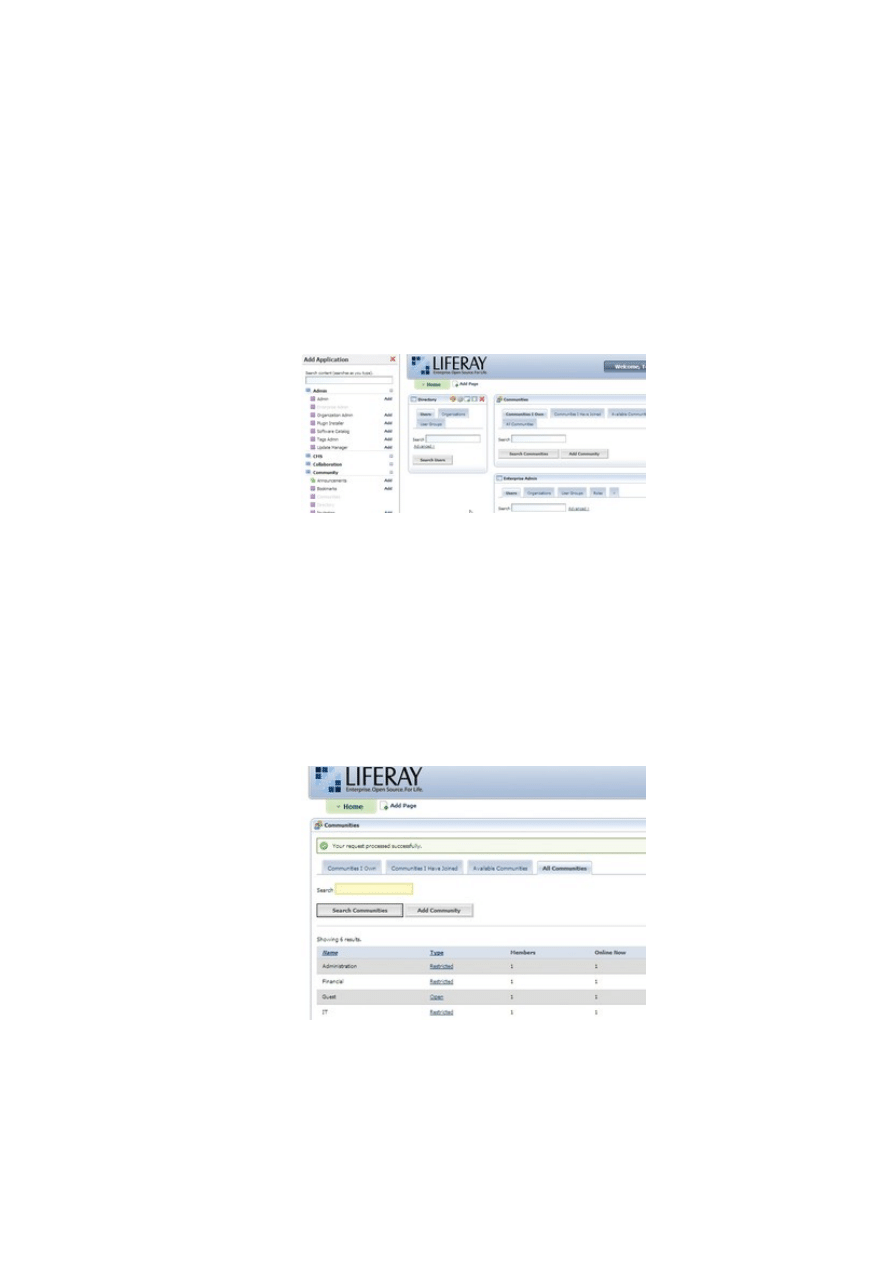
Once you have logged into the system, add the Communities Portlet by mousing over the Welcome button in
the upper right corner of the page (Figure 1), selecting Add Application in the toolbar on the left, and
selecting Community | Communities (add) (Figure 2). Use this portlet to create a community for each
department.
Figure 2:
Adding the Communities Portlet to a page in Liferay.
Next, assign members to communities by browsing to the All Communities tab and selecting Actions | Assign
Members, select the User Groups tab and then the Available tab, then select the user group you want to map to
the community. Commit the changes with the Update Associations button. Do this for every community
except for Guest.
Add the Enterprise Admin portlet to the home page and select the >> button. Select the Settings tab and fill in
the following information: Name and Mail Domain. Next, go to the Default User Associations tab and list the
Guest community in the Community Names box (Figure 3). This will ensure that all users can browse the
Guest community pages while they are logged in. Commit your changes with the Save button.
Figure 3:
The Community Names list lets the user easily select a community.
After you have installed Liferay and organized the space into user communities, it is easy to add new content
pages to the site. Go back to the home page and mouse over the Welcome button and select the Manage Pages
option (Figure 4). You can create a public or private page for any of the Liferay communities. Next, mouse
over the Welcome button and go to My Places. From here, you can edit the layout of each community's site
structure.
The Way of the Ray
8
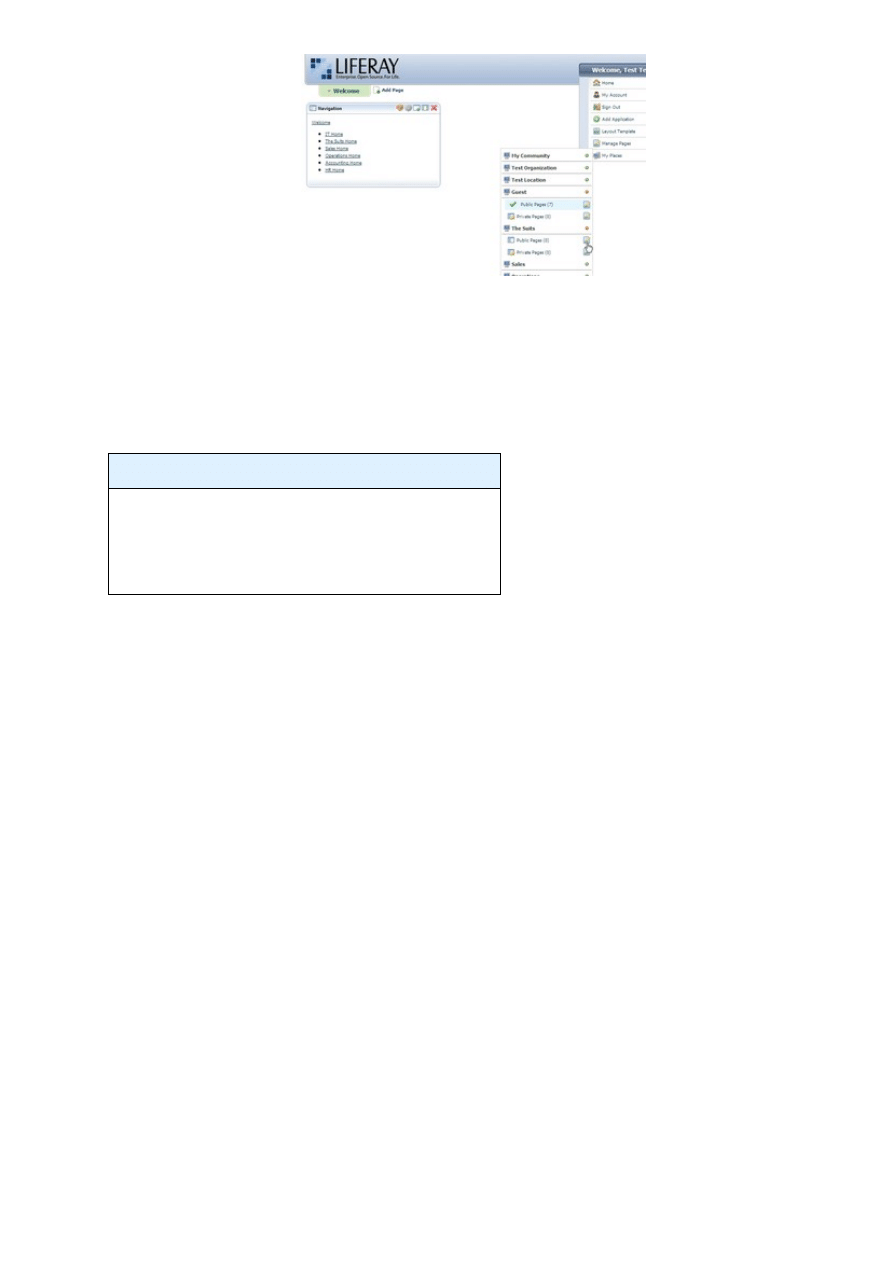
Figure 4:
The Manage Pages option lets you create and edit content pages.
Conclusion
Liferay is a big, complex system. Just getting Liferay installed and working is the first and largest hurdle.
After that, you can easily use Liferay as a central, reasonably secure approach to collaboration and
information dissemination.
INFO
[3] Java:
[5] Apache documentation:
The Way of the Ray
9
Document Outline
Wyszukiwarka
Podobne podstrony:
the!st?ntury seems to hale found an interesting way of solving problems OQ5R2UJ7GCUWHEDQYXYPNT2RBNFL
(ebook) Martial Arts Hagakure The Way of the Samurai
Dan Millman Way of the Peaceful Warrior Version (v3 0) (doc)
Way Of The Ascetics Tito Colliander
Hagakure The Way Of The Samurai (Zen Buddhism)
The Way of Chuang Tzu by Thomas Merton (1969)
Kwiek, Marek The Growing Complexity of the Academic Enterprise in Europe A Panoramic View (2012)
Barker, Clive Tortured Souls Six Destinies 01 06 The Legend of Primordium
Legend Of The Five Rings Way of the Crow
The Audio Lingual Method An Easy way of Achieving Speech
The Way of Peace James Allen
James Axler Deathlands 042 Way of the Wolf
The Very Thought of You (Ray Noble)
Way of the Apprentice, The Jude Watson
Jack Anderson The effects of embeddeddness on enterpreneurial proccess
Alan Dean Foster Spellsinger 06 The Time Of The Transferance
The rationalist way of death Sposób śmierci Racjonalisty
więcej podobnych podstron