
MQL4 COURSE
By Coders’ guru
-11-
Your First Indicator
Part 2
-------------------------------
W
elcome to the second part of “Your First Indicator” lesson.
In the previous lesson we didn’t write any line of code, that’s because the New Project
Wizard wrote all the code for us. Thanks!
Today we are going to add few lines to the code the wizard had generated to make our
program more useful.
Afterwards, we are going to explain the whole of the code line by line.
Let’s coding
Code we have added:
We have added the code which in a
bold
dark blue
to our previous code:
//+------------------------------------------------------------------+
//| My_First_Indicator.mq4 |
//| Codersguru |
//| http://www.forex-tsd.com |
//+------------------------------------------------------------------+
#property
copyright
"Codersguru"
#property
link
#property
indicator_separate_window
#property
indicator_buffers
1
#property
indicator_color1
Red
//---- buffers
double
ExtMapBuffer1
[];
//+------------------------------------------------------------------+
//| Custom indicator initialization function |
//+------------------------------------------------------------------+
int
init
()
{
//---- indicators
SetIndexStyle
(
0
,
DRAW_LINE
);
SetIndexBuffer
(
0
,
ExtMapBuffer1
);
string short_name = "Your first indicator is running!";
IndicatorShortName(short_name);

//----
return
(
1
);
}
//+------------------------------------------------------------------+
//| Custor indicator deinitialization function |
//+------------------------------------------------------------------+
int
deinit
()
{
//----
//----
return
(
0
);
}
//+------------------------------------------------------------------+
//| Custom indicator iteration function |
//+------------------------------------------------------------------+
int
start
()
{
int
counted_bars
=
IndicatorCounted
();
//---- check for possible errors
if (counted_bars<0) return(-1);
//---- last counted bar will be recounted
if (counted_bars>0) counted_bars--;
int pos=Bars-counted_bars;
double dHigh , dLow , dResult;
Comment("Hi! I'm here on the main chart windows!");
//---- main calculation loop
while(pos>=0)
{
dHigh = High[pos];
dLow = Low[pos];
dResult = dHigh - dLow;
ExtMapBuffer1[pos]= dResult ;
pos--;
}
//----
return
(
0
);
}
//+------------------------------------------------------------------+
How will we work?
We will write the line(s) of the code we are going to explain then we will explain them
afterwards, if there are no topics, we will explain the line(s) of code directly. But at the
most of the time we will pause to discuss some general topics.
I want to here your suggestion about this method please!
Now let’s crack this code line by line.

//+------------------------------------------------------------------+
//| My_First_Indicator.mq4 |
//| Codersguru |
//| http://www.forex-tsd.com |
//+------------------------------------------------------------------+
Comments:
The first five lines of code (which are in gray color) are comments.
You use Comments to write lines in your code which the compiler will ignore them.
You are commenting your code for a lot of reasons:
•
To make it clearer
•
To document some parts like the copyright and creation date etc.
•
To make it understandable.
•
To tell us how the code you have written is work.
•
…
You can write comments in two ways:
Single line comments: The Single line comment starts with “//” and ends with the new
line.
Multi-line comments: The multi-line comment start with “/*” and ends with “*/” and
you can comment more than one line.
In our program the MQL4 wizard gathered from the data we entered the name of the
program, author and the link and wrote them as comments at the top of our program.
#property
copyright
"Codersguru"
#property
link
#property
indicator_separate_window
#property
indicator_buffers
1
#property
indicator_color1
Red
Property directive:
As you notice all of these lines start with the word (#property). That’s because they are
kind of the Preprocessors directives called property directives.
The Preprocessors are the instructions you give to the compiler to carry them out before
starting (processing) your code.

The property directives are predefined constants called “Controlling Compilation”
built in the MQL4 language; their job is setting the properties of your program.
For example: is your Indicator will appear in the main chart window or in a separate
window? Who is the writer of the program?
Note: The preprocessors lines end with a carriage-return character (new line) not a
semi-colon symbol.
We will try to discuss here the property directives available in MQL4.
link:
This property setting the web link to your web site which you asked to enter it in step 2
in the Expert Advisor Wizard (review the previous lesson).
The data type of this property is string.
copyright:
It’s the name of the author of the program, same as the link property you asked to enter
it in step 2 in the Expert Advisor Wizard.
The data type of this property is string.
stacksize:
It’s an integer value sets the memory size for every thread, the default value is 16384
.
The data type of this property is integer.
indicator_chart_window:
When you set this property, your indicator will be drawn in the main chart window
(Figure 1). You have to choose one of two options for your Indicators, drawing them in
the main chart windows by using this property, or drawing them in separate windows by
choosing the indicator_separate_window. You can’t use the both of them at the same
time.
The data type of this property is void, which means it takes no value.
indicator_separate_window:
When you set this property, your indicator will be drawn in a separate window (Figure
1). You can set the scale of the separate indicator window using two properties
indicator_minimum for the minimum value and indicator_maximum for the
maximum value of the scale.
And you can set the level of your indicators on these scales using the property
indicator_levelN where’s the N is the indicator number.

Both of the properties indicator_chart_window and indicator_separate_window are
void data type, which mean they don’t take value and you just write them.
In our program we will draw our indicator in a separate window:
#property
indicator_separate_window
Figure 1
indicator_minimum:
With the aid of this property we are setting the minimum value of the separate windows
scale, which is the bottom border of the windows. For example:
#propery indicator_minimum
0
#propery indicator_ maximum
100
Here we have set the bottom border of the window to 0 and the top border to 100 (see
indicator_ maximum), hence we have a scale ranged from 0 to 100 in our separate
window which we are drawing our indicator.
The data type of this property is integer.
indicator_maximum:
With the aid of this property we are setting the maximum value of the separate windows
scale, which is the top border of the windows.
This value must be greater than the indicator_minimum value.
The data type of this property is integer.
Main chart window
Separate window

indicator_levelN:
With the aid of this property we are setting the level of the indicator in the scale we have
created with the properties indicator_minimum and indicator_maximum, this value
must be greater than the indicator_minimum value and smaller than the
indicator_maximum value.
N is the indicator number which we are setting its level, it must range from 1 to 8
(because we are allowed only to use up to 8 indicator buffers in our program, so we can
set the indicator_level for each of them using its number). For example:
#propery indicator_minimum
0
#propery indicator_minimum
100
#propery indicator_level1
10
//set the first indicator buffer level
#propery indicator_level2
65.5
//set the second indicator buffer level
The data type of this property is double.
indicator_buffers:
With the aid of this property we are setting the number of memories spaces (Arrays)
allocated to draw our line(s). When we set the number (ranged from 1 up to 8) we are
telling MQL4: “Please allocate a memory space for me to draw my indicator line”.
In our program we used only one buffer.
#property
indicator_buffers
1
That’s because we will draw only one line.
indicator_colorN:
We can use up to 8 lines in our indicator, you can set the color of each of them using this
property indicator_colorN , where the N is the line number which defined by
indicator_buffers.
The user of your Indicator can change this color from the properties dialog of your
Indicator (Figure 2).
In our program the indicator line color will be red.
#property
indicator_color1
Red
The data type of this property is color.
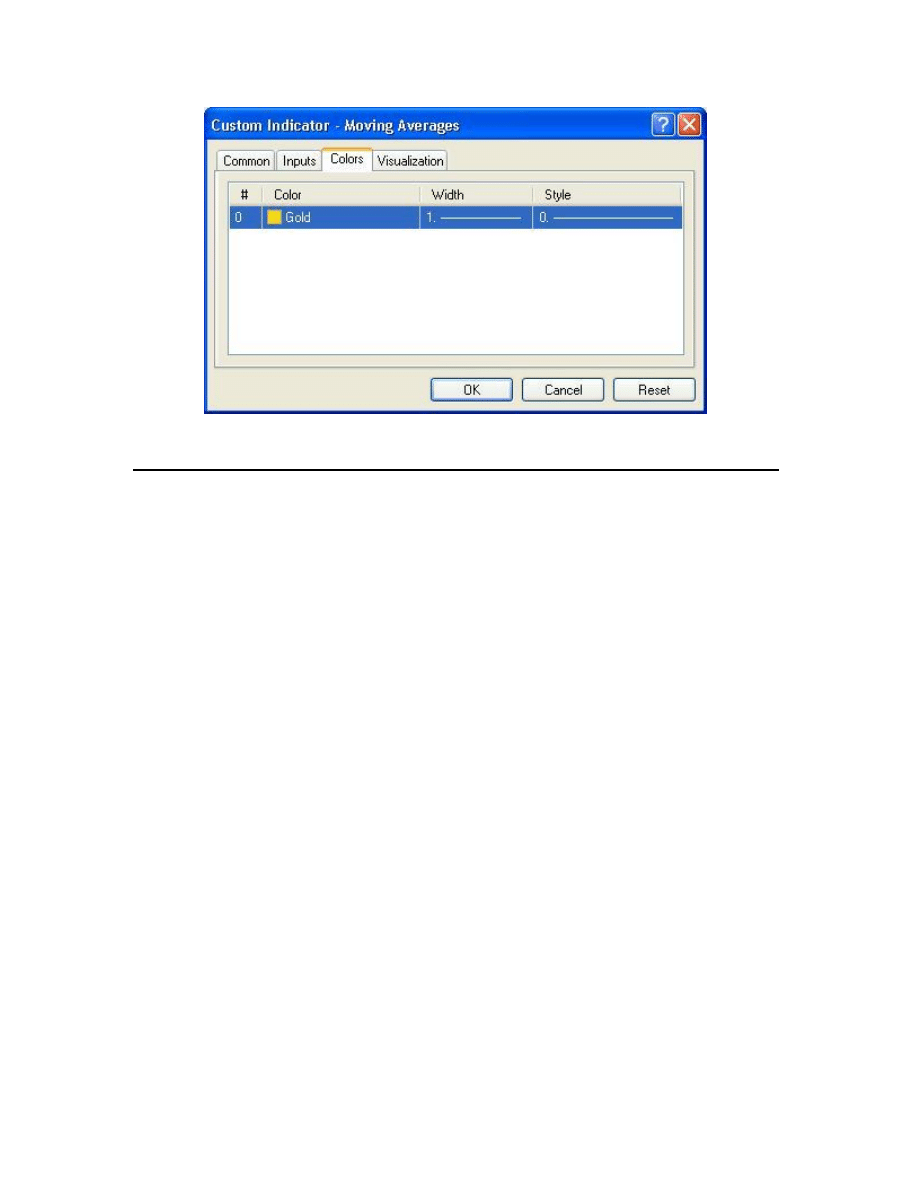
Figure 2
double
ExtMapBuffer1
[];
Arrays:
In our life we usually group similar objects into units, in the programming we also need
to group together the data items of the same type. We use Arrays to do this task.
Arrays are very like the list tables, you group the items in the table and access them the
number of the row. Rows in the Arrays called Indexes.
To declare an array you use a code like that:
int my_array[50];
Here, you have declared an array of integer type, which can hold up to 50 items.
You can access each item in the array using the index of the item, like that:
My_array[10] = 500;
Here, you have set the item number 10 in the array to 500.
You can initialize the array at the same line of the declaration like that:
int my_array[5] = {1,24,15,66,500};
In our program we used this line of code:
double
ExtMapBuffer1
[];

Here we have declared and array of double type. We will use array to calculate our
values which we will draw them on the chart.
int
init
()
{
}
Special functions:
Functions are blocks of code which like a machine takes inputs and returns outputs
(Please review lesson 7 – Functions).
In MQL4 there are three special functions
init():
Every program will run this function before any of the other functions, you have to put
here you initialization values of you variables.
start():
Here’s the most of the work, every time a new quotation have received your program
will call this function.
deinit():
This is the last function the program will call before it shutdown, you can put here any
removals you want.
SetIndexStyle
(
0
,
DRAW_LINE
);
SetIndexBuffer
(
0
,
ExtMapBuffer1
);
string short_name = "Your first indicator is running!";
IndicatorShortName(short_name);
Custom indicator functions:
I can’t give you a description for all of the indicators functions in this lesson. But we
will use them all in our next lessons with more details. So, we will study here the
functions used in our program.
SetIndexStyle:

void SetIndexStyle( int index, int type, int style=EMPTY, int width=EMPTY, color
clr=CLR_NONE)
This function will set the style of the drawn line.
The index parameter of this function ranges from 1 to 7 (that’s because the array
indexing start with 0 and we have limited 8 line). And it indicte which line we want to
set its style.
The type parameter is the shape type of the line and can be one of the following shape
type’s constants:
DRAW_LINE (draw a line)
DRAW_SECTION (draw section)
DRAW_HISTOGRAM (draw histogram)
DRAW_ARROW (draw arrow)
DRAW_NONE (no draw)
The style parameter is the pen style of drawing the line and can be one of the following
styles’ constants:
STYLE_SOLID (use solid pen)
STYLE_DASH (use dash pen)
STYLE_DOT (use dot pen)
STYLE_DASHDOT (use dash and dot pen)
STYLE_DASHDOTDOT (use dash and double dots)
Or it can be EMPTY (default) which means it will be no changes in the line style.
The width parameter is the width of line and ranges from 1 to 5. Or it can be EMPTY
(default) which means the width will not change.
The clr parameter is the color of the line. It can be any valid color type variable. The
default value is CLR_NONE which means empty state of colors.
In our line of code:
SetIndexStyle
(
0
,
DRAW_LINE
);
We have set the index to 0 which means we will work with the first (and the only) line.

And we have set the shape type of our line to DRAW_LINE because we want to draw a
line in the chart.
And we have left the other parameters to their default values.
SetIndexBuffer:
bool SetIndexBuffer( int index, double array[])
This function will set the array which we will assign to it our indicator value to the
indicator buffer which will be drawn.
The function takes the index of the buffer where’s 0 is the first buffer and 2 is the second,
etc. Then it takes the name of the array.
It returns true if the function succeeds and false otherwise.
In our program the array which will hold our calculated values is
ExtMapBuffer1.
And we have only one indicator buffer
(
#property
indicator_buffers
1
).
So it
will be the buffer assigned.
IndicatorShortName:
void IndicatorShortName( string name)
This function will set the text which will be showed on the upper left corner of the chart
window (Figure 3) to the text we have inputted.
In our program we declared a string variable and assigned the value “You first indicator
is running” to it, then we passed it to the IndicatorShortName function.
string short_name = "Your first indicator is running!";
IndicatorShortName(short_name);
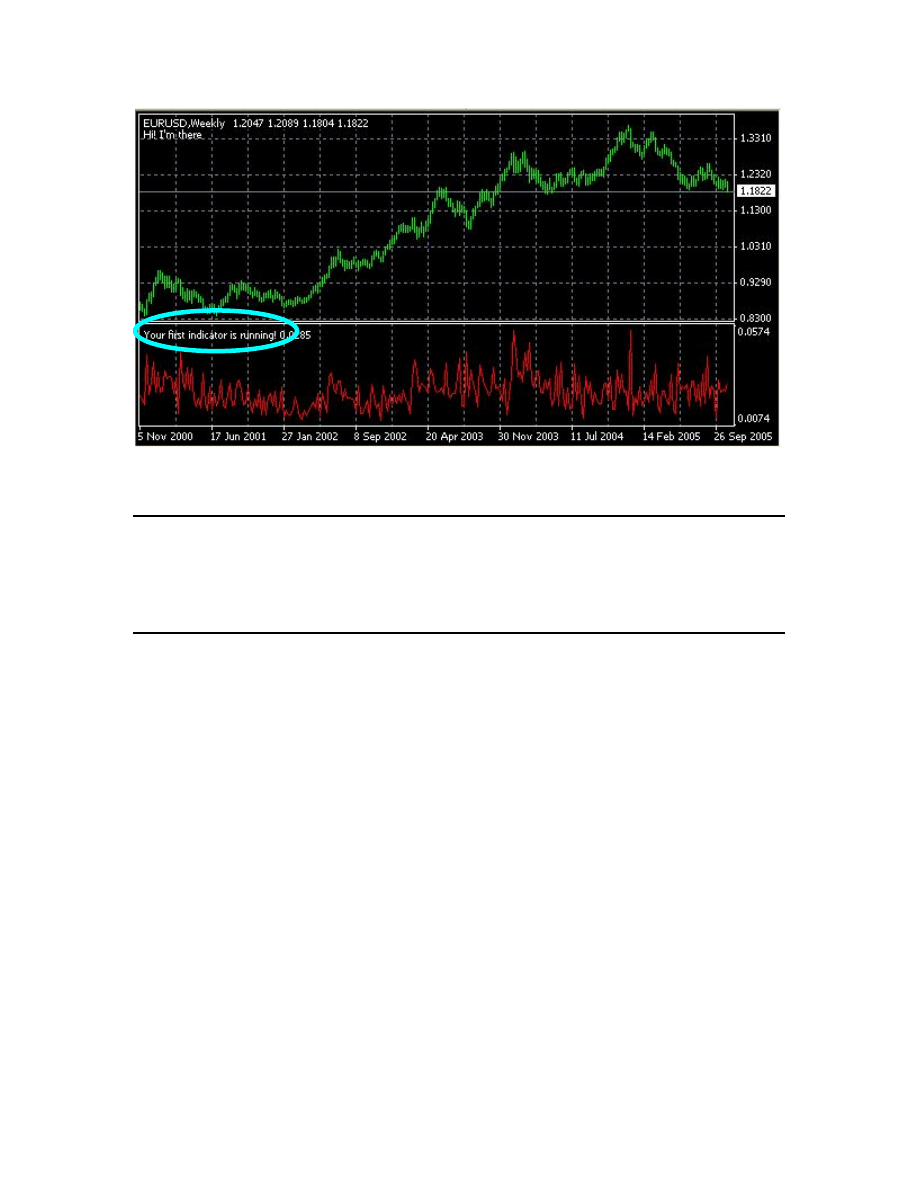
Figure 3
return
(
0
);
This is the return value of the init() function which terminate the function and pass the
program to the execution of the next function start().
int
deinit
()
{
//----
//----
return
(
0
);
}
Nothing new to say about deinit() function.
We will continue with remaining of the code in the next lesson.
I hope you enjoyed the lesson and I welcome your questions.
See you
Coders’ Guru
06-11-2005
The short name
Wyszukiwarka
Podobne podstrony:
12 Lesson12 Your First Indicator (Part3)
17 Lesson17 Your First Script
13 Lesson13 Your First Expert Advisor (Part 1)
14 Lesson14 Your First Expert Advisor (Part 2)
15 Lesson15 Your First Expert Advisor (Part 3)
16 Lesson16 Your First Expert Advisor (Part 4)
Lekcje, Nauka.pl Lesson 11, Lesson 11
You are on your first military mission
You Will Always Remember Your First Time
11 New JLPT N3 Prep Course 11 Lesson No
11 New JLPT N3 Prep Course 11 Lesson Notes
2 3 Unit 1 Lesson 2 – Master of Your Domain
Lekcje, Nauka.pl Lesson 12, Lesson 11
Lekcje, Nauka.pl Lesson 12, Lesson 11
więcej podobnych podstron