
Index
I.Specification of PC Diagnostic Cards…………………………………………………..2
1. Notice……………………………………………………………………………………………2
2. Product Introduction In Brief…………………………………………………….……..2
3. Functional Characteristics………………………………………………………….…….3
4. Type Characteristics…………………………………………………………….………….4
5. Operation Flow……………………………………………………………….……………..5
6. Must-Reads of Users……………………………………………………………….………6
7. Hexadecimal Characters and Particular Characters of Our
8. Meanings of POST codes……………………………………………………………….10
AWARD……………………………………………….…………………………………………..18
Phoenix…………………………………………………………………………………………..22
9. Description of beep code……………………………………………………………….28
10. Common Problems & Solutions…………………………………………………….29
II. Detailed Specification of Diagnostics & Stability-Test Card……………….34
1)Figure of Diagnostics & Stability-Test Card Components (MKCP6 for
example)…………………………………………………………………………………………34
2)Figure of Connection to Main Board…………………………….……………..34
2. Differences and Functional Characteristics of Diagnostics & Stability-Test
Cards and Common Analyzer Cards……………………………………………35
3. Explanation of Diagnostics & Stability-Test Card Indicator………………...36
4.Testing Status……………………………………………………………………………….36
5.Notice………………………………………………………………………………..………..36
1
I.Specification of PC Diagnostic Cards
1. Notice
Notice:Only use this product with guidance of this instruction and under
the endurance of it. The safety grading of this product accords with the IEC
61010-1(2001).EN 61010-1(2001)standards and it has got the international CE
certificate. The safety environment for this product is as below: indoor
circumstance; operating temperature and relative humidity (non-condensing)
≤10℃, 11℃~30℃(≤80% relative humidity), 31℃~40℃(≤75% relative
humidity), 41℃~50℃(≤45% relative humidity); storage temperature and relative
humidity: -20℃~60℃(0~80% relative humidity).
The length of warranty of our PC Diagnostic Cards is one year. Please contact
our factory immediately for return and change of products if they work wrong
during this period, except usage beyond the length of warranty, torn or unsealed
facing slip, incorrectly usage without the guidance of this manual, damage by drop
and collision or force majeure.
2. Product Introduction In Brief
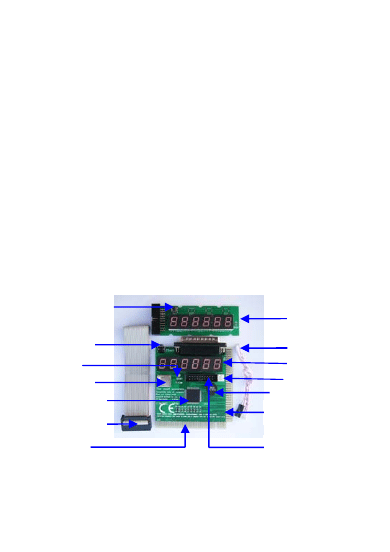
1. Product Appearance (KLPI6-SD for example)
Display Check Switch
Check Switch
Speaker Needle Seat
Integrated Circuit
Package
LED indicator
External Display Panel
Speaker
USB Interface
Display Needle Seat
Ext rnal Display
e
FFC
Speaker Cable
RESET Indicator
Light
ISA Interface
PCI Interface
Notice: This is the typical configuration with nearly all components and
functions, of which the real configuration can be designed according to different
types and individual demand.
2. Part of Working Principle of POST Code
It tests and diagnoses the target by internal intelligent programs and displays
2

all results by codes. With the meaning explanation of the POST codes of this
manual, the users can find out what are the problems quickly. Especially when the
PC operating system fails to start, the screen is blank, or the buzzer doesn’t work,
the advantages of using this card is obvious! It will help you solve the complicated
problems easily and efficiently.
Each time when the PC is boosting, the intelligent program will test all
components such as circuit, memory, keyboard, display system, hard disks and
floppy drive strictly, analyze the system configuration and initialize the basic I/O
setting automatically. If every part works normally, the system will keep on. It
tests the key components first and forces the PC to halt if there is failure, the
cursor will not appear and the screen shows nothing. Then PC will go on
none-key-component test. It keeps on even there is failure, with failure
information showing on screen. When the computer works abnormally, especially
key-component failure which not shown on screen, the advantage of using our PC
Diagnostic Card is obvious. The failure will be found soon with POST code showing
on PC Diagnostic Card.
3. Functional Characteristics
1. There is no need to install software. Combining advanced technology and user’s
behavioral science, QiGuan Electronics Co., Ltd humanized PC Diagnostic Card
to be user-friendly. it is very easy to use. Thus it is not only applicable to the
technicians, but also general PC users. It will make all new users professional
masters.
2. Using large-scale IC integrated module with compact structure and stable
performance, the high quality Diagnostics & Stability-Test Card can meet the
high standards. With more internal resources, it has more excellent
anti-jamming performance and lower rate of self failures.
3. Functional limitation of traditional PC Diagnostic Cards has been broken, e.g.
we have created standard PCI interface and varieties of auxiliary parts that
enhance the accuracy and reliability of PC Diagnostic Cards. And part of its
functions depend on BIOS no more, and never limit to POST contents and
manners.
4. Unlike traditional PC diagnostic cards that become useless when the system
booted, KLPI6-SD helps you solve problems like system halt, blank screen, and
instability, and keeps your computer running safely and stably.
5. Unprecedented compatibility. KLPI6-SD is compatible with all kinds of high,
middle and low classes of motherboards in the market, and shows more
accurate failure codes, there is even no exception for Intel 9XX series that
represent the mainstream of top motherboards (such as SIS671) which can not
be tested by the traditional PC diagnostic card.
6. The random initial codes which mislead the diagnoses are thoroughly
eliminated. Kingnostic Card no more depends on RESET signal of the test
computer, and can prevent impulse loss, correct failures automatically, even if
the reset logic of the test computer is abnormal, it will not influence the testing
functions of Kingnostics Cards and New Generation PC Diagnostic Card.
7. Adopting excellent control algorithm to page down the codes, which is easier
3
than the traditional diagnostic cards do, Kingnostic cards greatly lower the rate
of inappropriate operation that lead to a low accuracy in test.
8. All the indicator lamps (such as CLK, IRDY and FRAME) are 100% correct.
They will be ON only when there are signals and OFF when there are no signals,
while the traditional ones will be ON once they have signals. Take the CLK
indicator for example, it makes the users see clearly even single 10ns impulse. It
will not be on when there is no CLK signal impulse, no matter the current signal
stays at high or low level, which won’t mislead the user. No pulse loss, and no
useless pulse.
9. The Kingnostics Cards are even more advanced than the New Generation PC
Diagnostic Cards. They extremely eliminated wrong codes, redundant codes,
and won’t miss any needed codes. The users can check all the failure codes by
check switch. They are really the most accurate all around the world.
10. Eliminated the fault that test stops halfway, which makes test more efficient
and reliable.
11. Supports 80h, 84h and 300h ports
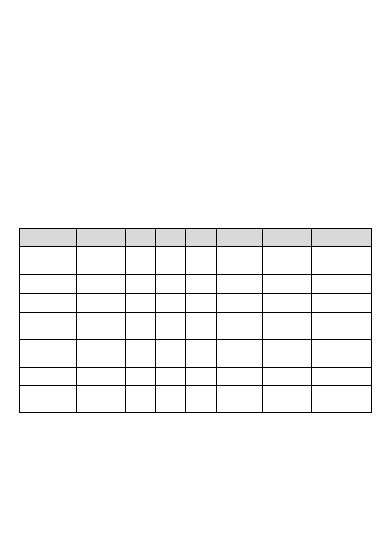
4. Type Characteristics
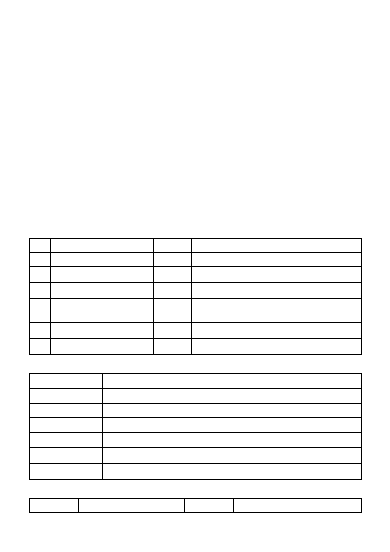
1) Table of Type Characteristics
Type
Series
Warning
PCI
ISA
LPT
MiniPCI
External
Display
Remarks
PI2 or
KPI2
Series
Optional
√
√
—
—
Optional
KPI4/KPI6
Series
√
√
√
—
—
Optional
P or KP
Series
Optional
√ — —
— Optional
KL Series
—
—
—
√ — —
Parallel
Port, by
USB-Power
KLP
Series
√
√ — √ — Optional
Parallel
Port, by
USB-Power
KM Series
—
—
—
—
√ Optional
KLM
Series
— —
—
√
√ Optional
Parallel
Port, by
USB-Power
Descriptions:
①
KL4 and KL6 are applicable to desktops and laptops with parallel port which
support POST codes.
②
KPI4 and KPI6 can be plugged in both PCI slot and ISA slot.
③
KM4 and KM6 can be plugged in MiniPCI slots of laptops.
④
KLM4 and KLM6 series can be plugged in MiniPCI slots of laptops and
parallel ports of laptops and desktops.
⑤
KLP4 and KLP6 can be plugged in PCI ports and parallel ports of the
desktops and laptops.
4

⑥
KLPI4 and KLPI6 can be plugged in PCI, ISA and LPT ports. Their test mode
supports kinds of interfaces.
2) There are beep warning functions for KPI4, KPI6, KLP4 and KLP6.
3) KPI4 and KPI6 plugged incorrectly, no component will be burnt out.
4) By KPI4, KPI6, KM4 or KM6, the important signals of mainboard can be tested
even without CPU, memory and video card.
5) KL4 and KL6 are USB-powered. Not plugged in the parallel port, KL4 or KL6
will not show codes no matter it is powered, which won’t mislead the users.
6) External Display. You can see the failure codes from outside.
5. Operation Flow
1. Shut down the power and take out all extended cards. Plug the PC Diagnostic
Card in ISA slot (Note: The front side of the component on ISA slot should face the
power supply, otherwise neither PC Diagnostic Card nor the mainboard will work
though they won’t be burnt out), PCI slot, MiniPCI slot or parallel port (LPT). (Note:
When using KL4, KL6, KLP4 or KLP6, plug the card into the parallel port first, then
connect the USB line, finally start up the computer.)
2. The PC Diagnostic Card starts running and the LED shows the codes. The user
may determine the testing result with POST Code Table (except extended
equipments ).
3. If the result shows failure, please shut down the power and solve the problem
according to the POST Code Table. And repeat from step 2.
4. If the result shows normal, please shut down the power and plug in the video
card, I/O card, keyboard, hard drives and extended cards, and restart up the
computer.
5. The PC Diagnostic Card will start running again and the LED shows the codes.
Determine the test result again with POST Code Table (It shows the working
status of all hardware this time).
6. If the result shows failure, please shut down the power again and solve the
problem according to the POST Code Table. And then repeat from step 2.
7. The test result shows normal, but the operating system can not boot, then the
hitch may lie somewhere of software, disk drive, disk controller or DMA circuit.
Please make relative treatment.
Flow Chart of PC Diagnostic Card Operation (lowest system for example)
5
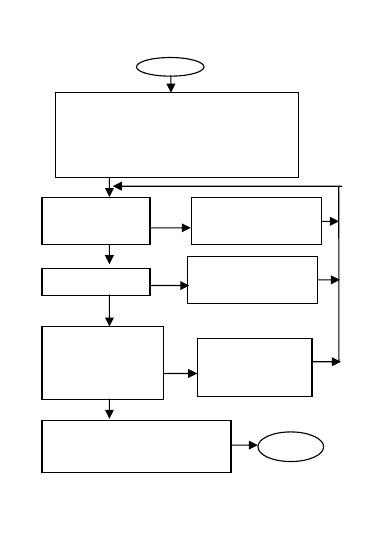
end
correct
Show down the power and take out all extended cards. Plug
the PC Diagnostic Card in ISA slot (Note: The front side of
the component on ISA slot should face the power supply,
otherwise neither PC Diagnostic Card nor the mainboard
will work though they won’t be burnt out.), PCI slot,
MiniPCI slot or parallel port (LPT). (Note: When using KL4,
KL6, KLP4 or KLP6, plug it to the parallel port first, connect
the USB line, and start up the computer finally.)
Whether all LEDs work
normally (BIOS signal
lamps may flash)?
Found failure code?
Shut down the power and
plug in the video card, I/O
card, keyboard, hard
drives and extended
cards, then restart and
check whether the failure
code is shown.
Shut down the power and
make treatment according
to POST Code Table in this
user manual
Shut down the power
and make treatment
according to POST Code
Table in this user
manual
failure
abnormal
Shut down the power and
make treatment according
to POST Code Table in this
user manual.
failure
normal
correct
If the operating system can not start yet, then it
is probably the software, disk drive, disk
controller or DMA circuit that do not work.
Test result shows normal.
start
6. Must-Reads of Users
1. The same code of different brand motherboard BIOS means differently. So
please make clear what is the version and type of the BIOS that you are going to
6
test. You may refer to the computer manual, check it from the CMOS chip on the
mainboard or the screen when system is starting, or contact the BIOS supplier.
The code meanings of this booklet are only for your reference.
2. The POST Code Table shows code values in ascending sequence, and
coding order on the card is decided by BIOS. Please pay attention that the POST
code values are usually continuous for common BIOS.
3. The mainboard pass the self test if the PC Diagnostic Card shows “FF” or
“00” after a series of codes. The mainboard doesn’t run if it stops and shows “no”,
“no-c” or “no-CPU” (“no” for short below). Is the CPU broken or is it correctly set?
Is the power supply normal? Does the battery goes moldy? Refer to the 2
nd
clause of Chapter 10 for treatments when New Generation PC Diagnostic Cards
and Kingnostics Cards show “no”.
4. The PC Diagnostic Card shows normal when the mainboard which works
wrong, probably the reason is that you have set no warning on CMOS, so the card
will go on showing “00” or “FF” until it has found critical failure. Solution: Reset the
CMOS and make it give warning for all failures, and then restart the computer. The
PC Diagnostic Card will stop coding and show failure codes for all failures. The user
can make relative treatment according to the failure codes.
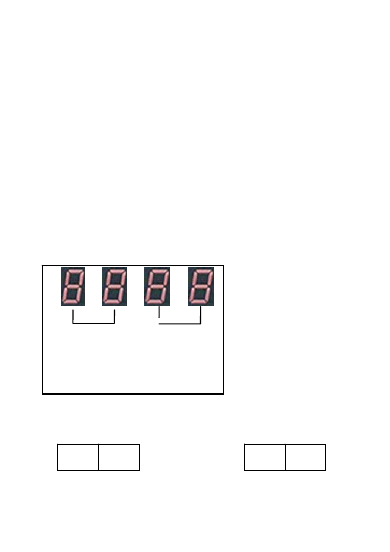
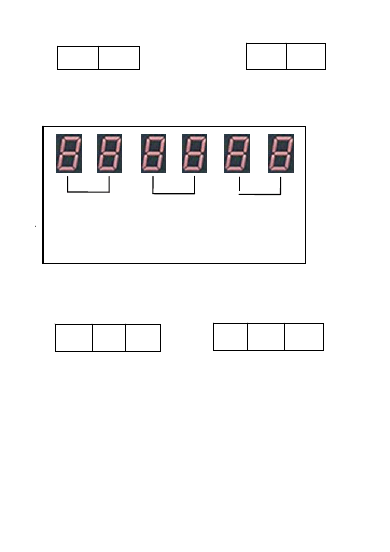
5. For the four digit PC Diagnostic Cards such as KPI4, KLPI4, KL4 and KLP4,
the kilobit and the hundreds on the LED show POST codes of the test computer,
and the tens digit and the unit digit show the one that is before the failure code, as
below:
Figure 1: Four Digit POST Code Display
For example: If the LED shows D0, D1, D2, D3, D4, D5, D6, D7, D8, D9, DA, Db,
DC and stops when testing a computer, the four digit card will show below as
Figure 2, press the check switch once, it will go on to show as Figure 3.
failur
e c
od
e
the
c
od
e bef
o
re
the
failur
e
D9
DA
DC
Db
Figure 2: when the card stops running
Figure 3: after press the check switch once
Press the check switch again, it will show as Figure 4; Press for a third time,
Figure 5, and it means there is no more codes to view.
7
‐c
no
Figure 4: press the check switch once more
Db
DC
Figure 5: press the check switch thirdly.
Press the check switch fourthly, it goes back to failure codes as Figure 2.
6. For six Digit PC Diagnostic Cards such as KPI6, KLPI6, KL6 and KLP6, the
codes show as below:
Figure A: Six Digit POST Code Display
For example: If the LED indicator shows D0, D1, D2, D3, D4, D5, D6, D7, D8,
D9, DA, Db, DC and shops when testing a computer, the six-bit-code card will
show as Figure B, press down the check switch once, it will go on to show as
Figure C, but Figure B back after the switch rebounds.
the
las
t c
od
e
the
c
ode bef
o
re
the
las
t c
od
e
failur
e c
od
e
DA
D9
D7
D8
Db
DC
Figure B: when the card stops running
Figure C: press down the check switch without rebound.
For another example: If the LED shows 15 codes such as C0, C1, C2, C3, C4,
C5, C6, 31, 32, 33, 34, 35, 85, 86 and FF when testing the computer. You can see
six codes shown as C5, C4, C3, C2, C1 and C0 if you press down the check switch
when it begins to show C5. When restart the computer, you can see 35, 34, 33, 32,
31 and C6 if you press down the check switch when it begins to show 35. Restart
the computer and wait until it shows “FF”, you can see FF, 86, 85, 35, 34, 33 clear.
So you will know all the POST codes no matter how many codes there are.
7. All Kingnostics Cards (including six digit, four digit and two digit) can test
the redundant code and missing code phenomena of the traditional PC Diagnostic
Cards. Plug a Kingnostics Card a traditional PC Diagnostic Card in the same
mainboard, power on and compare their codes, and you will know the incorrect
code of the traditional PC Diagnostic Card.
The code display of the two-digit Kingnostics Card is similar with that of the
8

four-digit Kingnostic Card. It shows a 2 digit code for each press. And it goes back
to show “no” at the sixth press, and the last code that the test stopped at the
seventh press. For example: If the LED shows D0, D1, D2, D3, D4, D5, D6, D7, D8,
D9, Da, Db and stops at DC during testing, it will show Db for the first press, and
Da the second press, …D7 the fifth press, and “no” the sixth press. And it goes
back to DC for the seven press, as below:
POST Code Figure of Two Digit Kingnostics Card
POST Code Figure of Two Digit Kingnostics Card
press check switch
DC
Db
DA
D9
D8
D7
no
8. The KL4, KLP4, KL6 and KLP6 with parallel pots are applicable to the
laptops and desktops with LPT. The failures can be found without opening the
computer cases.
8. The KL4, KLP4, KL6 and KLP6 with parallel pots are applicable to the
laptops and desktops with LPT. The failures can be found without opening the
computer cases.
The USB line is used for power supply only. So the user have connect the
parallel port with LPT, and then connect the USB of the PC Diagnostic Card and the
USB of the computer with the USB line attached, finally turn on the PC and check
the failure codes.
The USB line is used for power supply only. So the user have connect the
parallel port with LPT, and then connect the USB of the PC Diagnostic Card and the
USB of the computer with the USB line attached, finally turn on the PC and check
the failure codes.
Note: Nowadays, most computers made in mainland and Taiwan use
AMIBIOS and PHOENIXBIOS mainboard, and they can be tested with PC
Diagnostic Cards that have parallel port. Other computers such as IBM, TOSHIBA,
HP, DELL and SONY usually PHOENIXBIOS or IntelBIOS, the ones that use
PHOENIXBIOS can be tested with PC diagnostic cards that have parallel port.
9. Time for the reset signals of ISA, PCI and LPT ports are different. Maybe
PCI card still shows “no” when ISA card start to show POST codes. And time to
show POST code for LPT port is also different with other interfaces such as PCI and
ISA, and the parallel port and other interfaces show different codes when the PC
works normally, because of different time sequence for PC managing different
interfaces. But the failure codes shown are the same no matter what type of
interface is used to in test.
10. The two digit and four digit PC Diagnostic Cards are not so mysterious as
you imagine. What they can do is just to display the POST codes that indicate the
failures (especially when the screen is blank). Some POST programs of BIOS stop
at the last code which the system fails to pass (failure code), while the others stop
at the last code which the system succeeds to pass (non failure code). With code
recheck functions, KPI4, KM4A, KL4 and KLP4 can show what codes the self test
has passed, from which the user can know what components work well. Both
functions and performances of two digit and four digit PC diagnostic card are not
better than those of KPI6, KM6, KL6 and KLP6. Because there is a wide range of
code collection, many versions and types of BIOS, varieties of content of POST
programs, new functions of BIOS, the meanings of codes may be not complete
and perfect. So the code meanings in this manual are only for your reference.
Please contact the mainboard manufacturers and BIOS makers for the most
accurate and latest POST code information.
9
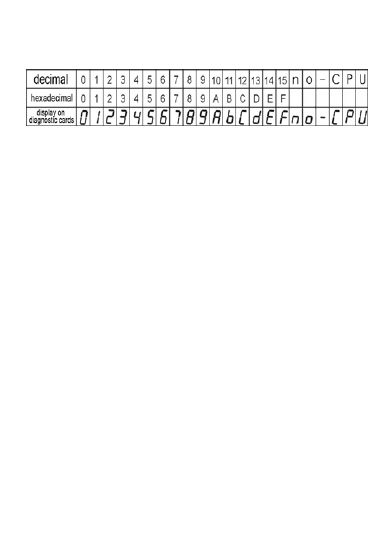
7. Hexadecimal Characters and Particular Characters
of Our Cards
8. Meanings of POST codes
AMI
(00) Going to give control to INT 19H boot loader.
(10) Processor register test about to start, and NMI to be disabled,286 reg. test
about
to start.
(02 )NMI is disabled. Power on delay starting. Power on de- lay starting.286reg.
(03) Power on delay complete. To check so ft reset/power-on. Any initialization
before keyboard BAT is in progress. ROM BIOS checksum(32K at F800:0) passed.
(04) Any initialization before keyboard BAT is complete. Reading keyboard SYS bit,
to check soft reset/power-on. Reading keyboard SYS bit, to check soft reset/power
On. Keyboard controller test with and without mouse passed. 8259 initialization
OK.
(05)Soft reset/power -on determined. Going to enable ROM. i.e. disable
shadow RAM/Cache if any. Going to enable ROM, .i.e. disable shadow RAM/cache
if any. Chipset initialization over, DMA and interrupt controller disabled. CMOS
pending interrupt disabled.
(06) ROM is enabled. Calculating ROM BIOS checksum, and waiting for Keyboard
controller input buffer to be free. Calculating ROM BIOS checksum. Video disabled
and sys- tem timer test begin. Video disabled and system timer counting OK.
(07) ROM BIOS checksum passed .CMOS shutdown register test to be done
next.ROM BIOS checksum passed, Keyboard controller I/B free. Going to issue the
BAT command to keyboard controller. Going to issue the BAT command to
keyboard controller.CH-2 of 8254 initialization half way.CH-2 of 8253 test OK
(08) CMOS shutdown register test done. CMOS checksum calculation to be done
next. BAT command to keyboard controller is issued. Going to verify the BAT
command. Going to verify the BAT command. CH-2 of timer initialization over.
CH-2 delta count test OK.
(09)CMOS checksum calculation is done, CMOS diag byte written. CMOS initialize
to begin. Keyboard controller BAT result verified. Keyboard command byte to be
written next.(09)Keyboard command byte to be written next. CH -1 of timer
initialization o ver. CH-1 delta count test OK.
(0A) CMOS initialization done(if any). Keyboard command byte code is issued.
Going to write command byte data. Going to write command byte data. CH -0 of
timer initialization over. CH-0 delta count test OK.
10

(0B) CMOS status register initialize done. Keyboard controller command byte is
written. Going to issue Pin -23, 24 blocking/ unblocking command. Going to issue
pin -23, 24 blocking/ unblocking command. Refresh started. Parity status cleared.
(0C) KB controller I/B free. Going to issue the BAT command to keyboard controller.
Pin-3,24 of keyboard controller is blocked/unblocked. NOP command of keyboard
controller to be issued next. NOP command of keyboard controller to be issued
next. System timer started. Refresh & system timer OK.
(0D) BAT command to keyboard controller is issued. Going to verify the BAT
command. NOP command processing is done. CMOS shutdown register test to be
done next. CMOS shutdown register test to be done next. Refresh link toggling
passed. Refresh link toggling passed.
(0E) Keyboard controller BAT result verified. Any initialization after KB controller
BAT to be next. CMOS shut down register R/W test passed. Going to calculate
CMOS checksum, and update DIAG. Going to calculate CMOS checks um, and
update DIAG Byte. Refresh period ON/OFF 50% OK.
(0F) initialization after KB controller BAT done. Keyboard command byte to be
written next. CMOS checksum calculation is done, DIAG byte written. CMOS Init.
To begin (If "INIT C MOS IN EVERY BOOT IS SET"). CMOS initialization to begin (If
"INIT CMOS IN E VERY BOOT IS SET").
(10) KB controller command byte is written. Going to issue p in-23,24
blocking/unblocking command. CMOS initialization done(if any). CMOS status
register about to Init for Date and Time. CMOS status register about to Init for
Date and Time. Refresh on and about to start 64K base memory test. Confirmed
refresh ON & about to start 64 K memory.
(11) Pin23,24 of keyboard controller is blocked/unblocked. Going to check to
check pressing of <INS>key during power-on. CMOS status register initialized.
Going to disable DMA and Interrupt controllers. Going to disable DMA and
interrupt controllers. Address line test passed. Address line test passed.
(12) Checking for pressing of <INS> key during power-on done. Going to disable
DMA and Interrupt controllers. D MA controller#1,#2,interrupt controller#1,#2
disabled. About to disable Video display and Init port -B. About to disable video
display and Init port -B.64K base memory test passed. 64K base memory test
passed.
(13) DMA controller#1,#2 ,interrupt controller#1,#2disa- bled. About to disable
Video display and initialize port -B. Chipset initialize/auto memory detection about
to begin. Replace first memory SIMM.(13)Chipset initialize/auto memory detection
about to begin. Check first SIMM.(13) Interrupt vectors initialized.
(14) Chipset initialization/auto memory detection over. To uncompress the POST
code if compressed BIOS. 8254 timer test about to start. 8254 timer test about to
start.8042 keyboard controller test OK.
(15) POST code is un -compressed.8254 timer about to start. CH-2 timer test
halfway. 8254 CH-2 timer test to be completed. 8254 CH-2 timer test to be
completed. Interrupt vectors initialized. CMOS read/write test OK.
(16) CH-2 timer test over.8254 CH-1 timer test to be completed. CMOS
checksum/battery check OK.
(17) CH-1 timer test over. 8254 CH-0 timer test to be completed. Monochrome
11

mode set.
(18) CH-0 timer test over. About to start memory refresh. Color mode set.
(19) 82 timer test over. Memory refresh test to be done next. About to look for
optional video ROM at segment C000 and give control to the optional video ROM if
present.
(1A) Memory refresh line is toggling. Going to check 15 micro second ON/OFF time.
Return from optional video ROM. Optional video ROM control OK
(1B) Memory refresh period 30 micro second test complete. Base 64K memory test
about to start. Shadow RAM enable /disable completed. Display memory
read/write test OK.
(1C)Display memory read/write test for main display type as set in the CMOS
setup program over. Display memory read/write test for alternate display OK.
(1D) Display memory read/write test for alternate display type complete if main
display memory read/write test returns error. Video retrace check OK. Set
configuration from CMOS.
(1E) Global equipment byte set for proper display type.
(1F) Video mode set call for mono/color be gins. Mode set call for mono/color OK.
Set EISA mode; If EISA non-volatile memory checksum is good, execute EISA
initialization. If not, execute ISA test an clear EISA mode flag. Test EISA
configuration memory integrity (checksum & communication interface).
(20) Memory refresh period 30 micro second test complete. Base 64K
memory/address test started. Address line test to be done next. Video mode set
completed.
(21) Address line test passed. Going to do toggle parity. ROM type 27256 verified.
Video display OK.
(22) Toggle parity over. Going for sequential data R/W test on 64 K memory. Power
on message display OK.
(23)Base 64K sequential data R/W test passed. Going to SET BIOS stack and to do
any setup before Interrupt vector Init. Any setup before interrupt vector Init about
to start. Power on message displayed.
(24) Setup required before vector initialization complete. Interrupt vector
initialization about to begin.
(25) Interrupt vector initialization done. Going to read Input port of 9042 for turbo
switch(if any).Going to read I/O port of 8042 for turbo switch(if any).
(26) I/O port of 8042 is read. Going to initialize global data for turbo switch. Going
to initialize global data for turbo switch.
(27) Global data initialization for turbo switch is over. Any initialization before
setting video mode to be done next.
(28) Initialization before setting video mode is complete. Going for monochrome
mode and color setting. Check extended memory.
(29) Monochrome mode setting is done. Going for color mode setting.
(2A) Monochrome Color mode setting is done. About to go for toggle parity before
optional ROM test. About to go for toggle parity before optional ROM Check.
(2B) Toggle parity over. About to give control for any setup required before
optional video ROM check.
(2C)Processing before video ROM control is done. About to look for optional video
12

ROM and give control.
(2D) Optional video ROM control is done. About to give control to do any
processing after video ROM returns control.
(2E) Return from processing after the video ROM control. If EGA/VGA not found
then do display memory R/W test.
(2F) EGA/VGA not found. Display memory R/W test about to begin.
(30) Display memory R/W test passed. About to look for the retrace checking.
Virtual mode memory test about to begin.
(31) Display memory R/W test or retrace checking failed. About to do alternate
Display memory R/W test. Virtual mode memory test started.
(32) Alternate display memory R/W test passed. About to look for the alternate
display retrace checking. Processor executing in virtual mode.
(33)Video display checking over. Verification of display type with switch setting
and actual card to begin. Verification of display type with switch setting and Actual
Card to begin. Memory address line test in progress.
(34)Verification of display adapter done. Display mode to be set next. Memory
address line test in progress.
(35) Display mode set complete. BIOS ROM data area about to be checked.
Memory below 1MB calculated.
(36) BIOS ROM data area check over. Going to set cursor for power on message.
Memory above 1MB calculated.
(37) Cursor setting for power on message id complete. Going to display the power
on message. Memory test about to start.
(38)Power on message display complete. Going to read new cursor position.
Memory below 1MB initialized.
(39)New cursor position read and saved. Going go display the Hit< DEL>message.
Memory above 1MB initialized.
(3A) Check memory, first 64K,one long beep. Reference string display is over.
Going to display the Hit<ESC> massage. Memory size display initiated. This will be
updated when the BIOS goes through the memory. Award (3A)Check memory.
(3B) Hit<DEL>or<ESC>message displayed. Virtual mode memory test about to
start, About to start below 1MB memory test.
(3C) Memory test below 1MB completed and about to start above 1MB test.
Award (3C)Set flag to allow users to enter CMOS setup utility. Setup enabled.
Phoenix (3C)Configure advanced chipset registers.(Beep)=1 -4-4-1. Determine
relative CPU speed.
(3D)Memory test above 1MB completed.
(3E) About to go to real mode(shutdown).
(3F) Shutdown successful and Processor in real mode.
(40)Preparation for virtual mode test started. Going to verify from video memory.
CACHE memory on and about to disable A20 address line.
(41) Returned after verifying from display memory. Going to prepare the
descriptor babbles. A20 address line disabled successful.
(42)descriptor tables prepared. Going to enter in virtual mode for memory test.
486 internal cache turned on. About to start DMA controller t est.
(43) Entered in the virtual mode. Going to enable interrupts for diagnostics mode.
13

About to start DMA controller test.
(44) Interrupts enabled(if post switch is on). Going to initialize data to check
memory wrap around at 0:0.
(45) Data initialized. Going to check for memory wrap around at 0:0 and the total
system memory size.
(46) Memory wrap around test done. Memory size calculation over, writing pat
terns to test memory.
(47)Pattern to be tested written in extended memory, 640 K memory.
(48)Patterns written in base memory. Going to find out amount of memory below
1M memory.
(49)Memory below 1M found and verified. Going to find out amount of memory
above 1M memory.
(4A)Amount of memory above 1M found and verified. Going for BIOS ROM data
area check.
(4B) Amount o f memory above 1M found and verified. Check for soft reset and
going to clear memory below 1M for reset (If power on, go to check point#4Eh).
BIOS ROM data area check over. Going to check <ESC> and to clear memory
below 1M for soft reset.
(4C) Memory below 1M cleared. (SOFT RESET) Going to clear memory above 1M.
(4D) Memory above 1M cleared. (SOFT RESET)Going to save the memory size.
(GOTO check point#52h).
(4E) Memory test started. (NO SOFT RESET) About to display the first 64K
memory test.
(4F) Memory size display started. This will be updated during memory test. Going
for sequential and random memory test. Processor in real mode after shutdown.
(50) Memory testing/initialization below 1M complete. Going to adjust displayed
memory size for relocation /shadow. DMA page register test complete.
(51) Memory size display adjusted due to relocation /shadow. Memory test above
1M to follow. DMA unit -1 base register test about to start.
(52) Memory testing/initialization below 1M complete. Going to save memory size
information. Going to prepare to go back to real mode. DMA un it-1 channel OK,
about to begin CH-2.
(53) Memory size information is saved. CPU registers are saved. Going to enter in
real mode. DMA CH-2 base register test OK.
(54) Shutdown successful, CPU in real mode. Going to restore registers saved
during preparation for shut down. About to check F/F latch for unit-1 and unit-2.
(55) Registers restored. Going to disable gate A20 address line. F/F latch for both
units checked.
(56) A20 address line disable successful. BIOS ROM data area about to be checked.
DMA unit 1 and 2 programming over and about to initialize 8259 interrupt
controller.
(57) A20 address line disable successful. BIOS ROM data area check halfway. BIOS
ROM data area check to be com plete.8259 initialization over.
(58) Memory size adjusted for relocation/shadow. Going to clear Hit<DEL>
message. BIOS ROM data area check over. Going to clear Hit<ESC > message.
8259 mask register check OK.
14

(59) Hit<ESC> message cleared. <Wait..> message displayed. About to start
DMA and interrupt controller test. Master 8259 mask register OK, about to start
slave.
(5A) About to check timer and keyboard interrupt level.
(5B) Timer interrupt OK.
(5C) About to test keyboard interrupt.
(5D) ERROR! Timer/keyboard interrupt not in proper level.
(5E) 8259 interrupt controller error.
(5F) 8259 interrupt controller test OK.
(60) DMA page register test passed. About to go for DMA #1, verify from display
memory.
(61) Display memory verification over. About to go for DMA #1 base register test.
(62) DMA#1 base register test passed. About to go for DMA #2 base register test.
(63) DMA #2 base register test passed. About to go for BIOS ROM data area
check.
(64) BIOS ROM data area check halfway. BIOS ROM data area check to be
completed.
(65) DMA #2 base register test passed. About to program DMA unit 1 and 2.
(66) DMA unit 1 and 2 programming over. About to initialize 8259 interrupt
controller.
(67) 8259 initialization over. About To start keyboard test.
(70) Start of keyboard test.
(71) Keyboard controller BAT test over.
(72) Keyboard interface test over, mouse interface test started.
(73) Global data initialization for keyboard/mouse over.
(74) Display 'SETUP' prompt and about to start floppy setup.
(75) Floppy setup over.
(76) Hard disk setup about to start.
(77) Hard disk setup over.
(79) About to initialize timer data area.
(7A) Timer data initialized and about to verify CMOS batter y power.
(7B) CMOS batter y verification over.
(7D) About to analyze POST results. About to analyze diagnostic test results for
memory.
(7E) CMOS memory size updated.
(7F) Look for <DEL> key and get into CMOS setup if found. About to check
optional ROM C000:0.
(80) Keyboard test started, clearing output buffer, checking for stuck key, About to
issue keyboard reset command. About to give control to optional ROM in segment
C800 to DE00.
(81) Keyboard reset error/stuck key found. About to issue keyboard controller
interface test command. Optional ROM control over.
(82) Keyboard controller interface test over. About to write command byte and Init
circular buffer. Check for printer ports and put the addresses in global data area.
(83) Command byte written, global data Init done. About to check for lock -key.
Check for RS232 ports and put the addresses in global data area.
15

(83) Command byte written, global data Init done. About to check for lock -key.
Check for RS232 ports and put the addresses in global data area.
(84) Lock-key checking over. About to check for memory size mismatch with CMOS.
Co-Processor detection over. 80287 check/test OK.
(85) Memory size check done. About to display soft error and check for password
or bypass setup. About to display soft error message. If no video replace Video
card.
(86) Password checked. About to do programming before setup. About to give
control to system ROM at segment E000.
(87) Programming before setup complete. Going to uncompress SETUP code and
execute CMOS setup. System ROM E000:0 check over.
(88) Returned from CMOS setup program and screen is cleared. About to do
programming after setup.
(89) Programming after setup complete. Going to display power on screen
message.
(8A) First screen message displayed. About to display <WAIT…>message.
(8B) First screen message displayed <WAIT...> message displayed. About to do
Main and Video BIOS shadow.
(8C) Main and video BIOS shadow successful. Setup options programming after
CMOS setup about to start.
(8D) Setup options are programmed, mouse check and Init to be done next. Going
for hard disk, floppy reset.
(8E) Mouse check and initialization complete. Going for hard disk controller reset.
About to go For floppy check.
(8F) Hard disk controller reset done. Floppy setup to be done nest.
(90) Floppy setup is over. Test for hard disk presence to be done.
(91) Floppy setup complete. Hard disk setup to be done next.
(92) Hard disk setup complete. About to go for BIOS ROM data area check.
(93) BIOS ROM data area check halfway. BIOS ROM data area check to be
completed.
(94) Hard disk setup complete. Going to set base and extended memory size.
BIOS ROM data area check over.
(95) Memory size adjusted due to mouse support, hard disk type-47. Going to
verify from display memory.
(96) Memory size adjusted due to mouse support, hard disk type -47.Going to do
any Init before C800 optical ROM control. Returned after verifying from display
memory.
(97) Any Init before C800 optional ROM control is over. Optional ROM check &
control will be done next.
(98) Optional ROM control is done. About to give control to do any required
processing after optional ROM returns control.
(99) Any initialization required after optional ROM test over. Going to setup timer
data area and printer base address .
(9A) Return after setting timer and printer base address. Going to set the RS -232
base address.
(9B) Returned after RS-232 base address. Going to de any initialization before
16

Co-Processor test.
(9C) Required initialization before Co-Processor is over. Going to initialize the
Co-Processor next.
(9D) Co-Processor initialized. Going to do any initialization after Co-Processor test.
(9E) Initialization after Co-Processor test is completed. Going to check expander
keyboard, keyboard ID and number-lock.
(9F) Extended keyboard check is done, ID flag set. Number-lock on/off. Keyboard
ID command to be issued.
(A0) Keyboard ID command issued. Keyboard ID flag to be reset. Compaq (A0)
Start of diskette tests.
(A1) Keyboard ID flag reset . Cache memory test to follow.
(A2) Cache memory test over. Going to display any soft errors.
(A3) Soft error display complete. Going to set the keyboard type matric rate.
(A4) Keyboard type matric rate set. Going to program memory wait states.
(A5) Memory wait states programming over. Going to clear the screen and enable
parity/NMI.
(A6) Screen cleared. Going to enable parity and NMI.
(A7) NMI and parity enabled. Going to do any Initialization required before giving
control to optional ROM at E000.
(A8) Initialization before E0 00 ROM control over. E000 ROM to get control next.
(A9) Returned from E000 ROM control. Going to do any init required after E000
optional ROM control.
(AA) Initialization after E000 optional ROM control is over. Going to display the
system configuration.
(B0) System configuration is displayed. Going to un-com-press SETUP code for
hot-key setup.
(B1) Un-compressing of SETUP code is complete. Going to copy any code to
specific area.
(C2) NMI is Disable. Power on delay start on.
(C3) Check memory(Cache, Video or first 64 K).
(C5)Power on delay complete. Going to enable ROM i.c. disable Cache if any.
(C6) Calculating ROM BIOS checksum.
(C7) ROM BIOS checksum passed. CMOS shutdown register test to be done next.
(C8)CMOS Shut down register test done. CMOS checksum calculation to be done
next.
(CA) CMOS checksum calculation is done, CMOS Drag byte written. CMOS status
register about to initializing for Date and Time.
(CB)CMOS status register Init done. Any initialization before keyboard BAT to be
done next.
(CD) BAT command to keyboard controller is to be issued.
(CE) Keyboard controller BAT result verified. Any initialization after KB controller.
(CF) Initialization after KB controller BAT done. Keyboard command byte to be
written next.
(D1) Keyboard controller command byte is written. Going to check pressing of
<INS> key during power-on.
(D2) Checking for pressing of <INS>key during power-on done. Going to disable
17

DMA and Interrupt controllers.
(D3) DMA controller #1,# 2,interrupt controller #1,#2 disable. Video display is
disable and port-B is initialized. Chipset initialize/auto memory detection about to
begin.
(D4) Chipset Initialization/auto memory detection about to begin. Check SIMM for
mismatch.
(D5) RUNT IME code is un-compressed.
(DD) Transfer control to uncompressed code in shadow ram at F000:FFF0.
AWARD
(01) Processor test 1;Processor status(1FLAGS) verification; Tests the following
processor status flags carry, zero, sign, overflow. The BIOS will set each of these
flags, verify they are set then turn each flag off and verify it is off.
(02) Processor test 2; Read/write/verify all CPU registers except SS, SP and BP
with data pattern FF&00. Determine status of manufacturing jumper.
(03) Initialize Chips; Disable NMI, PIE, AIE, UEI, SQWV, disable video, parity
checking, DMA; Reset math Coprocessor; Clear all page registers, CMOS shutdown
byte; Initialize timer 0, 1 and 2 including set EISA timer to a known state; Initialize
DMA controllers 0 and 1; Initialize interrupt controller 0 and 1; Initialize EISA
extended registers. Calculate BIOS EPROM and sign -on message checksum; fail if
not 0. Initialize EISA registers (EISA) BIOS only. Clear 8042 keyboard controller.
(04) Test memory refresh toggle; RAM must be periodically refreshed in order to
keep the memory from decaying. This function assures that the memory refresh
function is working properly. Test CMOS RAM I/O port interface and verify battery
power is available (bat. status=1). Reset 8042.
(05) Keyboard controller self-test enable keyboard inter face. Blank video,
Initialize keyboard; Keyboard controller initialization. Initialize Chips; Disable
NMI, PIE, AIE, UEI, SQWV, disable video, parity checking, DMA; Reset math
Coprocessor; Clear all page registers, CMOS shutdown byte; Initialize timer 0, 1
and 2 including set EISA timer to a known state; Initialize DMA controllers 0 and 1;
Initialize interrupt controller 0 an d 1; Initialize EISA extended Registers. Get
manufacturing status, reset if set(loop 1 -5).
(06) Test memory refresh toggle; RAM must be periodically refreshed in order to
keep the memory from decaying. This function assures that the memory refresh
function is working properly. Initialize chips.
(07) Verifies CMOS's basis R/W functionality. Test CMOS interface and battery
status; Verifies CMOS is working correctly, detects bad battery. Setup low memory;
Early chip set initialization; Memory presence test; OEM chip set routines; Clear
low 64K of memory; Test first 64 K memory; clear lower 256K of memory, enable
parity checking and test parity in lower 256K; test lower 25 If the BIOS detects
error 2C, 2E, or 30 (base 512K RAM error), it displays 6K memory. Set up stack,
beep. Read/write/verify CPU registers.
(08) Setup low memory; Early chip set initialization; Memory presence test; OEM
chip set routines; Clear low 64K of memory; Test first 64K memory; clear lower
256K of memory, enable parity checking and test parity in lower 256K; test lower
256K memory. Set up stack, beep. Setup interrupt vector table in lower 1K RAM
18

area; Initialize first 120 interrupt vectors with SPURIOUS_INT_HD LR and initialize
INT 00h-1Fh according to INT_TBL. Initialize CMOS timer.
(09) Program the configuration register of Cyrix CPU. OEM specific cache
initialization. Early Cache initialization; Cyrix CPU initialization; cache initialization.
Test CMOS RAM checksum; beep; also test extended storage of parameters in the
motherboard chipset; if not warm- booting; display the Test CMOS RAM checksum
message, if bad, or insert key pressed, load defaults if bad. Check BIOS
Checksum.
(0A) Initialize the first 32 interrupt vectors. Initialize INTs 33 to 120.Early Power
Management initialization. Setup interrupt vector table in lower 1 K RAM area;
Initialize first 120 interrupt vectors with SPURIOUS_INT_HDLR and initialize INT
00h-1Fh according to INT_TBL. Initialize key - board; Detect type of keyboard
controller(optional 8242 or 8248, with Nedadon XOR gate control); Set
NUM_LOCK status. Reset keyboard test keyboard controller interface to verify it
returned AAH and responded to enable/disable commands, set keyboard buffer,
enable keyboard and keyboard interrupts for normal use, beep, halt .Initialize
Video controller.
(0B) Verify the RTC time is valid or not. Detect bad battery. Read CMOS data into
BIOS s tack area. Perform PnP initializations. Assign I/O & Memory for PCI devices
(PCI BIOS Only). Test CMOS RAM checksum; beep; also test extended storage of
parameters in the motherboard chipset; if not warm-booting, display the Test
CMOS RAM checksum message, if bad, or insert key pressed, load defaults if bad.
Initialize video interface; Detect CPU clock; Read CMOS location 14b to find out
type of video in use; Detect and initialize video adapter. 8254 timer, channel 0 test.
(0C) Initialization of the BIOS data area(40:00 -40:FF). Initialize keyboard; Detect
type of keyboard controller (optional 8242 or 8248, with Nedadon XOR gate
control); Set NUM_LOCK status. Reset keyboard test keyboard controller interface
to verify it returned AAH and responded to enable/disable commands, set
keyboard buffer, enable keyboard and keyboard interrupts for normal use, beep,
halt. 8254 timer, channel 1 test.
(0D) Program some of the chipset's value. Measure CPU speed for display. Video
initialization including MDA, CGA, EGA/VGA. Initialize video interface; Detect CPU
clock; Read CMOS location 14b to find out type of video in use; Detect and
initialize video adapter. OEM specific -Initialize motherboard special chipset as
required by OEM; initialize cache controller early, when cache is separate from
chipset.8254 timer, channel 2 test.
(0E) Initialize the APIC(Multi-Processor BIOS only). Test video RAM(If
Monochrome display device found). Show startup screen message. Test video
memory; Test video memory, write sign-on message to screen. Setup shadow
RAM-Enable shadow according to setup. Test COMS Shut down byte.
(0F) DMA channel 0 Test. Test DMA controller 0; BIOS checksum test, keyboard
detect and initialization. Test Extended CMOS.
(10) DMA channel 1 Test. Test DMA controller 1 with AA, 55, FF,00 pattern.8237
DMA, channel 0 test.
(11) DMA page register test. Test DMA page registers, use I/O ports t o test
address circuits. POST enables user reboot here. Test DMA page registers. FATAL
19

DISP LAY ERRORS. 8237 DMA, channel 1 test.
(12) Call support 800 -909-3424. Test 8254 timer 0 channel 0. Test DMA page
registers.
(13) Test 8254 timer 0 channel 1. Test keyboard controller.
(14) Test 8254 timer 0 counter 2. Test timer counter 2; Test 8254 timer 0 counter
2. Test memory refresh.
(15) Test 8259 interrupt mask bits for channel 1. Test 8259-1 mask bits; Verify
8259 channel 1 masked interrupt by alternate turning off and on the interrupt line.
Test 1st 64K of system memory.
(16) Test 8259-2 mask bits; Verify 8259 channel 2 masked interrupt by alternate
turning off and on the interrupt line. Setup Interrupt vectors.
(17) Test struck 8259's interrupt bits; Turn off interrupt then verify no interrupt
mask register is on. Setup video I/O operations.
(18) Test 8259 interrupt functionality; Force an interrupt and verify the interrupt
occurred. Test video memory.
(19) Test 8259 functionality. Test stuck NON-Maskable Interrupt bits(Parity/I/O
check);Verify NMI can be cleared. 8259 Interrupt controller, channel 1 mask bits
test.
(1A) Display CPU clock.8259 Interrupt controller, channel 2 mask bits test.
(1B) Test CMOS battery status. Test the system ROM.
(1C)Test CMOS RAM checks um. Test CMOS.
(1E) If EISA NVM checksum is good, execute EISA initialization(EISA BIOS ONLY).
Size system memory.
(1F)Test system memory.
(20) Enable slot 0; Initialize slot 0(system board). (Check memory size). 8259
stuck bits test.
(21) Enable slots 1 through 15; Initialize slot 1.Test stuck NMI bits (parity I/O
check).
(22) Enable slots 2; Initialize slot 2. Test 8259 working.
(23) Enable slots 3;Initialize slot 3. Test protected mode.
(24) Enable slots 4; Initialize slot 4.Size extended memory.
(25) Enable slots 5; Initialize slot 5. Test extended memory.
(26) Enable slots 6; Initialize slot 6. Test protected mode exceptions.
(27) Enable slots 7; Initialize slot 7. Setup cache control or shadow RAM.
(28) Enable slots 8; Initialize slot 8. Setup 8242.
(29) Enable slots 9; Initialize slot 9.
(2A) Enable slots A; Initialize slot A. (2A)8242 initialization.
(2B) Enable slots B; Initialize slot B. Initialize floppy drive and controller.
(2C) Enable slots C; Initialize slot C. Detect & initialize serial ports.
(2D) Enable slots D; Initialize slot D. Detect & initialize parallel ports. Test timer 2.
(2E) Enable slots E; Initialize slot E. Initialize hard drive & controller.
(2F) Enable slots F; Initialize slot F. Detect & initialize 80x87 Coprocessor.
(30) Get base memory & extended memory size. Size base And extended memory
from 256K to 640K and extended memory above 1MB.
(31) Test base and extended memory; Test base memory from 256K to 640K and
extended memory above 1MB using various patterns. Detect & initialize optional
20

ROMs.
(32) Display the Award Plug & Play BIOS extension message(PnP BIOS only).Test
EISA extended memory; If EISA mode flag is set then test EISA memory found in
slots initialization, T his test is skipped in ISA mode and can be skipped with ESC
key in EISA mode.
(33) Call Tech Support 727 -532-4151.
(36) Warm Start shut down.
(38) shadow system BIOS ROM.
(3A) Auto size cache.
(3C) Advanced configuration of chipset registers.
(3D) Initialize keyboard. Install PS/2 mouse. Initialize & install mouse; Detect if
mouse is present, initialize mouse, install interrupt vectors.
(3E)Try to turn on level 2 cache.
(3F) Enable shadow RAM per CMOS RAM setup or if MEMORY TYPE is SYS in the
EISA configuration.
(40) Display virus protest disable or enable.
(41) Initialize floppy disk drive controller.
(42) Initialize hard drive & controller; Initialize hard drive controller and any
drives.
(43) If it is a PnP BIOS, initialize serial & parallel ports. Detect & initialize
serial/parallel ports; Initialize any serial and parallel ports (also game port).
(44) Going to initialize data to check memory re -map at 0:0.
(45) Detect & Initialize math Coprocessor; Initialize math Coprocessor.
(46) Display the setup message(to press Ctrl -Alt-Esc to enter setup), and enable
setup.
(47) Set system speed for boot.
(48) Check video configuration against CMOS.
(49) Initialize PCI bus and devices.
(4A) Initialize all video adapters in system.
(4B) QuietBoot start (optional).
(4C) Shadow video BIOS ROM.
(4E) If there is any error, show all the error messages on the screen & wait for user
to press<F1>. Manufacturing POST loop or display messages; Reboot if
manufacturing POST loop pin is set. Otherwise display any messages and enter
setup.
(4F) If password is needed, ask for password. Clear the Energy Star logo (Green
BIOS only). Security check; Ask password security.
(50) Write all the CMOS values currently in the BIOS stack areas back into the
CMOS. Write CMOS; Write all CMOS values back to RAM and clear screen.
(51) Pre-boot enable; Enable parity checker; Enable NMI, Enable cache before
boot.
(52) Initialize all ISA ROMs. Later PCI initializations(PCI BIOS only). PnP
initializations(PnP BIOS only). Program shadow RAM according to setup settings.
Program parity according to setup setting. Power Management initialization.
Initialize option ROMs; initialize any option ROMs present from C8000h to EFFFFh.
(53) If it is not a PnP BIOS, initialize serial & parallel ports. Initialize time value in
21

BIOS data area. Initialize time value; Initialize time value in 40h BIOS data area.
(55) Check PCI video Card -or replace video card.
(60) Setup virus protection(Boot sector protection).
(61) Try to turn on level 2 cache. Set the boot up speed according to setup setting.
Last chance for chipset initialization. Last chance for power management
initialization. Show the system configuration table.
(62) Setup daylight saving according to setup values. Program the NUM lock, type
rate & type speed according to setup setting. Setup NUM_LOCK; Setup
NUM_LOCK status according to setup.
(63) If there is any changes in the hardware configuration, update the ESCD
information n(PnP BIOS only. Clear memory that have been used. Boot system via
INT 19h.
(B0) Spurious interrupt occurred in protect mode. Check mismatch memory.
(B1) If unmasked NMI occurs, Press F1 to disable NMI,F2 to boot.
(BE) Program defaults values into chipset.(BE)Chipset default initialization;
Program chipset registers with power on BIOS defaults.
(BF) Program the rest of the chipset (BF)Chipset initialization; Program chipset
registers with setup values.
(C0) Turn off chipset cache; OEM Specific -cache control.
(C1) Memory presence test; OEM specific-test to size on - board memory. Bad
SIMM.
(C3) DRAM Select page, Check BIOS setting and first SIMM, Possible address line
failure.
(C4) CMOS conflicts, check video switch, BIOS(Chipset) on the video not
initializing.
(C5) Early shadow; OEM Specific -Early shadow enable for fast boot.
(C6) Cache presence test; External cache size detection. (Check Memory first
64K.Check CPU jumper Setting). Also, Check Video memory
(C7) Shadow video/system BIOS after memory pass.
(C8) CMOS Shutdown, time delay.
(CA) Micronics cache initialization.
(CC) NMI handler shutdown.
(FF)System booting. This means that the BIOS already passed control to the
operation system. If no error flags such as memory size are set ,boot via INT 19
-load
system from drive A, then C; display error message if correct boot device not
found.
Boot system.
(EE)Unexpected Processor exception.
Phoenix
(01) [Beep]=none 80286 register test in progress.
(02) Verify real -mode operation(Beep)=1 -1-1-3.CPU Flags test.
(02) [Beep]=1-1-3 CMOS write/read test in -progress or failure.
(03) Disable Non-Maskable Interrupt(NMI).[Beep]=1 -1-4 BIOS ROM checksum
in-progress or failure.
22

(04) Get the CPU type (Beep)=1 -1-2-1.CPU register test. Programmable Interval
Timer test failure.
(05) [Beep]=1-2-2 DMA initialization in-progress or failure.
(06) Initialize system hardware (Beep)=1 -1-2-3.DMA page register write/read
test in-progress or fail.
(08) Initialize chipset registers with POST values. [Beep]= 1 -3-1 RAM refresh
verification in -progress or failure.
(09) Set POST flay.(Beep)=1-1-3-2. 1st 64K RAM test in-progress.
(0A) Initialize CPU registers. (Beep)=1 -1-3-3. Perform BIOS checksum test. 1st
64K RAM chip or data line failure multi -bit.
(0B)Enable CPU Cable -Check CPU Jumpers. [Beep]=1 -3-4 1st 64K RAM odd/even
logic failure.
(0C) Initialize cache to initial POST value. Test DMA page registers. [Beep]=1 -4-1
1st 64K RAM address line failure.
(0D) [Beep]=1-4-2 1st 64K RAM parity test in progress or failure.
(0E) Initialize I/O.(Beep)=1 -1-4-3. Test 8254 timers.
(0F) Initialize the local IDE
10) Initialize Power Management.(Beep)=1 -2-1-1.Initialize 8254 timers.[Beep]=2
-1-1 1st 64K RAM chip or data line failure-bit 0.
(11) Load alternate registers with POST values.(Beep)=1 -2- 2. 1st 64K RAM chip
or data line failure-bit 1.
(12) Restore CPU control word during warm boot. J ump to User Path
0.(Beep)=1-2-1-3.Test both 8237 DMA controllers. 1st 64K RAM chip or data line
failure-bit 2.
(13)[Beep]=2 -1-4 1st 64K RAM chip or data line failure -bit 3. Initialize PCI Bus
Mastering devices.
(14) Initialize keyboard controller.(Beep)=1 -2-2-1.Initialize 823 7 DMA
controllers.[Beep]=2 -2-1 1st 64K RAM chip or data line failure -bit 4.
(15) [Beep]=2-2-2 1st 64K RAM chip or data line failure-bit 5.
(16) BIOS ROM checksum .(Beep)=1 -2-2-3. Initialize 8259, reset
Coprocessor.[Beep]=2 -2-3 1st 64K RAM chip or data line failure -bit 6.
(17)Initialize cache before memory auto -size.[Beep] =2-2-4 1st 64K RAM chip or
data line failure-bit 7.
(18)8254 timer initialization.(Beep)=1 -2-3-1. Test 8259 interrupt controllers
registers.[Beep]=2-3-1 1st 64K RAM chip or data line failure -bit 8.
(19) check memory[Beep]=2-3-2 1st 64K RAM chip or data line failure -bit 9.
(1A) 8237 DMA controller initialization.(Beep)=1 -2-3-3. Verify refresh is
occurring.[Beep]=2 -3-3 1st 64K RAM chip or data line failure-bit A.
(1B) [Beep]=2 -4-1 1st 64K RAM chip or data line failure - bit B.
(1C) [Beep]=2 -4-1 1st 64K RAM chip or data line failure- bit C. Reset
Programmable Interrupt Controller.(Beep)=1 -2 ¨C4-1.Base 64K address test.
(1D) [Beep]=2-4-2 1st 64K RAM chip or data line failure - bit D
(1E) [Beep]=2-4-3 1st 64K RAM chip or data line failure - bit E. Base 64K RAM
test(16 b its).
(1F) [Beep]=2-4-4 1st 64K RAM chip or data line failure - bi t F.
(20) [Beep]=3-1-1 master DMA register test in -progress or failure. Test DRAM
23

refresh.(Beep)=1-3-1-1. Upper 16 of 32 bit test failed.
(21) [Beep]=3-1-2 slave DMA register test in -progress or failure.
(22) [Beep]=3-1-3 master interrupt mask register test in - progress or fail. Test
8742 keyboard controller.(Beep)=1 - 3-1-3
(23) [Beep]=3-1-4 slave interrupt mask register test in -progress or fail.
(24) Set ES segment to register to 4 GB.(beep)=1 -3-2-1. Verify CMOS/Configure
CMOS.
(25) [Beep]=none interrupt vector loading in-progress.
(26) Enable A20 line. Verify/Load NVRAM parameters.
(27) [Beep]=3-2-4 keyboard controller test in -progress or failure.
(28) [Beep]=3-3-1 CMOS power-fail and checks um checks in -progress. Auto -size
DRAM.(Beep)=1 -3-3-1.Protected mode 1.
(29) [Beep]=3-3-2 CMOS configuration info validation in - progress. Initialize
POST Memory Manager.
(2A) Clear 512K base RAM.(Beep)=1 -3-3-3.Aubo-site memory chips.
(2B) [Beep]=3 -3-4 screen memory test in-progress or failure.
(2C)RAM failure on address xxxx. If the BIOS detects error 2C,2E,or 30(base 512K
RAM error),it displays and additional word –bitmap (xxxx) indication the address
line
or bits that failed. For example, "2C 0002"means address line 1 (bit one set) has
failed. "2E 1020 means data bits 12 and 5 (bits 12 and 5 set) have failed in the
lower
16 bits. Note that error 30 cannot occur on 386SX systems because the y have a
16
rather than 32-bit bus. The BIOS also sends the bitmap to the port -80 LED display.
It
first display the check point code, followed b y a delay, the high -order byte,
another
delay, and then the low-order byte of the error. It repeats this sequence
continuously.
Test 512 base address lines.(Beep)= 1-3-4-1 Activate interleave(if
possible).[Beep]3-4-1 screen initialization in -progress or failure.
(2D) [Beep]=3-4-2 screen retrace tests in -progress or failure.
(2E) See Error code "2C". Test 512K base memory.(Beep)= 1-3-4-3.Exit 1st
protected
mode test.[Beep]=none search for video ROM in -progress.
(2F) Enable cache before system BIOS shadow.
(30) see Error Code "2C".Unexpected shutdown.[Beep]=no - ne screen believed
operable. [Beep]=none screen believed running w/video ROM.
(31) [Beep]=none monochromatic screen believed operable.
(32)Test CPU bus-clock frequency.(Beep)=1-4-1-3.Deter- mine system board
memory size. [Beep]=none 40-column color screen believed operable.
(33) [Beep]=none 80 -column color screen believed operable. Initialize dispatch
Manager.
(34) [Beep]=4-2-1 timer tick interrupt test in progress or failure. Relocate memory
option.
24

(35) [Beep]=4-2-2 shutdown test in progress or failure.
(36) [Beep]=4-2-3 gate A20 failure. Warm start shut down . Configure EMS
memory option.
(37) [Beep]=1-4-2-4 unexpected interrupt in protected mode. Reinitialize the
motherboard chipset.
(38) [Beep]=4-3-1 RAM test in progress or failure above address 0FFFFh
(38) Shadow system BIOS ROM.(Beep)=1 -4-3-1.Configure wait state option.
(39) Reinitialize the cache.(Beep)=1 -4-3-1
(3A) [Beep]=4-3-3 Interval timer channel 2 test in progress or failure.
(3A) Auto -size cache.(Beep)=1 -4-3-3.Retest 64K base RA M.
(3B) [Beep]=4 -3-4 Time-Of-Day clock test in progress or failure.
(3C) [Beep]=4 -4-2 Serial port test in progress or failure.
(3D) Load alternate registers with CMOS values,(Beep)= 1 -4-4-2
(3D) [Beep]=4-4-2 Parallel port test in progress or failure.
(3E) Get switches/jumper status from 8742.
(3E) [Beep]=4-4-3 Math CoProcessor test in progress or failure.
(40) Set initial CPU speed.(Beep)=2 -1-1-1.
(42) Initialize interrupt vectors.(Beep)=2 -1-1-3.
(44) Initialize BIOS interrupts.(Beep)=2 -1-2-1. Verify video con figuration.
(45) POST device initialization.
(46) Check ROM copying notice.(Beep)=2 -1-2-3. Initialize video system.
(47) Initialize manager for PCI Options ROMs.(Beep)=2 -1- 2-4.
(48)Check Video configuration against CMOS.(Beep)=2 - 1-3-1. Test for
unexpected interrupts.
(49) Initialize PCI bus and devices.(Beep )=2-1-3-2.
(4A) Initialize all video adapters in system.(Beep)=2 -1-3-3. Start 2nd protected
mode test.
(4B) Quiet-Boot start(optional).
(4C) Shadow video BIOS ROM.(Beep)=2 -1 -4-1.Perform LDT instructions test.
(4E) Display copying notice.(Beep)=2 -1-4-3. Perform TR instruction test.
(50) Display CPU type and speed.(Beep)=2 -2-1-1.(50)Per- form LSL instruction
test.[Beep]=none Custom chip set or custom platform.
(51) Initialize EISA board.
(52) Test keyboard.(Beep)=2 -2-1-3.(52)Perform LAR instruction test.
(54) Set key click if enabled.(Beep)=2 -2-2-1.(54)Perform VERR instruction test.
(56) Enable keyboard.(Beep)=2-2-2-3.Unexpected exception.
(58)Test for unexpected interrupts.(Beep)=2 -3-3-.(58) Perform A20 gate test.
(59) Initialize POST display service.
(5A) Keyboard ready test. Display prompt "press F2 to enter SETUP".(Beep)=2
-2-3-3
(5B) Display CPU cache.
(5C) Test RAM between 512 and 640K.(Beep)=2 -2-4-1. Determine if AT or KT
keyboard type.
(5E) Enter third protected mode test.
(60) Test expanded memory.(Beep)=2 -3-1-1.(60)Base memory test.
(62) Test extended memory address lines.(Beep)=2 -3-1-3. Base memory address
25

test.
(64) Jump to User Patch 1.(Beep)=2 -3-2-1.Shadow memory test.
(67)Initialize Multi Processor APIC.
(68) Enable external and CPU caches.(Beep)=2 -3-3-1. Ex- tended address test.
(69) Setup System Management Mode(SMM) area.
(6A) Display external cache size.(Beep)=2 -3-3-3.Determine memory test.
(6B) Load custom defaults(optional).
(6C) Display shadow message.(Beep)=2 -3-4-1.Display error messages.
(6E) Display possible high address for UMB recovery. Display non-disposable
segments.(Beep)=2 -3-4-3.Configure ROM/RAM BIOS.
(70) Display error messages.(Beep)=2 -4-1-1.System time test.
(72) Check for configuration errors.(Beep)=2 -4-1-3.(72) Real time clock test.
(74) Test real-time clock.(Beep)=2 -4-2-1.Test for stuck keys.
(76) Check for keyboard errors. (Beep)=2 -4-2-3.Initialize hardware interrupt
vectors.
(78) Detect and test CoProcessor.
(7A) Determine/Init COM channels.
(7C) Set up hardware interrupts vectors.(Beep)=2 -4-4-1.Determine LPT
channels.
(7E) Test CoProcessor if p resent.(Beep)=2 -4-4-3.Initialize BIOS data area.
(80) Disable onboard Super I/O ports and IRQs.(Beep)=3 -1- 1-1.Detect floppy
controller.
(81) late POST device initialization.
(82) Detect and ins tall external RS232 ports.(Beep)=3 -1- 1-3.Test floppy drives.
(83) Configure non -MCD IDE controllers.
(84) Detect and install external parallels ports.(Beep)=3 -1- 2-1.Fixed disk test.
(85) Initialize PC-compatible PnP ISA devices.
(86) Re-initialize onboard I/O ports.(Beep)=3 -1-2-3.(86)Per form external ROM
scan.
(87) Configure Motherboard Configuration Devices(option - al)
(88) Initialize BIOS Data Area.(Beep)=3 -1-3-1.Test key- lock/keyboard type.
(89) Enable Non - Maskable Interrupts (NMIs)
(8A) Initialize Extended BIOS Data Area.(Beep)=3-1-3-3. wait for F1 test.
(8B) Test and initialize PS/2 mouse.
(8C) Initialize floppy controller.(Beep)=3-1-4-1.Final system initialization.
(8E) Interrupt 19 boot loader.
(8F) Determine number o f ATA drives(optional)
(90) Initialize hard -disk controller.(Beep)=3 -2-1-1
(91) Initialize local-bus hard-disk controller.(Beep)=3 -2-1-2
(92) Jump to User Patch 2.(Beep)= 3 -2-1-3
(93) Build MPTABLE for multi processor boards.
(94) Disable A20 address line.(Beep)=3 -2-2-1
(95) Install CD ROM for boot.
(96) Clear huge ES segment register.(Beep)=3 -2-2-3.
(97) Fix-up Multi Processor table.
(98) Search for option ROMs. One long, two short beeps on checksum
26

failure.(Beep)=3 -2-3 -1.
(99) Check for SMART Drive(optional).
(9A) Shadow option ROMS.(Beep)=3 -2-3-3.
(9C) Set up Power Management.(Beep)=3 -2-4-1.
(9E) Enable hardware interrupts.(Beep)=3 -2-4-3.
(9F) Determine number at ATA and SCSI drives.
(A0) Set time of day .(Beep)=3 -3-1-1
(A2) Check key lock.(Beep)=3 -3-1-3
(A4) Initialize Type matri crate.
(A8) Erase F2 prompt.(Beep)3 -3-3-1
(AA) Scan for F2 key stroke.(Beep)=3 -3-3-3
(AC) Enter SETUP.(Beep)=3-3-4-1
(AE) Clear in-POST flag.(Beep)=3 -3-4-3.Clear Boot fag.
(B0) Check for errors.(Beep)=3 -4-1-1.Unknown interrupt occurred.
(B2) POST done-prepare to boot operating system.(Beep)=3- 4-1-3
(B4) One short beep before boot.(Beep)=3 -4-3-1
(B5) terminate Quiet -Boot(optional)
(B6) Check password(optional) .(Beep)=3 -4-2-3
(B8) Clear global descriptor table.(Beep)=3 -4-3-4
(B9) Prepare boot.
(BA) Initialize DMI parameters.
(BB) Initialize PnP option ROMs.
(BC) Clear parity checkers.(Beep)=3 -4-4-1
(BD) Display Multi -Boot menu.
(BE) Clear screen(optional).(Beep)=3 -4-4-3
(BF) Check virus and backup reminders.(Beep)=3 -4-4-4
(C0) Try to boot with INT 19.(Beep)=4 -1-1-1
(C1) Initialize POST Error Manager(PEM).
(C2) Initialize error logging.
(C3) Initialize error display function.
(C4) initialize system error handler.
(C5) PnPnd dual CMOS(optional)
(C6) Initialize notebook docking (optional).
(C7) Initialize notebook docking late.
(C8) Force check(optional)
(C9) Extended checksum(optional)
(D0) Interrupt handler error.(Beep)=4-2-1-1
(D2) Unknown interrupt error.(Beep)=4 -2-1-3
(D4) Pending interrupt error.(Beep)=4 -2-2-1
(D6)Initialize option ROM error.(Beep)4 -2-2-3.Shutdown
error.(Beep)=4-2-3-1.(DA)Extended Block Move.(Beep)=4
-2-3-3.(DC)Shutdown 10 error(Beep)=4 -2-4-1
(E0) Initialize the chipset.
(E1) Initialize the bridge.
(E2) Initialize the motherboard chipset, and CPU.(Beep)=4 -3 -1-3
(E3) Initialize refresh counter and system timer(Beep)=4 -3- 1 ¨C4
27
(E4) Check for forced Flash or initialize system I/O.(Beep)= 4 -3-2.
(E5) Check HW status of ROM or check force recovery boot.(Beep)4 -3-2-2.
(E6) BIOS ROM is OK. (Beep) =4-3-2-3.
(E7) Do a complete RAM Test or go to BIOS. (Beep)=4 -3-2-4.
(E8) Do OEM initialization or set huge segment. (Beep)=4 -3-3-1.
(E9) Initialize interrupt controller or initialize multi processor. (Beep)=4-3-3-2.
(EA)Read in bootstrap code or initialize OEM special code. (Beep)=4 -3 -3-3.
(EB) Initialize all vectors or initialize PIC and DMA. (Beep)=4 -3-3-4.
(EC) Boot the Flash program or initialize memory type. (Beep)=4-3-4-1.
(ED) Initialize the boot device or initialize memory size. (Beep)=4 -3-4-2
(EE)Boot code was read OK or shadow boot block.(Beep)= 4 -3-4-3
(F0)Initialize interrupt vectors.
(F1) Initialize Run Time Clock.
(F2) Initialize video.
(F3) Initialize System Management Mode.
(F4) Output one beep before DOS.
(F5) Boot to Mini DOS.(F6)Clear Huge Segment.(F7)Boot to Full DOS.
9. Description of beep code
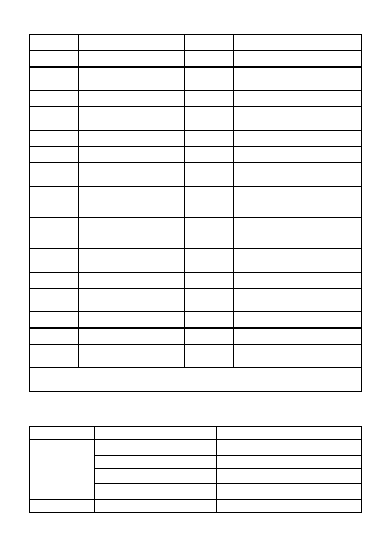
1) Beep Code Meaning of AMI BIOS Critical Failures
1S DMA refresh failure
8S
Video memory error
2S Memory parity error
9S
ROM checksum error
3S Base 64K RAM failure
10S
CMOS checksum
error
4S System
timer not
operational
11S
Bad cache memory
5S Processor failure
Audi
o
code
Non-critical failure
6S Gate
A20/keyboard
controller failure
1L 3S
Memory failure
7S Virtual mode exception
error
1L 8S
Display test fails (display data line is
loose or video card is unstable)
2) Beep Code Meaning of Award BIOS
1S
System boots normally
2S
Non critical failure, enter CMOS SETUP to reset
1L 1S
RAM or mainboard failure
1L 2S
Video adapter error
1S 3S
Keyboard controller failure
1L 9S
Flash RAM/EPROM (which on the mainboard) failure. (BIOS
failure)
High frequency
beeps
Memory bank is not plugged well, or bad memory
3) Meanings of Beep for Phoenix BIOS Self test
1S
System boots normally
3S-1S-1S
Register failure
28
3S
System self
test
initialization (POST) fails 3S-1S-2S
The second DMA controller
failure or register failure
1S-1S-2S Mainboard
failure
3S-1S-3S
INTMSK (interrupt mask
register) failure
1S-1S-3S
No power of mainboard
battery or CMOS is
broken
3S-2S-4S
Keyboard timer failure.
Reinstall in CMOS or skip
POST
1S-1S-4S ROM BIOS test failure
3S-3S-4S
Display RAM failure or no
RAM, non-fatal failure
1S-2S-1S System time failure
3S-4S-2S
Display data line loose,
video card not plugged well,
or video card broken
1S-2S-2S DMA channel initialization
failure
3S-4S-3S
ROM BIOS of video card not
found
1S-2S-3S DMA channel register
failure
4S-2S-1S
System real-time clock
failure
1S-3S-1S
Memory channel refresh
failure (any memory
bank)
4S-2S-2S
System start failure, CMOS
setting failure or BIOS
broken
1S-3S-2S
Base memory failure
(memory bank broken or
RAM setting failure)
4S-2S-3S
Gate A20 switch in keyboard
controller (8042) failure,
BIOS can not be switched to
protected mode
1S-3S-3S
Base memory failure
(maybe the memory bank
on the DIMMC slot
broken)
4S-2S-4S
Protected mode interrupt
failure
1S-3S-4S Assistant interrupt mask
register failure
4S-3S-1S
Memory failure (memory
bank broken or RAM setting
failure)
1S-4S-1S Some address of base
memory failure
4S-3S-3S
The second clock of system
failure
1S-4S-2S
Parity check of system
base memory (the first
64k) failure
4S-3S-4S
Real-time clock failure
1S-4S-3S EISA BUS timer failure
4S-4S-1S
Serial ports (COM port,
mouse port) failure
1S-4S-4S EISA NMI port failure
4S-4S-2S
Parallel ports (or LPT port)
failure
2S-1S-1S
System base memory
(the first 64k) check
failure
4S-4S-3S
Digital coprocessor (8087,
80287, 80387, 80487 )
failure
L: Long Beep
S: Short Beep
10. Common Problems & Solutions
1) Failures & Solutions (Note: Make all treatments after shutting down the
power)
Problems Reasons
Suggested
Solutions
Memory bank
Memory bank not plugged
well
Plug it again
Memory bank broken
Try replacing the memory bank
The bottom of memory bank
dirty
Wipe by rubber or clean by pure
ethanol, then try again
Not matching with other
memory banks
Use matching memory banks
Memory slot Slot dirty and impure
Clean the dirt or impurities
29
and extended
slot
Metal sheet in the slot
deformed or broken
Repair by pliers or replace a new
slot
Metal sheet rusted or dirty
Clean it by pure ethanol, remove
the rust by other tools or draw and
plug times to make them well
touch
CPU
CPU bottom dirty or rusty
CPU broken
Replace a new CPU or check the
voltage of CPU
CPU jumper wire setting or
CMOS setting failure
Check the CPU jumper wire and try
again after CMOS discharged
CPU not plugged well
Plug it again and check
Diagnostic
Card
problems
Plugged in wrong slot
Identify PCI and ISA slot carefully
Plugged in opposite side
Correct the side (the side with
components face power supply
when plugged in ISA slot)
Broken
Ask for quality warranty from the
reseller
Not well plugged or data
interface dirty
Plug again times, wipe by rubber,
clean by alcohol, or plug in
another slot
Stop coding
PC Diagnostic Card is not
compatible with the main
board
Please contact our company for
solutions
PC Diagnostic Card fault
Ask for quality warranty from the
reseller
indicator
shows in
halves
Mistake! It is impossible for
our cards to show codes in
halves, maybe it is the user
who regard “no” as “half
code”
Plug again times, wipe by rubber,
clean by ethanol, or plug in
another slot
Slot is dusty
Check the power and CPU jumper
wire
Plug in another slot, and refer to
the Must-Reads of Users
Bad
Keyswitch
Mistake! When the PC
diagnostic card receive no
codes from mainboard, the
LED will remain showing the
same code, even if you keep
on pressing the check
switch . Actually that’s not
true.
Press the keyswitch over and
again, if the “no” appear for the
sixth time, the keyswitch is ok,
otherwise it is broken. Please
contact our company for solution
Not enough force on the
button
Press harder
The PC diagnostic card is not
well connected with the
mainboard, which is caused
by pressing the keyswitch
Use less power to press the
keyswitch, in order to keep the PC
diagnostic card and motherboard
touch well
2) What does “no” mean? How to solve the problem?
Answer: “no” means the CPU doesn’t work, as well as there is no CPU on the
mainboard. The suggested solutions are as below
Treatments When New Generation PC Diagnostic Cards and Kingnostics Cards
Show “no”
S
N
Time to
Show “no”
Reasons
Treatments
1 PC power up
CPU
is not
working yet
Normal condition
2
PC is
resetting
CPU
stops
working during
PC resetting
Normal condition
30
3
CPU
overheat
protection
A.CPU fan not
powerful enough
or not plugged
well
Change to a powerful CPU fan, and
fix it tightly to CPU
B.Heat
sinking
silica gel not
enough or not
good quality
Refill sufficient quality silica gel
C.Fan is dusty
Clean the fan
D.CPU
is
overclocked
Revert the frequency or replace the
CPU
E.Overloaded
(pins of) CPU
Test the resistance of the pins of
the CPU by multimeter
4
Power switch
is not well
connected
CPU can not work
normally
Replace or repair the power supply
5
Use under
high
temperature
and
sunshine
A.CPU under
overheating
protection
Keep on changing to bigger CPU
fans, open the PC case if conditions
permitted, blow cool air into the
case
B.Overheated
power supply
lead to abnormal
voltage
regulation, which
makes the CPU
doesn’t work
Clean the cooling fan of the power,
or use more powerful cooling fans,
remove the cards, hard disks,
CD-ROM etc., which are not in use
currently, or change to higher
power supply
C.other individual
component is
overheated which
make the CPU
doesn’t work
Find out the components which are
not heat-resistant and replace them
(don’t touch by hand)
D.High
temperature
makes both CPU
and power unable
to work
Lower CPU frequency, use higher
power supply, remove the
components not in use, exit all
software that have nothing to do
with current job.
E.The
temperature is
too high for most
components to
work
Keep the PC far from heat resource;
use heat insulation equipments;
change the heat dissipation
direction (away from the
computer); use powerful cooling
fans or air conditioner; work at
nights, or on cloudy or rainy days;
lower CPU frequency and use
higher power, remove the
components not in use, exit all
software that have nothing to do
with current job.
6
Use under
high
humidity
Overload the CPU
by peripheral
circuit
Uncover the computer case, blow
hot air into case, and adjust the
temperature to the favorite range
that can remove the moisture and
keep the computer work normally
(lower the temperature until the
card shows “no” and then heighten
the temperature until the card
shows “no” again, finally adjust the
temperature to the middle point).
Please minimize the period that
shows “no” in testing.
7
Use in
Bad contact of
Check all fasteners of the computer,
31
vibration
hardware caused
by vibration may
make the CPU
unable to work
replace all loose ones or put more
nuts to fasten them and enhance
their vibration-resistance ability;
put spring or leather bottom to the
PC, but don’t use large size of
cotton material, otherwise it will
keep the PC overheated; keep the
PC away from the vibration
resource
8 When testing
a normal PC
A.incompatible
main board
Consult from Qi Guan factory or
email to p678@163.net
B.Broken
Analyzer Card
Send back to Qi Guan factory to
repair
9
Others
A.data interface
dirty
Wipe by rubber or plug again times
B.Plugged
in
wrong slot
Identify PCI and ISA slot carefully
C.Plug in opposite
side
Change the side (face power source
when plugged in ISA slot)
D.There is no
code transmitted
to the BUS slot,
which plugged
with Analyzer
Card, from the
main board.
Plug in another slot with reference
to the Must-Reads of Users of this
instruction
E.Main board has
not run yet
Check the power resource and CPU
jumper wire
F.Slot is
bad
contact
Plug again times
G.Slot is dusty
Clean the slot
3) The new meanings of the old indicator lamps for New Generation PC
Diagnostic Cards and Kingnostics Cards
Answer: please see the table below for details
S
N
Nam
e of
Indi
cato
r
Meanings
for New
Generatio
n PC
Diagnosti
c Cards
Meanings for Kingnostics
Cards
Remarks
1 CLK
This
indicator
light is
still kept
Shows the PCI BUS clock
signal. It is dynamic and
sometimes on when the
assembly is busy, and off
when the assembly is idle.
With ns grade speed, which
can not be seen by human
eyes. (it is dispensable)
Some cards use
radix point of
the LED
indicator
2 RESET The same
as right
This indicator should be on
during resetting and off after
resetting. Generally, it is on
for a half second then off
after PC is restarted.
Otherwise it works
abnormally
Some cards use
radix point of
the LED
indicator
3 RUN Only in
old cards
It is cancelled because it
stops the start code
Some cards use
radix point of
the LED
indicator
4 FRAME
Only
in
early
types
The same with that of CLK
Some cards use
radix point of
the LED
32

indicator
5
3.3V Power
Special voltage of
motherboards that have PCI
slot. The indicator will be
always on when power on.
Part of the motherboards
that have PCI slot have no
3.3V voltage, so the
indicator is off.
Some cards use
radix point of
the LED
indicator
-5V Power
Share the same indicator
with 3.3V power. Special -5V
voltage of motherboards
that have ISA slot. The
indicator will be always on
when power on,or the
motherboard does not have
-5V voltage or there is short
circuit.
Some cards use
radix point of
the LED
indicator
LED
Indicat
or 5V
Power
There must be 5V voltage if
the indicator is on.
Some cards use
radix point of
the LED
indicator
+12V Power
the indicator will be always
on when power on, or there
is no 12V voltage or there is
short circuit.
Some cards use
radix point of
the LED
indicator
-12V Power
the indicator will be always
on when power on, or there
is no -12V voltage or there is
short circuit.
Some cards use
radix point of
the LED
indicator
CLK
BUS
Clock
The CLK will be on when
there is clock signal impulse,
and will be off when there is
no clock signal impulse, no
matter the current signal
stays at high or low level,
which won’t mislead the user
that there is clock signal
impulse.
Some cards use
radix point of
the LED
indicator
RESET Reset
It is normal that the
indicator light is on for a half
second and then is off when
start the computer or press
the RESET. If the indicator
light is never off, usually it is
because the Reset Contact
Pin on the main board is
pinned to the Accelerate
Switch or the Reset Circuit is
damaged.
Some cards use
radix point of
the LED
indicator
IRDY
Main
parts are
not ready
IRDY will flash if there is
signal impulse when plug the
PC diagnostic card into PCI
slot, or it will be off.
Some cards use
radix point of
the LED
indicator
FRAME
Frame
cycle
The Frame will flash if there
is frame cycle signal from
PCI slot or MiniPCI slot.
Some cards use
radix point of
the LED
indicator
33
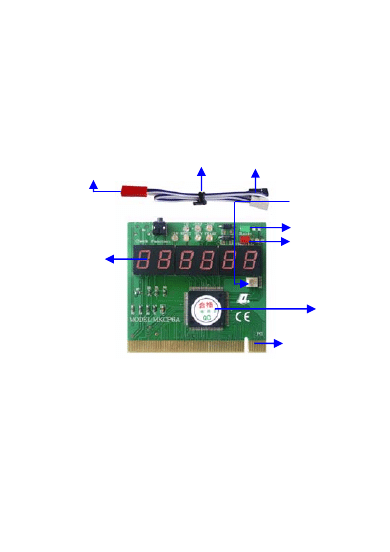
II. Detailed Specification of Diagnostics & Stability-
Test Card
1.
Components of Diagnostics & Stability-Test Card
(
1) Figure of Diagnostics & Stability-Test Card Components (MKCP6 for
example)
Connect to the RESET on the
ase, there is no need to connect
Reset Line to the case if you
don’t need to use Reset.
Connected to RESET contact
pin on main board
c
the
Reset Line
There may be some differences between the real product and the figure,
please take the real product as final. Our company will keep upgrading the
product without further notice.
(
2)Figure of Connection to Main Board
Please pay attention to the connection of the RESET line.
Stable indicator light
Unstable indicator light
LED indicator
chip
PCI data interface
Connected this plug to
the white socket as
indieated.
34
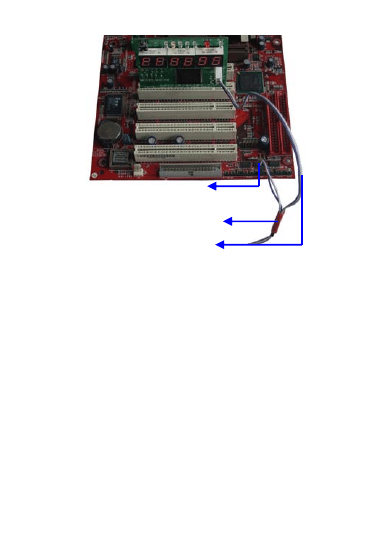
2. Differences and Functional Characteristics of Diagnostics & Stability-Test
Cards and Common Analyzer Cards
(1) The Diagnostics & Stability-Test Card is a kind of high performance card by
which not only the PC failure but also its stability can be tested.
(2) By PC Diagnostic Cards, the hardware problems can be found easily. It helps us
to find the causes when the computer works abnormally. No matter you are a
developing engineer, a maintenance man or a beginner, or a common user, it
shows the PC failures and helps your make rapid and correct treatment.
(3) The Diagnostics & Stability-Test Card is mainly used for stability test. It can test
not only the stability of the stable computers, but also stability of the unstable
computers, not matter it is invariable failure or variable failures, such as
occasional and invisible potential failures.
(4) It is helpful for PC and PC accessory selection. It can help users select the high
quality computer and spare parts (such as memory bank, hard disk and key
board), even the external equipments (such as UPS, printer and computer
used for ATM), and help the seller to sell the stable computers at a good price.
(5) Independent of the RESET signal of the test computer, the abnormal reset logic
of the testing computer will not influence the testing. There are also functions
such as automatic failure correction and automatic preventing pulse loss.
Reset the computer during testing will not influence the stability test.
(6) The CLK indicator Diagnostics & Stability-Test Card has been thoroughly
upgraded, it’s 100% correct and will not mislead the users. The users can see
the clock pulse fluctuation clearly, even the single 10ns clock pulse. CLK light
will not be on when there is no CLK signal impulse, no matter the current
signal stays at high or low level. No pulse loss, no unwanted pulse.
connected to RESET contact pin on
connect to RESET switch on the case
connect to RESET outlet on
Diagnostics & Stability-Test Card
35
36
3. Explanation of Diagnostics & Stability-Test Card Indicator
LED Name
Function
Description
3V Power
Special 3V voltage of motherboards that have PCI
slot. The indicator will be always on when power on.
Part of the motherboards that have PCI slot have no
3.3V voltage, so the indicator is off.
+12V Power
The indicator will be always on when power on,or
the motherboard does not have -5V voltage or there
is short circuit.
-12V Power
The indicator will be always on when power on,or
the motherboard does not have -5V voltage or there
is short circuit.
CLK BUS
Clock
The CLK will be on when there is clock signal
impulse, and will be off when there is no clock signal
impulse, no matter the current signal stays at high or
low level, which won’t mislead the user that there is
clock signal impulse.
RESET Reset
It is normal that the indicator light is on for a half
second and then become off when start the
computer or press the RESET button. If the indicator
light is never off, usually it is because the Reset
Contact Pin on the main board is pinned to the
Accelerate Switch or the Reset Circuit is damaged
Unstable
Indicator
Stability
Testing
Result
Indicator
Light on indicator of the test computer means
instability, potential failure or the accessories not
matching with the host.
Stable
Indicator
The test computer is stable, no potential failure.
4.Testing Status
Both Stable and Unstable indicators on -------- Failure analyzing
The Stable and Unstable indicators flash quickly and alternately - stability testing
The Stable and Unstable indicators flash slowly and alternately –internal data
processing of stability test
The Stable indicator on -------------------- stable
The Unstable indicator on ------------------ unstable
5.Notice
(1) Connection of RESET Line
Please make sure that the Reset Line (attached) of Diagnostics & Stability-Test
Card is well connected before usage. Plug the bigger terminal of the line in the
card and the smaller terminal in the RESET contact pin of the testing main board.
Plug the RESET line on the main board in the hole at the other end of this line if
you need to use RESET switch.
If the Reset Line that connect the Diagnostics & Stability-Test Card and main
board is not connected, only failure test will go on, and stability test will not. The
indicator light will mislead the user that the test computer is unstable.
(2) Power Cord of Hard Disk
Please remove the power cord from the hard disk before using Diagnostics &
Stability-Test Card, because the test computer has to be reset to change the test
circuit before starting stability test and avoid damage of data(system files) in the
hard disk caused by restarting. Starting the test without removing the power cord
from the hard disk means abnormal shutdown, and won’t cause any bad results.
Document Outline
- I.Specification of PC Diagnostic Cards
- 1. Notice
- 2. Product Introduction In Brief
- 3. Functional Characteristics
- 4. Type Characteristics
- 5. Operation Flow
- 6. Must-Reads of Users
- 7. Hexadecimal Characters and Particular Characters of Our Cards
- 8. Meanings of POST codes
- 9. Description of beep code
- 10. Common Problems & Solutions
- 2. Differences and Functional Characteristics of Diagnostics & Stability-Test Cards and Common Analyzer Cards
- 3. Explanation of Diagnostics & Stability-Test Card Indicator
- 4.Testing Status
- 5.Notice
Wyszukiwarka
Podobne podstrony:
Diagnostics & Stability Test Card User Manula ver 1 1
pc diagnostic post card
diagnostyka
T 3[1] METODY DIAGNOZOWANIA I ROZWIAZYWANIA PROBLEMOW
Przedmiot PRI i jego diagnoza przegląd koncepcji temperamentu
DIAGNOSTYKA FIZJOLOGICZNA I 1
Dyslipidemie diagnoza JH
Diagnostyka i leczenie kaszlu
05 Badanie diagnostyczneid 5649 ppt
Diagnoza Funkcjonalna
Rola badań dodatkowych w diagnostyce chorób wewnętrznych wykład
Diagnoza rynku warzyw i owocow
Diagnoza rozne podejscia teoretyczne
więcej podobnych podstron