Uma publicação eletrônica da E
DITORA
S
UPERVIRTUAL
L
TDA
.
Colaborando com a preservação do Patrimônio Intelectual da Humanidade.
WebSite:
http://www.supervirtual.com.br
E-Mail:
supervirtual@supervirtual.com.br
(reprodução permitida para fins não-comerciais)
Manual for building a c. 40 lbs. Longbow
by Hans Schuurman
Secretary of "Roger Ascham, Traditional Archery"
Translation: Dick de Bruin
I would like to give a special thanks to Hans Schuurman for writing the Dutch version of
this manual, and to Dick
De Bruin for all of his work on the translation. Dick De Bruin has put a great deal of his
precious time into this so
that I could put this page on my web site. Numerous revisions have gone back and forth
between us, and his
patience is greatly appreciated. Both Hans and Dick are members of Roger Ascham,
Traditional Archery, a club
associated with the British Longbow Society, and I invite you to visit them. If Mr. De Bruin
is any indication, the
club is a fantastic group of people.
Dick De Bruin has also written a manual for making selfarrows, also found on this site.
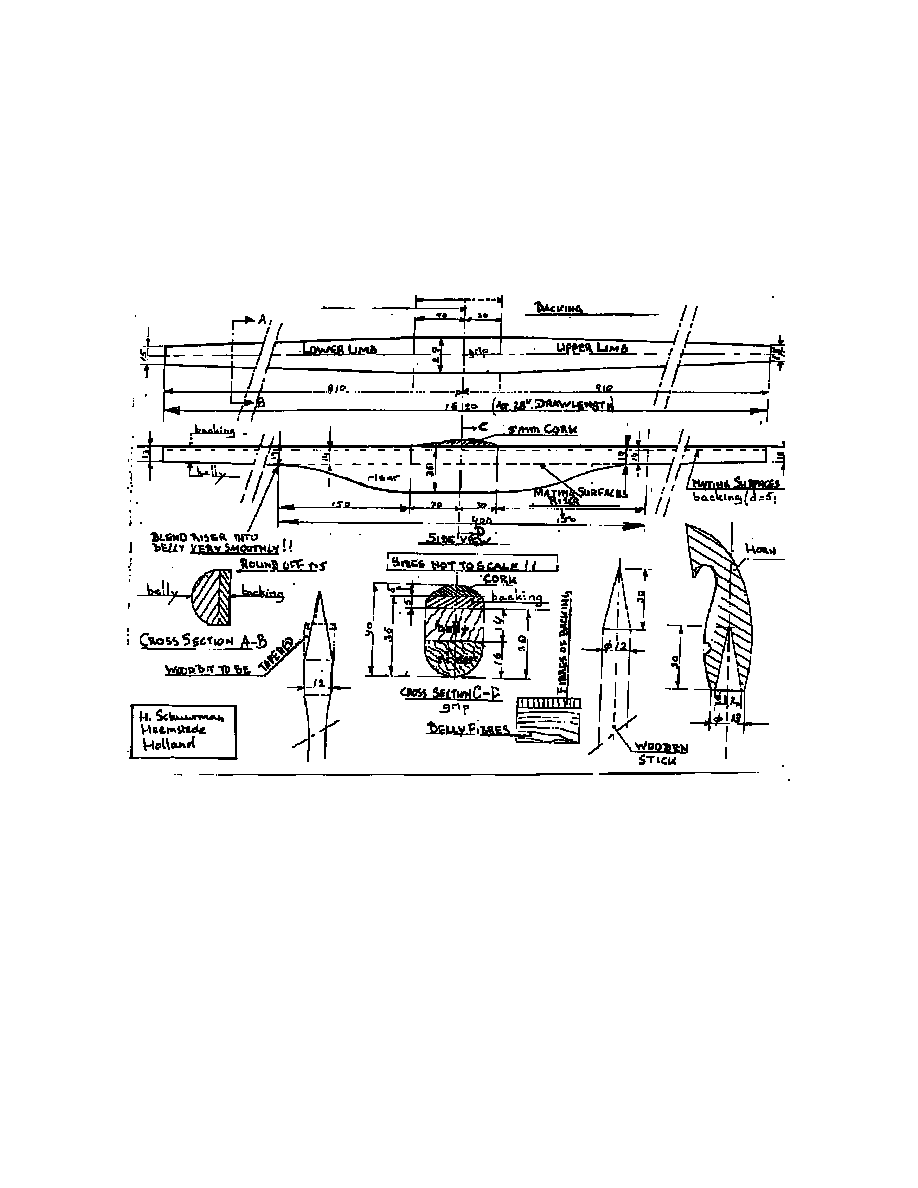
The longbow design drawings are finally here!!!
Now you can view the pictures that go along with the text that has been here for a while.
Right now there is just the above link to the image because my first attempt at placing the
different parts of the main picture into the correct place in the text didn't work all that well.
Some of the images are shapes that don't fit well onto a page with text, or have to be large
to be legible. I hope to have a more integrated page out soon though.
Introduction
More so than is the case when building an American Flatbow, the traditional English
Longbow requires more skill, as it is much more inclined to break. The elasticity of the
backing and the compressibility of the belly should be considerable, so that the wood one

uses has to meet very high standards. For thousands of years yew was used to build bows,
as its sapwood possesses a high degree of elasticity and its heartwood can be compressed
without much trouble.
However the problem is that good quality yew is very hard if not impossible to come by
these days, so I shall not consider it. Also, bows consisting of more than two laminations
are outside the scope of this little manual.
The easily obtainable woods that remain are a.o. : Maple, Hickory, or Bamboo for the
backing (the outside, or the back of the bow) and Tropical hardwood (e.g. Whalebone
Greenheart or else Bullet- or Beefwood), Satinwood or Rosewood for the belly (the inside
of the bow).
Always take care to use dry (not desiccated) wood with straight fibres, preferably free from
any blemishes whatsoever. Bamboo will have to be dry as a bone.
The measurements I use are not set law, but based on my experience, acquired while
building numerous bows, 29 in all so far. Following them will produce a bow of c. 40 lbs
draw weight, having enough strength to shoot 5/16" arrows with good result over a range of
50/60 yards. It goes without saying that the measurements meet the requirements
of the British Longbow Society.
Apart from a workspace in which you can produce as much sawdust as you wish, you will
need the following tools:
Preferably a Black & Decker workmate or else a workbench with the same clamping
facility.
Sandpaper (100 to 320 grain)
abrasive cloth (80 grain)
Band saw, plane, spokeshave, adhesive tape, tapemeasure, glue and various wood files,
(straight, half-round
and round, c. 3 or 4 mm).
Polyurethane construction glue
It is important that you do not hurry the process of building your bow. The wood will have
to get the time to "set" after each working. Try to get your measurements accurate to within
1/2 mm. And do not let you plane take "cuts" out of the wood because you will run the risk
of ending up with a 20/30 lbs bow.
Always clamp finished surfaces with bits of wood or cork so as to avoid damaging them.
The Bowstave
This is the wood needed to build your bow which should have the following size in
millimeters (Length X Depth X

Width):i
A.Selfbow (a bow made out of one single piece of wood) Use tropical hardwood
1820x30x36
B.Selfbow with separate riser (the thick part in the middle where you grip the bow)
1820x30x20. Riser
400x30x17
C.Bow with riser and backing:
Belly: 1820x30x15 (14 if the wood was planed smooth already)
Backing: 1820x30x6 (5 if the wood was planed smooth already)
Riser 400x30x17
The length of the bowstave is suggested at 1820 mm plus or minus 50mm for every inch
you pull more or less than 28". If you pull more than 28", increase the thickness of the belly
by 1/2 mm for every inch you pull more. If you pull less than 28", decrease the thickness of
the belly by 1/2 mm for every inch you pull less.
Building your bow
Choose from:
A.Selfbow (bow from one single piece of wood) Same qualities as a laminated bow (see
C) except that you do
not have to glue on a separate backing and riser. Size of finished bow same as C.
B.Selfbow with separate riser: Same as C except that a backing need not be glued on.
C.Laminated bow with backing and riser glued on.
Establish the length of your bow in relation to you draw length. If you decide to build a
bow of category C, the surfaces of both backing and belly that need to be glued together
should be smooth, but not too smooth in connection with the adhesion of the glue. Sand
them (wrap sandpaper 100 grain around a piece of flat wood or cork) in order to prevent
rounding to the side. See to it that both surfaces are free from dust and scour them with
refined petrol or another type of degreaser. Next, apply a thin layer of Polyurethane
construction glue (or an equivalent) to both surfaces. Then clamp them together by
wrapping around tightly with adhesive tape, allow the glue to dry for 24 hours, during
which time the bowstave must be fixed to a flat surface.
In the meantime you may decide to make the riser, using a nice bit of tropical hardwood or
else the same wood as that used for the construction of the belly. At this stage, bevel the
riser on both sides and glue to the belly after sanding and scouring (see above). Clamp it to
the unfinished bow and again allow to dry for 24 hours.
During the next stage you are required to draw a heart-line (a line bisecting the bowstave
from top to bottom) on the backing. One way of doing so is by stretching a piece of string
along the backing and carefully tracing it with a pencil.

Draw the profile of the front of the bow on the backing, and give it its rough shape using
either the band saw or the plane or both,. Allow an extra 2 mm on either side of the lines
you drew. Again do not hurry the process, take your time and work carefully. Allow the
bowstave to set for another 24 hours!
Afterwards check with the string to see if the heart-line still runs straight, if not, make the
necessary corrections to the delineation of the limbs i.e. altering the stave so that the heart-
line remains in the center. You should have a tolerance of 4 mm (2 mm on either side).
If everything is satisfactory, you should proceed by delineating the side profile of the bow
and carefully plane the bow to its required thickness. Take care to make the riser blend into
the belly very smoothly as the ends may come loose. A great deal of tension will be applied
to that spot when bending the bow.
Now it is time to draw a very thick heart-line along the entire belly and give the belly its
rough rounding using a very finely adjusted spokeshave. The heart-line, in the meantime,
must remain visible. Give the proper rounding to the riser (and the grip). Then round off the
belly properly by means of coarse abrasive cloth (80 grain), applying it at right angles to
the heart-line. Sand the belly along its length with 100 grain sandpaper and perform the
same action on the backing. Round off the edges of the backing slightly.
Use the 3 or 4 mm round wood file to apply temporary slots to hold the string at about 6
mm from the ends of the limbs. The depth of the groove on the backing should be 1 mm, 2
mm on the sides at an angle of 45 degrees and "fading out" to 0 mm.
Prepare a temporary bowstring out of 2mm nylon. Use a number of strands and intertwine
them. It should be c 6 or 7 cm shorter than the distance between the two slots or grooves.
Now carefully attempt to string the bow. Should this be too arduous a task, sand down the
limbs belly side. Don't overdo this, as one easily goes too far. Increase the bracing heightii
to 1 fistmele (c.15 - 16 cm).
Now follows a very sensitive process, i.e. tilleringiii the bow and so causing both limbs
display an equal degree of bending. Do not overdraw the bow, but draw the nocksiv down
to about 10cm. The upper limb may bend a little more than the lower. Leave the bow strung
for a few hours while you draw it out to half your draw length once in a while.
If the bow draws smoothly and without too much exertion on your part, leave it as it is.
Should it require too much strength, continue the tillering process until it meets your
expectations. Please keep in mind that it will lose a few pounds because it will slightly
follow the stringv after some use.
Once you have reached this stage, it would be very unwise to draw the bow to your full
draw length. There is a serious risk of breaking it!!! Instead draw it out to about 3/4 of your
draw length, and when you estimate that the required draw weight is being approached,
again check the bend of the limbs. If necessary make the necessary corrections (sand it
down a little until the limbs again bend equally, the upper limb slightly more than the

lower) finish sanding the bow using 180 grain sandpaper. Again draw your bow, this time
to 4/5 of your draw length. If necessary correct.
Now you may loose about 30 arrows. (choose your target wisely, you wouldn't want the
neighbours to complain) If the bow is not too strong you can proceed to making the
(permanent) horn nocks.
Making the horn nocks
Try to obtain two cow horns or a set of antlers (your butcher may come in handy at this
stage, or the slaughterhouse). For those of you who are not willing to undergo the rather
evil smelling process of making your own horn nocks, Quick's Archery In Great Britain
sells them ready made.
Saw off the solid tips of the cow horns (c. 6 cm) and drill a hole 29 mm deep. Use a 12 mm
wood bit, filed down to a point (see drawing). Glue them to 12 mm sticks, tapered to a
point, using joiner's glue. Clamp the sticks carrying the horns in your workmate and shape
the nocks (see drawing) using files and sandpaper. Sand the finished product smooth with
sandpaper (up to 400 grain), polish with abrasive liquid or toothpaste.
Then disengage the horn nocks from their sticks by immersing them in boiling water for
about one minute and pulling them free.
After a while when everything is dry and has cooled down, clean the hole and scour it with
refined petrol or a degreaser. Give the ends of your bow limbs the shape that will fit the
hole in the nocks and glue them on with epoxy based glue, then file the grooves into the
nocks with your 3 / 4 mm round wood file.
Finishing the bow
Make a string out of dacron and see to it that the bracing height is still 1 fistmele (c. 15 -16
cm). If it takes your fancy you may make an arrow plate out of ivory, bone, mother of pearl,
or silver. However, if you do make an arrow plate, do not chisel deeper than 2 mm to avoid
any risk of breaking the bow. Glue a 5 mm layer of cork to the backing, to produce a grip
and finish it with sandpaper or abrasive cloth (see drawing).
To finish the bow it should be covered in three layers of lacquer. Between each layer the
bow should be sanded with 320 grain sandpaper. Allow each layer to dry for 3 days.
Wrap the grip with green velvet, leather or whatever takes your fancy.
Good shooting!
i.In the case of a selfbow, the height has to exceed the breadth of the stave as the riser will
have to be fashioned, so a lot more planing and scraping is required.
ii.Bracing Height - the distance between the string and the thickest part of the riser
iii.Tillering - giving the limbs the required bend by means of sanding or scraping with a
spokeshave.
iv.Nock - place on the limb where the string finds a purchase (i.e. in the previously
prepared grooves or slots)
v.to follow the string - after unstringing your bow it will most probably not regain a
completely straight position.
The limbs will remain slightly bent.
Wyszukiwarka
Podobne podstrony:
Manual for building a c 40 lbs Longbow
Forex Online Manual For Successful Trading
Glow Worm installation and service manual Glow micron 40
Cranenbroeck Advanced Surveying Control Services for Building the Vertical Cities
Ebook Nlp Very Practical Suggestions For Building Wealth
Glow Worm installation and service manual Energy Saver 40 UI
Operator's Manual for Advanced Combat Helmet
Operation Manual for Ladder Pro Nieznany
Forex Online Manual For Successful Trading
Service (repair) manual for Pioneer BCT1410
A modal pushover analysis procedure for estimating seismic demands for buildings
SETOOL3 USER MANUAL FOR ALL NEW CUSTOMERS
Manual for BenQ Siemens (firmware) Update tool
IMPRESSIONING MANUAL FOR AMATEUR LOCKSMITHS
Glow Worm installation and service manual Energy Saver 40 UI
Eurocode 1 Part 1 1 2002 UK NA Actions on Structures General actions Densities, self weight, imp
The Art of Seeing Your Psychic Intuition, Third Eye, and Clairvoyance A Practical Manual for Learni
więcej podobnych podstron