
Kasia
By: burdastyle
http://www.burdastyle.com/projects/kasia
The design for this playful skirt came from our very own kasia26! Great for summer fun, this skirt features
gathering of the pocket backing and bold bib-front buttons. Try using a contrast for the pocket backing for
some extra punch.
1
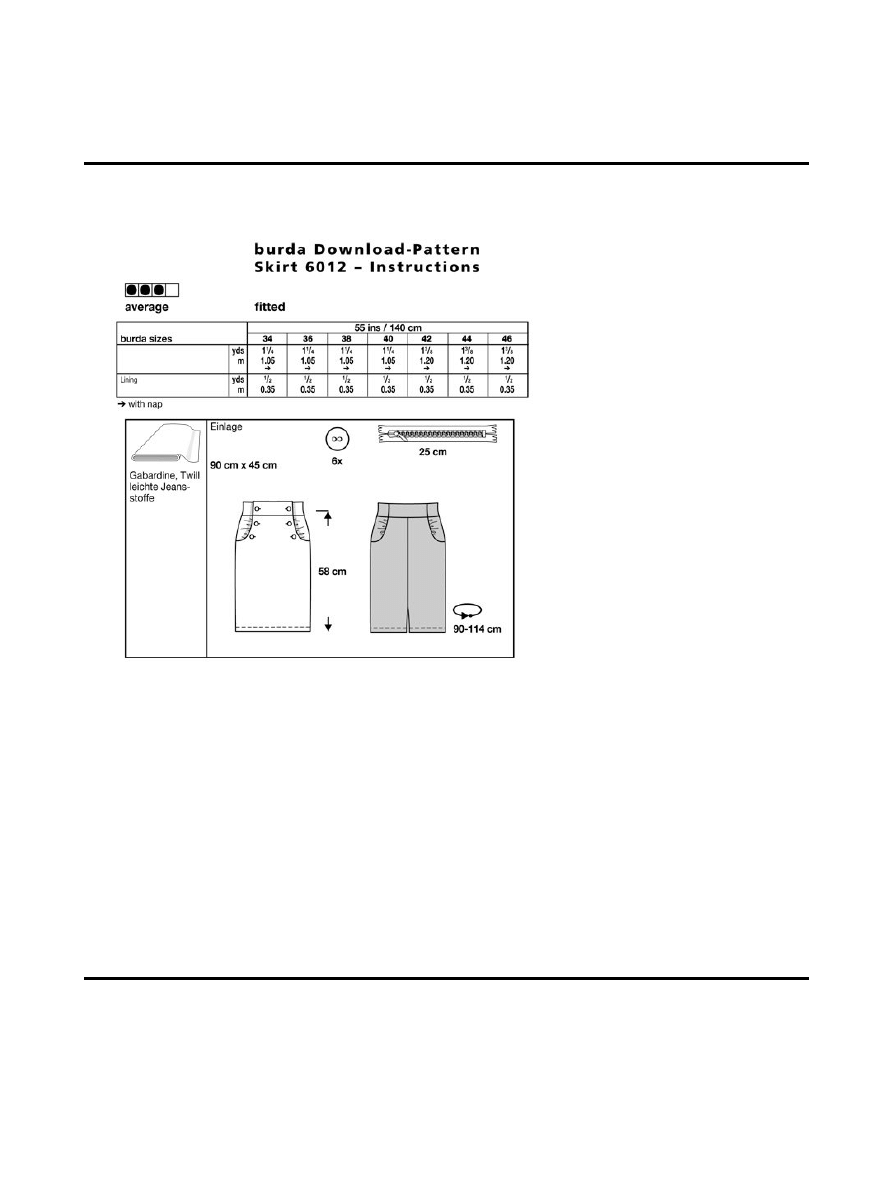
Materials
Stretch twill, buttons, zipper, interfacing.
Step 1
1 Front skirt panel 1x
2 Lining for pocket pouch 1x
3 Front yoke 2x
4 Inner front skirt panel 2x
5 Front hip yoke 2x
6 Front center yoke 4x
7 Front side yoke 4x
8 Back skirt panel 2x
9 Back hip yoke 2x
10 Back center yoke 2x
11 Back side yoke 4x
Fabrics: Gabardine, twill, light jeans fabric
Step 2
2
The patterns can be printed out at the copy shop. If you decide to print them at home, follow the instructions:
Paper cut for ANSI A (German DIN A4) prints: The patterns are printed out on 18 sheets with a thin frame.
Wait, until all sheets are printed out. Arrange the sheets so that they fit together (see extra page with the
overview of the prints). Fold the single sheets on the upper and right edge along the thin frame lines. Begin
with the left lower sheet and then tape the frame lines together precisely.
Step 3
ADJUSTING PATTERN SIZES
Select your size according to the Burda-dimension table: Dresses, blouses, jackets and coats according to the
bust size, trousers and skirts according to the hip width. If necessary, change the pattern to fit your
measurements if they deviate from the Burda-dimension table. Size 4 to 14 (EU 36 to EU 46) The button
holes of piece 1 and 3 are marked according to size 2 (EU 34). For the bigger sizes, mark the buttonhole and
stitch lines the same length to the front center as size 2 (EU 34). Cut out the pattern according to your size
3

(a).
Refer to our â“ Adjust patterns for mixed sizesâ“ technique
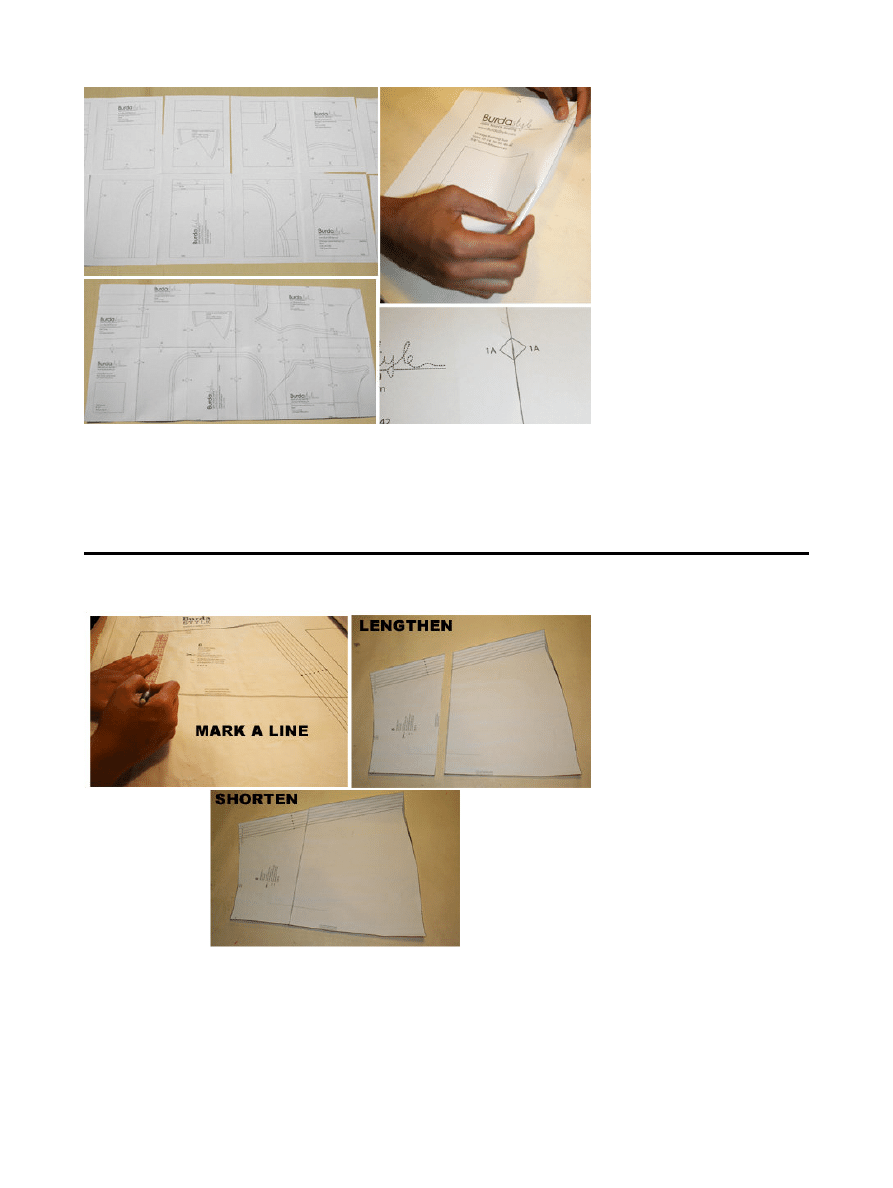
LENGTHENING OR SHORTENING THE PATTERN PIECES ACCORDING TO YOUR SIZE Our
pattern is calculated for a height of 5â“ 6â“ (168 cm). If you are taller or shorter, you can adjust the
pattern pieces along the lines marked “lengthen or shorten here”. Thus the proper fit is preserved. Always
adjust all pattern pieces along the same line the same degree (b).
How to lengthen and shorten pattern pieces: Cut the pattern pieces along the marked lines.
To lengthen, slide the two halves of the pattern piece as far apart as necessary.
To shorten, overlap the two halves of the pattern piece as far as necessary. Even out the side edges ©.
Step 4
4
CUTTING OUT FOLD (â“ â“ â“ â“ ) means: here is the center of a pattern piece but never a cut edge or
a seam. The piece should be cut double, with the fold line forming the centre line. Pattern pieces that are
outlined with a broken line in the cutting diagrams are to be placed face down on the fabric. The cutting
diagrams on the pattern sheet show how the pattern pieces should be placed on the fabric (a).
The cutting diagrams show the placement of the pattern on the fabric For a single layer of fabric, the pattern
pieces are pinned to the right side. For double layers of fabric, the right sides are facing and the pattern pieces
are pinned to the wrong side. The pattern pieces that are shown in the cutting diagram, extending over the
fold of the fabric, should be cut last from a single layer of fabric (b).
5
Step 5
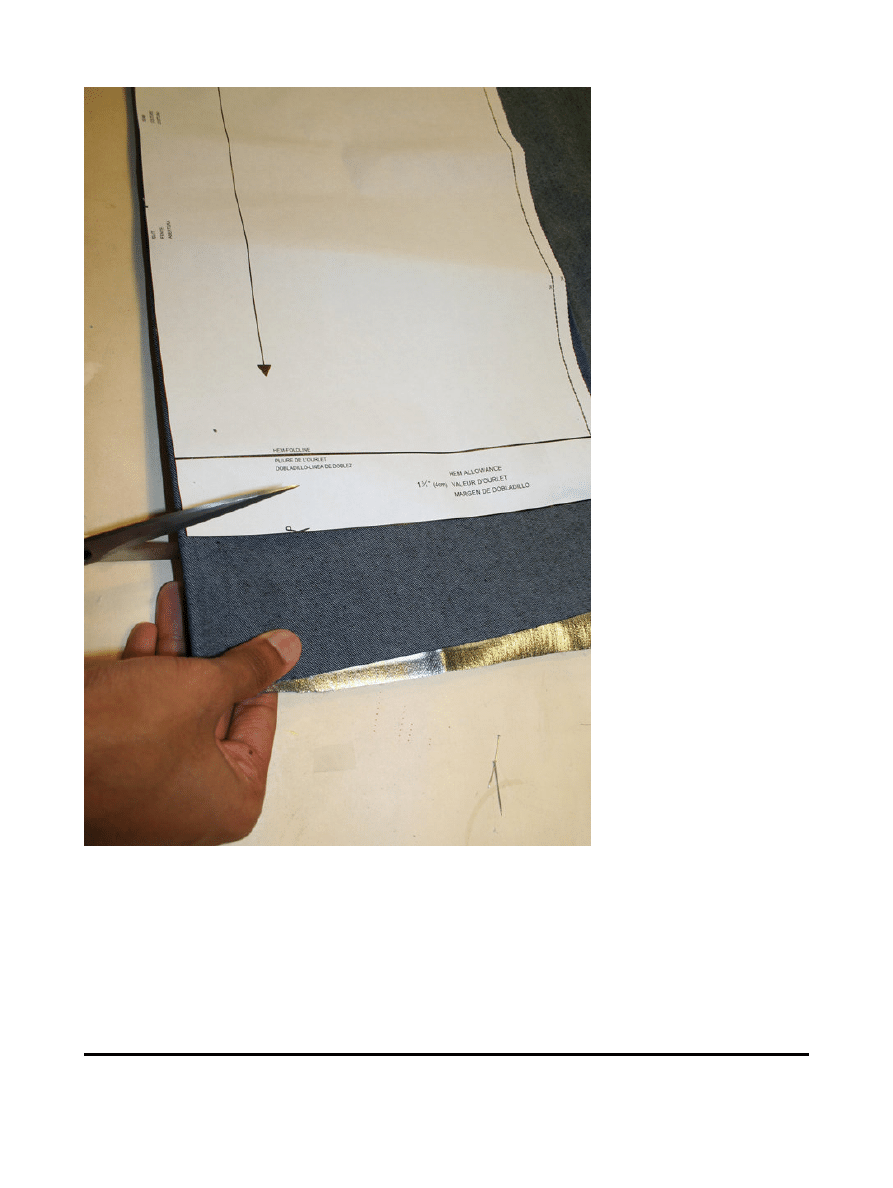
SEAM AND HEMLINE ALLOWANCES are included on an average: 5/8â“ (1.5 cm) for all edges and
stitches. Using BURDA copying paper, transfer the lines and signs of the pattern onto the wrong fabric side.
You will find instructions in the packaging.
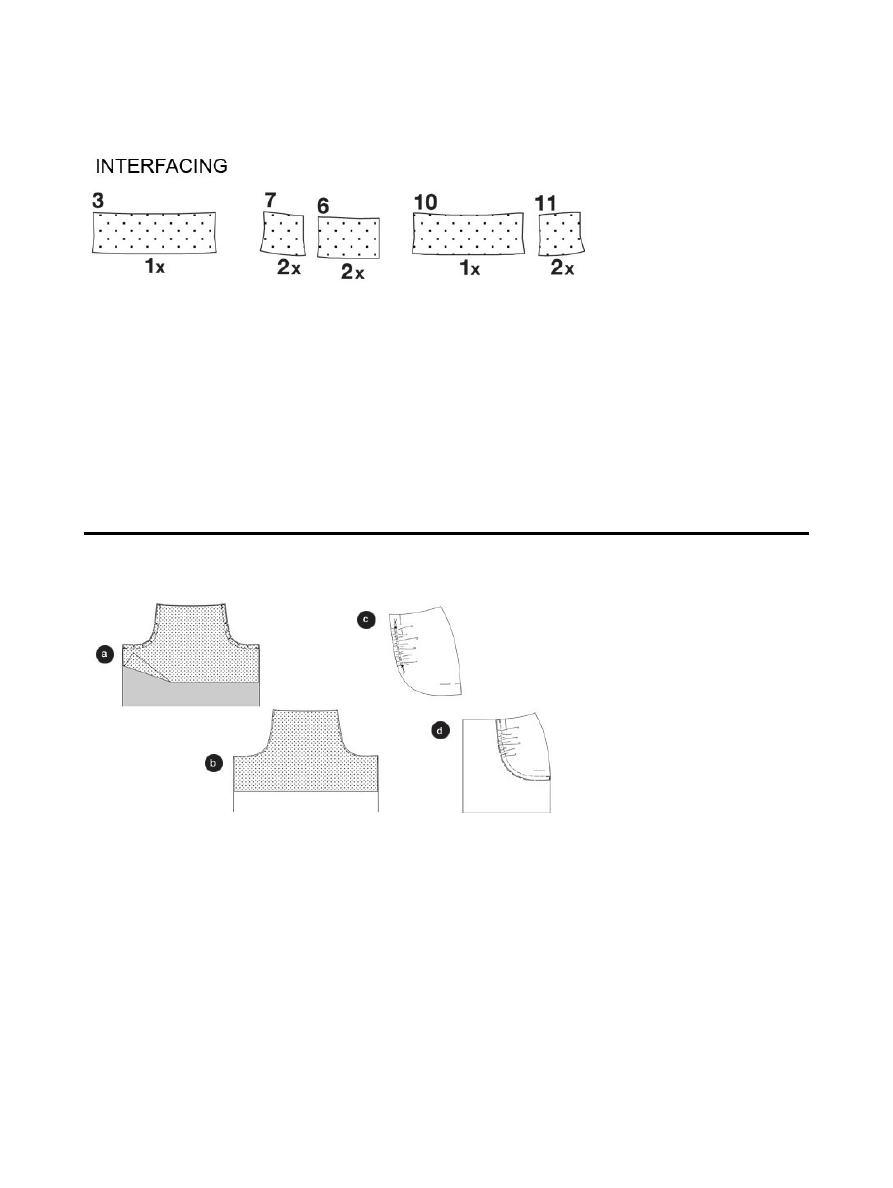
Interfacing Cut out the interfacing according to the drawing and press it onto the wrong fabric side.
Sewing
While sewing the right fabric sides are facing. Transfer all lines of the pattern onto the right fabric side using
basting stitches
Step 6
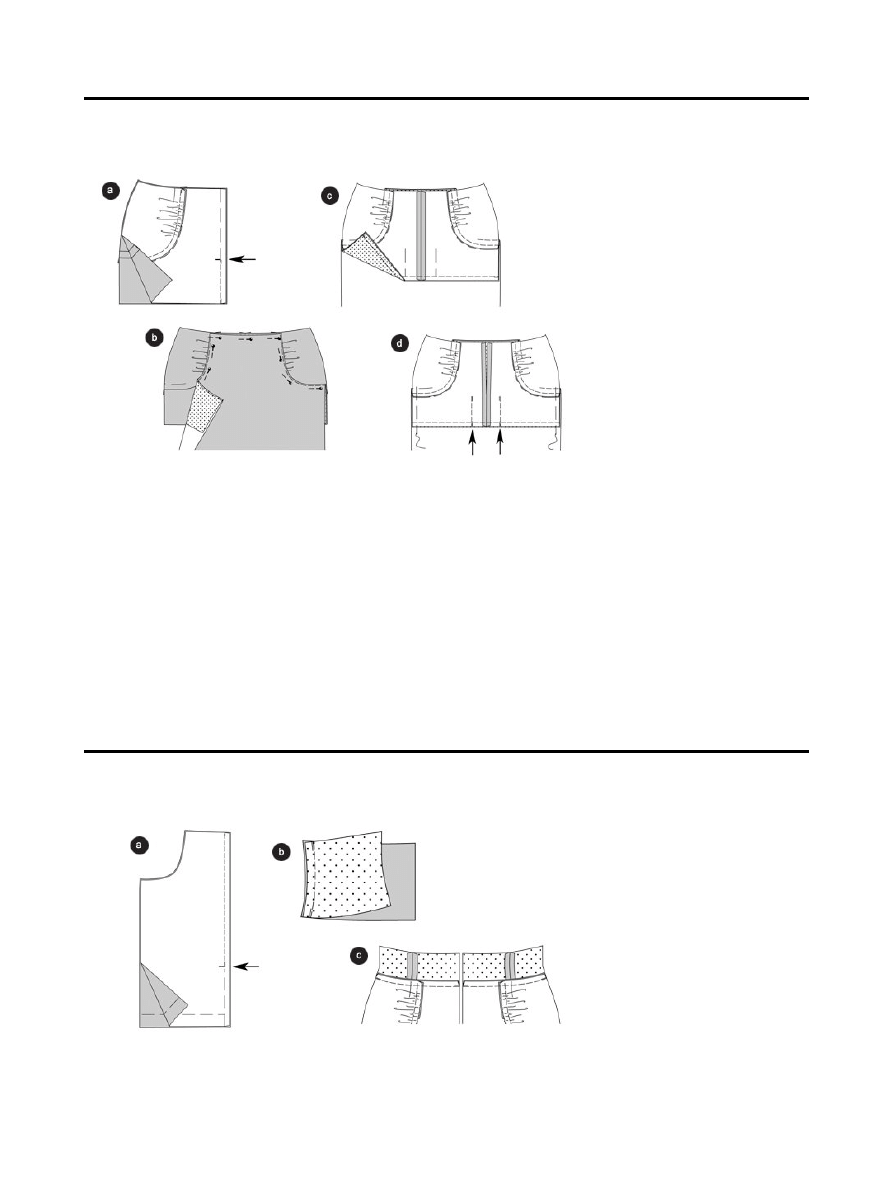
Hip yoke pockets
Pin the lining pocket pouch onto the front skirt panel, the right sides are facing. Stitch along the pocket
openings (seam 1). Trim allowances, and snip in the curves (a).
Fold the lining pocket pouch inside out. Baste the pocket openings, press and topstitch narrowly (b).
Double stitch the front hip yokes from * to *, using basting stitches. Hold the bobbin thread and gather the
fabric until the hip yoke edge fits the round edge of the inner skirt panel. Knot the basting threads and
distribute the gathers equally ©.
Pin the front hip yoke onto the curved edge of the inner front skirt panel (seam 2), right sides facing. Stitch.
Trim allowances, snip in where necessary. Neaten the allowances, and press towards the skirt panel (d).
6
Step 7
Position the inner front skirt panels on top of each other, right sides facing. Baste the center seam from top to
bottom. Then stitch the seam from the slit sign to the bottom. Secure seam ends by stitching back and forth.
Neaten the allowances, and press apart. Keep the slit basted (a).
Position the front skirt panel onto the inner front skirt panel, the pocket openings meet the lines marked on
the front hip yokes. Pin the pocket openings, thereby pinning the upper edges on top of each other (b).
Pin the bottom edge of the lining pocket pouch onto the bottom edge of the inner skirt panel, and stitch, not
including the outer front skirt panel. Neaten the allowances ©. Additionally, stitch the pocket pouches along
the vertical stitch lines, from the cross line to the bottom, on top of each other (arrows) (d). Further, baste the
side edges of the pocket pouches onto the skirt panels. Remove the pins from the top edge. Open the basting
stitches from the slit (inner skirt panel).
Step 8
7
Back skirt panels
Position the back skirt panels on top of each other, right sides facing; baste the center seam from top to
bottom. Stitch along the seam line to the slit (arrow). Secure seam ends. Keep the slit basted. Neaten the
allowances, and press apart. Open the basting stitches along the slit. Double baste stitch the back hip yokes
and attach to the back skirt panel (seam 30) (a).
Yokes
Position the interfaced center and side yokes 9 pieces 6 and 7) on top of each other, right sides facing. Pin the
front princess seams, and stitch (seam 4). Trim the allowances, and press apart. Stitch the interfaced center
and side back yokes (pieces 10 and 11) together (seam 5) (b).
Fold the slit allowances of the center toward the right side of the skirt. Pin the front yokes onto the top edges
of the inner skirt panels and of the hip yokes (seam 6); the princess seams meet the marked lines of the
pocket. Stitch. Trim allowances and press inside the yokes. Stitch the back yoke onto the top edge of the back
skirt panel (seam 7), the center parts are facing and the princess seams meet. Trim allowances and press
inside the yoke ©.
Step 9
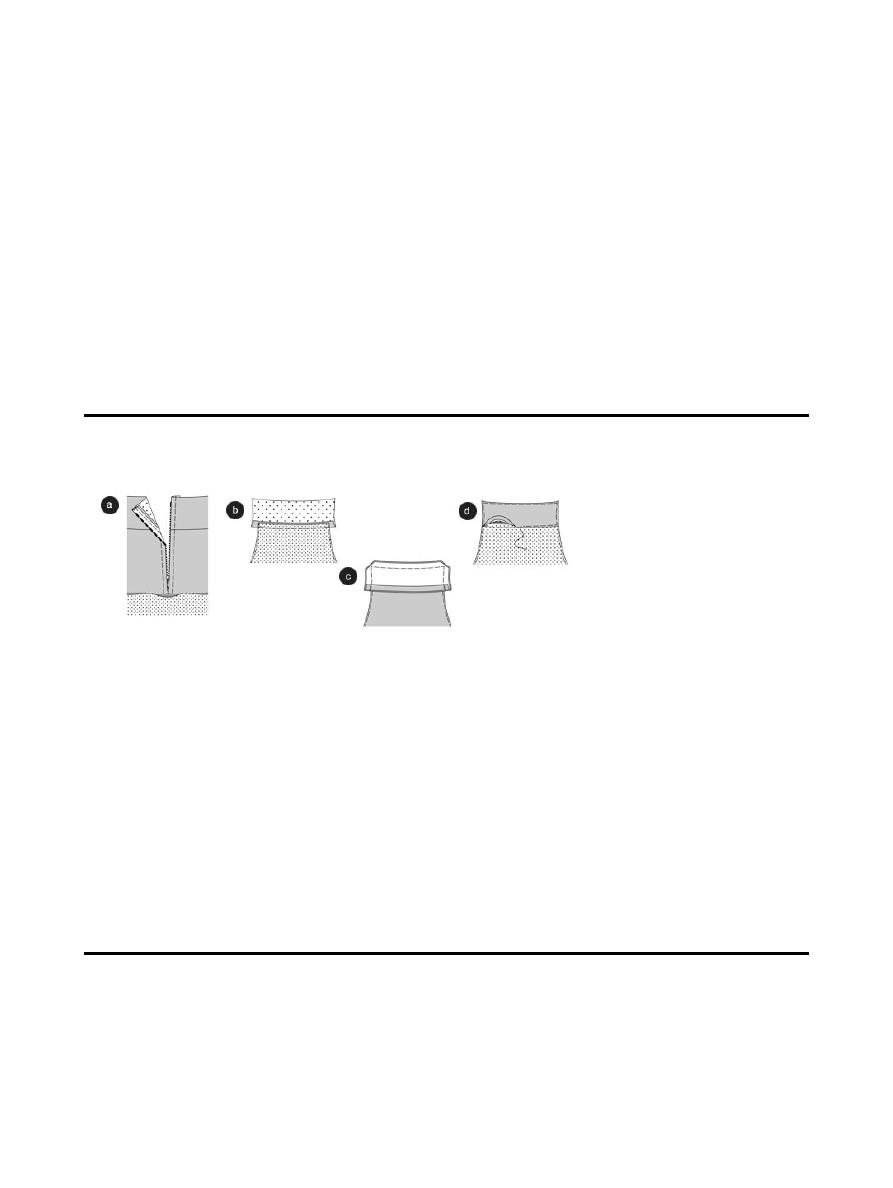
Zipper / inner front skirt panel
Fold the allowances along the slit edges inside. Position and pin the zipper under the slit in such a way that
the little zipper teeth are covered. Stitch the zipper using the zipper foot (a).
Front yoke / outer front skirt panel
Pin the interfaced front yoke (piece 3) onto the top edge of the outer front skirt panel (seam 8), right sides
facing. Stitch. Trim the allowances and press inside the yoke (b).
Fold inside and press the allowance of the bottom edge along the interfaced front yoke. Position the yoke
onto the yoke that is already stitched, right sides facing. Stitch the side and top yoke edges on top of each
other. Trim the allowances, and cut the corners diagonally ©.
Fold the yoke inside, baste the edges and press. Pin the bottom yoke edge onto the marked line. Stitch the
yoke all around, thereby enclosing the bottom yoke edge (d).
Step 10
8
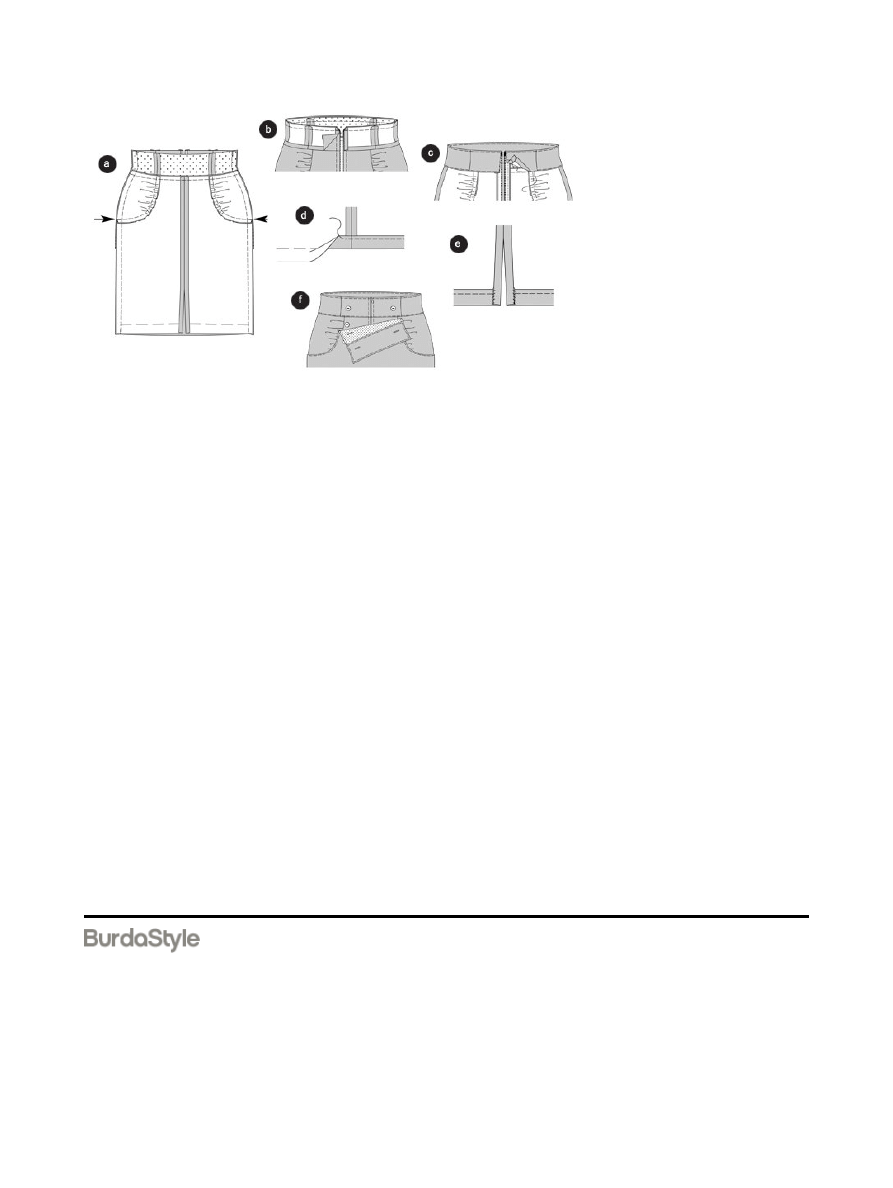
Side seams
Position the back skirt panel onto the front skirt panel, right sides facing. Baste the side seams (seam 9): the
princess seams of the back hip yoke meet the front pocket openings (arrows). Stitch. Neaten allowances, and
press apart (a).
Top skirt edge
Put the non-interfaced front and back yoke pieces in a position to be sewn together. Position the front and
back yokes on top of each other, right sides facing. Stitch the side seams (seam 9).
Press inwards the bottom and front edge allowance of the non-interfaced yoke. Pin the yoke onto the top
edge, right sides facing. The seams meet. Stitch. Trim allowances, cut the corners diagonally (b).
Turn the yoke right-side out. Baste the top edge and press. Fold the front edges inside and stitch onto the
zipper straps. Baste the bottom yoke edge onto the yoke seam. Topstitch the top yoke edge narrowly.
Topstitch the bottom part of the yoke narrowly, thereby enclosing the inner yoke ©.
Hemline and placket
Neaten the hemline and fold the allowances of the placket on top. Fold the hemline inside and baste, press
and stitch with 1â“ (2.5 cm) width. Fold the allowances of the placket inside again: stitch onto the hemline,
may be stitched by hand if desired (d).
Apply the BUTTONHOLES as marked onto the outer front skirt panel and onto the front yoke. Pin the skirt
panel, including the yoke onto the inner skirt panel. The side edges meet the princess seams of the yokes.
BUTTONS: Mark the position of the buttons according to the buttonhole positions. Sew the buttons onto the
inner skirt panel (e)
Kasia
9
Document Outline
Wyszukiwarka
Podobne podstrony:
prezentacja z chirurgii cw 4 kasia comber
JedyAK gwarancje na sprzedaż original
Functional Origins of Religious Concepts Ontological and Strategic Selection in Evolved Minds
Zestaw 88 Kasia Goszczyńska, materiały farmacja, Materiały 3 rok, Od Ani, biochemia, biochemia, opra
ODP NOO cw KASIA - SKRÓT, STUDIA, WZR I st 2008-2011 zarządzanie jakością, NOO - nauka o organizacji
Odkurzacz Dyson?) origin
Origin
12 Intro to origins of lg LECTURE2014
M2H Networking Tutorial Original
Ogden T A new reading on the origins of object relations (2002)
Bhagavadgita Original
Kasia
Original Chinese
original c68 retail diy auto diagnostic tool manual
kasia, Ekonomia
Jacobsson G La forme originell Nieznany
origin dopasowanie gausem na przykladzie wahadla matematycznego
więcej podobnych podstron